2021 NISSAN FRONTIER ignition
[x] Cancel search: ignitionPage 180 of 492
The lights can be turned off without waiting
by performing one of the following opera-
tions:
• Placing the ignition switch in the ON po-sition.
• Locking the doors with the Intelligent Key.
• Switching the interior lights switch to the OFF position.
For additional information, refer to “Interior
lights” in the “Instruments and controls”
section in this manual.Using the panic alarm
If you are near your vehicle and feel threat-
ened, you may activate the panic alarm to
call attention by pressing and holding the
button on the Intelligent Key for lon-
ger than 0.5 seconds.
The panic alarm and headlights will stay on
for a period of time.
The panic alarm stops when:
• It has run for a period of time.
• Any button is pressed on the Intelligent Key.
• The request switch (if so equipped) on the driver or passenger door is pushed and
the Intelligent Key is in range of the door
handle.
Answer back horn feature
If desired, the answer back horn feature
can be deactivated using the Intelligent
Key. When it is deactivated and the
button is pressed, the hazard indicator
lights flash twice. When thebutton is
pressed, neither the hazard indicator lights
nor the horn operates.
To deactivate:
Press and hold the
andbut-
tons for at least 2 seconds. The hazard
indicator lights will flash three times to con-
firm that the answer back horn feature has
been deactivated.
To activate:
Press and hold the
andbut-
tons for at least 2 seconds once more.
The hazard indicator lights will flash once
and the horn will sound once to confirm
that the horn beep feature has been reac-
tivated.
Deactivating the horn beep feature does
not silence the horn if the alarm is trig-
gered.
3-10Pre-driving checks and adjustments
Page 182 of 492
TROUBLESHOOTING GUIDE
Verif y the location of all Intelligent Keys that are programmed for the vehicle. If another Intelligent Key is in range or inside the vehicle, the
vehicle system may respond differently than expected.
SymptomPossible CauseRemedy
When pushing the ignition switch to
stop the engine The Shif t P (Park) warning light appears
on the display and the inside warning
chime sounds continuously. The shif t lever is not in the P (Park) po-
sition.
Move the shif t lever to the P (Park) po-
sition.
When opening the driver's door to get
out of the vehicle The door open warning light appears
on the display and the inside warning
chime sounds continuously. The ignition switch is in the AUTO ACC
position.
Place the ignition switch in the ON po-
sition or close the driver’s door.
When closing the door af ter getting
out of the vehicle The NISSAN Intelligent Key® warning
light appears on the display, the out-
side chime sounds three times and the
inside warning chime sounds for ap-
proximately three seconds.
The Intelligent Key is not detected in-
side of the vehicle.
Place the ignition switch in the OFF
position.
The Shif t P (Park) warning light appears
on the display and the inside and out-
side chimes sound continuously. The ignition switch is in the ACC or OFF
position and the shif t lever is not in the
P (Park) position.
Carry the Intelligent Key with you.
When closing the door with the inside
lock knob turned to LOCK The outside chime sounds for approxi-
mately three seconds and all the doors
unlock.
The Intelligent Key is inside the vehicle. Carry the Intelligent Key with you.
When pushing the ignition switch to
start the engine The NISSAN Intelligent Key® warning
light appears on the display.
The battery charge is low.Replace the battery with a new one.
For additional information, refer to
“Battery replacement” in the “Do-it-
yourself ” section of this manual.
The NISSAN Intelligent Key® warning
light appears on the display . The Intelligent Key is not detected in-
side of the vehicle.Carry the registered Intelligent Key
with you.
3-12Pre-driving checks and adjustments
Page 188 of 492
AUTOMATIC ANTI-GLARE
REARVIEW MIRROR
The inside mirror is designed so that it au-
tomatically dims during nighttime condi-
tions and according to the intensity of the
headlights of the vehicle following you. The
automatic anti-glare feature is activated
when the ignition switch is in the ON posi-
tion.
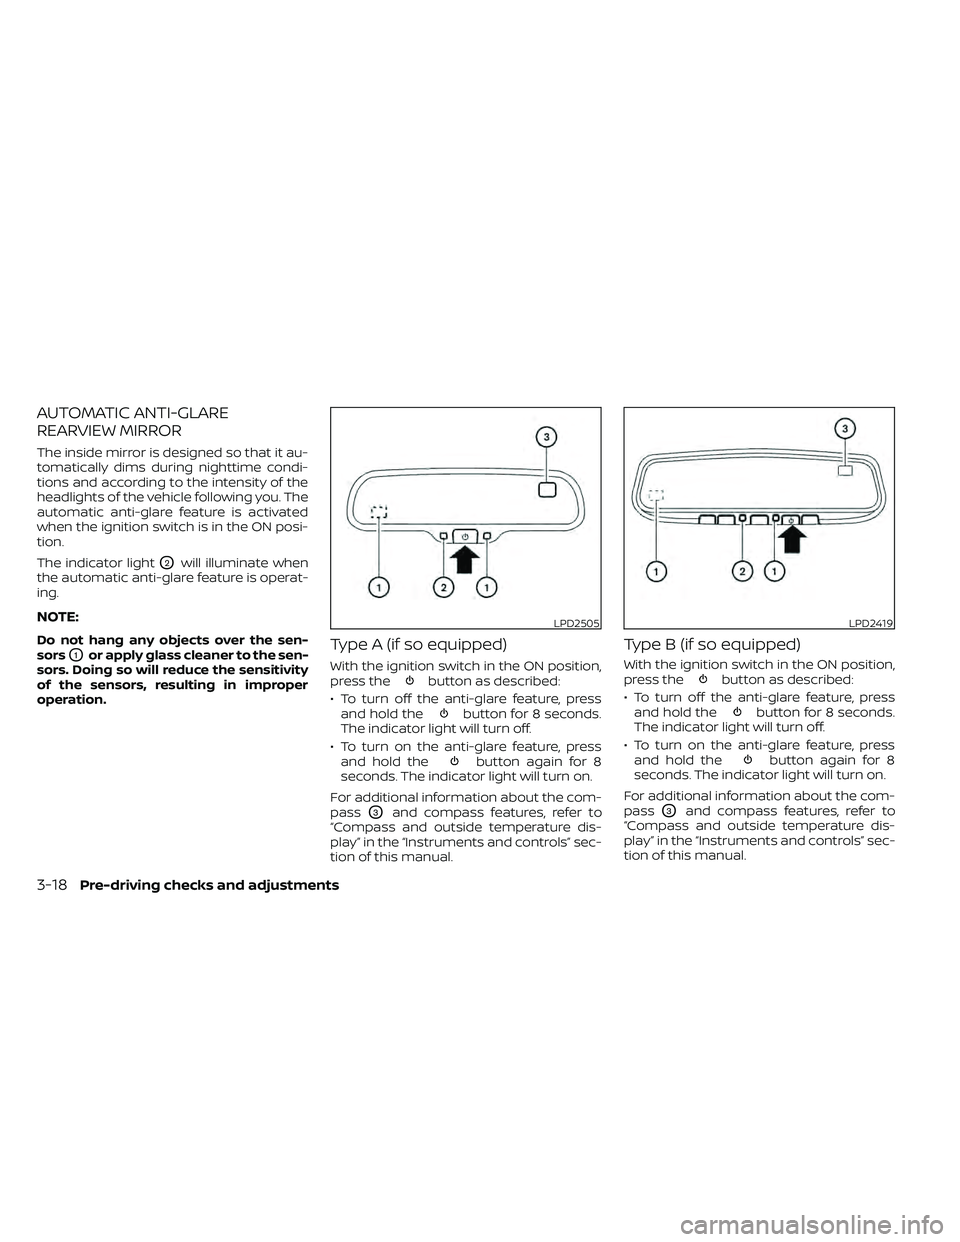
The indicator light
O2will illuminate when
the automatic anti-glare feature is operat-
ing.
NOTE:
Do not hang any objects over the sen-
sors
O1or apply glass cleaner to the sen-
sors. Doing so will reduce the sensitivity
of the sensors, resulting in improper
operation.Type A (if so equipped)
With the ignition switch in the ON position,
press thebutton as described:
• To turn off the anti-glare feature, press and hold the
button for 8 seconds.
The indicator light will turn off.
• To turn on the anti-glare feature, press and hold the
button again for 8
seconds. The indicator light will turn on.
For additional information about the com-
pass
O3and compass features, refer to
“Compass and outside temperature dis-
play” in the “Instruments and controls” sec-
tion of this manual.
Type B (if so equipped)
With the ignition switch in the ON position,
press thebutton as described:
• To turn off the anti-glare feature, press and hold the
button for 8 seconds.
The indicator light will turn off.
• To turn on the anti-glare feature, press and hold the
button again for 8
seconds. The indicator light will turn on.
For additional information about the com-
pass
O3and compass features, refer to
“Compass and outside temperature dis-
play” in the “Instruments and controls” sec-
tion of this manual.
LPD2505LPD2419
3-18Pre-driving checks and adjustments
Page 206 of 492
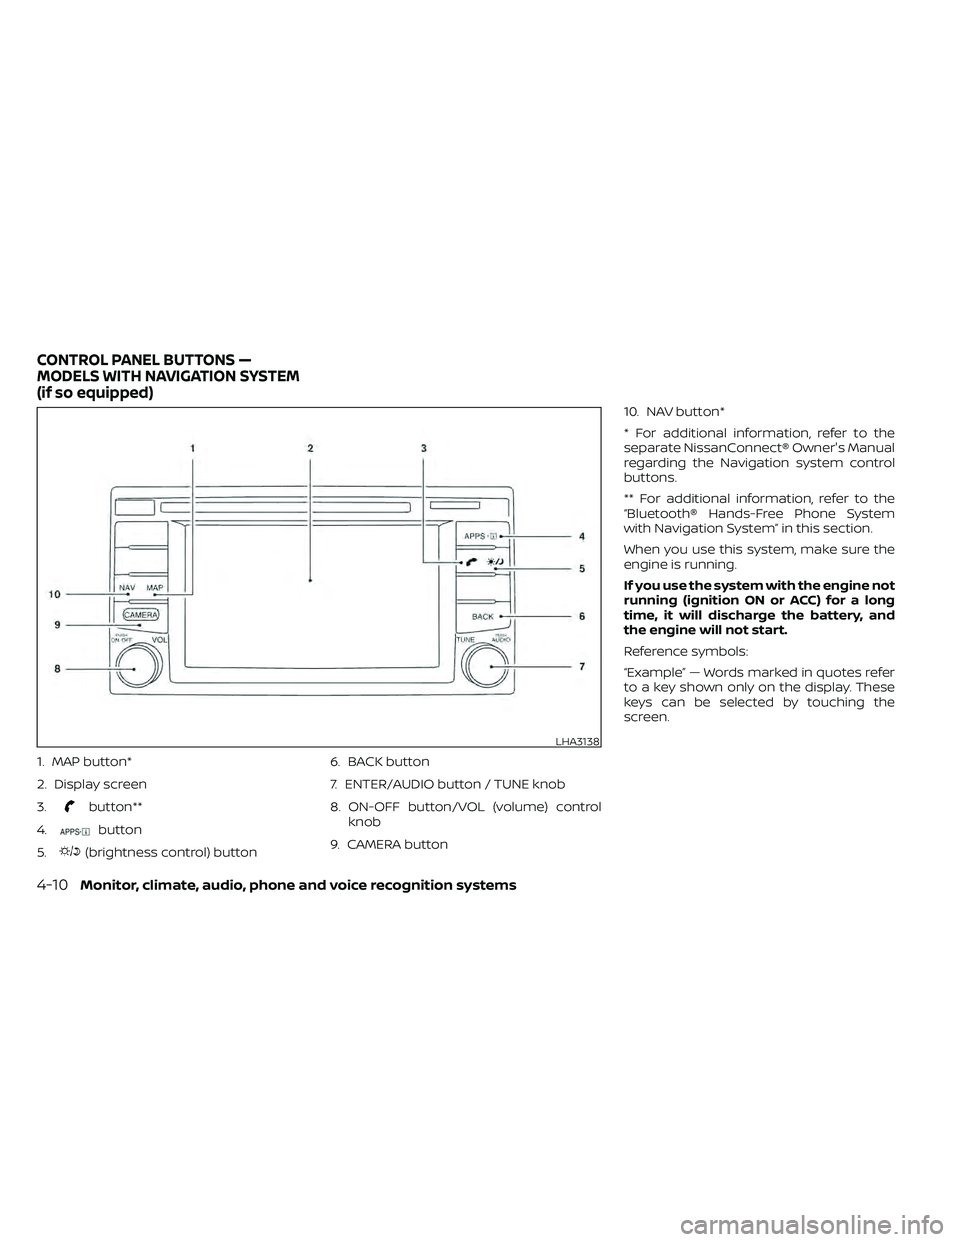
1. MAP button*
2. Display screen
3.
button**
4.
button
5.
(brightness control) button 6. BACK button
7. ENTER/AUDIO button / TUNE knob
8. ON-OFF button/VOL (volume) control
knob
9. CAMERA button 10. NAV button*
* For additional information, refer to the
separate NissanConnect® Owner's Manual
regarding the Navigation system control
buttons.
** For additional information, refer to the
“Bluetooth® Hands-Free Phone System
with Navigation System” in this section.
When you use this system, make sure the
engine is running.
If you use the system with the engine not
running (ignition ON or ACC) for a long
time, it will discharge the battery, and
the engine will not start.
Reference symbols:
“Example” — Words marked in quotes refer
to a key shown only on the display. These
keys can be selected by touching the
screen.
LHA3138
CONTROL PANEL BUTTONS —
MODELS WITH NAVIGATION SYSTEM
(if so equipped)
Page 213 of 492
•The distance guide line and the ve-
hicle width line should be used as a
reference only when the vehicle is on
a level paved surface. The distance
viewed on the monitor is for refer-
ence only and may be different than
the actual distance between the ve-
hicle and displayed objects.
CAUTION
Do not scratch the camera lens when
cleaning dirt or snow from the front of
the camera.
The RearView Monitor system automati-
cally shows a rear view of the vehicle when
the shif t lever is shif ted into the R (Reverse)
position. Press the CAMERA button (if so
equipped) while in the R (Reverse) position
to cycle through guideline options. The ra-
dio can still be heard while the RearView
Monitor is active. To display the rear view, the RearView Moni-
tor system uses a camera located next to
the tailgate handle
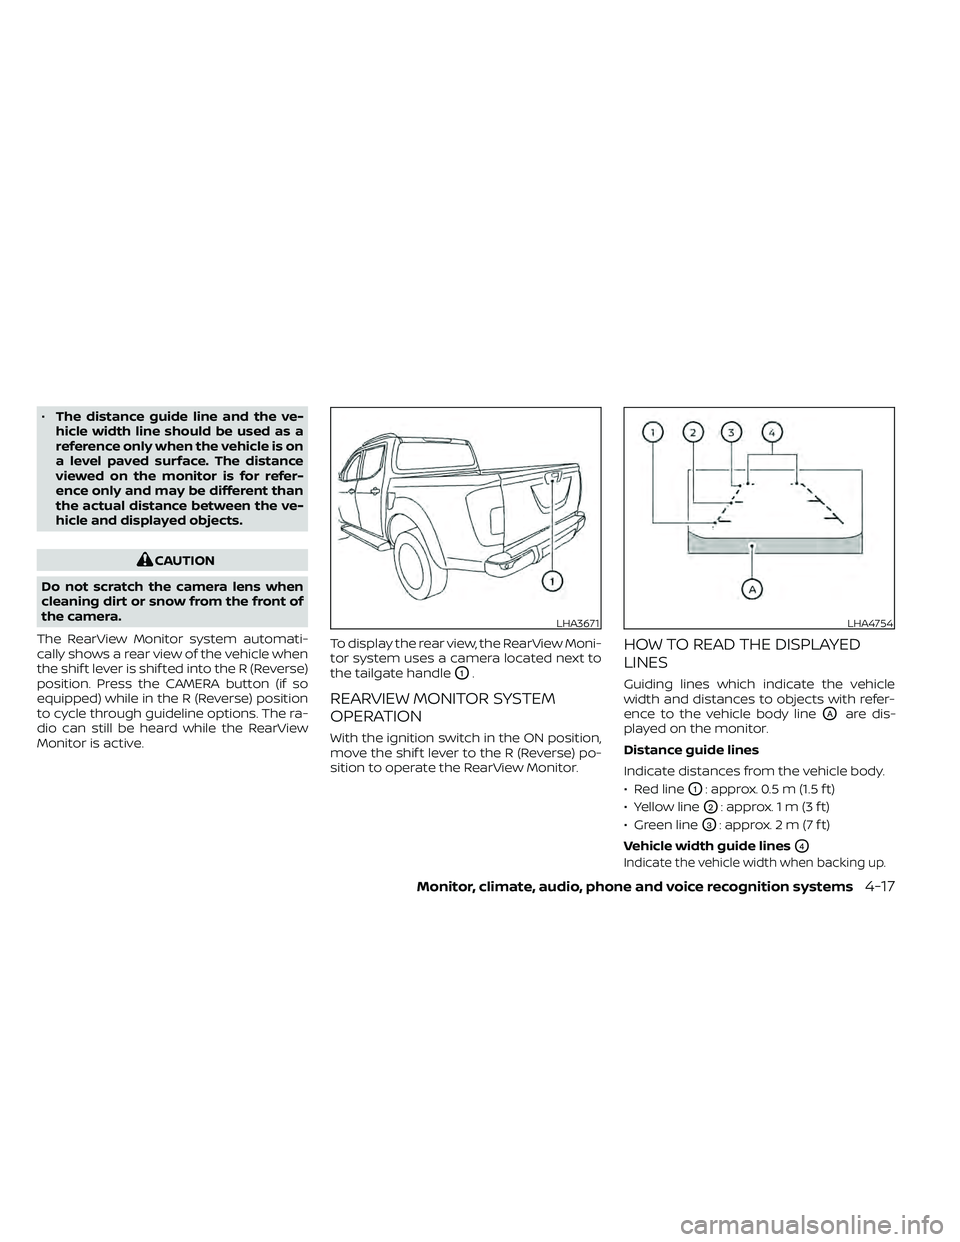
O1.
REARVIEW MONITOR SYSTEM
OPERATION
With the ignition switch in the ON position,
move the shif t lever to the R (Reverse) po-
sition to operate the RearView Monitor.
HOW TO READ THE DISPLAYED
LINES
Guiding lines which indicate the vehicle
width and distances to objects with refer-
ence to the vehicle body line
OAare dis-
played on the monitor.
Distance guide lines
Indicate distances from the vehicle body.
• Red line
O1: approx. 0.5 m (1.5 f t)
• Yellow line
O2: approx. 1 m (3 f t)
• Green line
O3: approx. 2 m (7 f t)
Vehicle width guide lines
O4
Indicate the vehicle width when backing up.
LHA3671LHA4754
Page 232 of 492
The air conditioner system in your NISSAN
vehicle is charged with a refrigerant de-
signed with the environment in mind.
This refrigerant does not harm the
earth's ozone layer.
Special charging equipment and lubricant
is required when servicing your NISSAN air
conditioner. Using improper refrigerants or
lubricants will cause severe damage to
your air conditioner system. For additional
information, refer to “Air conditioner sys-
tem refrigerant and oil recommendations”
in the “Technical and consumer informa-
tion” section of this manual.
It is recommended that you visit a NISSAN
dealer to service your “environmentally
friendly ” air conditioning system.
(power) or
ON•OFF button to turn the radio on. If you
listen to the radio with the engine not run-
ning, the ignition should be placed in the
ACC position.
Radio reception is affected by station sig-
nal strength, distance from radio transmit-
ter, buildings, bridges, mountains and other
external influences. Intermittent changes
in reception quality normally are caused by
these external influences.
Using a cellular phone in or near the vehicle
may influence radio reception quality.
Radio reception
Your NISSAN radio system is equipped with
state-of-the-art electronic circuits to en-
hance radio reception. These circuits are
designed to extend reception range, and to
enhance the quality of that reception.
However, there are some general charac-
teristics of both FM and AM radio signals
that can affect radio reception quality in a
moving vehicle, even when the finest
equipment is used. These characteristics
are completely normal in a given reception
area and do not indicate any malfunction
in your NISSAN radio system. Reception conditions will constantly
change because of vehicle movement.
Buildings, terrain, signal distance and inter-
ference from other vehicles can work
against ideal reception. Described below
are some of the factors that can affect your
radio reception.
Some cellular phones or other devices may
cause interference or a buzzing noise to
come from the audio system speakers.
Storing the device in a different location
may reduce or eliminate the noise.
FM RADIO RECEPTION
Range: FM range is normally limited to 25 –
30 mi (40 – 48 km), with monaural (single
channel) FM having slightly more range
than stereo FM. External influences may
sometimes interfere with FM station re-
ception even if the FM station is within 25
mi (40 km). The strength of the FM signal is
directly related to the distance between
the transmitter and receiver. FM signals fol-
low a line-of-sight path, exhibiting many of
the same characteristics as light. For ex-
ample, they will reflect off objects.
Fade and drif t: As your vehicle moves away
from a station transmitter, the signals will
tend to fade and/or drif t.
SERVICING AIR CONDITIONER
AUDIO SYSTEM
4-36Monitor, climate, audio, phone and voice recognition systems
Page 240 of 492
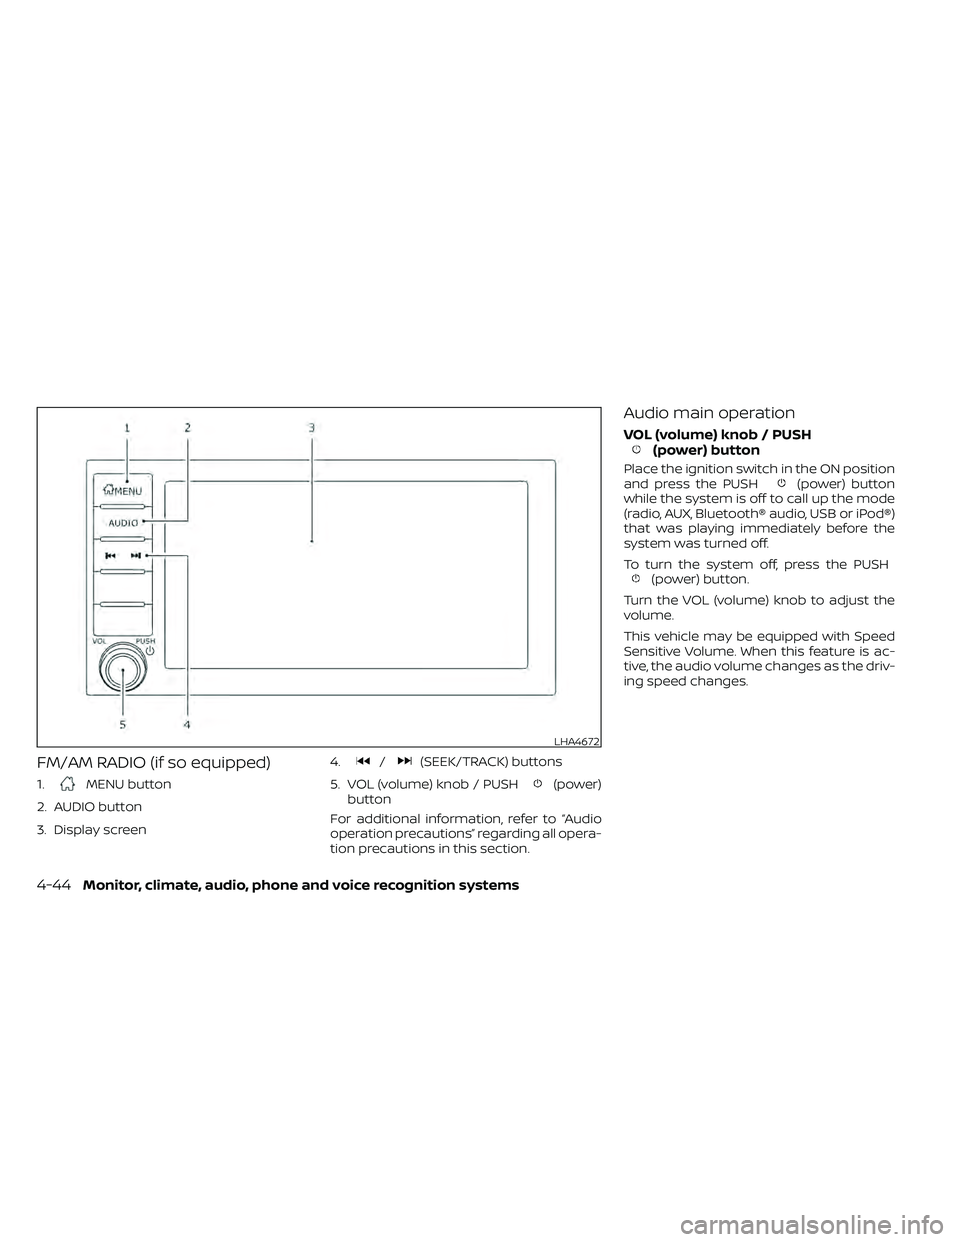
FM/AM RADIO (if so equipped)
1.MENU button
2. AUDIO button
3. Display screen 4.
/(SEEK/TRACK) buttons
5. VOL (volume) knob / PUSH
(power)
button
For additional information, refer to “Audio
operation precautions” regarding all opera-
tion precautions in this section.
Audio main operation
VOL (volume) knob / PUSH(power) button
Place the ignition switch in the ON position
and press the PUSH(power) button
while the system is off to call up the mode
(radio, AUX, Bluetooth® audio, USB or iPod®)
that was playing immediately before the
system was turned off.
To turn the system off, press the PUSH
(power) button.
Turn the VOL (volume) knob to adjust the
volume.
This vehicle may be equipped with Speed
Sensitive Volume. When this feature is ac-
tive, the audio volume changes as the driv-
ing speed changes.
LHA4672
4-44Monitor, climate, audio, phone and voice recognition systems
Page 246 of 492
Audio main operation
ON-OFF button / VOL (volume) control
knob
Place the ignition switch in the ACC or ON
position and press the ON-OFF button
while the system is off to call up the mode
(radio, CD, AUX, Bluetooth® audio, USB or
iPod®) that was playing immediately before
the system was turned off.To turn the system off, press the ON-OFF
button.
Turn the VOL (volume) control knob to ad-
just the volume.
This vehicle may be equipped with Speed
Sensitive Volume. When this feature is ac-
tive, the audio volume changes as the driv-
ing speed changes.
Audio settings
1. Press the [] button.
2. Touch the “Settings” key.
3. Touch the “Audio” key.
Use the touch-screen to adjust the follow-
ing items to the desired setting:
Audio Bass Adjusts the bass to the desired level.
Treble Adjusts the treble to the desired level.
Balance Adjusts the balance to the desired level. Balance adjusts the sound level between the lef t and right speak-
ers.
Fade Adjusts the fade to the desired level. Fade adjusts the sound level between the front and rear speakers.
Speed Sensitive Vol. Adjusts the speed sensitive volume function, which increases the volume of the audio system as the
speed of the vehicle increases. Set to “ 0 ” to disable the feature. The higher the setting, the more the vol-
ume increases in relation to vehicle speed.
AUX Volume Level Controls the volume level of incoming sound when an auxiliary device is connected to the system. Avail-
able options are Low (Quiet), Medium, and High (Loud).
Bass, treble, balance and fade can also be adjusted by pressing the AUDIO button and turning the TUNE knob to select the item to adjust.
When the desired item is shown on the display, turn the tuning to adjust and then press the AUDIO button until the display returns to the
main audio screen. If the button is not pressed for approximately 10 seconds, the radio or CD display will automatically reappear.
4-50Monitor, climate, audio, phone and voice recognition systems