2021 NISSAN FRONTIER ignition
[x] Cancel search: ignitionPage 322 of 492
cranking the engine, release the accel-
erator pedal. Crank the engine with
your foot off the accelerator pedal by
depressing the brake pedal and push-
ing the ignition switch to start the en-
gine. If the engine starts, but fails to
run, repeat the above procedure.
Page 323 of 492
CAUTION
• To avoid possible damage to your ve-
hicle, when stopping the vehicle on
an uphill grade, do not hold the ve-
hicle by depressing the accelerator
pedal. The foot brake should be used
for this purpose.
The A/T in your vehicle is electronically con-
trolled to produce maximum power and
smooth operation.
The recommended operating procedures
for this transmission are shown on the fol-
lowing pages. Follow these procedures for
maximum vehicle performance and driv-
ing enjoyment.
Starting the vehicle
1. Af ter starting the engine, fully depress the foot brake pedal before moving the
shif t lever out of the P (Park) position.
2. Keep the foot brake pedal depressed and move the shif t lever into a driving
gear.
3. Release the foot brake, then gradually start the vehicle in motion. The automatic transmission is designed
so the foot brake pedal MUST be de-
pressed before shif ting from P (Park) to
any drive position while the ignition
switch is in the ON position.
The shif t lever cannot be moved out of
the P (Park) position and into any of the
other gear positions if the ignition
switch is placed in the LOCK or OFF posi-
tion.
The shif t lever may not be moved out of
the P (Park) position and into any of the
other gear positions if the ignition
switch is placed in the ON position, but
the engine is not running and the out-
side temperature is extremely low.
Shif ting
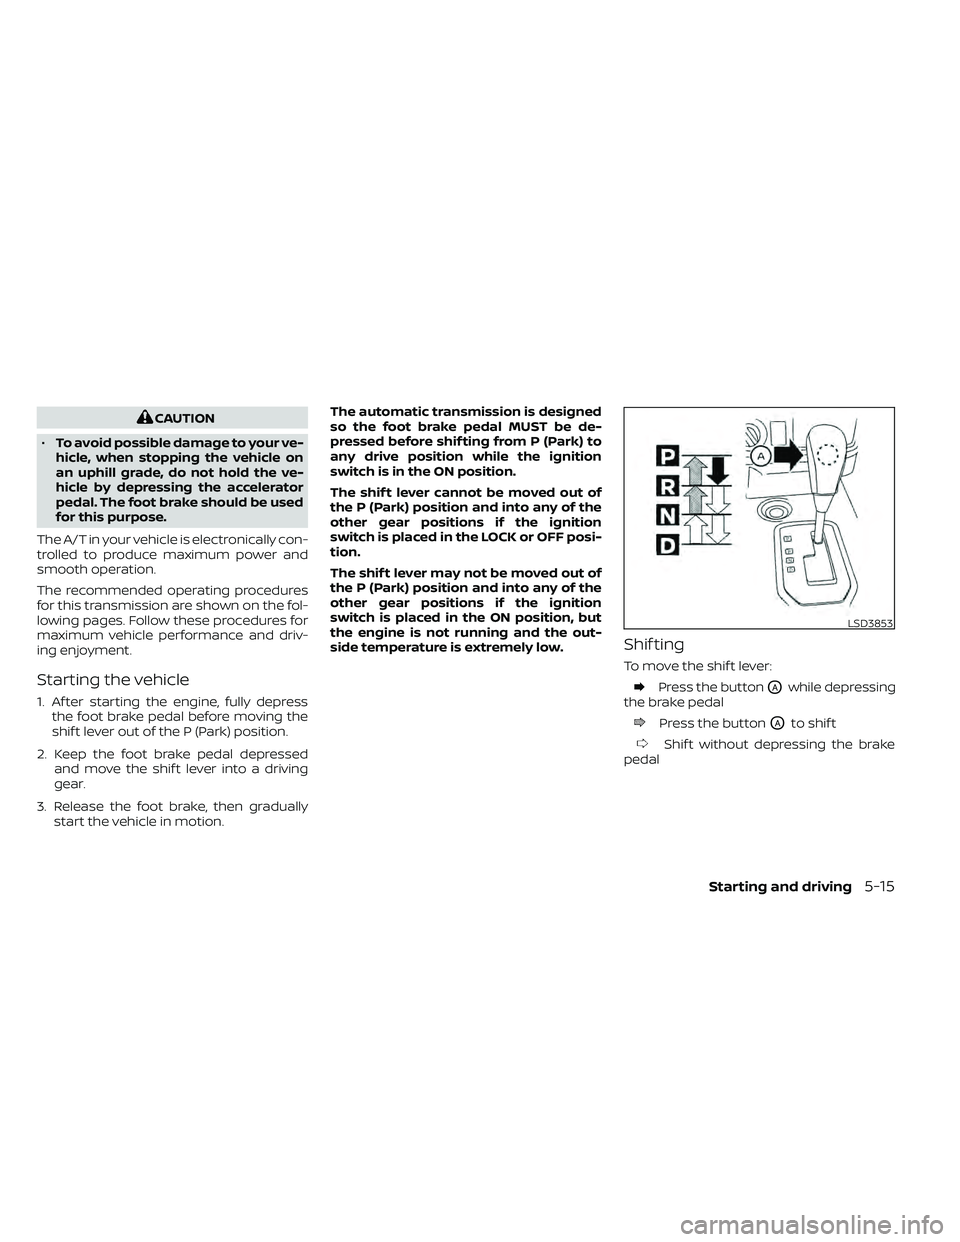
To move the shif t lever:
Press the buttonOAwhile depressing
the brake pedal
Press the buttonOAto shif t
Shif t without depressing the brake
pedal
LSD3853
Page 324 of 492
Shif ting
Af ter starting the engine, fully depress the
brake pedal and move the shif t lever out of
the P (Park) position.
CAUTION
To prevent transmission damage, use
the P (Park) position only when the ve-
hicle is completely stopped.
Use the P (Park) shif t lever position when
the vehicle is parked or when starting the
engine. Make sure the vehicle is completely
stopped.
The brake pedal should be depressed to
move the shif t lever from N (Neutral) or
any drive position to P (Park).
The P (Park) position is automatically en-
gaged if you switch off the ignition.
Apply the parking brake. When parking on a
hill, apply the parking brake first, then move
the shif t lever into the P (Park) position.
R (Reverse)
CAUTION
To prevent transmission damage, use
the R (Reverse) position only when the
vehicle is completely stopped.
Use the R (Reverse) position to back up. Make
sure the vehicle is completely stopped be-
fore selecting the R (Reverse) position. The
brake pedal must be depressed to move
the shif t lever from P (Park), N (Neutral) or
any drive position to R (Reverse).
N (Neutral)
Neither forward nor reverse gear is engaged.
The engine can be started in this position.
You may shif t to N (Neutral) and restart a
stalled engine while the vehicle is moving.
D (Drive)
Use this position for all normal forward
driving.
5-16Starting and driving
Page 333 of 492
*1: Before moving the shif t lever from N (Neutral), wait until the transfer 4LO position indicator light stays on steady. This indicates that the 4WD shif t procedure
is completed and the transfer gear is correctly set in the 4LO position. If the vehicle is shif ted into gear before the indicator is on steady, the transf er gear
may grind, not engage correctly or stay in the neutral position.
- If the 4WD warning light illuminates, perform the following procedure to return the transfer case to correct operating condition.
1. Turn off the engine by placing the ignition switch in the OFF position.
2. Start the engine.
- Check that the 4WD warning light turns off. If the 4WD warning light illuminates, have the system checked. It is recommended that you visit a NISSAN dea ler
for this service.
3. Apply the parking brake, depress the brake pedal and move the shif t lever to N (Neutral) position.
4. With the brake pedal depressed, move the 4WD shif t switch to the desired mode.
- Be sure to wait until the transfer gear change completes before shif ting the shif t lever from the N (Neutral) position.
*2: While changing in and out of 4LO, the ignition switch must be in the ON position and the vehicle's engine must be running for a shif t to take place and for the indicator lights (4WD shif t and 4LO position indicator) to be operable. Otherwise, the shif t will not take place and no indicator lights will be on o r flashing.
*3: Make sure the transfer 4LO position indicator light turns on when you shif t the 4WD shif t switch to 4LO. The
indicator light will also turn on when 4LO
is selected. For additional information, refer to “Vehicle Dynamic Control (VDC) system” in this section.
When the 4LO position is selected, the VDC system is disabled and the VDC off indicator light illuminates, refer to “Vehicle Dynamic Control (VDC) off indicator
light” in the “Instruments and controls” section of this manual.
Starting and driving5-25
Page 336 of 492
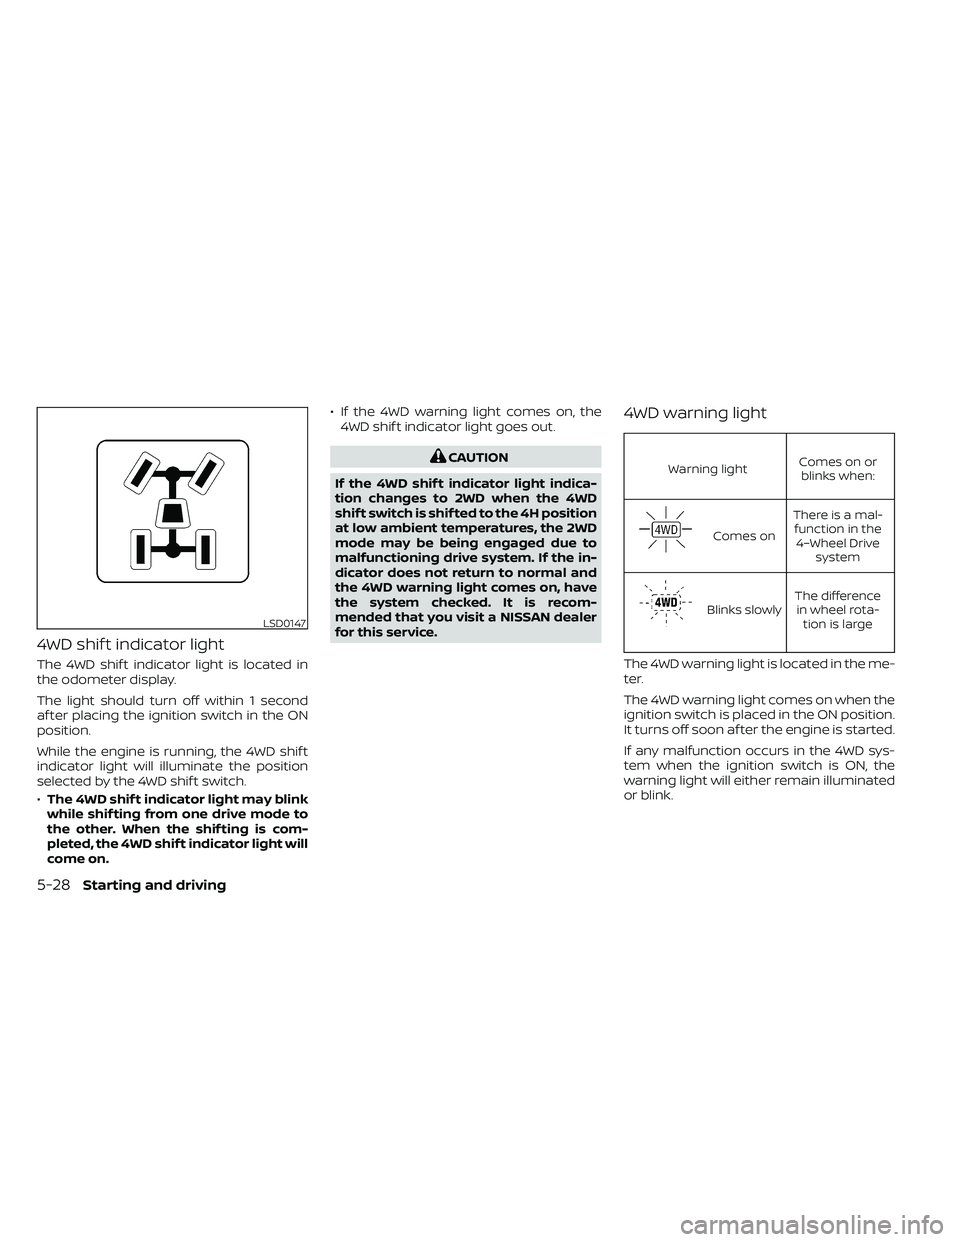
4WD shif t indicator light
The 4WD shif t indicator light is located in
the odometer display.
The light should turn off within 1 second
af ter placing the ignition switch in the ON
position.
While the engine is running, the 4WD shif t
indicator light will illuminate the position
selected by the 4WD shif t switch.
•The 4WD shif t indicator light may blink
while shif ting from one drive mode to
the other. When the shif ting is com-
pleted, the 4WD shif t indicator light will
come on. • If the 4WD warning light comes on, the
4WD shif t indicator light goes out.
Warning light Comes on or
blinks when:
Comes on There is a mal-
function in the 4–Wheel Drive system
Blinks slowly The difference
in wheel rota- tion is large
The 4WD warning light is located in the me-
ter.
The 4WD warning light comes on when the
ignition switch is placed in the ON position.
It turns off soon af ter the engine is started.
If any malfunction occurs in the 4WD sys-
tem when the ignition switch is ON, the
warning light will either remain illuminated
or blink.
LSD0147
5-28Starting and driving
Page 339 of 492
WARNING
• Do not stop or park the vehicle over
flammable materials such as dry
grass, waste paper or rags. They may
ignite and cause a fire.
•
Safe parking procedures require that
both the parking brake be set and the
transmission placed into P (Park). Fail-
ure to do so could cause the vehicle to
move unexpectedly or roll away and re-
sult in an accident. Make sure the shif t
lever has been pushed as far forward as
it can go and cannot be moved without
depressing the foot brake pedal.
• Never leave the engine running while
the vehicle is unattended.
• Do not leave children unattended in-
side the vehicle. They could unknow-
ingly activate switches or controls or
make the vehicle move. Unattended
children could become involved in
serious accidents.
•
To help avoid risk of injury or death
through unintended operation of the
vehicle and/or its systems, do not leave
children, people who require the assis-
tance of others or pets unattended in
your vehicle. Additionally, the tempera-
ture inside a closed vehicle on a warm day can quickly become high enough to
cause a significant risk of injury or
death to people and pets.
1. Firmly apply the parking brake.
2. Move the shif t lever to the P (Park)
position.
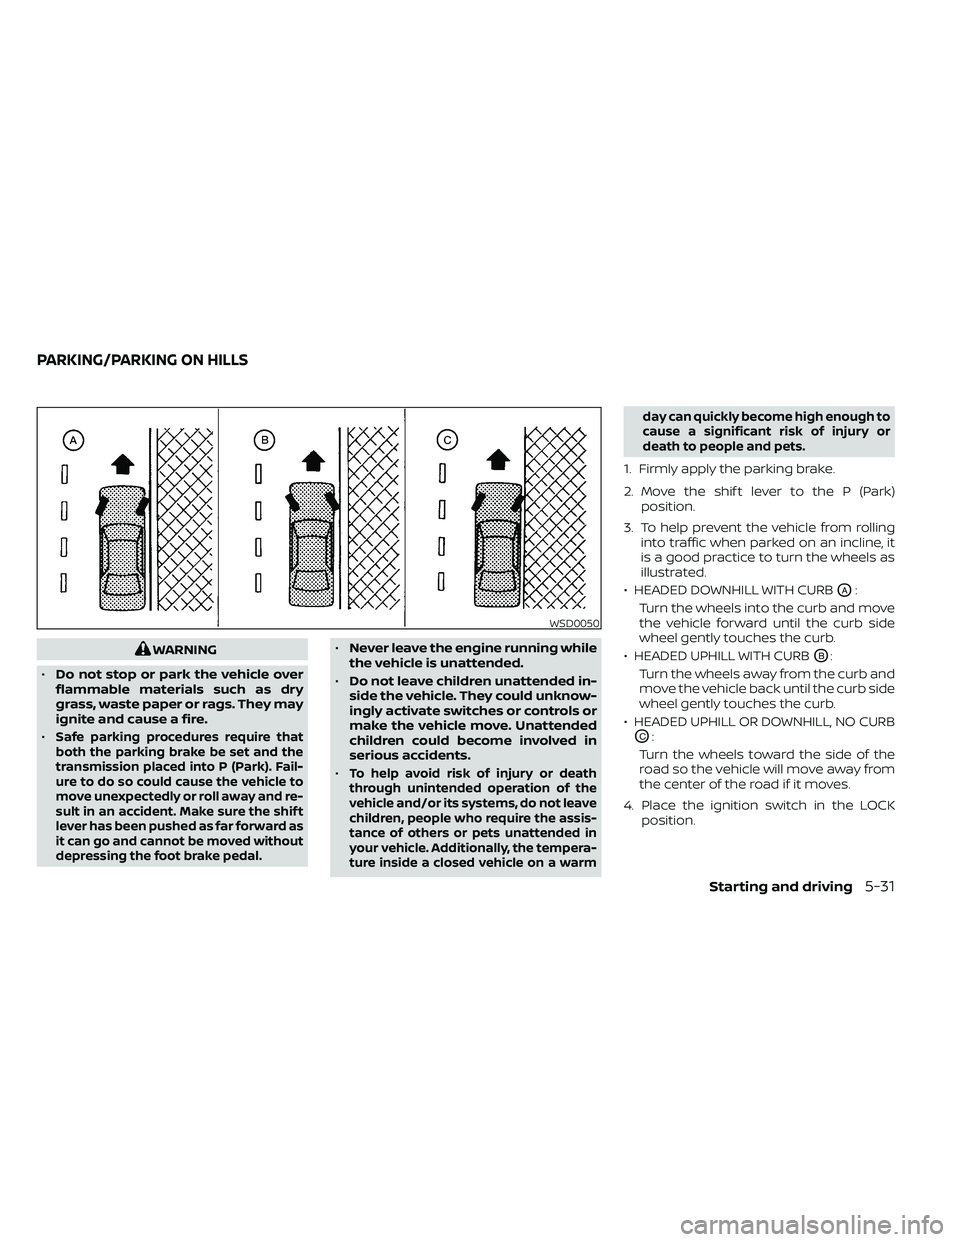
3. To help prevent the vehicle from rolling into traffic when parked on an incline, it
is a good practice to turn the wheels as
illustrated.
• HEADED DOWNHILL WITH CURB
OA:
Turn the wheels into the curb and move
the vehicle forward until the curb side
wheel gently touches the curb.
• HEADED UPHILL WITH CURB
OB:
Turn the wheels away from the curb and
move the vehicle back until the curb side
wheel gently touches the curb.
• HEADED UPHILL OR DOWNHILL, NO CURB
OC:
Turn the wheels toward the side of the
road so the vehicle will move away from
the center of the road if it moves.
4. Place the ignition switch in the LOCK position.
WSD0050
PARKING/PARKING ON HILLS
Starting and driving5-31
Page 343 of 492
The VDC system uses various sensors to
monitor driver inputs and vehicle motion.
Under certain driving conditions, the VDC
system helps to perform the following
functions:
• Controls brake pressure to reduce wheelslip on one slipping drive wheel so power
is transferred to a non-slipping drive
wheel on the same axle.
• Controls brake pressure and engine out- put to reduce drive wheel slip based on
vehicle speed (traction control function).
• If the 4WD transfer case is shif ted into 4LO the
indicator light will come on and
the VDC system will be turned off. For
additional information, refer to “Using
4–Wheel Drive (4WD)” in this section.
• Controls brake pressure at individual wheels and engine output to help the
driver maintain control of the vehicle in
the following conditions:– Understeer (vehicle tends to not follow the steered path despite increased
steering input)
– Oversteer (vehicle tends to spin due to certain road or driving conditions)
The VDC system can help the driver to
maintain control of the vehicle, but it can-
not prevent loss of vehicle control in all driv-
ing situations. When the VDC system operates, the
indicator light in the instrument panel
flashes so note the following:
• The road may be slippery or the system
may determine some action is required
to help keep the vehicle on the steered
path.
• You may feel a pulsation in the brake pedal and hear a noise or vibration from
under the hood. This is normal and indi-
cates that the VDC system is working
properly.
• Adjust your speed and driving to the road conditions.
For additional information, refer to “Slip in-
dicator light” and ”Vehicle Dynamic Control
(VDC) OFF indicator light” in the ”Instru-
ments and controls” section of this manual.
If a malfunction occurs in the system, the
indicator light will come on in the in-
strument panel. The VDC system auto-
matically turns off when these indicator
lights are off.
The VDC OFF switch is used to turn off the
VDC system. The
indicator light illumi-
nates to indicate the VDC system is off. When the VDC OFF switch is used to turn off
the system, the VDC system still operates
to prevent one drive wheel from slipping by
transferring power to a non-slipping drive
wheel. The
indicator light flashes if this
occurs. All other VDC functions are off and
the
indicator light will not flash.
The VDC system is automatically reset to
on when the ignition switch is placed in the
OFF position then back to the ON position.
The computer has a built-in diagnostic fea-
ture that tests the system each time you
start the engine and move the vehicle for-
ward or in reverse at a slow speed. When
the self-test occurs, you may hear a clunk
noise and/or feel a pulsation in the brake
pedal. This is normal and is not an indica-
tion of a malfunction.
VEHICLE DYNAMIC CONTROL (VDC)
SYSTEM
Starting and driving5-35
Page 347 of 492
WARNING
• Always turn and look back before
backing up. The RSS is not a substi-
tute for proper backing procedures.
• Read and understand the limitations
of the RSS as contained in this sec-
tion. Inclement weather may affect
the function of the RSS; this may in-
clude reduced performance or a false
activation.
• This system is not designed to pre-
vent contact with small or moving
objects. •
The system is designed as an aid to
the driver in detecting large station-
ary objects to help avoid damaging
the vehicle. The system will not de-
tect small objects below the bumper,
and may not detect objects close to
the bumper or on the ground.
• If your vehicle sustains damage to
the rear bumper fascia, leaving it
misaligned or bent, the sensing zone
may be altered causing inaccurate
measurement of obstacles or false
alarms.
The RSS sounds a tone to warn the driver of
obstacles near the rear bumper when the
shif t lever is in R (Reverse). The system may
not detect objects at speeds above 3 mph
(5 km/h) and may not detect certain angu-
lar or moving objects.
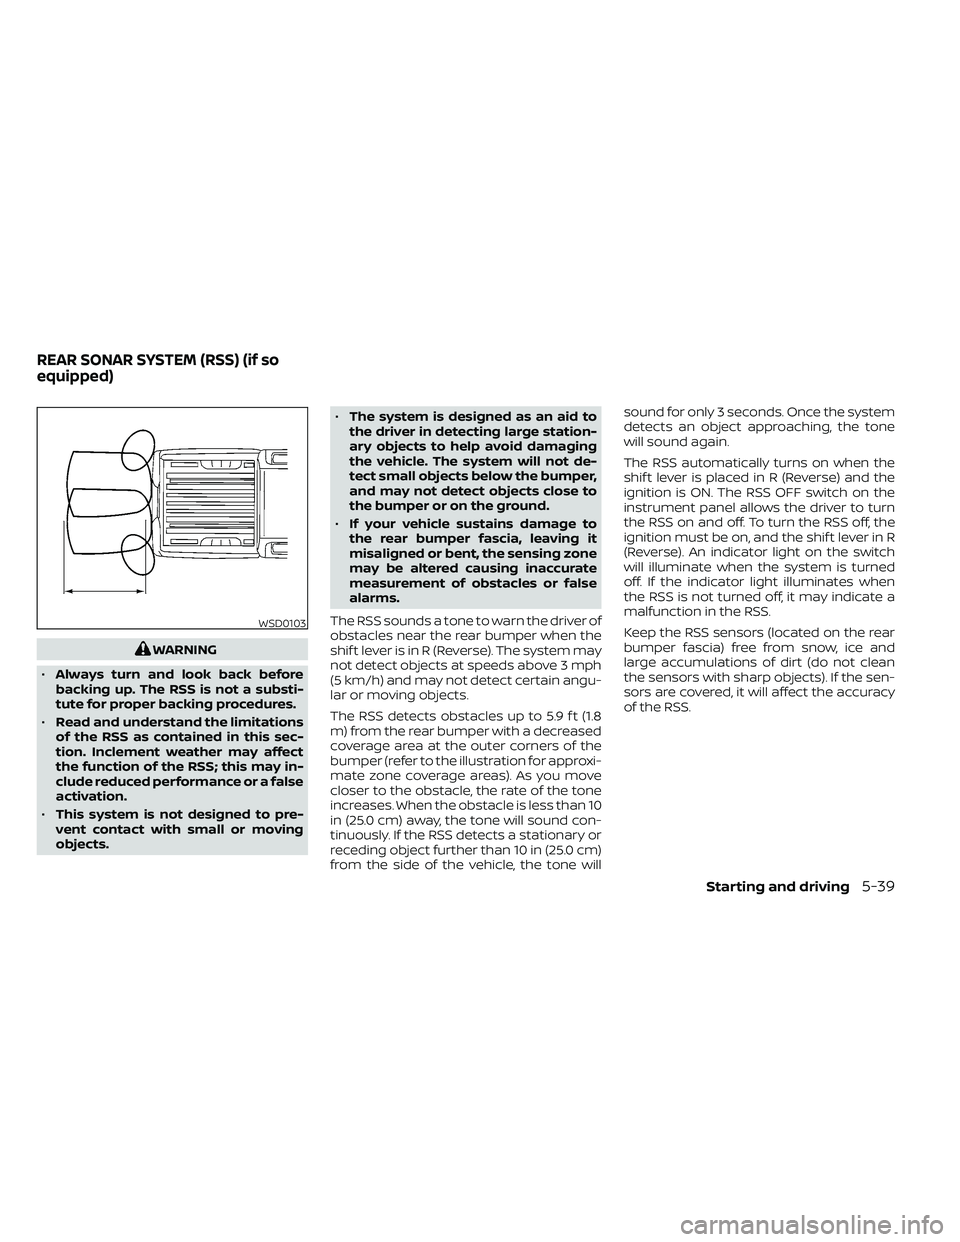
The RSS detects obstacles up to 5.9 f t (1.8
m) from the rear bumper with a decreased
coverage area at the outer corners of the
bumper (refer to the illustration for approxi-
mate zone coverage areas). As you move
closer to the obstacle, the rate of the tone
increases. When the obstacle is less than 10
in (25.0 cm) away, the tone will sound con-
tinuously. If the RSS detects a stationary or
receding object further than 10 in (25.0 cm)
from the side of the vehicle, the tone will sound for only 3 seconds. Once the system
detects an object approaching, the tone
will sound again.
The RSS automatically turns on when the
shif t lever is placed in R (Reverse) and the
ignition is ON. The RSS OFF switch on the
instrument panel allows the driver to turn
the RSS on and off. To turn the RSS off, the
ignition must be on, and the shif t lever in R
(Reverse). An indicator light on the switch
will illuminate when the system is turned
off. If the indicator light illuminates when
the RSS is not turned off, it may indicate a
malfunction in the RSS.
Keep the RSS sensors (located on the rear
bumper fascia) free from snow, ice and
large accumulations of dirt (do not clean
the sensors with sharp objects). If the sen-
sors are covered, it will affect the accuracy
of the RSS.
WSD0103
REAR SONAR SYSTEM (RSS) (if so
equipped)
Starting and driving5-39