2021 NISSAN FRONTIER display
[x] Cancel search: displayPage 214 of 492
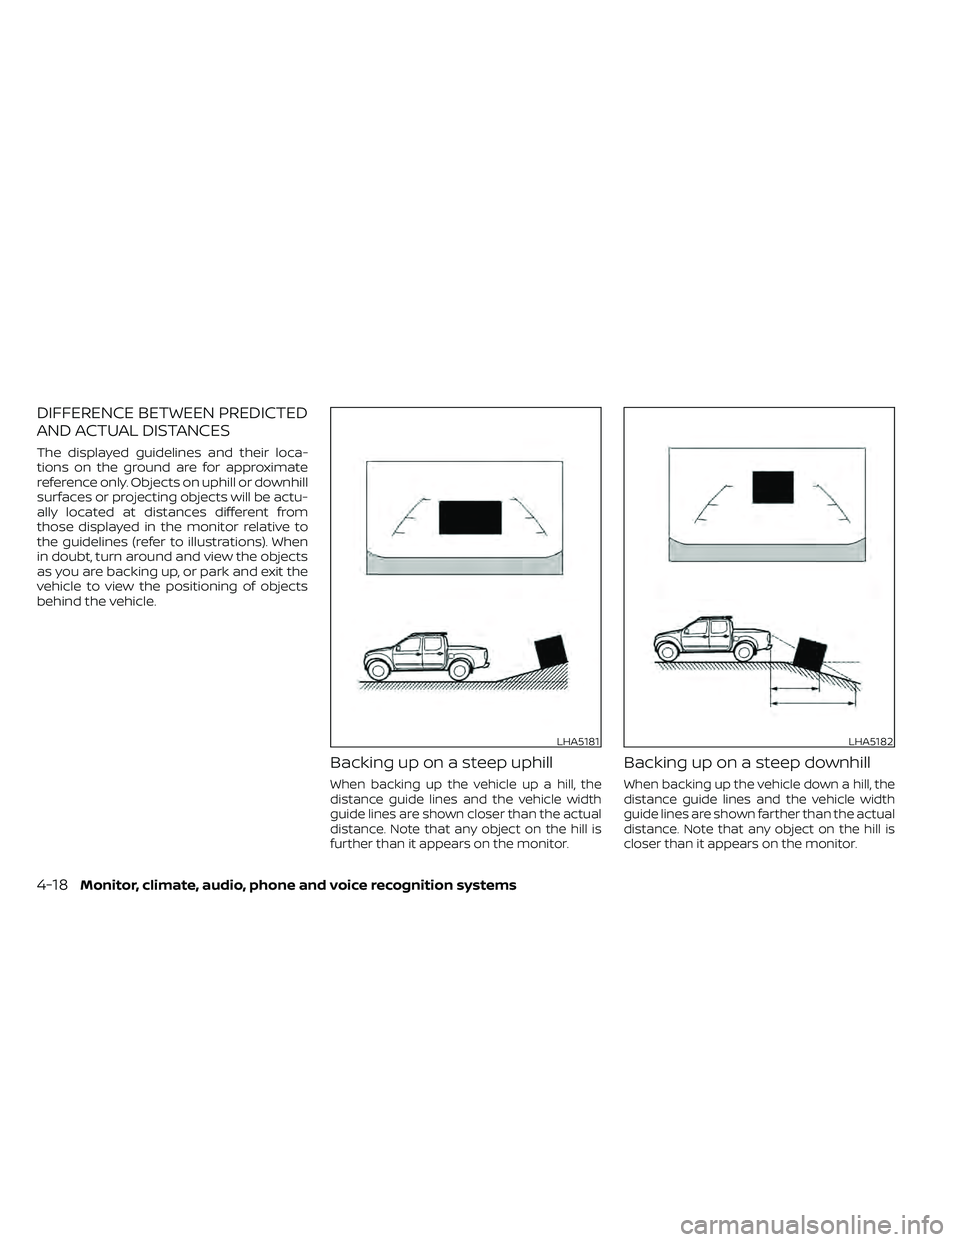
DIFFERENCE BETWEEN PREDICTED
AND ACTUAL DISTANCES
The displayed guidelines and their loca-
tions on the ground are for approximate
reference only. Objects on uphill or downhill
surfaces or projecting objects will be actu-
ally located at distances different from
those displayed in the monitor relative to
the guidelines (refer to illustrations). When
in doubt, turn around and view the objects
as you are backing up, or park and exit the
vehicle to view the positioning of objects
behind the vehicle.
Backing up on a steep uphill
When backing up the vehicle up a hill, the
distance guide lines and the vehicle width
guide lines are shown closer than the actual
distance. Note that any object on the hill is
further than it appears on the monitor.
Backing up on a steep downhill
When backing up the vehicle down a hill, the
distance guide lines and the vehicle width
guide lines are shown farther than the actual
distance. Note that any object on the hill is
closer than it appears on the monitor.
LHA5181LHA5182
4-18Monitor, climate, audio, phone and voice recognition systems
Page 215 of 492
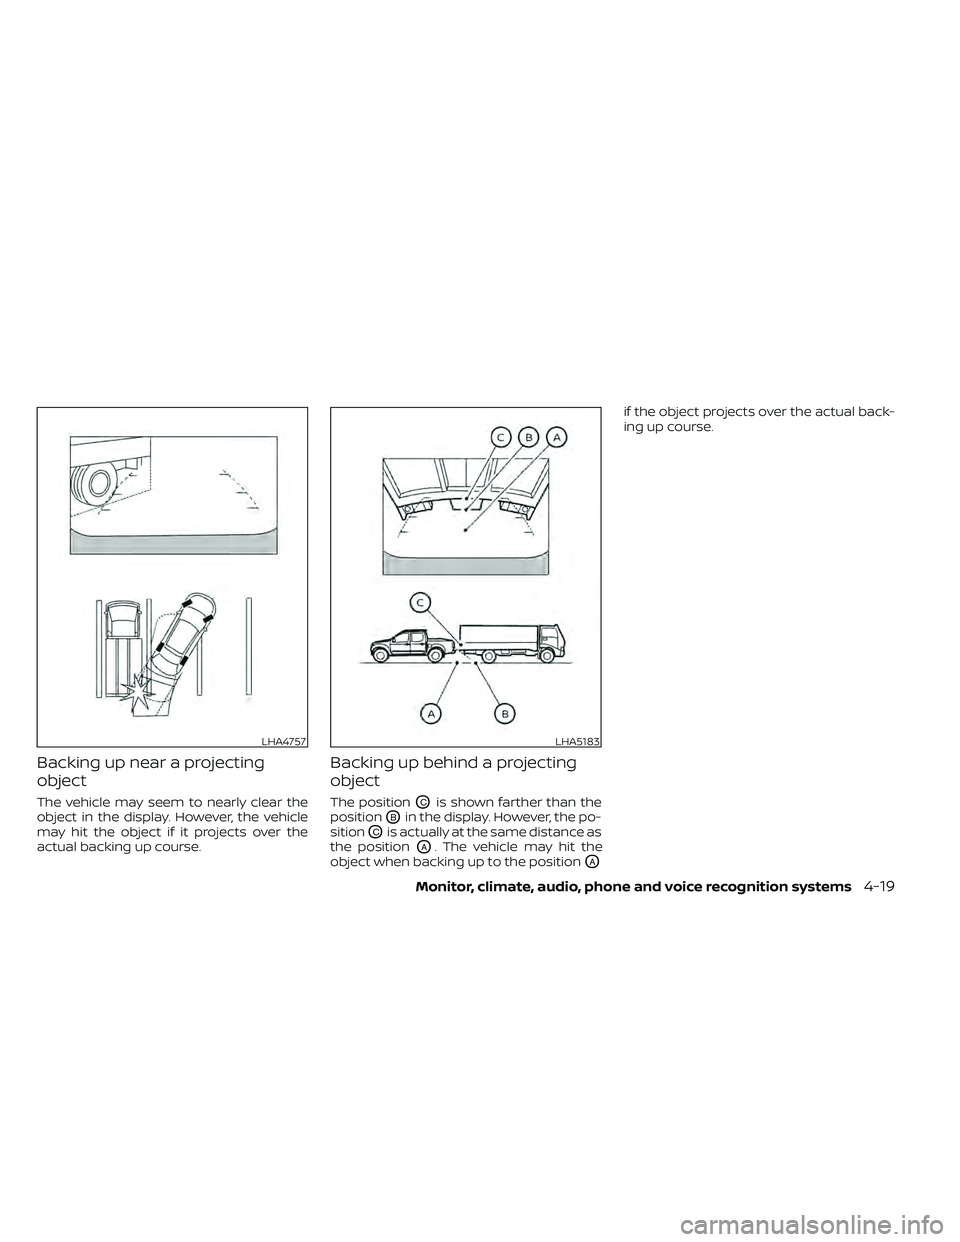
Backing up near a projecting
object
The vehicle may seem to nearly clear the
object in the display. However, the vehicle
may hit the object if it projects over the
actual backing up course.
Backing up behind a projecting
object
The positionOCis shown farther than the
position
OBin the display. However, the po-
sition
OCis actually at the same distance as
the position
OA. The vehicle may hit the
object when backing up to the position
OA
if the object projects over the actual back-
ing up course.
LHA4757LHA5183
Page 216 of 492
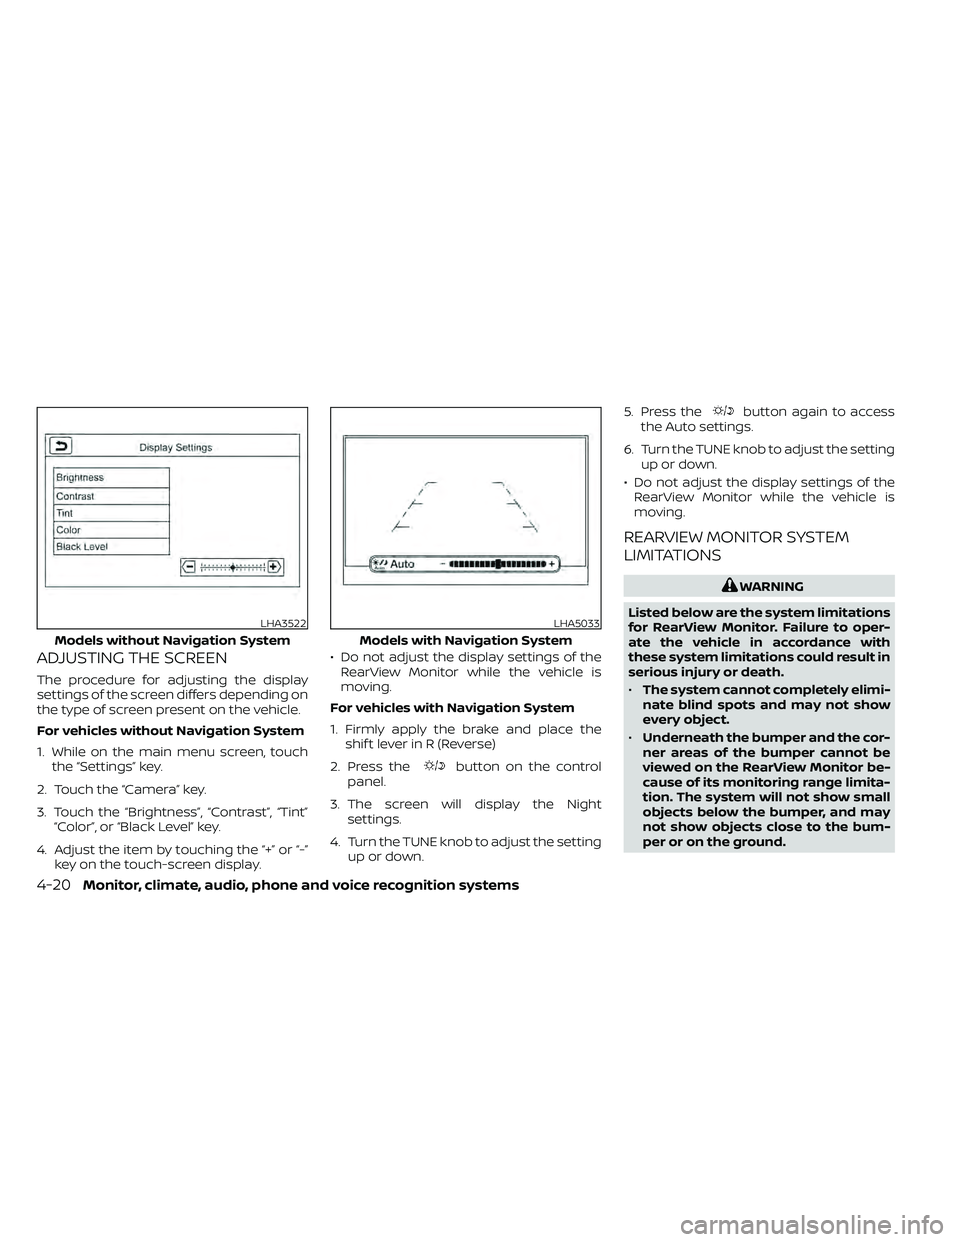
ADJUSTING THE SCREEN
The procedure for adjusting the display
settings of the screen differs depending on
the type of screen present on the vehicle.
For vehicles without Navigation System
1. While on the main menu screen, touchthe “Settings” key.
2. Touch the “Camera” key.
3. Touch the “Brightness”, “Contrast”, “Tint” “Color”, or “Black Level” key.
4. Adjust the item by touching the “+” or “-” key on the touch-screen display. • Do not adjust the display settings of the
RearView Monitor while the vehicle is
moving.
For vehicles with Navigation System
1. Firmly apply the brake and place the shif t lever in R (Reverse)
2. Press the
button on the control
panel.
3. The screen will display the Night settings.
4. Turn the TUNE knob to adjust the setting up or down. 5. Press the
button again to access
the Auto settings.
6. Turn the TUNE knob to adjust the setting up or down.
• Do not adjust the display settings of the RearView Monitor while the vehicle is
moving.
REARVIEW MONITOR SYSTEM
LIMITATIONS
Page 217 of 492
•Objects viewed in the RearView
Monitor differ from actual distance
because a wide-angle lens is used.
• Objects in the RearView Monitor will
appear visually opposite compared
to when viewed in the rearview and
outside mirrors.
• Use the displayed lines as a refer-
ence. The lines are highly affected by
the number of occupants, fuel level,
vehicle position, road conditions and
road grade.
• Make sure that the tailgate is se-
curely closed when backing up.
• Do not put anything on the rearview
camera. The rearview camera is in-
stalled on the tailgate.
• When washing the vehicle with high
pressure water, be sure not to spray it
around the camera. Otherwise, water
may enter the camera unit causing
water condensation on the lens, a
malfunction, fire or an electric shock.
• Do not strike the camera. It is a preci-
sion instrument. Otherwise, it may
malfunction or cause damage result-
ing in a fire or an electric shock. The following are operating limitations and
do not represent a system malfunction:
• When the temperature is extremely high
or low, the screen may not clearly display
objects.
• When strong light directly shines on the camera, objects may not be displayed
clearly.
• Vertical lines may be seen in objects on the screen. This is due to strong reflected
light from the bumper.
• The screen may flicker under fluorescent light.
• The colors of objects on the RearView Monitor may differ somewhat from the
actual color of objects.
• Objects on the monitor may not be clear in a dark environment.
• There may be a delay when switching between views.
• If dirt, rain or snow accumulate on the camera, RearView Monitor may not dis-
play objects clearly. Clean the camera.
• Do not use wax on the camera lens. Wipe off any wax with a clean cloth dampened
with a diluted mild cleaning agent, then
wipe with a dry cloth.
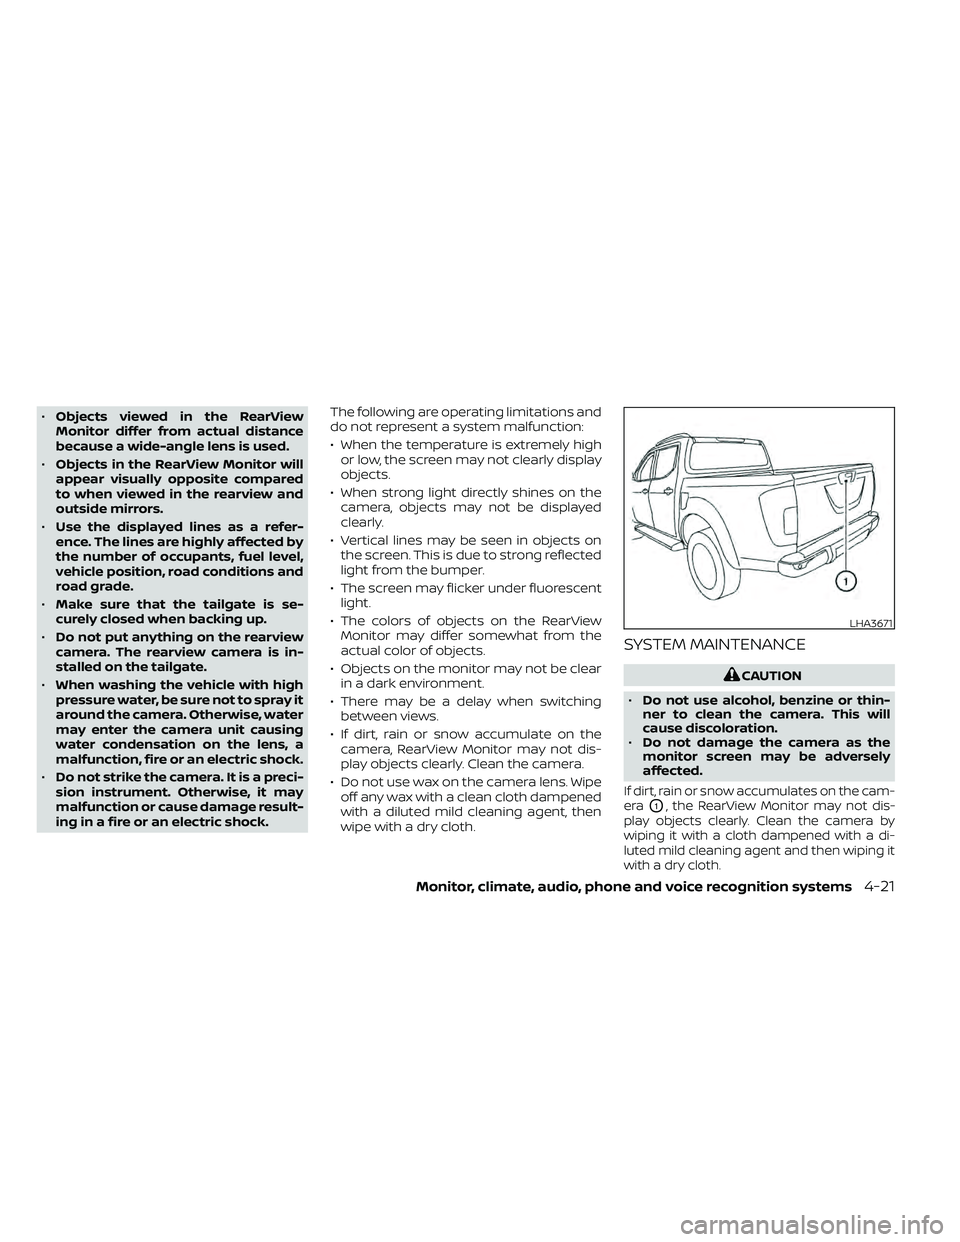
SYSTEM MAINTENANCE
LHA3671
Page 233 of 492
Static and flutter: During signal interfer-
ence from buildings, large hills or due to
antenna position (usually in conjunction
with increased distance from the station
transmitter), static or flutter can be heard.
This can be reduced by adjusting the treble
control to reduce treble response.
Multipath reception: Because of the reflec-
tive characteristics of FM signals, direct and
reflected signals reach the receiver at the
same time. The signals may cancel each
other, resulting in momentary flutter or loss
of sound.
AM RADIO RECEPTION
AM signals, because of their low frequency,
can bend around objects and skip along
the ground. In addition, the signals can be
bounced off the ionosphere and bent back
to earth. Because of these characteristics,
AM signals are also subject to interference
as they travel from transmitter to receiver.
Fading: Occurs while the vehicle is passing
through freeway underpasses or in areas
with many tall buildings. It can also occur for
several seconds during ionospheric turbu-
lence even in areas where no obstacles exist.
Static: Caused by thunderstorms, electrical
power lines, electric signs and even traffic
lights.
SATELLITE RADIO RECEPTION (if so
equipped)
When the satellite radio is used for the first
time or the battery has been replaced, the
satellite radio may not work properly. This
is not a malfunction. Wait more than 10
minutes with satellite radio ON and the ve-
hicle outside of any metal or large building
for satellite radio to receive all of the neces-
sary data.
No satellite radio reception is available and
“NO SAT” is displayed when the SAT band
option is selected unless optional satellite
receiver and antenna are installed and a
SiriusXM® Satellite Radio service subscrip-
tion is active. Satellite radio is not available
in Alaska, Hawaii and Guam.
Satellite radio performance may be af-
fected if cargo carried on the roof blocks
the satellite radio signal.
If possible, do not put cargo over the satel-
lite antenna.
A build up of ice on the satellite radio an-
tenna can affect satellite radio perfor-
mance. Remove the ice to restore satellite
radio reception.
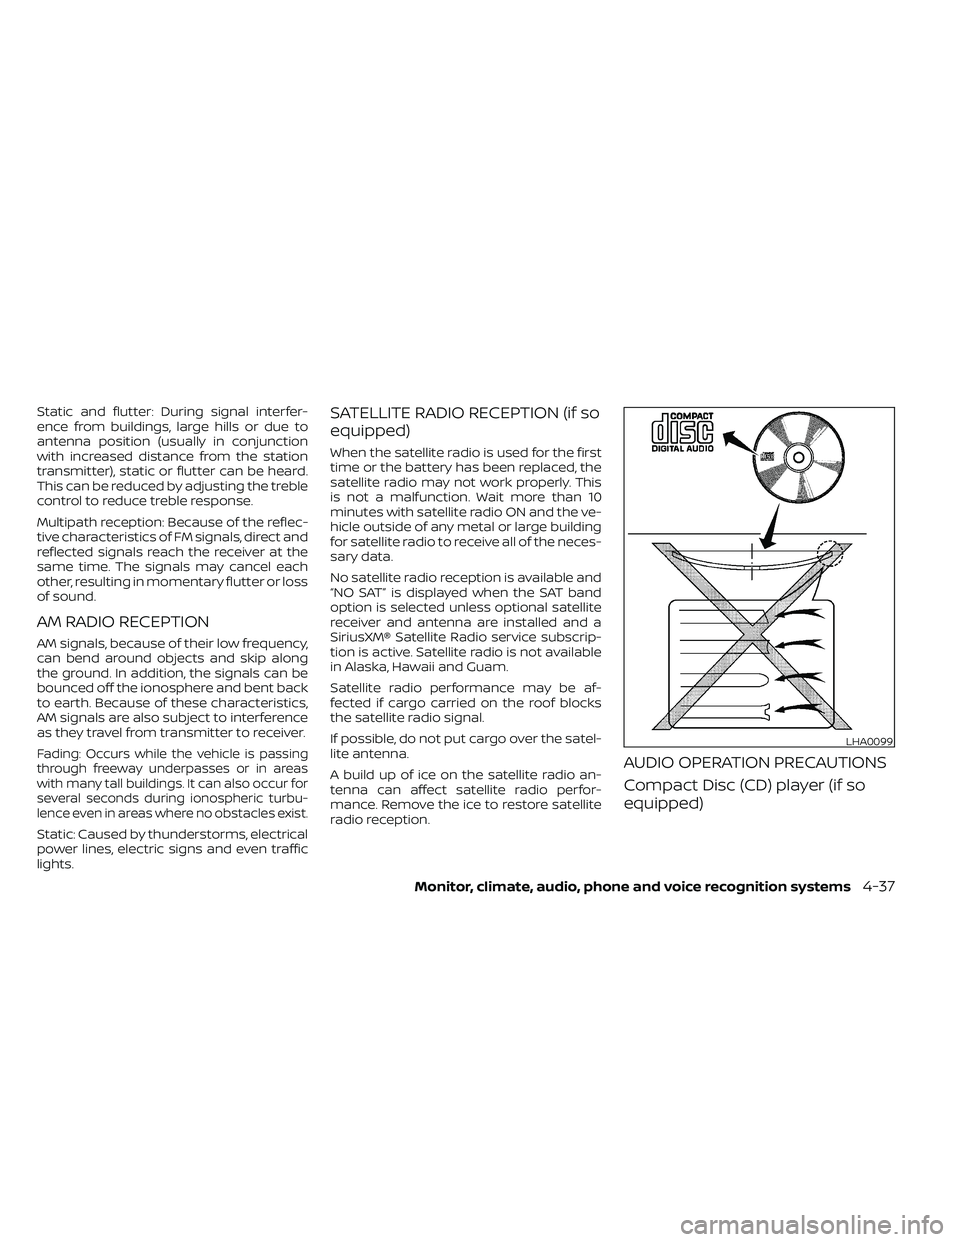
AUDIO OPERATION PRECAUTIONS
Compact Disc (CD) player (if so
equipped)
LHA0099
Page 234 of 492
CAUTION
• Do not force a compact disc into the
CD insert slot. This could damage the
CD and/or CD player.
• Trying to load a CD with the CD door
closed could damage the CD and/or
CD player.
• Only one CD can be loaded into the
CD player at a time.
• Only use high quality 4.7 in (12 cm)
round discs that have the “COMPACT
disc DIGITAL AUDIO” logo on the disc or
packaging.
• During cold weather or rainy days, the
player may malfunction due to the hu-
midity. If this occurs, remove the CD
and dehumidif y or ventilate the player
completely.
• The player may skip while driving on
rough roads.
• The CD player sometimes cannot func-
tion when the compartment tempera-
ture is extremely high or low. Decrease/
increase the temperature before use.
• Do not expose the CD to direct sunlight.
• CDs that are in poor condition or are
dirty, scratched or covered with finger-
prints may not work properly. •
The following CDs may not work prop-
erly: – Copy Control Compact Discs (CCCD)
– Recordable Compact Discs (CD-R)
– Rewritable Compact Discs (CD-RW)
•
Do not use the following CDs as they may
cause the CD player to malfunction:
– 3.1 in (8 cm) discs with an adapter
– CDs that are not round
– CDs with a paper label
– CDs that are warped, scratched, or
have abnormal edges
• This audio system can only play pre-
recorded CDs. It has no capability to re-
cord or burn CDs.
• If the CD cannot be played, one of the
following messages will be displayed.
CHECK DISC:
––
Confirm that the CD is inserted cor-
rectly (the label side is facing up, etc.).
–– Confirm that the CD is not bent or
warped and it is free of scratches.
PRESS EJECT:
This is an error due to excessive tem-
perature inside the player. Remove the
CD by pressing the EJECT button. Af ter
a short time, reinsert the CD. The CD
can be played when the temperature
of the player returns to normal. UNPLAYABLE:
The file is unplayable in this audio sys-
tem (only MP3 or WMA CD).
Compact disc with MP3 or WMA (if
so equipped)
Terms
• MP3 — MP3 is short for Moving Pictures
Experts Group Audio Layer 3. MP3 is the
most well-known compressed digital au-
dio file format. This format allows for near
“CD quality” sound, but at a fraction of the
size of normal audio files. MP3 conversion
of an audio track from CD-ROM can re-
duce the file size by approximately a 10:1
ratio with virtually no perceptible loss in
quality. MP3 compression removes the
redundant and irrelevant parts of a
sound signal that the human ear doesn’t
hear.
• WMA — Windows Media Audio (WMA)* is a compressed audio format created by Mi-
crosof t as an alternative to MP3. The WMA
codec offers greater file compression
than the MP3 codec, enabling storage of
more digital audio tracks in the same
amount of space when compared to
MP3s at the same level of quality.
4-38Monitor, climate, audio, phone and voice recognition systems
Page 235 of 492
• Bit rate — Bit rate denotes the number ofbits per second used by a digital music
file. The size and quality of a compressed
digital audio file is determined by the bit
rate used when encoding the file.
• Sampling frequency — Sampling fre- quency is the rate at which the samples
of a signal are converted from analog to
digital (A/D conversion) per second.
• Multisession — Multisession is one of the methods for writing data to media. Writ-
ing data once to the media is called a
single session, and writing more than
once is called a multisession.
• ID3/WMA Tag — The ID3/WMA tag is the part of the encoded MP3 or WMA file that
contains information about the digital
music file such as song title, artist, encod-
ing bit rate, track time duration, etc. ID3
tag information is displayed on the Artist/
song title line on the display.
* Windows® and Windows Media® are reg-
istered trademarks and trademarks in the
United States of America and other coun-
tries of Microsof t Corporation of the USA.
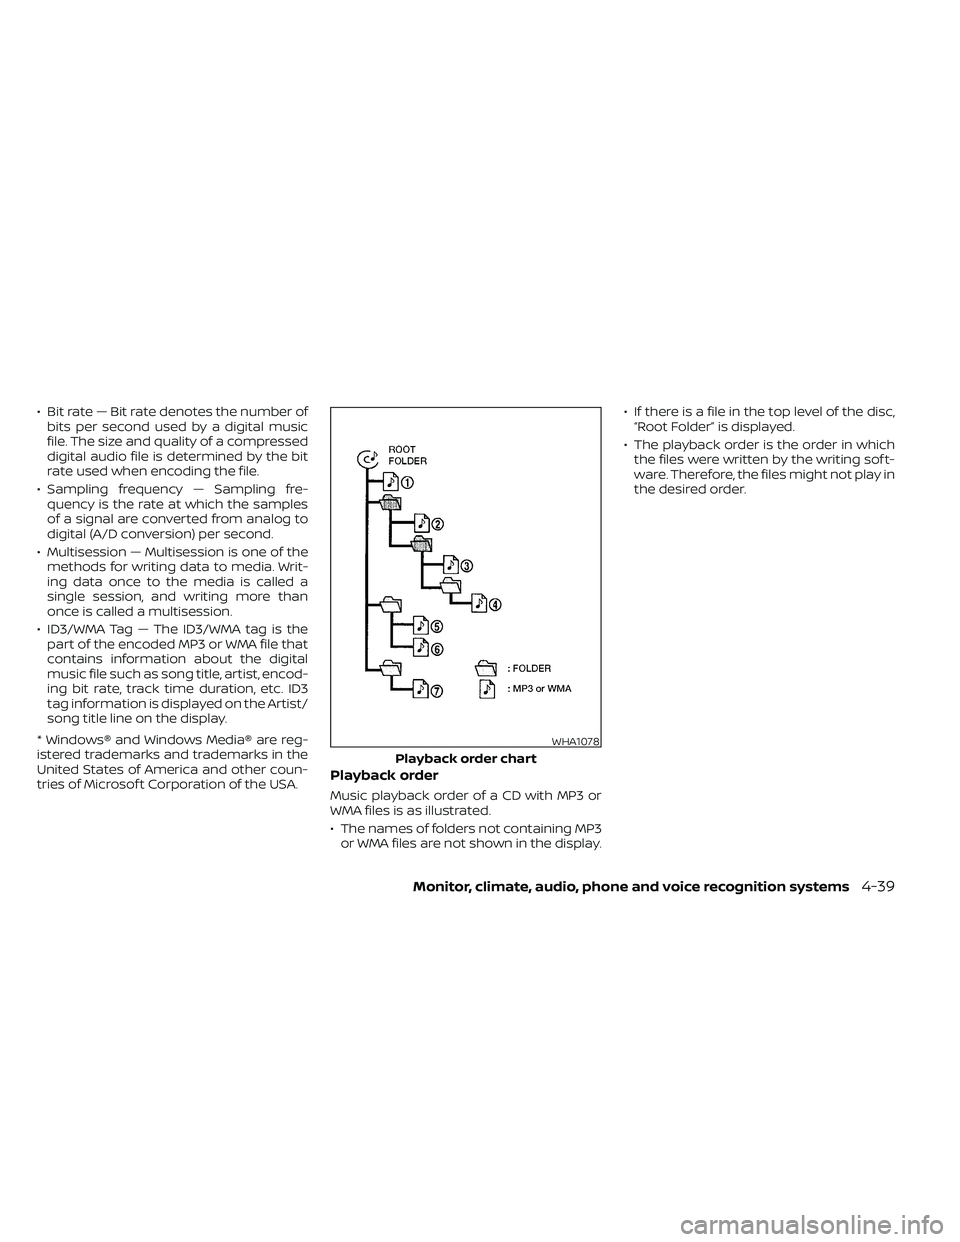
Playback order
Music playback order of a CD with MP3 or
WMA files is as illustrated.
• The names of folders not containing MP3 or WMA files are not shown in the display. • If there is a file in the top level of the disc,
“Root Folder” is displayed.
• The playback order is the order in which the files were written by the writing sof t-
ware. Therefore, the files might not play in
the desired order.
WHA1078
Playback order chart
Monitor, climate, audio, phone and voice recognition systems4-39
Page 238 of 492
USB (Universal Serial Bus)
connection port
CAUTION
• Do not force the USB device into the
USB port. Inserting the USB device
tilted or up-side-down into the port
may damage the port. Make sure
that the USB device is connected cor-
rectly into the USB port.
• Do not grab the USB port cover (if so
equipped) when pulling the USB de-
vice out of the port. This could dam-
age the port and the cover.
• Do not leave the USB cable in a place
where it can be pulled unintention-
ally. Pulling the cable may damage
the port. The vehicle is not equipped with a USB de-
vice. USB devices should be purchased
separately as necessary.
This system cannot be used to format USB
memory devices. To format a USB device,
use a personal computer.
In some jurisdictions, the USB device for the
front seats plays only sound without im-
ages for regulatory reasons, even when the
vehicle is parked.
This system supports various USB
memory devices, USB hard drives and
iPod® players. Some USB devices may not
be supported by this system.
• Partitioned USB devices may not play
correctly.
• Some characters used in other lan- guages (Chinese, Japanese, etc.) may not
appear properly in the display. Using Eng-
lish language characters with a USB de-
vice is recommended.
General notes for USB use
• For additional information, refer to your device manufacturer's owner informa-
tion regarding the proper use and care of
the device. Notes for iPod® use
iPod® is a trademark of Apple Inc., regis-
tered in the U.S. and other countries.
• Improperly plugging in the iPod® may
cause a check mark to be displayed on
and off (flickering). Always make sure that
the iPod® is connected properly.
• An iPod® nano (1st Generation) may re- main in fast forward or rewind mode if it is
connected during a seek operation. In
this case, please manually reset the
iPod®.
• An iPod® nano (2nd Generation) will con- tinue to fast-forward or rewind if it is dis-
connected during a seek operation.
• An incorrect song title may appear when the Play Mode is changed while using an
iPod® nano (2nd Generation).
• Audiobooks may not play in the same order as they appear on an iPod®.
• Large video files cause slow responses in an iPod®. The vehicle center display may
momentarily black out, but will soon re-
cover.
• If an iPod® automatically selects large video files while in the shuffle mode, the
vehicle center display may momentarily
black out, but will soon recover.
4-42Monitor, climate, audio, phone and voice recognition systems