2021 NISSAN FRONTIER display
[x] Cancel search: displayPage 123 of 492
Inaccurate compass direction
The compass display is equipped with au-
tomatic correction function. If the correct
direction is not shown, follow this proce-
dure.
1. With the display turned on, press andhold the
button for about 13 sec-
onds or thebutton for about 10
seconds. The “C” icon in the compass
display will illuminate.
2. Calibrate the compass by driving the ve- hicle in three complete circles at a maxi-
mum speed of 5 mph (8 km/h).
3. Af ter completing the circles, the display should return to normal.
Page 181 of 492
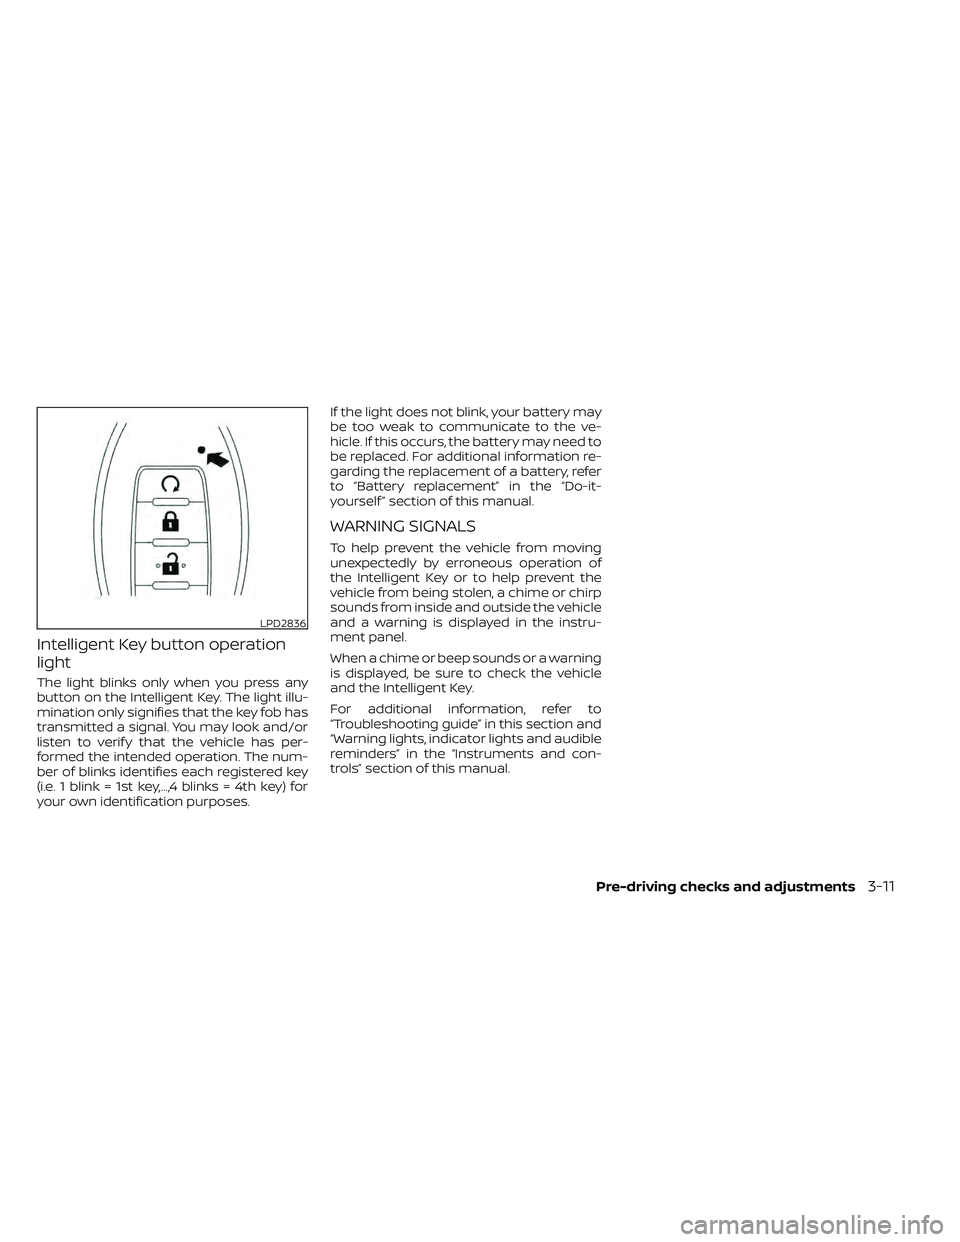
Intelligent Key button operation
light
The light blinks only when you press any
button on the Intelligent Key. The light illu-
mination only signifies that the key fob has
transmitted a signal. You may look and/or
listen to verif y that the vehicle has per-
formed the intended operation. The num-
ber of blinks identifies each registered key
(i.e. 1 blink = 1st key,...,4 blinks = 4th key) for
your own identification purposes.If the light does not blink, your battery may
be too weak to communicate to the ve-
hicle. If this occurs, the battery may need to
be replaced. For additional information re-
garding the replacement of a battery, refer
to “Battery replacement” in the “Do-it-
yourself ” section of this manual.
WARNING SIGNALS
To help prevent the vehicle from moving
unexpectedly by erroneous operation of
the Intelligent Key or to help prevent the
vehicle from being stolen, a chime or chirp
sounds from inside and outside the vehicle
and a warning is displayed in the instru-
ment panel.
When a chime or beep sounds or a warning
is displayed, be sure to check the vehicle
and the Intelligent Key.
For additional information, refer to
“Troubleshooting guide” in this section and
“Warning lights, indicator lights and audible
reminders” in the “Instruments and con-
trols” section of this manual.
LPD2836
Page 182 of 492
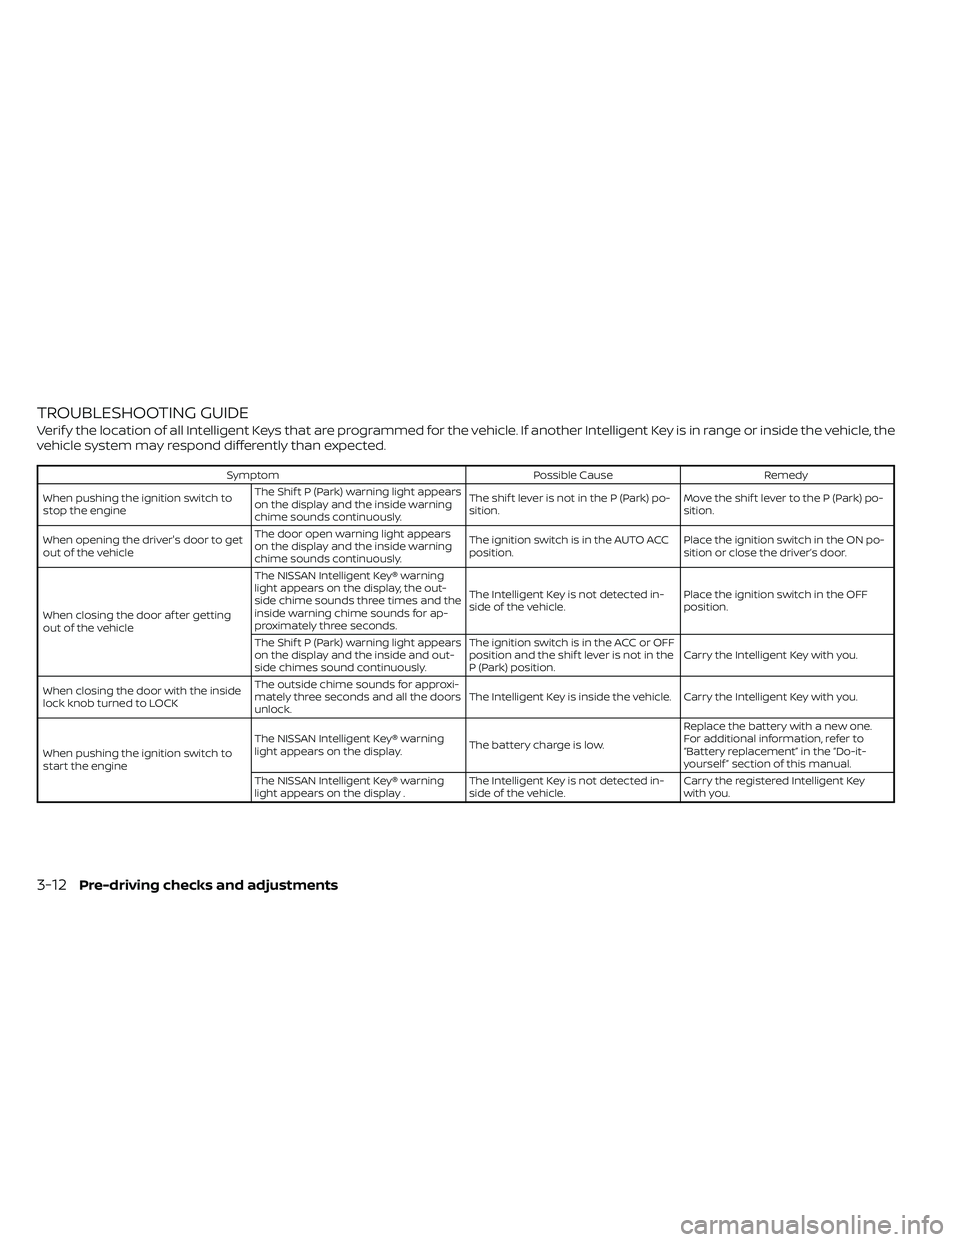
TROUBLESHOOTING GUIDE
Verif y the location of all Intelligent Keys that are programmed for the vehicle. If another Intelligent Key is in range or inside the vehicle, the
vehicle system may respond differently than expected.
SymptomPossible CauseRemedy
When pushing the ignition switch to
stop the engine The Shif t P (Park) warning light appears
on the display and the inside warning
chime sounds continuously. The shif t lever is not in the P (Park) po-
sition.
Move the shif t lever to the P (Park) po-
sition.
When opening the driver's door to get
out of the vehicle The door open warning light appears
on the display and the inside warning
chime sounds continuously. The ignition switch is in the AUTO ACC
position.
Place the ignition switch in the ON po-
sition or close the driver’s door.
When closing the door af ter getting
out of the vehicle The NISSAN Intelligent Key® warning
light appears on the display, the out-
side chime sounds three times and the
inside warning chime sounds for ap-
proximately three seconds.
The Intelligent Key is not detected in-
side of the vehicle.
Place the ignition switch in the OFF
position.
The Shif t P (Park) warning light appears
on the display and the inside and out-
side chimes sound continuously. The ignition switch is in the ACC or OFF
position and the shif t lever is not in the
P (Park) position.
Carry the Intelligent Key with you.
When closing the door with the inside
lock knob turned to LOCK The outside chime sounds for approxi-
mately three seconds and all the doors
unlock.
The Intelligent Key is inside the vehicle. Carry the Intelligent Key with you.
When pushing the ignition switch to
start the engine The NISSAN Intelligent Key® warning
light appears on the display.
The battery charge is low.Replace the battery with a new one.
For additional information, refer to
“Battery replacement” in the “Do-it-
yourself ” section of this manual.
The NISSAN Intelligent Key® warning
light appears on the display . The Intelligent Key is not detected in-
side of the vehicle.Carry the registered Intelligent Key
with you.
3-12Pre-driving checks and adjustments
Page 184 of 492
•Do not attempt to top off the fuel
tank af ter the fuel pump nozzle
shuts off automatically. Continued
refueling may cause fuel overflow,
resulting in fuel spray and possibly a
fire.
• Use only an original equipment type
fuel-filler cap as a replacement. It has
a built-in safety valve needed for
proper operation of the fuel system
and emission control system. An in-
correct cap can result in a serious
malfunction and possible injury. It
could also cause the
Malfunc-
tion Indicator Light (MIL) to come on.
• Never pour fuel into the throttle body
to attempt to start your vehicle.
• Do not fill a portable fuel container in
the vehicle or trailer. Static electricity
can cause an explosion of flammable
liquid, vapor or gas in any vehicle or
trailer. To reduce the risk of serious
injury or death when filling portable
fuel containers:
– Always place the container on the
ground when filling.
– Do not use electronic devices
when filling. –
Keep the pump nozzle in contact
with the container while you are
filling it.
– Use only approved portable fuel
containers for flammable liquid.
CAUTION
• Do not use a fuel containing more
than 15% ethanol in your vehicle. For
additional information, refer to “Fuel
recommendation” in the “Technical
and consumer information” section
of this manual.
• The LOOSE FUEL CAP warning will ap-
pear if the fuel-filler cap is not prop-
erly tightened. It may take a few driv-
ing trips for the message to be
displayed. Failure to tighten the fuel-
filler cap properly af ter the LOOSE
FUEL CAP warning appears may
cause the
Malfunction Indicator
Light (MIL) to illuminate. •
Failure to tighten the fuel-filler cap
properly may cause the
Mal-
function Indicator Light (MIL) to illu-
minate. If the
light illuminates
because the fuel-filler cap is loose or
missing, tighten or install the cap and
continue to drive the vehicle. The
light should turn off af ter a few
driving trips. If thelight does not
turn off af ter a few driving trips, have
your vehicle inspected. It is recom-
mended that you visit a NISSAN
dealer for this service.
• For additional information, refer to
“Malfunction Indicator Light (MIL)” in
the “Instruments and controls” sec-
tion in this manual.
• If fuel is spilled on the vehicle body,
flush it away with water to avoid
paint damage.
3-14Pre-driving checks and adjustments
Page 185 of 492

To remove the fuel-filler cap:
1. Turn the fuel-filler cap counterclockwiseto remove.
2. Put the fuel-filler cap on the cap holder
O1while refueling.
To install the fuel-filler cap:
1. Insert the fuel-filler cap straight into the fuel-filler tube.
2. Turn the fuel-filler cap clockwise until a single click is heard.
LOOSE FUEL CAP warning
message
The LOOSE FUEL CAP warning message
displays in the odometer when the fuel-
filler cap is not tightened correctly af ter the
vehicle has been refueled. It may take a few
driving trips for the message to be dis-
played. To turn off the warning message,
perform the following:
1. Remove and install the fuel-filler cap asdescribed above as soon as possible.
2. Tighten the fuel-filler cap until it clicks. 3. Press the loose fuel cap change/reset
button
OAin the meter for about one
second to turn off the LOOSE FUEL CAP
warning message af ter tightening the
fuel-filler cap.
For additional information, refer to “Meters
and gauges” in the “Instruments and con-
trols” section of this manual.
LPD2699LIC4378
Page 198 of 492
FM/AM radio (if so equipped)................4-44
FM/AM/SAT radio with Compact Disc
(CD) player (if so equipped) ..................4-49
USB (Universal Serial Bus) connection
port (models without Navigation
System) (if so equipped) .....................4-55
USB (Universal Serial Bus) connection
port (models with Navigation System)
(if so equipped) .............................. 4-58
iPod®* player operation without
Navigation System (if so equipped) ..........4-60
iPod®* player operation with Navigation
System (if so equipped) .....................4-63
Bluetooth® streaming audio without
Navigation System (if so equipped) ..........4-66
Bluetooth® streaming audio with
Navigation System (if so equipped) ..........4-69
CD care and cleaning .......................4-70
Steering wheel switch for audio control .....4-71
Antenna ..................................... 4-72
NissanConnect® Mobile Apps (if so equipped) . . 4-72 Registering with NissanConnect®
Mobile Apps ................................. 4-72
Connect Phone ............................. 4-72
Application download .......................4-73Siri® Eyes Free (models without Navigation
System) (if so equipped)
........................4-73
Requirements ............................... 4-73
Operating Siri® Eyes Free ....................4-74
Troubleshooting guide ......................4-75
Siri® Eyes Free (models with Navigation
System) (if so equipped) ........................4-76
Requirements ............................... 4-76
Siri® Activation .............................. 4-76
Operating Siri® Eyes Free ....................4-77
Changing Siri® Eyes Free settings ...........4-77
Troubleshooting guide ......................4-78
Car phone or CB radio .......................... 4-79
Bluetooth® Hands-Free Phone System
without Navigation System (if so equipped) ....4-79
Regulatory information ......................4-81
Using the system ........................... 4-81
Indicators ................................... 4-83
Control buttons ............................. 4-83
Connecting procedure ......................4-84
Voice commands ........................... 4-85
Phone display screen .......................
4-87
Making
a call ................................ 4-88
Receiving a call .............................. 4-88
Page 200 of 492
WARNING
• Positioning of the heating or air con-
ditioning controls and display con-
trols should not be done while driv-
ing in order that full attention may be
given to the driving operation.
• Do not disassemble or modif y this
system. If you do, it may result in ac-
cidents, fire, or electrical shock.
• Do not use this system if you notice
any abnormality, such as a frozen
screen or lack of sound. Continued
use of the system may result in acci-
dent, fire or electric shock.
• In case you notice any foreign object
in the system hardware, spill liquid
on it, or notice smoke or smell com-
ing from it, stop using the system im-
mediately. Ignoring such conditions
may lead to accidents, fire or electri-
cal shock. It is recommended that
you visit a NISSAN dealer for
servicing.
4-4Monitor, climate, audio, phone and voice recognition systems
Page 201 of 492
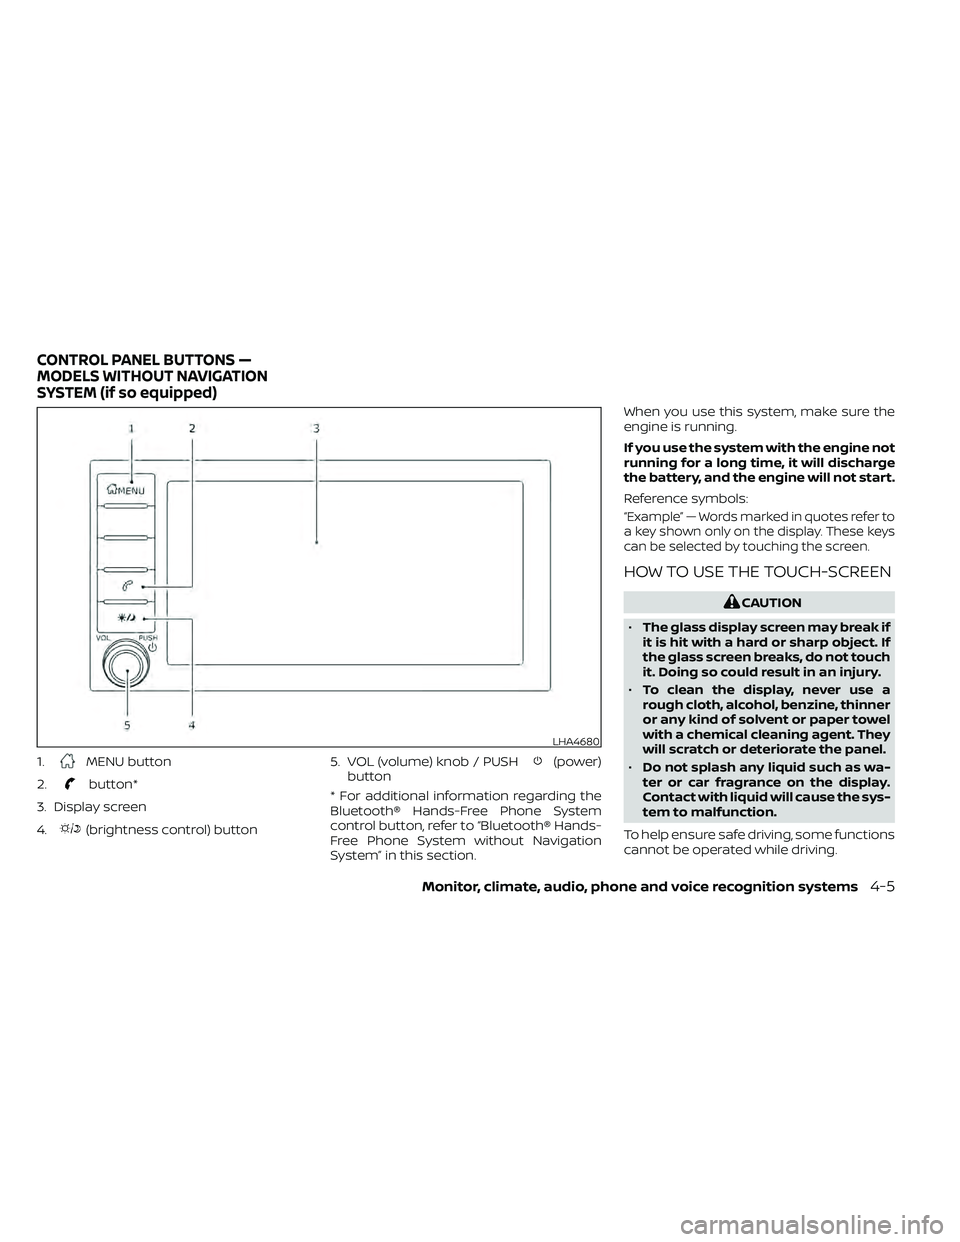
1.MENU button
2.
button*
3. Display screen
4.
(brightness control) button 5. VOL (volume) knob / PUSH
(power)
button
* For additional information regarding the
Bluetooth® Hands-Free Phone System
control button, refer to “Bluetooth® Hands-
Free Phone System without Navigation
System” in this section. When you use this system, make sure the
engine is running.
If you use the system with the engine not
running for a long time, it will discharge
the battery, and the engine will not start.
Reference symbols:
“Example” — Words marked in quotes refer to
a key shown only on the display. These keys
can be selected by touching the screen.
HOW TO USE THE TOUCH-SCREEN
LHA4680
CONTROL PANEL BUTTONS —
MODELS WITHOUT NAVIGATION
SYSTEM (if so equipped)
Monitor, climate, audio, phone and voice recognition systems4-5