2021 NISSAN FRONTIER display
[x] Cancel search: displayPage 240 of 492
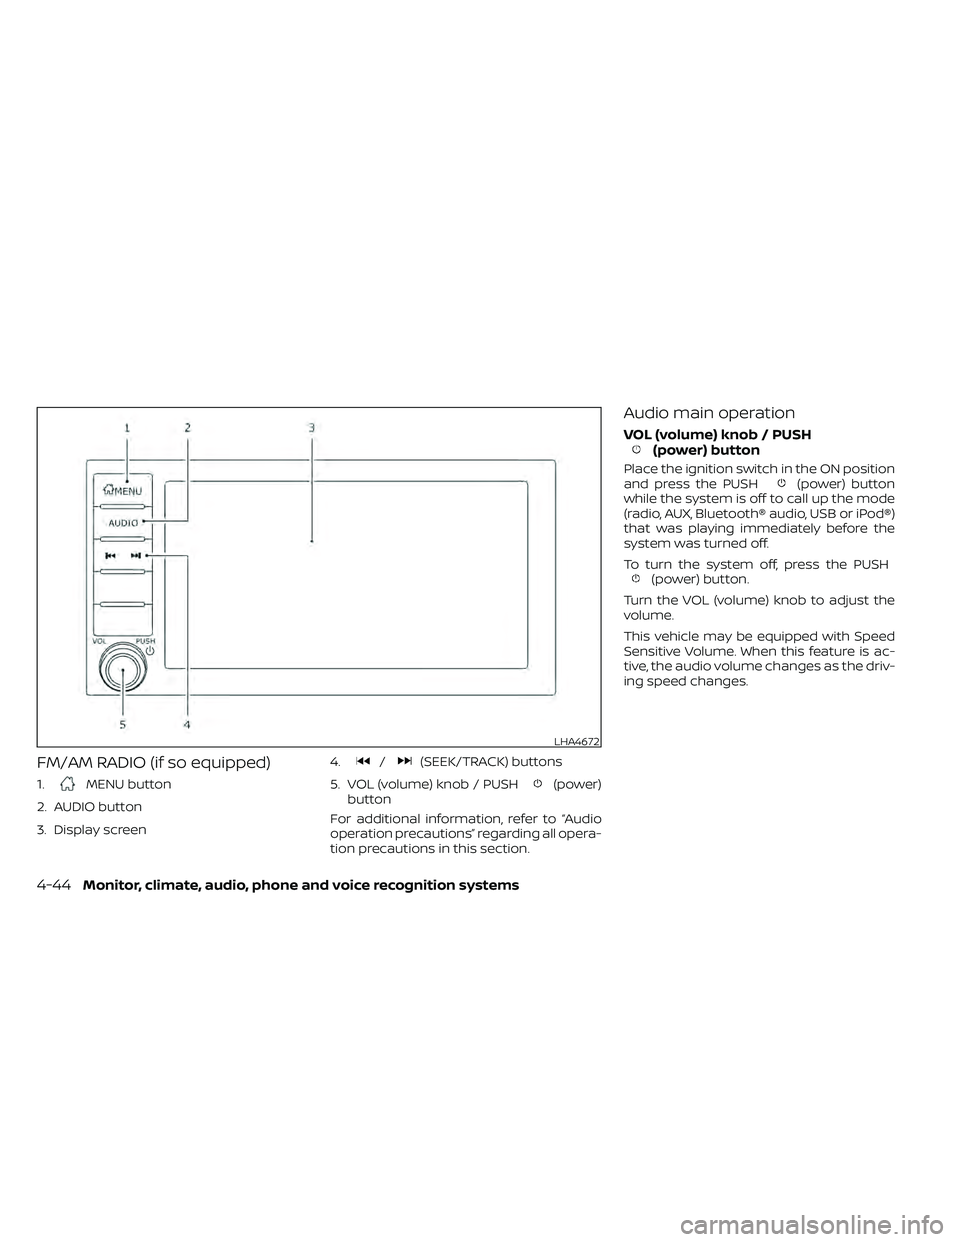
FM/AM RADIO (if so equipped)
1.MENU button
2. AUDIO button
3. Display screen 4.
/(SEEK/TRACK) buttons
5. VOL (volume) knob / PUSH
(power)
button
For additional information, refer to “Audio
operation precautions” regarding all opera-
tion precautions in this section.
Audio main operation
VOL (volume) knob / PUSH(power) button
Place the ignition switch in the ON position
and press the PUSH(power) button
while the system is off to call up the mode
(radio, AUX, Bluetooth® audio, USB or iPod®)
that was playing immediately before the
system was turned off.
To turn the system off, press the PUSH
(power) button.
Turn the VOL (volume) knob to adjust the
volume.
This vehicle may be equipped with Speed
Sensitive Volume. When this feature is ac-
tive, the audio volume changes as the driv-
ing speed changes.
LHA4672
4-44Monitor, climate, audio, phone and voice recognition systems
Page 241 of 492
MENU button
Press theMENU button to show the
Menu screen. Touch the “Settings” key on
the display, then touch the “Sound” key.
Sound Settings
Bass Adjusts the bass to the desired level.
Treble Adjusts the treble to the desired level.
Balance Adjusts the balance to the desired level. Balance adjusts the sound level between the lef t and right
speakers.
Fade Adjusts the fade to the desired level. Fade adjusts the sound level between the front and rear
speakers.
Speed Sensitive Volume Adjusts the speed sensitive volume function, which increases the volume of the audio system as
the speed of the vehicle increases. Set to “OFF” to disable the feature. The higher the setting, the
more the volume increases in relation to vehicle speed.
Bass, treble, balance, fade and Speed Sensitive Volume can be adjusted by touching “-” or “+” keys.
AUDIO button
Push to display the audio screen. When this
button is pushed while the audio screen is
not displayed, the last audio source played
will play.
Monitor, climate, audio, phone and voice recognition systems4-45
Page 242 of 492
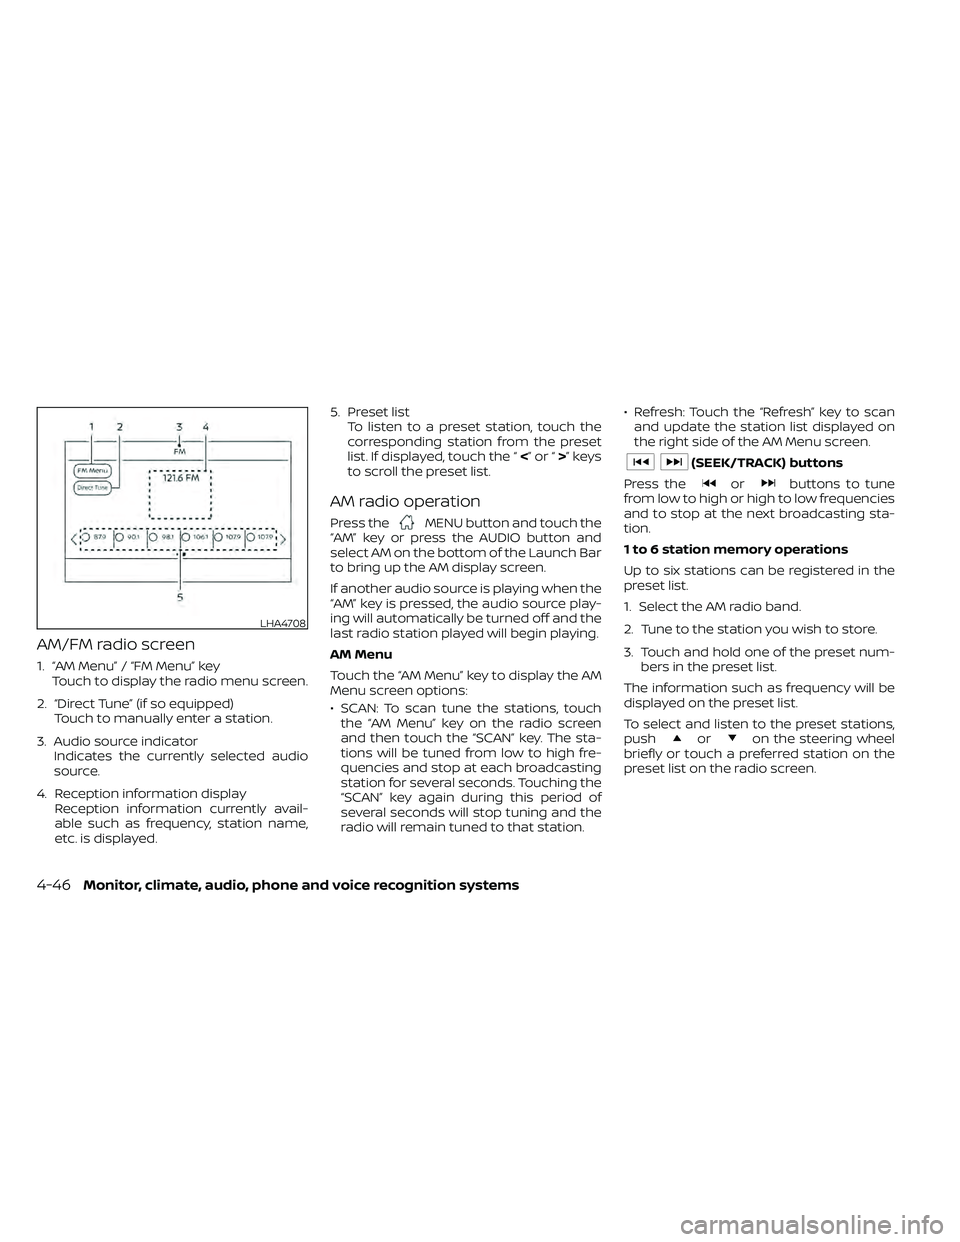
AM/FM radio screen
1. “AM Menu” / “FM Menu” keyTouch to display the radio menu screen.
2. “Direct Tune” (if so equipped) Touch to manually enter a station.
3. Audio source indicator Indicates the currently selected audio
source.
4. Reception information display Reception information currently avail-
able such as frequency, station name,
etc. is displayed. 5. Preset list
To listen to a preset station, touch the
corresponding station from the preset
list. If displayed, touch the “ <”or“>”keys
to scroll the preset list.
AM radio operation
Press theMENU button and touch the
“AM” key or press the AUDIO button and
select AM on the bottom of the Launch Bar
to bring up the AM display screen.
If another audio source is playing when the
“AM” key is pressed, the audio source play-
ing will automatically be turned off and the
last radio station played will begin playing.
AM Menu
Touch the “AM Menu” key to display the AM
Menu screen options:
• SCAN: To scan tune the stations, touch the “AM Menu” key on the radio screen
and then touch the “SCAN” key. The sta-
tions will be tuned from low to high fre-
quencies and stop at each broadcasting
station for several seconds. Touching the
“SCAN” key again during this period of
several seconds will stop tuning and the
radio will remain tuned to that station. • Refresh: Touch the “Refresh” key to scan
and update the station list displayed on
the right side of the AM Menu screen.
orbuttons to tune
from low to high or high to low frequencies
and to stop at the next broadcasting sta-
tion.
1 to 6 station memory operations
Up to six stations can be registered in the
preset list.
1. Select the AM radio band.
2. Tune to the station you wish to store.
3. Touch and hold one of the preset num- bers in the preset list.
The information such as frequency will be
displayed on the preset list.
To select and listen to the preset stations,
push
oron the steering wheel
briefly or touch a preferred station on the
preset list on the radio screen.
LHA4708
4-46Monitor, climate, audio, phone and voice recognition systems
Page 243 of 492
FM radio operation
Press theMENU button and touch the
“FM” key or press the AUDIO button and
select FM on the bottom of the Launch Bar
to bring up the FM display screen.
If another audio source is playing when the
“FM” key is pressed, the audio source play-
ing will automatically be turned off and the
last radio station played will begin playing.
The FM stereo indicator (STEREO) is shown
on the screen during FM stereo reception.
When the stereo broadcast signal is weak,
the radio automatically changes from ste-
reo to monaural reception.
FM Menu
Touch the “FM Menu” key to display the FM
Menu screen options:
• SCAN: To scan tune the stations, touch the “FM Menu” key on the radio screen
and then touch the “SCAN” key. The sta-
tions will be tuned from low to high fre-
quencies and stop at each broadcasting
stations for several seconds. Touching
the “SCAN” key again during this period of
several seconds will stop tuning and the
radio will remain tuned to that station. • Refresh: Touch the “Refresh” key to up-
date the station list displayed on the right
side of the FM Menu screen.
• RDS Info: Radio station and song informa- tion can be displayed on the FM display
screen.
orbuttons to tune
from low to high or high to low frequencies
and to stop at the next broadcasting sta-
tion.
1 to 12 Station memory operations
Up to 12 stations can be registered in the
preset list.
1. Select the FM radio band.
2. Tune to the station you wish to store.
3. Touch and hold one of the preset num- bers in the preset list.
The information such as frequency will be
displayed on the preset list.
To select and listen to the preset stations,
push
oron the steering wheel
briefly or touch a preferred station on the
preset list on the radio screen.
Auxiliary (AUX) devices operation
Connecting auxiliary devices
Connect an AUX device into the AUX input
jack located on the center console below
the heater and air conditioner controls.
The AUX input jack accepts any standard
analog audio input such as from a portable
cassette player, CD player, MP3 player or
phone.
Insert a 1/8 in (3.5 mm) stereo mini plug in
the audio input jack. If a cable with a mono
plug is used, the audio output may not
function normally.
Activation and playing
Turn on the AUX device. Connect an AUX
cable to the AUX device and the AUX input
jack. Select AUX mode from the audio
source menu screen or by pressing the
Source button on the steering wheel.
Monitor, climate, audio, phone and voice recognition systems4-47
Page 245 of 492
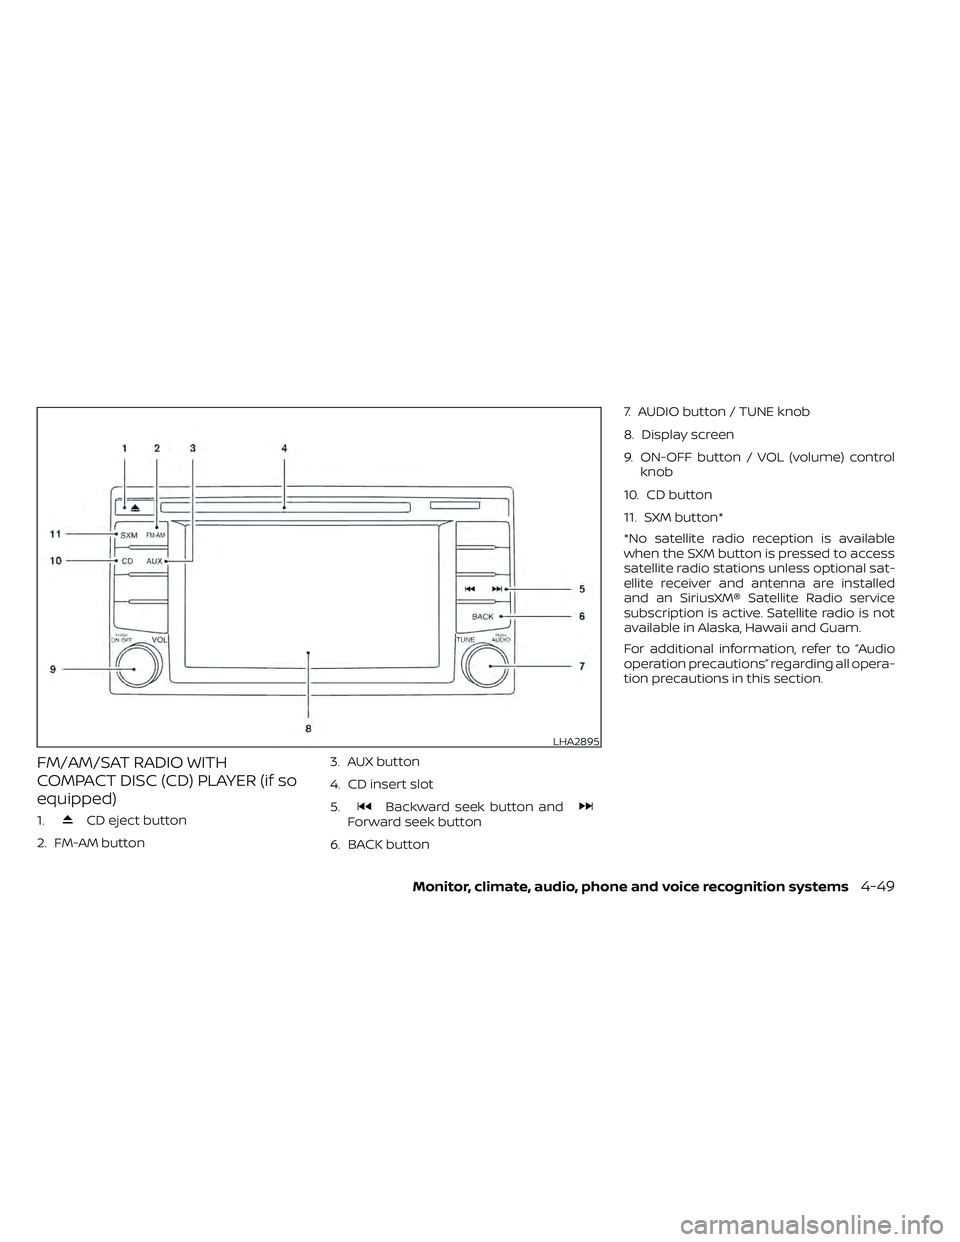
FM/AM/SAT RADIO WITH
COMPACT DISC (CD) PLAYER (if so
equipped)
1.CD eject button
2. FM-AM button 3. AUX button
4. CD insert slot
5.Backward seek button andForward seek button
6. BACK button 7. AUDIO button / TUNE knob
8. Display screen
9. ON-OFF button / VOL (volume) control
knob
10. CD button
11. SXM button*
*No satellite radio reception is available
when the SXM button is pressed to access
satellite radio stations unless optional sat-
ellite receiver and antenna are installed
and an SiriusXM® Satellite Radio service
subscription is active. Satellite radio is not
available in Alaska, Hawaii and Guam.
For additional information, refer to “Audio
operation precautions” regarding all opera-
tion precautions in this section.
LHA2895
Page 246 of 492
Audio main operation
ON-OFF button / VOL (volume) control
knob
Place the ignition switch in the ACC or ON
position and press the ON-OFF button
while the system is off to call up the mode
(radio, CD, AUX, Bluetooth® audio, USB or
iPod®) that was playing immediately before
the system was turned off.To turn the system off, press the ON-OFF
button.
Turn the VOL (volume) control knob to ad-
just the volume.
This vehicle may be equipped with Speed
Sensitive Volume. When this feature is ac-
tive, the audio volume changes as the driv-
ing speed changes.
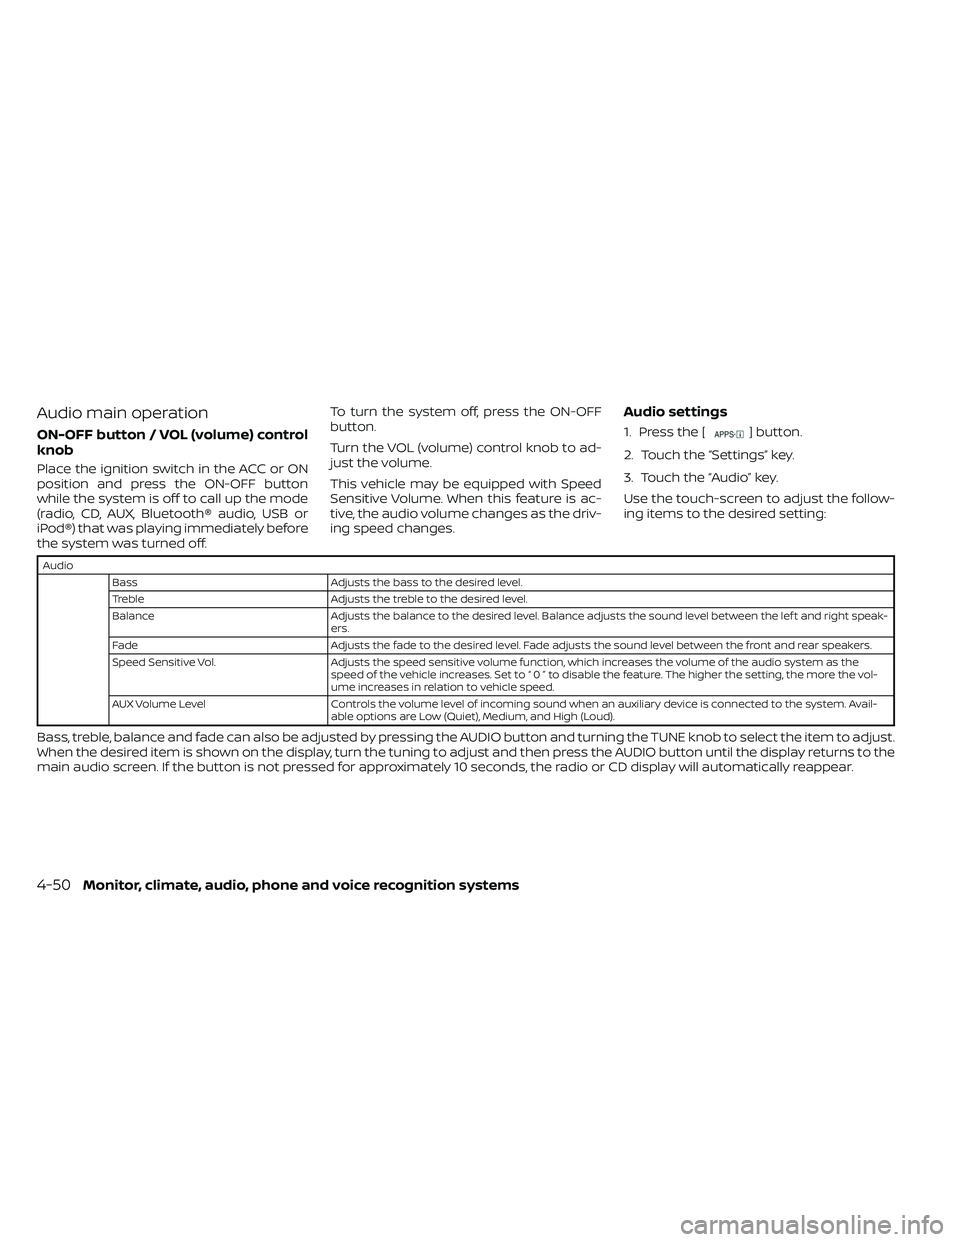
Audio settings
1. Press the [] button.
2. Touch the “Settings” key.
3. Touch the “Audio” key.
Use the touch-screen to adjust the follow-
ing items to the desired setting:
Audio Bass Adjusts the bass to the desired level.
Treble Adjusts the treble to the desired level.
Balance Adjusts the balance to the desired level. Balance adjusts the sound level between the lef t and right speak-
ers.
Fade Adjusts the fade to the desired level. Fade adjusts the sound level between the front and rear speakers.
Speed Sensitive Vol. Adjusts the speed sensitive volume function, which increases the volume of the audio system as the
speed of the vehicle increases. Set to “ 0 ” to disable the feature. The higher the setting, the more the vol-
ume increases in relation to vehicle speed.
AUX Volume Level Controls the volume level of incoming sound when an auxiliary device is connected to the system. Avail-
able options are Low (Quiet), Medium, and High (Loud).
Bass, treble, balance and fade can also be adjusted by pressing the AUDIO button and turning the TUNE knob to select the item to adjust.
When the desired item is shown on the display, turn the tuning to adjust and then press the AUDIO button until the display returns to the
main audio screen. If the button is not pressed for approximately 10 seconds, the radio or CD display will automatically reappear.
4-50Monitor, climate, audio, phone and voice recognition systems
Page 247 of 492
![NISSAN FRONTIER 2021 Owners Manual SXM settings
To view the SXM settings:
1. Press the [
] button.
2. Touch the “Settings” key.
3. Touch the “SXM” key.
The signal strength, activation status and
other information are displayed NISSAN FRONTIER 2021 Owners Manual SXM settings
To view the SXM settings:
1. Press the [
] button.
2. Touch the “Settings” key.
3. Touch the “SXM” key.
The signal strength, activation status and
other information are displayed](/manual-img/5/56721/w960_56721-246.png)
SXM settings
To view the SXM settings:
1. Press the [
] button.
2. Touch the “Settings” key.
3. Touch the “SXM” key.
The signal strength, activation status and
other information are displayed on the
screen.
FM/AM/SAT radio operation
FM·AM button
Press the FM·AM button to change the
band as follows:
AM →P1→ FM1→FM→P2
If another audio source is playing when the
FM·AM button is pressed, the audio source
playing will automatically be turned off and
the last radio station played will begin play-
ing.
The FM stereo indicator (STEREO) is shown
on the screen during FM stereo reception.
When the stereo broadcast signal is weak,
the radio automatically changes from ste-
reo to monaural reception.
SXM band select
Pressing the SXM button will change the
band as follows:
SXM1* →SXM2* →SXM3* →SXM1* (satellite,
if so equipped)
When the SXM button is pressed while the
ignition switch is in the ACC or ON position, the
radio will come on at the last station played.
The last station played will also come on
when the ON-OFF button is pressed to turn
the radio on.
*When the SXM button is pressed, the sat-
ellite radio mode will be skipped unless an
optional satellite receiver and antenna are
installed and a SiriusXM® Satellite Radio
service subscription is active. Satellite radio
is not available in Alaska, Hawaii and Guam.
If a compact disc is playing when the SXM
button is pressed, the compact disc will
automatically be turned off and the last
radio station played will come on.
While the radio is in SXM mode, the opera-
tion can be controlled through the touch-
screen. Touch the “Categories” key to dis-
play a list of categories. Touch a category
displayed on the list to display options
within that category.
Tuning with the touch-screen
When in AM or FM mode, the radio can be
tuned using the touch-screen. To bring up
the visual tuner, touch the “Tune” key on the
lower right corner of the screen. A screen
appears with a bar running from low fre-
quencies on the lef t to high frequencies on
the right. Touch the screen at the location
of the frequency you wish to tune and the
station will change to that frequency. To
return to the regular radio display screen,
touch the “OK” key.
Tuning with the TUNE knob
The radio can also be manually tuned us-
ing the TUNE knob. When in FM or AM mode,
turn the TUNE knob to the lef t for lower
frequencies or to the right for higher fre-
quencies. When in SXM mode, turn the
TUNE knob to change the channel.
orseek buttons to tune from low to high
or high to low frequencies and to stop at
the next broadcasting station.
When in SXM mode, press the
orseek buttons to change the category.
Monitor, climate, audio, phone and voice recognition systems4-51
Page 249 of 492
3. Touch the “Tune Start” key to activate(ON) or deactivate (OFF) Smart Favorites.
4. Touch the “Add Preset” key to select an available preset.
For additional information, refer to “1 to 6
station memory operations” in this section
regarding preset memory options.
NOTE:
• Smart Favorites will start functioning
only af ter the audio unit is turned on for
a few minutes.
• Tune Start is supported for music chan-
nels only.
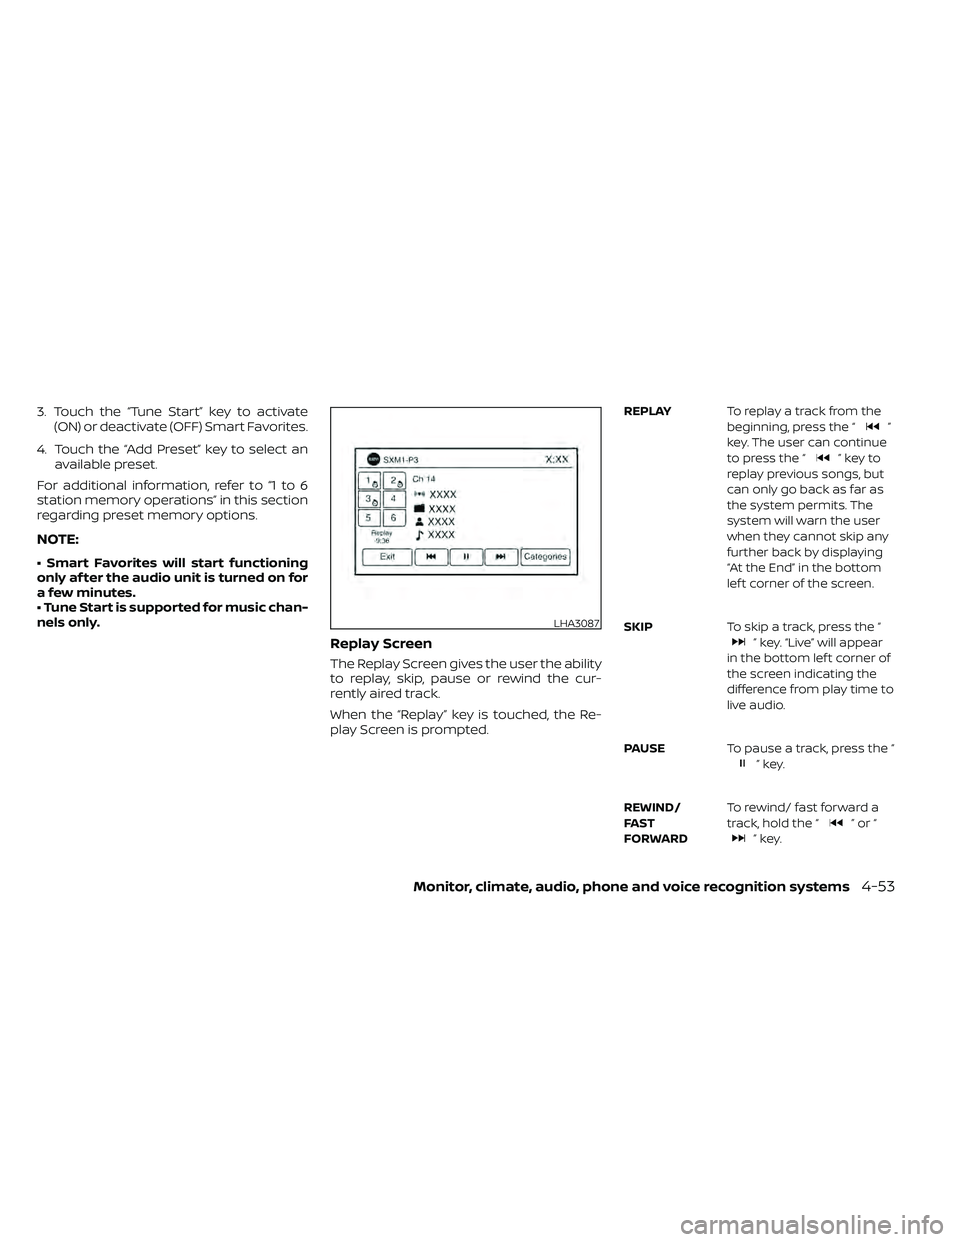
Replay Screen
The Replay Screen gives the user the ability
to replay, skip, pause or rewind the cur-
rently aired track.
When the “Replay” key is touched, the Re-
play Screen is prompted.
REPLAY To replay a track from the
beginning, press the “”
key. The user can continue
to press the “
”keyto
replay previous songs, but
can only go back as far as
the system permits. The
system will warn the user
when they cannot skip any
further back by displaying
“At the End” in the bottom
lef t corner of the screen.
SKIP To skip a track, press the “
” key. “Live” will appear
in the bottom lef t corner of
the screen indicating the
difference from play time to
live audio.
PAUSE To pause a track, press the “
”key.
REWIND/
FA ST
FORWARD To rewind/ fast forward a
track, hold the “
”or“”key.
LHA3087