2021 NISSAN FRONTIER air condition
[x] Cancel search: air conditionPage 315 of 492
Seat belts help reduce the risk of injury in
collisions and rollovers.In a rollover crash,
an unbelted person is significantly more
likely to die than a person wearing a seat
belt..
OFF-ROAD RECOVERY
While driving, the right side or lef t side
wheels may unintentionally leave the road
surface. If this occurs, maintain control of
the vehicle by following the procedure be-
low. Please note that this procedure is only
a general guide. The vehicle must be driven
as appropriate based on the conditions of
the vehicle, road and traffic.
1. Remain calm and do not overreact.
2. Do not apply the brakes.
3. Maintain a firm grip on the steering wheel with both hands and try to hold a
straight course.
4. When appropriate, slowly release the ac- celerator pedal to gradually slow the
vehicle.
5. If there is nothing in the way, steer the vehicle to follow the road while vehicle
speed is reduced. Do not attempt to
drive the vehicle back onto the road sur-
face until vehicle speed is reduced. 6. When it is safe to do so, gradually turn
the steering wheel until both tires return
to the road surface. When all tires are on
the road surface, steer the vehicle to
stay in the appropriate driving lane.
• If you decide that it is not safe to return the vehicle to the road surface based
on vehicle, road or traffic conditions,
gradually slow the vehicle to a stop in
a safe place off the road.
RAPID AIR PRESSURE LOSS
Rapid air pressure loss or a “blow-out” can
occur if the tire is punctured or is damaged
due to hitting a curb or pothole. Rapid air
pressure loss can also be caused by driving
on under-inflated tires.
Rapid air pressure loss can affect the han-
dling and stability of the vehicle, especially
at highway speeds.
Help prevent rapid air pressure loss by
maintaining the correct air pressure and
visually inspecting the tires for wear and
damage. For additional information, refer
to “Wheels and tires” in the “Do-it-yourself ”
section of this manual. If a tire rapidly loses
air pressure or “blows-out” while driving,
maintain control of the vehicle by following
the procedure below. Please note that this
procedure is only a general guide. The ve- hicle must be driven as appropriate based
on the conditions of the vehicle, road and
traffic.
Page 330 of 492
3.Use Air Conditioning (A/C) at Higher
Vehicle Speeds
• Below 40 mph (64 km/h), it is more efficient to open windows to cool the
vehicle due to reduced engine load.
• Above 40 mph (64 km/h), it is more efficient to use A/C to cool the vehicle
due to increased aerodynamic drag.
• Recirculating the cool air in the cabin when the A/C is on reduces cooling
load.
4. Drive at Economical Speeds and
Distances
• Observing the speed limit and not ex- ceeding 60 mph (97 km/h) (where le-
gally allowed) can improve fuel effi-
ciency due to reduced aerodynamic
drag.
• Maintaining a safe following distance behind other vehicles reduces unnec-
essary braking.
• Safely monitoring traffic to anticipate changes in speed permits reduced
braking and smooth acceleration
changes.
• Select a gear range suitable to road conditions. 5.
Use Cruise Control
• Using cruise control during highway driving helps maintain a steady speed.
• Cruise control is particularly effective in providing fuel savings when driving
on flat terrains.
6. Plan for the Shortest Route
• Utilize a map or navigation system to determine the best route to save time.
7. Avoid Idling
• Shutting off your engine when safe for stops exceeding 30–60 seconds saves
fuel and reduces emissions.
8. Buy an Automated Pass for Toll Roads
• Automated passes permit drivers to use special lanes to maintain cruising
speed through the toll and avoid stop-
ping and starting. 9.
Winter Warm Up
• Limit idling time to minimize impact to fuel economy.
• Vehicles typically need no more than 30 seconds of idling at start-up to ef-
fectively circulate the engine oil before
driving.
• Your vehicle will reach its ideal operat- ing temperature more quickly while
driving versus idling.
10. Keeping your Vehicle Cool
• Park your vehicle in a covered parking area or in the shade whenever pos-
sible.
• When entering a hot vehicle, opening the windows will help to reduce the
inside temperature faster, resulting in
reduced demand on your A/C system.
5-22Starting and driving
Page 362 of 492
WARNING
Always follow the instructions below.
Failure to do so could result in damage
to the charging system and cause per-
sonal injury.
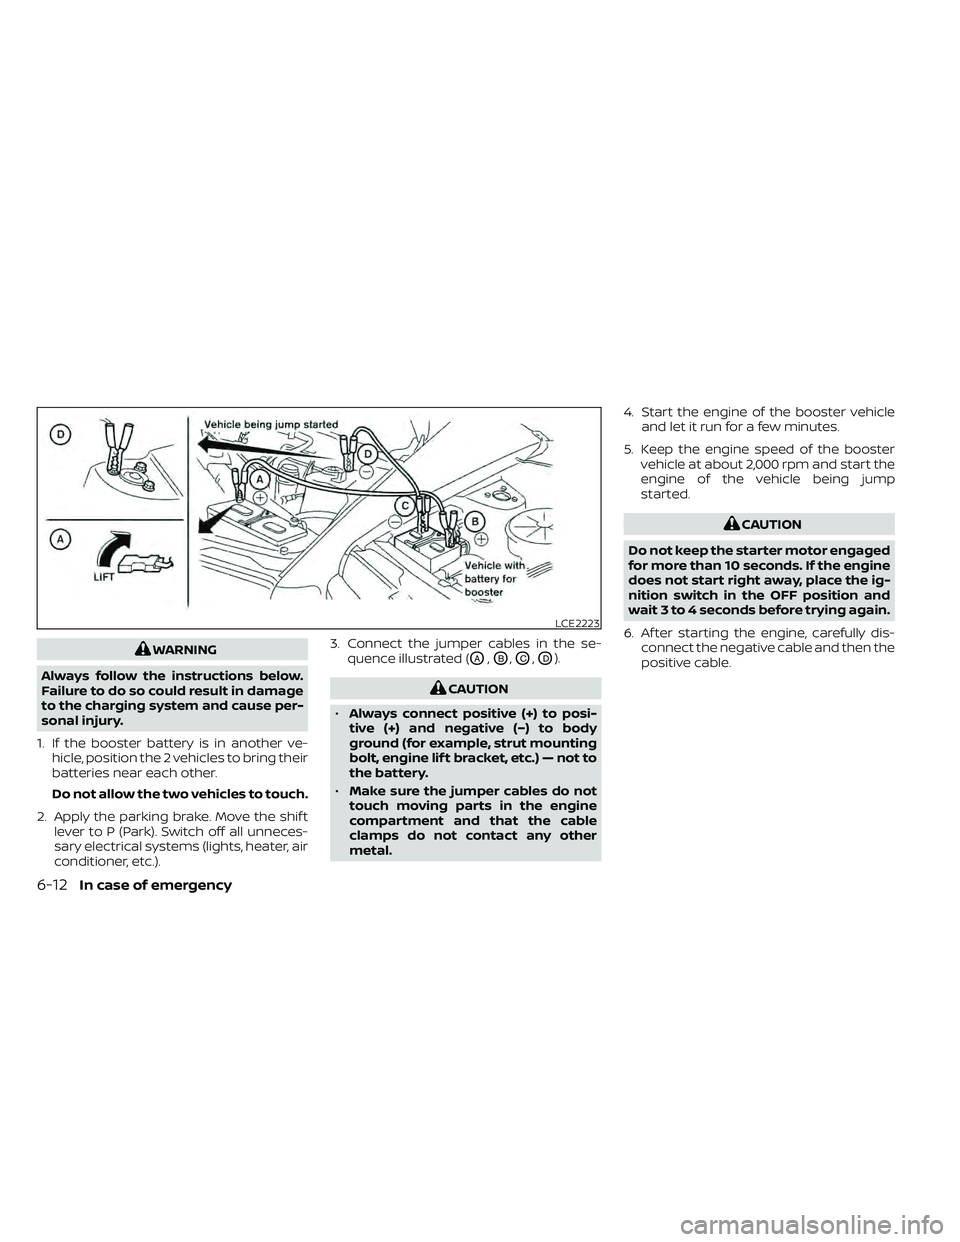
1. If the booster battery is in another ve- hicle, position the 2 vehicles to bring their
batteries near each other.
Do not allow the two vehicles to touch.
2. Apply the parking brake. Move the shif t lever to P (Park). Switch off all unneces-
sary electrical systems (lights, heater, air
conditioner, etc.). 3. Connect the jumper cables in the se-
quence illustrated (OA,OB,OC,OD).
LCE2223
6-12In case of emergency
Page 363 of 492
CAUTION
• Do not push start this vehicle. The
three-way catalyst may be
damaged.
• Automatic transmission models can-
not be push-started or tow-started.
Attempting to do so may cause
transmission damage.WARNING
• Do not continue to drive if your ve-
hicle overheats. Doing so could cause
engine damage or a vehicle fire.
• To avoid the danger of being scalded,
never remove the radiator or coolant
reservoir cap while the engine is still
hot. When the radiator or coolant res-
ervoir cap is removed, pressurized
hot water will spurt out, possibly
causing serious injury.
• Do not open the hood if steam is
coming out.
If your vehicle is overheating (indicated by
an extremely high temperature gauge
reading), or if you feel a lack of engine
power, detect abnormal noise, etc. take the
following steps.
1. Move the vehicle safely off the road, ap- ply the parking brake and move the shif t
lever to P (Park).
Do not stop the engine.
2. Turn off the air conditioner. Open all the windows, move the heater or air condi-
tioner temperature control to maximum
hot and fan control to high speed. 3. Get out of the vehicle. Look and listen for
steam or coolant escaping from the ra-
diator before opening the hood. If steam
or coolant is escaping, turn off the en-
gine. Do not open the hood further until
no steam or coolant can be seen.
4. Open the engine hood.
Page 391 of 492
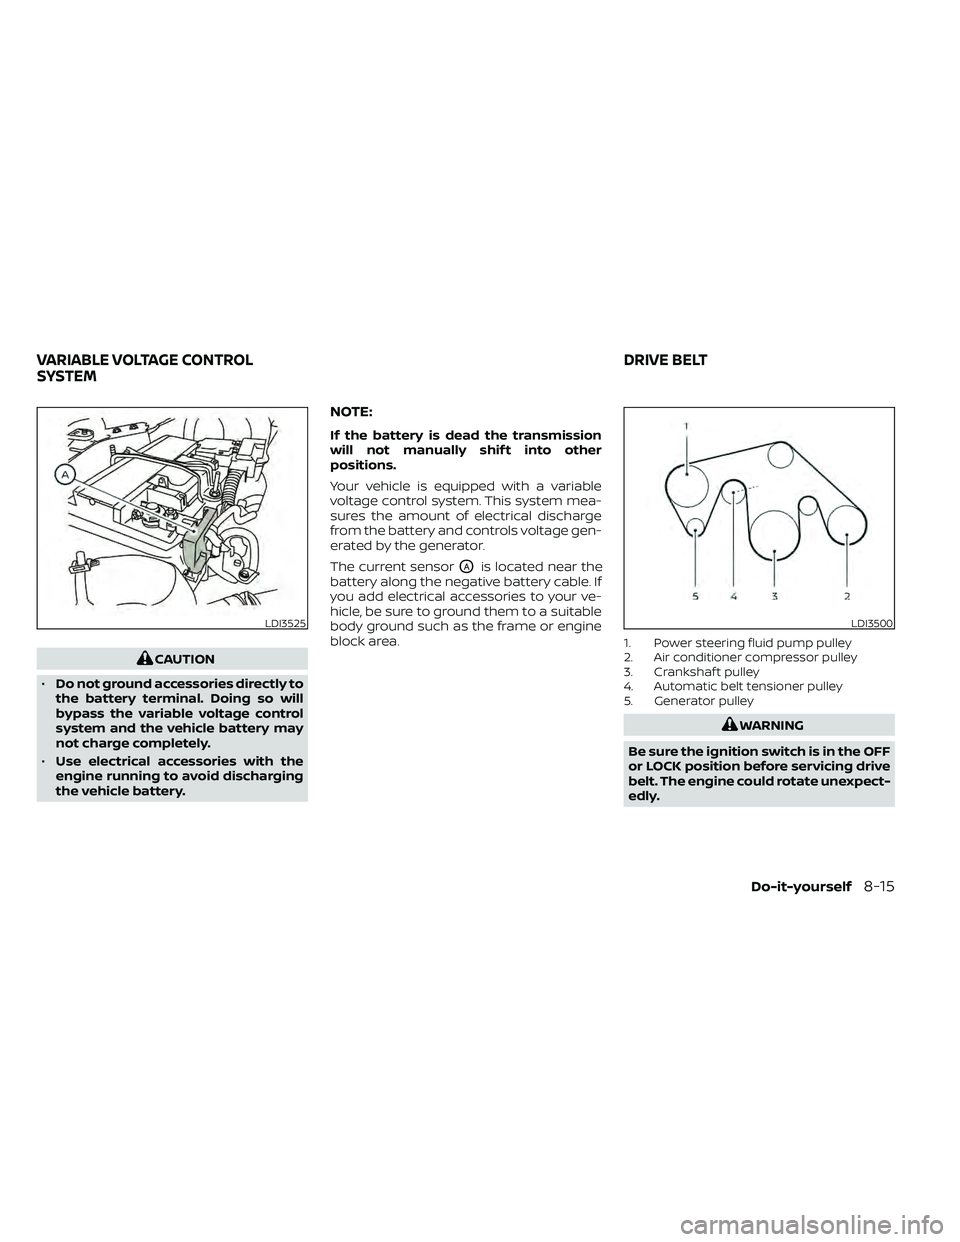
CAUTION
• Do not ground accessories directly to
the battery terminal. Doing so will
bypass the variable voltage control
system and the vehicle battery may
not charge completely.
• Use electrical accessories with the
engine running to avoid discharging
the vehicle battery.
NOTE:
If the battery is dead the transmission
will not manually shif t into other
positions.
Your vehicle is equipped with a variable
voltage control system. This system mea-
sures the amount of electrical discharge
from the battery and controls voltage gen-
erated by the generator.
The current sensor
OAis located near the
battery along the negative battery cable. If
you add electrical accessories to your ve-
hicle, be sure to ground them to a suitable
body ground such as the frame or engine
block area.
1. Power steering fluid pump pulley
2. Air conditioner compressor pulley
3. Crankshaf t pulley
4. Automatic belt tensioner pulley
5. Generator pulley
LDI3500
VARIABLE VOLTAGE CONTROL
SYSTEM DRIVE BELT
Do-it-yourself8-15
Page 398 of 492
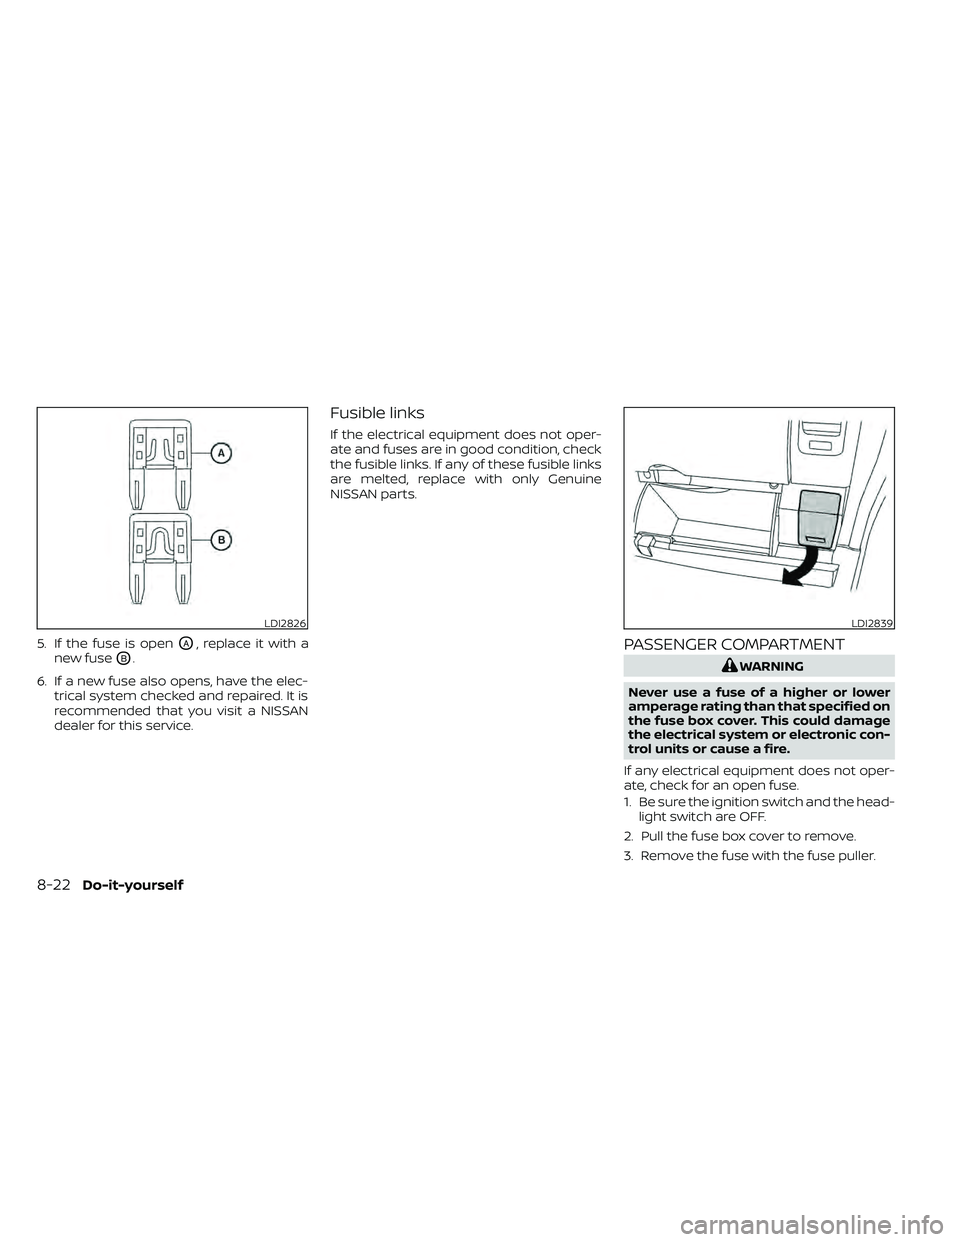
5. If the fuse is openOA, replace it with a
new fuse
OB.
6. If a new fuse also opens, have the elec- trical system checked and repaired. It is
recommended that you visit a NISSAN
dealer for this service.
Fusible links
If the electrical equipment does not oper-
ate and fuses are in good condition, check
the fusible links. If any of these fusible links
are melted, replace with only Genuine
NISSAN parts.
PASSENGER COMPARTMENT
LDI2826LDI2839
8-22Do-it-yourself
Page 407 of 492
TPMS will activate only when the vehicle is
driven at speeds above 16 mph (25 km/h).
Also, this system may not detect a sudden
drop in tire pressure (for example, a flat tire
while driving).
For additional information, refer to “Low tire
pressure warning light” in the “Instruments
and controls” section, “Tire Pressure Moni-
toring System (TPMS)” in the “Starting and
driving” section, and “Flat tire” in the “In case
of emergency” section of this manual.
Tire inflation pressure
Check the tire pressures (including the
spare) of ten and always prior to long dis-
tance trips. The recommended tire pres-
sure specifications are shown on the
F.M.V.S.S./C.M.V.S.S. certification label or the
Tire and Loading Information label under
the “Cold Tire Pressure” heading. The Tire
and Loading Information label is affixed to
the driver side center pillar. Tire pressures
should be checked regularly because:
• Most tires naturally lose air over time.
• Tires can lose air suddenly when drivenover potholes or other objects or if the
vehicle strikes a curb while parking. The tire pressures should be checked
when the tires are cold. The tires are con-
sidered COLD af ter the vehicle has been
parked for 3 or more hours, or driven less
than 1 mile (1.6 km) at moderate speeds.
Incorrect tire pressure, including under
inflation, may adversely affect tire life
and vehicle handling.
WARNING
• Improperly inflated tires can fail sud-
denly and cause an accident.
• The Gross Vehicle Weight Rating
(GVWR) is located on the F.M.V.S.S./
C.M.V.S.S. certification label. The ve-
hicle weight capacity is indicated on
the Tire and Loading Information la-
bel. Do not load your vehicle beyond
this capacity. Overloading your ve-
hicle may result in reduced tire life,
unsafe operating conditions due to
premature tire failure, or unfavorable
handling characteristics and could
also lead to a serious accident. Load-
ing beyond the specified capacity
may also result in failure of other ve-
hicle components. •
Before taking a long trip, or when-
ever you heavily load your vehicle,
use a tire pressure gauge to ensure
that the tire pressures are at the
specified level.
• For additional information regarding
tires, refer to “Important Tire Safety
Information” (US) or “Tire Safety In-
formation” (Canada) in the Warranty
Information Booklet.
Do-it-yourself8-31
Page 420 of 492
Some day-to-day and regular mainte-
nance is essential to maintain your vehicle
good mechanical condition, as well as its
emissions and engine performance.
It is the owner's responsibility to make sure
that the scheduled maintenance, as well as
general maintenance, is performed.
As the vehicle owner, you are the only one
who can ensure that your vehicle receives
proper maintenance. You are a vital link in
the maintenance chain.
GENERAL MAINTENANCE
General maintenance includes those items
which should be checked during normal
day-to-day operation. They are essential
for proper vehicle operation. It is your re-
sponsibility to perform these procedures
regularly as prescribed.
Performing general maintenance checks
requires minimal mechanical skill and only
a few general automotive tools.
These checks or inspections can be done
by yourself, a qualified technician or, if you
prefer, a NISSAN dealer.
SCHEDULED MAINTENANCE
The maintenance items listed in this sec-
tion are required to be serviced at regular
intervals. However under severe driving
conditions, additional or more frequent
maintenance will be required.
WHERE TO GO FOR SERVICE
If maintenance service is required or your
vehicle appears to malfunction, have the
systems checked and serviced. It is recom-
mended that you visit a NISSAN dealer for
this service.
NISSAN technicians are well-trained spe-
cialists and are kept up-to-date with the
latest service information through techni-
cal bulletins, service tips and training pro-
grams. They are fully qualified to work on
NISSAN vehiclesbeforework begins.
If your vehicle is involved in a collision, it is
recommended that you ask your NISSAN
dealer where the nearest NISSAN Certified
Collision Center is located, or go to http://
collision.nissanusa.com.
You can be confident that a NISSAN deal-
er's service department can perform the
service needed to meet the maintenance
requirements on your vehicle. During the normal day-to-day operation of
the vehicle, general maintenance should
be performed regularly as prescribed in
this section. If you detect any unusual
sounds, vibrations or smells, be sure to
check for the cause or have it checked
promptly. In addition, it is recommended
that you visit a NISSAN dealer if you think
that repairs are required.
When performing any checks or mainte-
nance work, closely observe the “Mainte-
nance precautions” in the “Do-it-yourself ”
section of this manual.
EXPLANATION OF GENERAL
MAINTENANCE ITEMS
Additional information on the following
items with“*”isf
ound in the “Do-it-
yourself ” section of this manual.
Outside the vehicle
The maintenance items listed here should
be performed from time to time, unless
otherwise specified.
Doors and engine hood: Check that the
doors and engine hood operate properly.
Also ensure that all latches lock securely.
Lubricate hinges, latches, latch pins, rollers
and links if necessary. Make sure that the
MAINTENANCE REQUIREMENTS GENERAL MAINTENANCE
9-2Maintenance and schedules