2021 NISSAN FRONTIER air condition
[x] Cancel search: air conditionPage 227 of 492
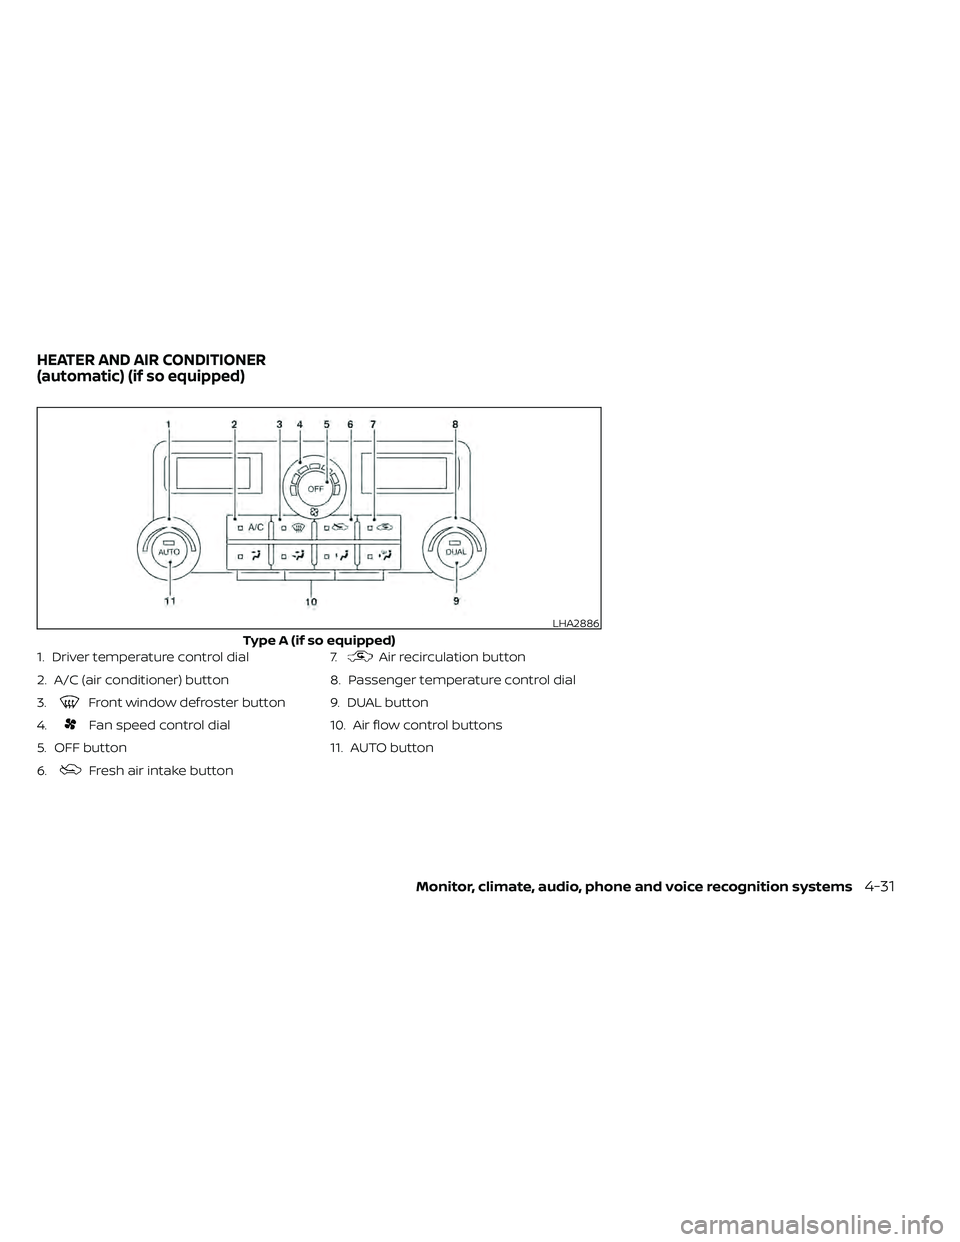
1. Driver temperature control dial
2. A/C (air conditioner) button
3.
Front window defroster button
4.
Fan speed control dial
5. OFF button
6.
Fresh air intake button 7.
Air recirculation button
8. Passenger temperature control dial
9. DUAL button
10. Air flow control buttons
11. AUTO button
LHA2886
Type A (if so equipped)
HEATER AND AIR CONDITIONER
(automatic) (if so equipped)
Monitor, climate, audio, phone and voice recognition systems4-31
Page 228 of 492
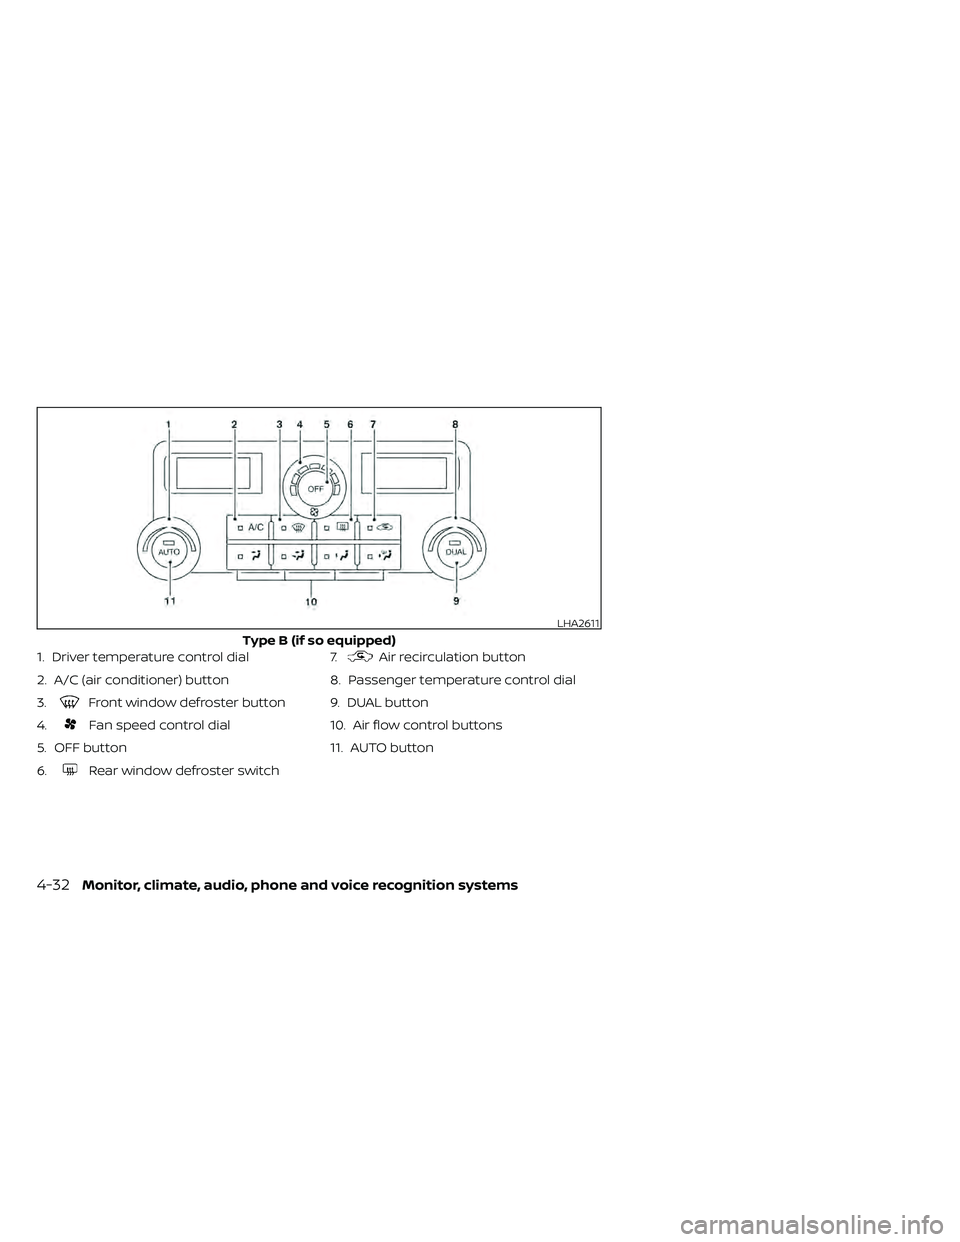
1. Driver temperature control dial
2. A/C (air conditioner) button
3.
Front window defroster button
4.
Fan speed control dial
5. OFF button
6.
Rear window defroster switch 7.
Air recirculation button
8. Passenger temperature control dial
9. DUAL button
10. Air flow control buttons
11. AUTO button
LHA2611
Type B (if so equipped)
Page 229 of 492
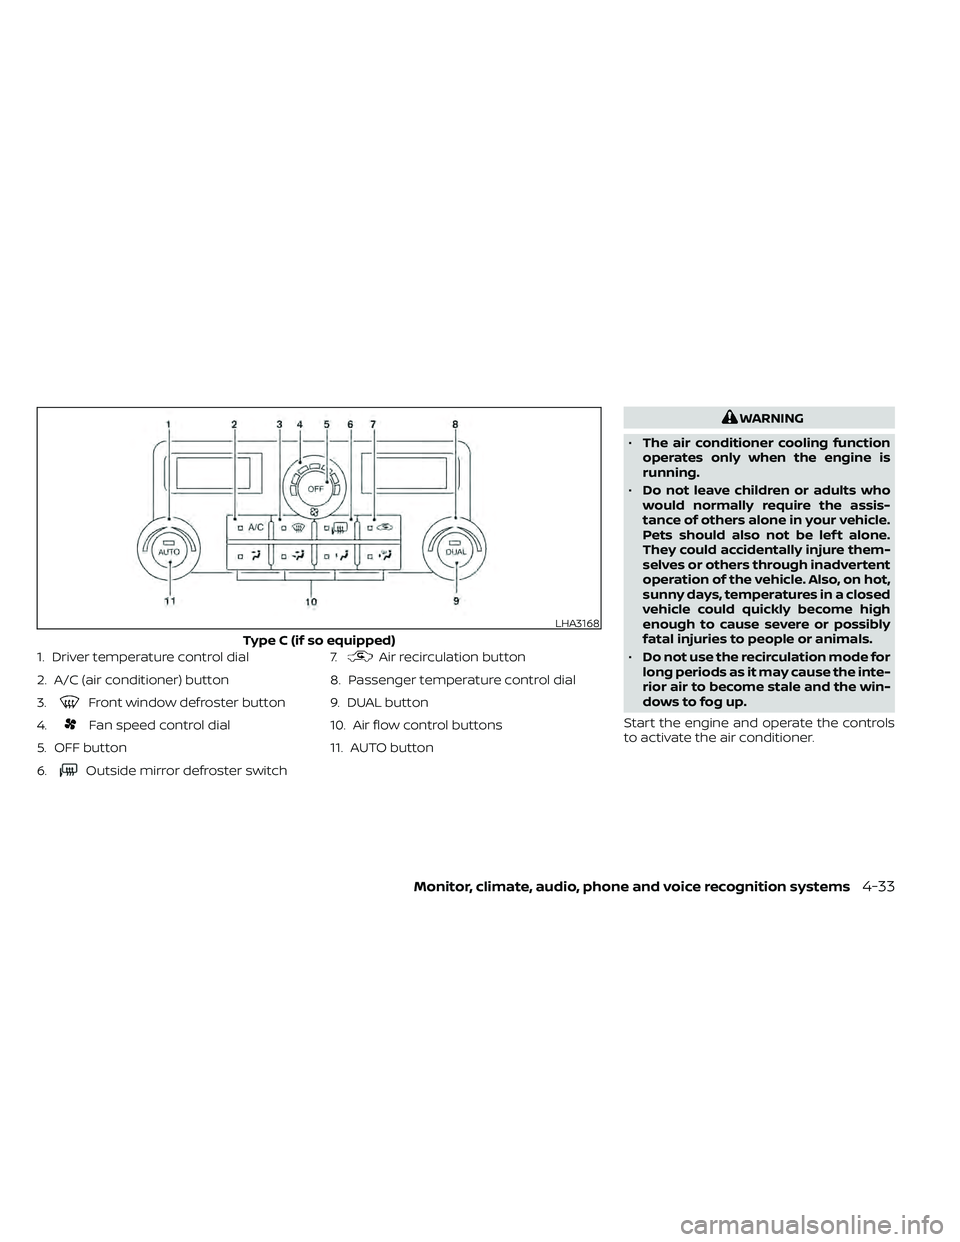
1. Driver temperature control dial
2. A/C (air conditioner) button
3.
Front window defroster button
4.
Fan speed control dial
5. OFF button
6.
Outside mirror defroster switch 7.
Air recirculation button
8. Passenger temperature control dial
9. DUAL button
10. Air flow control buttons
11. AUTO button
LHA3168
Type C (if so equipped)
Monitor, climate, audio, phone and voice recognition systems4-33
Page 230 of 492
NOTE:
• Odors from inside and outside the ve-hicle can build up in the air conditioner
unit. Odor can enter the passenger
compartment through the vents.
• When parking, set the heater and air conditioner controls to turn off air re-
circulation to allow fresh air into the
passenger compartment. This should
help reduce odors inside the vehicle.
AUTOMATIC OPERATION
Cooling or heating (auto)
This mode may be normally used all year
round as the system automatically works
to keep a constant temperature. Air flow
distribution and fan speed are also con-
trolled automatically.
1. Press the AUTO button on.
2. Turn the temperature dial to the lef t or right to set the desired temperature.
Driver and passenger temperatures can
be set independently. Press DUAL to ac-
tivate dual climate control functions.
Turn the passenger's side temperature
control dial to the lef t or right to set the
desired passenger's temperature. • Adjust the temperature dial to about 75°F
(24°C) for normal operation.
• The temperature of the passenger com- partment will be maintained automati-
cally. Air flow distribution, fan speed and
A/C on/off are also controlled automati-
cally.
• A visible mist may be seen coming from the vents in hot, humid conditions as the
air is cooled rapidly. This does not indicate
a malfunction.
Heating (A/C OFF)
The air conditioner does not activate. When
you need to heat only, use this mode.
1. Press the AUTO button.
2. Turn the temperature control dial to set the desired temperature.
• The temperature of the passenger com- partment will be maintained automati-
cally. Air flow distribution and fan speed
are also controlled automatically.
• Do not set the temperature lower than the outside air temperature. Otherwise,
the system may not work properly.
• Not recommended if windows fog up.
Dehumidified defrosting or
defogging
1. Push thedefroster control switch
to turn the system on. The indicator light
in the button will illuminate.
2. Turn the temperature dial to the lef t or right to set the desired temperature.
• To quickly remove ice from the outside of the windows, turn the manual fan control
to the maximum position.
• As soon as possible af ter the windshield is clean, press the AUTO button to return
to the auto mode.
• When the
control is activated, the air
conditioner will automatically be turned
on at outside temperatures above 36°F
(2°C). If in defrost mode for more than 1
minute, the air conditioning system will
continue to operate until the fan control
is turned OFF, the vehicle is shut off or the
A/C button is used to turn off the com-
pressor even if an air flow button other
than
is selected. This dehumidifies
the air which helps defog the windshield.
The air recirculation mode automatically
turns off, allowing outside air to be drawn
into the passenger compartment to fur-
ther improve the defogging perfor-
mance.
4-34Monitor, climate, audio, phone and voice recognition systems
Page 231 of 492
MANUAL OPERATION
Fan speed control
Turn thefan speed control dial to
manually control the fan speed.
Press the AUTO button to return to auto-
matic control of the fan speed.
Air recirculation
Press the air recirculation buttonto
recirculate interior air inside the vehicle.
Press the AUTO button to return to auto-
matic mode.
The air recirculation cannot be activated
when the air conditioner is in the
front
defogging mode.
Fresh air intake (if so equipped)
Press thefresh air intake button to
draw outside air into the passenger com-
partment. The
indicator light on the
button will come on.
A/C (air conditioner) button
Start the engine, turn thefan speed
control dial to the desired position and
press the
button to turn on the air
conditioner. To turn off the air conditioner,
press the
button again. The air conditioner cooling function op-
erates only when the engine is running.
Air flow control
Press the air flow control buttons to manu-
ally control air flow and select the air outlet:
— Air flows from center and side
vents.
— Air flows from center and sidevents and foot outlets.
— Air flows mainly from foot outlets.— Air flows from defroster and footoutlets.
— Air flows from defroster outlets.
To turn system off
Press the OFF button.
Rear window or outside mirror
defroster switch (if so equipped)
For additional information, refer to “Rear
window or outside mirror defroster switch”
in the “Instruments and controls” section of
this manual.
OPERATING TIPS
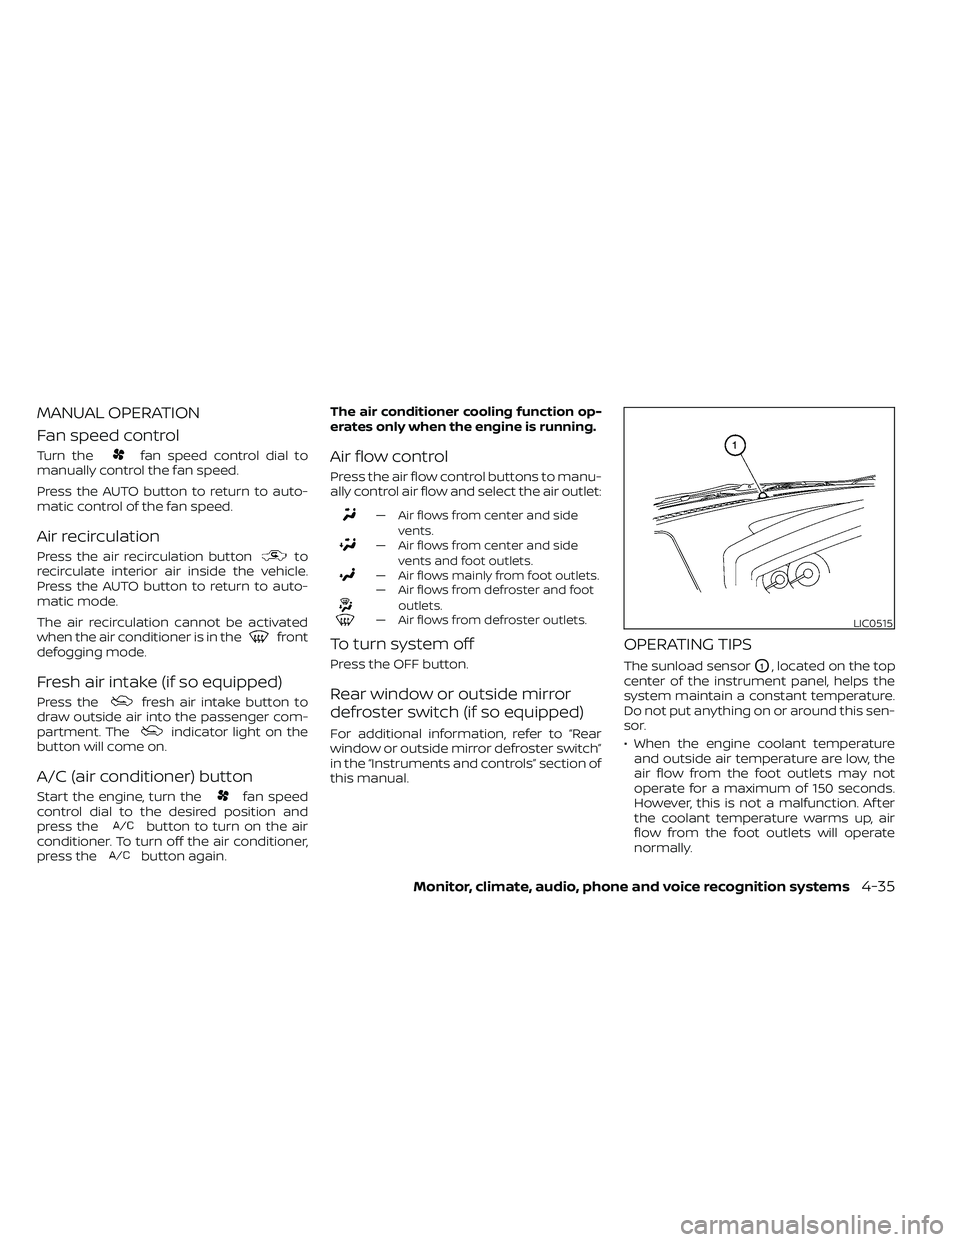
The sunload sensorO1, located on the top
center of the instrument panel, helps the
system maintain a constant temperature.
Do not put anything on or around this sen-
sor.
• When the engine coolant temperature and outside air temperature are low, the
air flow from the foot outlets may not
operate for a maximum of 150 seconds.
However, this is not a malfunction. Af ter
the coolant temperature warms up, air
flow from the foot outlets will operate
normally.
LIC0515
Page 232 of 492
The air conditioner system in your NISSAN
vehicle is charged with a refrigerant de-
signed with the environment in mind.
This refrigerant does not harm the
earth's ozone layer.
Special charging equipment and lubricant
is required when servicing your NISSAN air
conditioner. Using improper refrigerants or
lubricants will cause severe damage to
your air conditioner system. For additional
information, refer to “Air conditioner sys-
tem refrigerant and oil recommendations”
in the “Technical and consumer informa-
tion” section of this manual.
It is recommended that you visit a NISSAN
dealer to service your “environmentally
friendly ” air conditioning system.
(power) or
ON•OFF button to turn the radio on. If you
listen to the radio with the engine not run-
ning, the ignition should be placed in the
ACC position.
Radio reception is affected by station sig-
nal strength, distance from radio transmit-
ter, buildings, bridges, mountains and other
external influences. Intermittent changes
in reception quality normally are caused by
these external influences.
Using a cellular phone in or near the vehicle
may influence radio reception quality.
Radio reception
Your NISSAN radio system is equipped with
state-of-the-art electronic circuits to en-
hance radio reception. These circuits are
designed to extend reception range, and to
enhance the quality of that reception.
However, there are some general charac-
teristics of both FM and AM radio signals
that can affect radio reception quality in a
moving vehicle, even when the finest
equipment is used. These characteristics
are completely normal in a given reception
area and do not indicate any malfunction
in your NISSAN radio system. Reception conditions will constantly
change because of vehicle movement.
Buildings, terrain, signal distance and inter-
ference from other vehicles can work
against ideal reception. Described below
are some of the factors that can affect your
radio reception.
Some cellular phones or other devices may
cause interference or a buzzing noise to
come from the audio system speakers.
Storing the device in a different location
may reduce or eliminate the noise.
FM RADIO RECEPTION
Range: FM range is normally limited to 25 –
30 mi (40 – 48 km), with monaural (single
channel) FM having slightly more range
than stereo FM. External influences may
sometimes interfere with FM station re-
ception even if the FM station is within 25
mi (40 km). The strength of the FM signal is
directly related to the distance between
the transmitter and receiver. FM signals fol-
low a line-of-sight path, exhibiting many of
the same characteristics as light. For ex-
ample, they will reflect off objects.
Fade and drif t: As your vehicle moves away
from a station transmitter, the signals will
tend to fade and/or drif t.
SERVICING AIR CONDITIONER
AUDIO SYSTEM
4-36Monitor, climate, audio, phone and voice recognition systems
Page 243 of 492
FM radio operation
Press theMENU button and touch the
“FM” key or press the AUDIO button and
select FM on the bottom of the Launch Bar
to bring up the FM display screen.
If another audio source is playing when the
“FM” key is pressed, the audio source play-
ing will automatically be turned off and the
last radio station played will begin playing.
The FM stereo indicator (STEREO) is shown
on the screen during FM stereo reception.
When the stereo broadcast signal is weak,
the radio automatically changes from ste-
reo to monaural reception.
FM Menu
Touch the “FM Menu” key to display the FM
Menu screen options:
• SCAN: To scan tune the stations, touch the “FM Menu” key on the radio screen
and then touch the “SCAN” key. The sta-
tions will be tuned from low to high fre-
quencies and stop at each broadcasting
stations for several seconds. Touching
the “SCAN” key again during this period of
several seconds will stop tuning and the
radio will remain tuned to that station. • Refresh: Touch the “Refresh” key to up-
date the station list displayed on the right
side of the FM Menu screen.
• RDS Info: Radio station and song informa- tion can be displayed on the FM display
screen.
orbuttons to tune
from low to high or high to low frequencies
and to stop at the next broadcasting sta-
tion.
1 to 12 Station memory operations
Up to 12 stations can be registered in the
preset list.
1. Select the FM radio band.
2. Tune to the station you wish to store.
3. Touch and hold one of the preset num- bers in the preset list.
The information such as frequency will be
displayed on the preset list.
To select and listen to the preset stations,
push
oron the steering wheel
briefly or touch a preferred station on the
preset list on the radio screen.
Auxiliary (AUX) devices operation
Connecting auxiliary devices
Connect an AUX device into the AUX input
jack located on the center console below
the heater and air conditioner controls.
The AUX input jack accepts any standard
analog audio input such as from a portable
cassette player, CD player, MP3 player or
phone.
Insert a 1/8 in (3.5 mm) stereo mini plug in
the audio input jack. If a cable with a mono
plug is used, the audio output may not
function normally.
Activation and playing
Turn on the AUX device. Connect an AUX
cable to the AUX device and the AUX input
jack. Select AUX mode from the audio
source menu screen or by pressing the
Source button on the steering wheel.
Monitor, climate, audio, phone and voice recognition systems4-47
Page 257 of 492
CAUTION
• Do not force the USB device into the
USB port. Inserting the USB device
tilted or up-side-down into the port
may damage the port. Make sure
that the USB device is connected cor-
rectly into the USB port.
• Do not grab the USB port cover (if so
equipped) when pulling the USB de-
vice out of the port. This could dam-
age the port and the cover.
• Do not leave the USB cable in a place
where it can be pulled unintention-
ally. Pulling the cable may damage
the port.
For additional information, refer to your de-
vice manufacturer’s owner information re-
garding the proper use and care of the
device.
To connect an iPod® to the vehicle so that
the iPod® can be controlled with the audio
system controls and display screen, use
the USB connection port located on the
center console below the heater and air
conditioner controls. Connect the iPod®-
specific end of the cable to the iPod® and
the USB end of the cable to the USB con-
nection port on the vehicle. If your iPod®
supports charging via a USB connection, its battery will be charged while connected to
the vehicle with the ignition switch in the
ON position. The port is illuminated for bet-
ter visibility when the headlight switch is in
the ON position.
While connected to the vehicle, the iPod®
can only be operated by the vehicle audio
controls.
To disconnect the iPod® from the vehicle,
remove the USB end of the cable from the
USB connection port on the vehicle, then
remove the cable from the iPod®.
* iPod® is a trademark of Apple Inc., regis-
tered in the U.S. and other countries.
Compatibility
The following models are compatible:
• iPod® Classic 5th generation (firmware
version 1.3.0 or later)
• iPod® Classic 6th generation (firmware version 2.0.1 or later)
• iPod® Classic 7th generation (firmware version 2.0.4 or later)
• iPod® Touch 2nd generation (firmware version 4.2.1 or later)*
• iPod® Touch 3rd generation (firmware version 5.1 or later) • iPod® Touch 4th generation (firmware
version 5.1 or later)
• iPod® nano - 1st generation (firmware version 1.3.1 or later)
• iPod® nano - 2nd generation (firmware version 1.1.3 or later)
• iPod® nano - 3rd generation (firmware version 1.1.3 or later)
• iPod® nano - 4th generation (firmware version 1.0.4 or later)
• iPod® nano - 5th generation (firmware version 1.0.2 or later)
• iPod® nano - 6th generation (firmware version 1.1 or later)
• iPhone® 3G (firmware version 4.2.1 or later)
• iPhone® 3GS (firmware version 5.1 or later)
• iPhone® 4 (firmware version 5.1 or later)
• iPhone® 4S (firmware version 5.1 or later)
* Some features of this iPod® may not be
fully functional.
Make sure that your iPod® firmware is up-
dated to the version indicated above.
Monitor, climate, audio, phone and voice recognition systems4-61