2021 NISSAN ARMADA ESP
[x] Cancel search: ESPPage 28 of 603

1-10Safety — seats, seat belts and supplemental restraint system
This can be dangerous. The
shoulder belt will not be against
your body. In an accident, you
could be thrown into it and re-
ceive neck or other serious inju-
ries. You could also slide under
the lap belt and receive serious
internal injuries.
. For the most effective protection
when the vehicle is in motion, the
seat should be upright. Always sit
well back and upright in the seat
with both feet on the floor and
adjust the seat belt properly. See
“Precautions on seat belt usage”
(P.1-20).
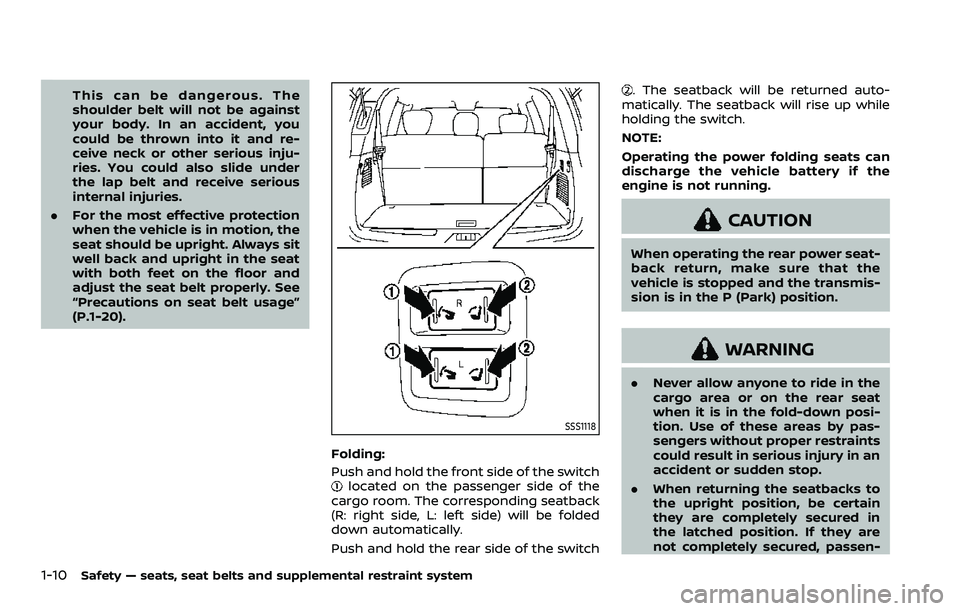
SSS1118
Folding:
Push and hold the front side of the switch
located on the passenger side of the
cargo room. The corresponding seatback
(R: right side, L: left side) will be folded
down automatically.
Push and hold the rear side of the switch
. The seatback will be returned auto-
matically. The seatback will rise up while
holding the switch.
NOTE:
Operating the power folding seats can
discharge the vehicle battery if the
engine is not running.
CAUTION
When operating the rear power seat-
back return, make sure that the
vehicle is stopped and the transmis-
sion is in the P (Park) position.
WARNING
. Never allow anyone to ride in the
cargo area or on the rear seat
when it is in the fold-down posi-
tion. Use of these areas by pas-
sengers without proper restraints
could result in serious injury in an
accident or sudden stop.
. When returning the seatbacks to
the upright position, be certain
they are completely secured in
the latched position. If they are
not completely secured, passen-
Page 31 of 603

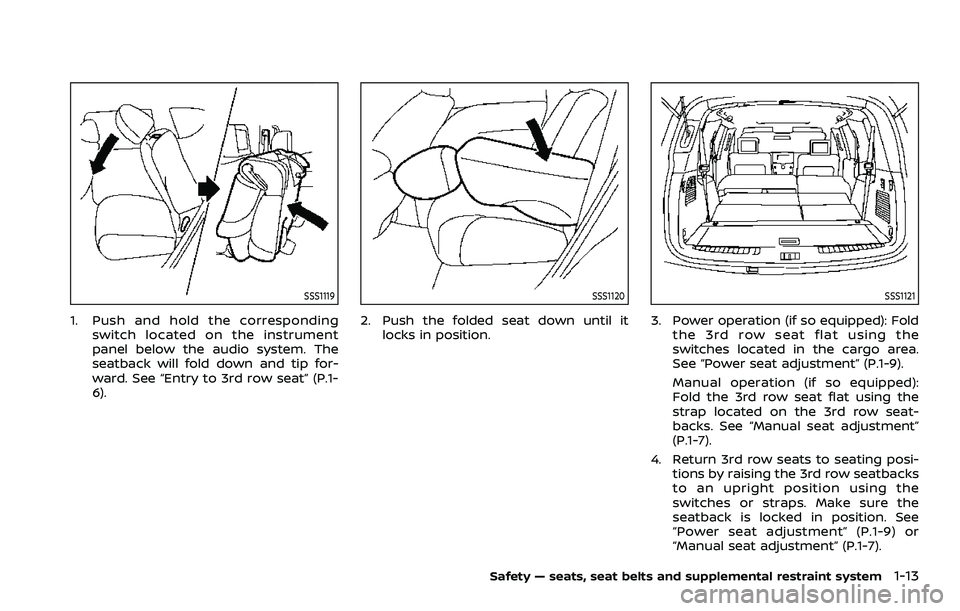
SSS1119
1. Push and hold the correspondingswitch located on the instrument
panel below the audio system. The
seatback will fold down and tip for-
ward. See “Entry to 3rd row seat” (P.1-
6).
SSS1120
2. Push the folded seat down until itlocks in position.
SSS1121
3. Power operation (if so equipped): Fold the 3rd row seat flat using the
switches located in the cargo area.
See “Power seat adjustment” (P.1-9).
Manual operation (if so equipped):
Fold the 3rd row seat flat using the
strap located on the 3rd row seat-
backs. See “Manual seat adjustment”
(P.1-7).
4. Return 3rd row seats to seating posi- tions by raising the 3rd row seatbacks
to an upright position using the
switches or straps. Make sure the
seatback is locked in position. See
“Power seat adjustment” (P.1-9) or
“Manual seat adjustment” (P.1-7).
Safety — seats, seat belts and supplemental restraint system1-13
Page 49 of 603

seat. Studies show that children are
safer when properly restrained in the
rear seat than in the front seat.
This is especially important because
your vehicle has a supplemental re-
straint system (Air bag system) for the
front passenger. See “Supplemental re-
straint system” (P.1-54).
INFANTS
Infants up to at least 1 year old should be
placed in a rear-facing child restraint.
NISSAN recommends that infants be
placed in child restraints that comply with
Federal Motor Vehicle Safety Standards
or Canadian Motor Vehicle Safety Stan-
dards. You should choose a child restraint
that fits your vehicle and always follow
the manufacturer’s instructions for instal-
lation and use.
SMALL CHILDREN
Children that are over 1 year old and
weigh at least 20 lbs (9 kg) should remain
in a rear-facing child restraint as long as
possible up to the height or weight limit
of the child restraint. Children who out-
grow the height or weight limit of the
rear-facing child restraint and are at least
1 year old should be secured in a forward-
facing child restraint with a harness. Refer
to the manufacturer’s instructions for
minimum and maximum weight andheight recommendations. NISSAN recom-
mends that small children be placed in
child restraints that comply with Federal
Motor Vehicle Safety Standards or Cana-
dian Motor Vehicle Safety Standards. You
should choose a child restraint that fits
your vehicle and always follow the man-
ufacturer’s instructions for installation
and use.
LARGER CHILDREN
Children should remain in a forward-
facing child restraint with a harness until
they reach the maximum height or
weight limit allowed by the child restraint
manufacturer.
Once a child outgrows the height or
weight limit of the harness-equipped
forward-facing child restraint, NISSAN
recommends that the child be placed in
a commercially available booster seat to
obtain proper seat belt fit. For a seat belt
to fit properly, the booster seat should
raise the child so that the shoulder belt is
properly positioned across the chest and
the top, middle portion of the shoulder.
The shoulder belt should not cross the
neck or face and should not fall off the
shoulder. The lap belt should lie snugly
across the lower hips or upper thighs, not
the abdomen.
A booster seat can only be used in
seating positions that have a three-pointtype seat belt. The booster seat should fit
the vehicle seat and have a label certify-
ing that it complies with Federal Motor
Vehicle Safety Standards or Canadian
Motor Vehicle Safety Standards.
A booster seat should be used until the
child can pass the seat belt fit test below:
.
Are the child’s back and hips against
the vehicle seatback?
. Is the child able to sit without slouch-
ing?
. Do the child’s knees bend easily over
the front edge of the seat with feet flat
on the floor?
. Can the child safely wear the seat belt
(lap belt low and snug across the hips
and shoulder belt across mid-chest
and shoulder)?
. Is the child able to use the properly
adjusted head restraint/headrest?
. Will the child be able to stay in position
for the entire ride?
Safety — seats, seat belts and supplemental restraint system1-31
Page 77 of 603

SSS0159
WARNING
Front seat-mounted side-impact
supplemental air bags and roof-
mounted curtain side-impact and
rollover supplemental air bags:
.The side air bags ordinarily will
not inflate in the event of a front
impact, rear impact, rollover, or
lower severity side collision. Al-
ways wear your seat belts to help
reduce the risk or severity of
injury in various kinds of acci-
dents. .
The curtain air bags ordinarily will
not inflate in the event of a front
impact, rear impact, or lower
severity side collision. Always
wear your seat belts to help
reduce the risk or severity of
injury in various kinds of acci-
dents.
. The seat belts, the side air bags
and curtain air bags are most
effective when you are sitting
well back and upright in the seat.
The side air bags and curtain air
bags inflate with great force. Do
not allow anyone to place their
hand, leg or face near the side air
bags on the side of the seatback
of the front seat or near the side
roof rails. Do not allow anyone
sitting in the front seats or rear
outboard seats to extend their
hand out of the window or lean
against the door. Some examples
of dangerous riding positions are
shown in the previous illustra-
tions.
. When sitting in the rear seat, do
not hold onto the seatback of the
front seat. If the side air bag
inflates, you may be seriously
injured. Be especially careful with
children, who should always be properly restrained. Some exam-
ples of dangerous riding posi-
tions are shown in the
illustrations.
. Do not use seat covers on the
front seatbacks. They may inter-
fere with side air bags inflation.
Safety — seats, seat belts and supplemental restraint system1-59
Page 116 of 603

2-24Instruments and controls
options:
.Auto Room Lamp
The interior light can be set to be ON
or OFF. Use the OK
button to turn
this feature ON or OFF.
. Auto Headlight
The sensitivity of the Intelligent Auto
Headlight can be adjusted. From the
“Lighting” menu, select “Auto Head-
light”. Use the
buttonsand the
OKbutton to select the required
sensitivity. The following options are
available:
— Turn on earliest
— Turn on earlier
— Turn on standard
— Turn on later
. Light Off Delay
The duration of the automatic head-
lights can be changed from 0 to 180
seconds. Use the OK
button to
change the duration.
Locking:
The “Locking” menu has the following
options:
. Ext. Door Switch (if so equipped)
When this item is turned on, the
request switch on the door is acti-
vated. Use the OK
button to activate
or deactivate this function. .
Selective Unlock (if so equipped)
When this item is turned on, and the
door handle request switch is pushed,
only the corresponding door is un-
locked. All the doors can be unlocked
if the door handle request switch is
pushed again within 1 minute. When
this item is turned to off, all the doors
will be unlocked when the door han-
dle request switch is pushed once. Use
the OK
button to activate or deac-
tivate this function.
. Auto Door Unlock
The “Auto Door Unlock” feature allows
user to customize the auto door
unlock options. Use the OK
button
to change the mode.
— Shift to P
— IGN OFF
— OFF
Wipers (if so equipped):
The “Wipers” menu has the following
options:
. Speed Dependent
The “Speed Dependent” feature can be
activated or deactivated. Use the OK
button to turn this feature ON or OFF. Driving Position (if so equipped):
.
Exit Seat Slide
This allows user to turn the entry/exit
function ON or OFF. Use the OK
button to turn this function ON or OFF.
(See “Memory seat” (P.3-40).)
. Exit Steering Up (if so equipped)
This allows user to turn the entry/exit
function ON or OFF. Use the OK
button to turn this function ON or OFF.
(See “Memory seat” (P.3-40).)
Rear Door Alert:
The “Rear Door Alert” feature allows user
to customize the Rear Door Alert options.
Use the OK
button to change the mode.
. Horn & Alert
When selected, the alert is displayed
and the horn sounds.
. Alert Only
When selected, only the alert is dis-
played.
. OFF
When selected, no alert or horn will be
active.
(See “Rear door alert” (P.2-58).)
ACC Off Delay (if so equipped):
This allows user to turn the ACC delay
timer function ON or OFF. (See “ACC
(Accessories) delay timer function” (P.5-
Page 126 of 603

2-34Instruments and controls
able Alert” turns off the Rear Door
Alert system for the remainder of a
trip and no audible alert will be
provided.
NOTE:
This system is disabled until the driver
enables it using the settings menu. See
“Vehicle settings” (P.2-23).
43. Check Rear Seat for all articles
When the rear door alert system is
enabled, this message appears when the
vehicle comes to a complete stop, the
shift lever is moved from the D (Drive) or R
(Reverse) position to P (Park) position, and
the driver exits the vehicle. This message
alerts the driver, after a period of time, to
check for items in the rear seat after the
audible alert has been provided.
NOTE:
This rear door alert system is disabled
until a driver enables it using the rear
door alert switch.
For more details, see “Rear door alert”
(P.2-58).
44. Rear Seat Belt warning
This rear seat belt warning appears after
the ignition switch is pushed to the ON
position. If any of the rear passenger’s
seat belts is not fastened, the seat icon
illuminates in red to show which seat belt
is not fastened. The seat icon illuminates
in red until the corresponding rear pas-
senger’s seat belt is fastened. The warn-
ing will automatically turn off after
approximately 65 seconds. If so equipped,
the seat icon will turn gray if the seat is
occupied and the passenger is buckled. If
a rear passenger seat belt is fastened
then unfastened at a vehicle speed less
than approximately 10 MPH (15 km/h), the
seat icon will illuminate. When the vehicle
speed exceeds approximately 10 MPH (15
km/h), the seat icon will blink and the
chime will sound. The warning will turn off
when a rear passenger seat belt is
fastened or automatically turn off ap-
proximately 65 seconds after the seat
belt is unfastened. For precautions on
seat belt usage, see “Seat belts” (P.1-20).
The display of the rear seat belt warning
varies depending on the number of seats.
45. Malfunction See Owner’s Man-
ual (if so equipped)
This warning appears when the Traffic
Sign Recognition (TSR) system malfunc-
tions. (See “Traffic Sign Recognition (TSR)”
(P.5-23).)
46. System fault See Owner’s Man-
ual
This warning appears when the Rear
Automatic Braking (RAB) system malfunc-
tions. (See “Rear Automatic Braking (RAB)”
(P.5-116).)
47. Take a Break? indicator
This indicator appears when the Intelli-
gent Driver Alertness (I-DA) system detect
that the driver attention is decreasing.
(See “Intelligent Driver Alertness (I-DA)”
(P.5-114).)
48. Intelligent Driver Alertness (I-DA)
malfunction
This warning appears when the Intelli-
gent Driver Alertness (I-DA) system mal-
functions. (See “Intelligent Driver Alertness
(I-DA)” (P.5-114).)
Page 132 of 603

2-40Instruments and controls
.Unlocking the door or opening the
liftgate without using the button on
the Intelligent Key, the door handle
request switch or the mechanical key.
(Even if the door is opened by releas-
ing the door inside lock knob, the
alarm will activate.)
. Opening the hood.
How to stop an activated alarm
The alarm will stop when a door is
unlocked by pushing the unlock button
on the Intelligent Key, the door handle
request switch or using the mechanical
key, or when the ignition switch is pushed
to the ACC or ON position.
If the system does not operate as
described above, it is recommended
you have it checked by a NISSAN dealer.
NISSAN VEHICLE IMMOBILIZER SYS-
TEM
The NISSAN Vehicle Immobilizer System
will not allow the engine to start without
the use of the registered Intelligent Key.
Never leave these keys in the vehicle.
FCC Notice:
For USA:
This device complies with Part 15 of the
FCC Rules. Operation is subject to the
following two conditions: (1) This device
may not cause harmful interference, and (2) this device must accept any
interference received, including inter-
ference that may cause undesired op-
eration.
NOTE:
Changes or modifications not expressly
approved by the party responsible for
compliance could void the user’s
authority to operate the equipment.
For Canada:
This device complies with Industry Ca-
nada licence-exempt RSS standard(s).
Operation is subject to the following
two conditions: (1) this device may not
cause interference, and (2) this device
must accept any interference, including
interference that may cause undesired
operation of the device.
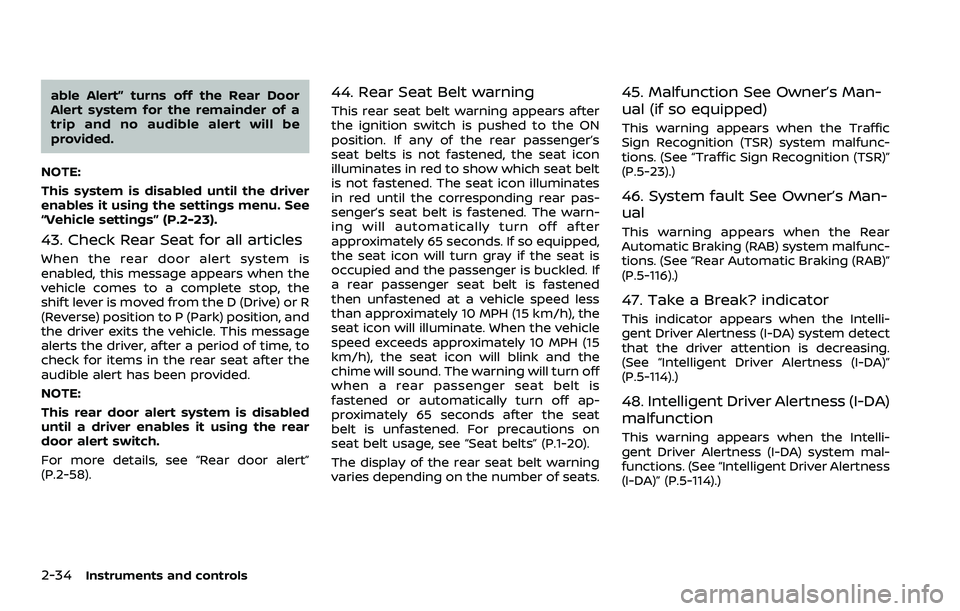
SIC2045
Security indicator light
The security indicator light is located on
the meter panel. It indicates the status of
the NISSAN Vehicle Immobilizer System.
The light blinks after the ignition switch
was in the ACC, OFF and LOCK position.
This function indicates the security sys-
tems equipped on the vehicle are opera-
tional.
If the NISSAN Vehicle Immobilizer System
is malfunctioning, this light will remain on
while the ignition switch is in the ON
position.
If the light still remains on and/or the
engine will not start, seek service for
Page 147 of 603

3. To turn off the heater, return theswitch to the level position. Make sure
the indicator light turns off.
The heater is controlled by a thermo-
stat, automatically turning the heater
on and off. The indicator light will
remain on as long as the switch is on.
When the vehicle’s interior is warmed,
or before you leave the vehicle, be
sure to turn off the switch.
WAC0640X
The climate controlled seat cools down
the front seats by blowing cool air from
the surface of the seat. The switches
located on the instrument panel can be
operated independently of each other.
1. Start the engine.
2. Push the climate controlled seatswitch to cool the seat. The indicator
light
on the corresponding switch
will illuminate depending on the cool
level.
3. Adjust the desired amount of air by pushing the switch again. The climate
controlled seat blower remains on low
speed for approximately 60 seconds
after pushing the switch on. 4. When the vehicle’s interior is warmed
or cooled, or before you leave the
vehicle, be sure to turn off the climate
controlled seats. To turn off the cli-
mate controlled seats, push the
switch until the indicator light turns
off.
To check the air filters for the climate
controlled seat, it is recommended
you visit a NISSAN dealer.
WARNING
Do not use or allow occupants to use
the climate controlled seats if you or
the occupants cannot monitor seat
temperatures or have an inability to
feel pain in those body parts in
contact with the seat. Use of the
climate controlled seats by such
people could result in serious injury.
CAUTION
.The battery could run down if the
climate controlled seat is oper-
ated while the engine is not run-
ning.
Instruments and controls2-55
CLIMATE CONTROLLED SEATS (if
so equipped)