2021 NISSAN ARMADA ESP
[x] Cancel search: ESPPage 182 of 603
2-90Instruments and controls
To clear all programming
1. Press and hold the two outerHomeLink® buttons until the indicator
light begins to flash in green and
“CLEARED” is displayed on the mirror,
in approximately 10 seconds. Do not
hold for longer than 20 seconds.
2. Release both buttons.
HomeLink® is now in the programming
mode and can be programmed at any
time beginning with “Programming
HomeLink®” - Step 1.
REPROGRAMMING A SINGLE
HomeLink® BUTTON
To reprogram a HomeLink® button, com-
plete the following.
1. Press and hold the desired HomeLink® button. DO NOT release the button.
2. The indicator light will illuminate in green, and after 20 seconds it will
begin to flash in orange and “TRAIN-
ING” is displayed on the mirror.
3. Release the HomeLink® button and proceed with “Programming
HomeLink®” — Step 3.
For questions or comments, contact
HomeLink® at: www.homelink.com/
nissan or 1-800-355-3515.
The HomeLink® button has now been
reprogrammed. The new device can be activated by pressing the HomeLink®
button that was just programmed. This
procedure will not affect any other pro-
grammed HomeLink® buttons.
If a new device is not programmed to the
HomeLink® button, it will revert to the
previously stored programming.
IF YOUR VEHICLE IS STOLEN
If your vehicle is stolen, you should
change the codes of any non-rolling code
device that has been programmed into
HomeLink®. Consult the Owner’s Manual
of each device or call the manufacturer or
dealer of those devices for additional
information.
When your vehicle is recovered, you will
need to reprogram the HomeLink® Uni-
versal Transceiver with your new trans-
mitter information.
FCC Notice:
For USA:
This device complies with Part 15 of the
FCC Rules. Operation is subject to the
following two conditions: (1) This device
may not cause harmful interference,
and (2) this device must accept any
interference received, including inter-
ference that may cause undesired op-
eration.
NOTE:
Changes or modifications not expressly
approved by the party responsible for
compliance could void the user’s
authority to operate the equipment.
For Canada:
This device complies with Industry Ca-
nada licence-exempt RSS standard(s).
Operation is subject to the following
two conditions: (1) this device may not
cause interference, and (2) this device
must accept any interference, including
interference that may cause undesired
operation of the device.
Page 188 of 603
3-6Pre-driving checks and adjustments
Lockout protection
When the power door lock switch (driver
or front passenger) is moved to the lock
position with any door open, all doors will
lock and unlock automatically. With the
Intelligent Key left in the vehicle and any
door open, all doors will unlock automa-
tically and a chime will sound after the
door is closed.
These functions help to prevent the
Intelligent Key from being accidentally
locked inside the vehicle.
AUTOMATIC DOOR LOCKS
.All doors lock automatically when the
vehicle speed reaches 15 MPH (24
km/h).
. All doors unlock automatically when
the ignition switch is placed in the OFF
position or when the shift lever is
moved to the P (Park) position, if
selected.
The automatic unlock function can be
deactivated or activated. To deactivate
or activate the automatic door unlock
system, perform the following procedure:
1. Close all doors.
2. Place the ignition switch in the ON
position.
3. Within 20 seconds of performing Step 2, push and hold the power door lock switch to the
position (UNLOCK)
for more than 5 seconds.
4. When activated, the hazard indicator will flash twice. When deactivated, the
hazard indicator will flash once.
5. The ignition switch must be placed in the OFF and ON position again be-
tween each setting change.
When the automatic door unlock system
is deactivated, the doors do not unlock
when the ignition switch is placed in the
OFF position. To unlock the door manu-
ally, use the inside lock knob or the power
door lock switch (driver’s or front passen-
ger’s side).
SPA2745
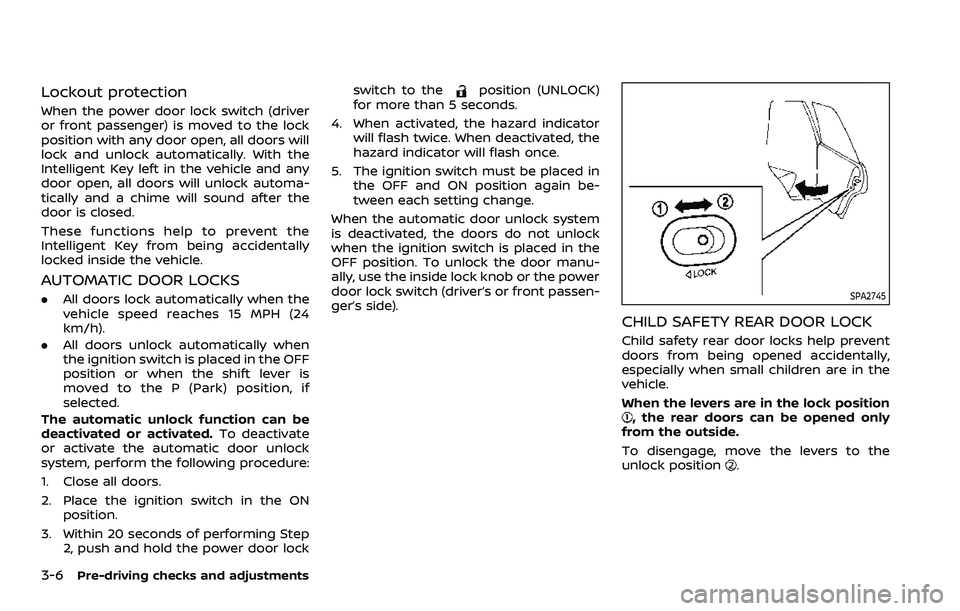
CHILD SAFETY REAR DOOR LOCK
Child safety rear door locks help prevent
doors from being opened accidentally,
especially when small children are in the
vehicle.
When the levers are in the lock position
, the rear doors can be opened only
from the outside.
To disengage, move the levers to the
unlock position
.
Page 194 of 603

3-12Pre-driving checks and adjustments
CAUTION
The lockout protection may not
function under the following condi-
tions:
.When the Intelligent Key is placed
on top of the instrument panel.
. When the Intelligent Key is placed
inside the glove box or a storage
bin.
. When the Intelligent Key is placed
inside the door pockets.
. When the Intelligent Key is placed
inside or near metallic materials.
Unlocking doors
1. Push the door handle request switch
(driver’s or front passenger’s)or the
liftgate request switchonce while
carrying the Intelligent Key with you.
When you approach the vehicle with
the Intelligent Key, the puddle light
and the passenger cabin illumination
will illuminate and stay on for a short
period of time (if so equipped). (See
“Welcome light” (P.2-77).)
2. The hazard indicator flashes once and outside chime sounds once. The cor-
responding door will unlock. 3. Push the door handle request switch
again within 60 seconds.
4. The hazard indicator flashes once and outside chime sounds once again. All
the doors will unlock.
The liftgate can be unlocked and opened
by pushing the liftgate opener switch. See
“Liftgate” (P.3-22).
All doors will be locked automatically
unless one of the following operations is
performed within 1 minute after pushing
the request switch while the doors are
locked. If during this 1-minute time period,
the request switch is pushed, all doors will
be locked automatically after another 1
minute.
. Opening any door
. Pushing the ignition switch
NOTE:
The unlocking operation can be chan-
ged in selective unlock in the Vehicle
Settings of the vehicle information dis-
play. See “Vehicle settings” (P.2-23).
Power liftgate open (if so equipped)
1. Carry the Intelligent Key.
2. Push the power liftgate opener switch
.
3. The liftgate will unlock and automati- cally open. 4. The hazard indicator flashes 4 times
and the outside chime sounds.
BATTERY SAVER SYSTEM
When all the following conditions are met
for a period of time, the battery saver
system will cut off the power supply to
prevent battery discharge.
.The ignition switch is in the ACC
position, and
. All doors are closed, and
. The shift lever is in the P (Park)
position.
WARNING SIGNALS
To help prevent the vehicle from moving
unexpectedly by erroneous operation of
the Intelligent Key listed on the following
chart or to help prevent the vehicle from
being stolen, chime or beep sounds inside
and outside the vehicle and a warning
displays in the vehicle information display.
When a chime or beep sounds or the
warning displays, be sure to check the
vehicle and Intelligent Key.
See “Troubleshooting guide” (P.3-13) and
“Vehicle information display” (P.2-19).
Page 213 of 603

SPA2450-A
Automatic anti-glare type (if so
equipped)
The inside mirror is designed so that it
automatically changes reflection accord-
ing to the intensity of the headlights of
the following vehicle.
The anti-glare system will be automati-
cally turned on when the ignition switch is
placed in the ON position.
When the anti-glare system is turned on,
the indicator light
will illuminate and
excessive glare from the headlights of the
vehicle behind you will be reduced.
Push the “*” switch
to make the inside
rearview mirror operate normally. The indicator light will turn off. Push the “I”
switch
to turn the system on.
Do not allow any object to cover the
sensors
or apply glass cleaner on
them. Doing so will reduce the sensitiv-
ity of the sensor, resulting in improper
operation.
For the HomeLink® Universal Transceiver
operation, see “HomeLink® Universal
Transceiver (Type A)” (P.2-81).
Intelligent Rear View Mirror (if so
equipped)
WARNING
Failure to follow the warnings and
instructions for proper use of the
Intelligent Rear View Mirror could
result in serious injury or death.
. The Intelligent Rear View Mirror is
a convenience feature but it is not
a substitute for proper vehicle
operation. The system has areas
where objects cannot be viewed.
Check the blind spot of the In-
telligent Rear View Mirror before
vehicle operation. The driver is
always responsible for safe driv-
ing. .
Do not disassemble or modify the
Intelligent Rear View Mirror, the
camera unit or wirings. If you do,
it may result in accidents or fire.
In case you notice smoke or smell
coming from the Intelligent Rear
View Mirror, stop using the sys-
tem immediately. It is recom-
mended that you see a NISSAN
dealer for servicing.
. Do not operate the Intelligent
Rear View Mirror while driving.
Doing so can be a distraction
and it could lose control of your
vehicle and cause an accident or
serious injury.
. Do not gaze into the Intelligent
Rear View Mirror display during
driving. It may cause a distraction
and it could lose control of your
vehicle and cause an accident or
serious injury.
. Do not put a cigarette or flames
to the Intelligent Rear View Mir-
ror, the camera unit or wirings. It
may cause a fire.
. Be sure to adjust the Intelligent
Rear View Mirror before driving.
Switch the system to the conven-
tional rearview mirror mode and
be properly seated on the driver’s
Pre-driving checks and adjustments3-31
Page 232 of 603
4-8Monitor, heater, air conditioner, audio, phone and voice recognition systems
5. When the vehicle is parked in thespace completely, place the shift lever
in the P (Park) position and apply the
parking brake.
REARVIEW MONITOR SETTINGS
The RearView Monitor settings can be
changed using the following procedure.
1. Push the MENU button on the DisplayCommander.
2. Touch the “Settings” key on the touch screen display.
3. Touch the “Camera” key. Available setting items:
Setting items
Action
Predictive Course Lines Display the predictive course lines.
Display
Settings Brightness
Adjust display settings by touching the “+”/“-” key.
Contrast
Tint
Color
Black Level
REARVIEW MONITOR SYSTEM LIM-
ITATIONS
WARNING
Listed below are the system limita-
tions for RearView Monitor. Failure to
operate the vehicle in accordance
with these system limitations could
result in serious injury or death.
. The system cannot completely
eliminate blind spots and may
not show every object.
. Underneath the bumper and the
corner areas of the bumper can-
not be viewed on the RearView
Monitor because of its monitoring
range limitation. The system will
not show small objects below the
bumper, and may not show ob-
jects close to the bumper or on the ground.
. Objects viewed in the RearView
Monitor differ from actual dis-
tance because a wide-angle lens
is used.
. Objects in the RearView Monitor
will appear visually opposite
compared to when viewed in the
rearview and outside mirrors.
. Use the displayed lines as a re-
ference. The lines are highly af-
fected by the number of
occupants, fuel level, vehicle po-
sition, road conditions and road
grade.
. Make sure that the liftgate is
securely closed when backing up.
. Do not put anything on the rear-
view camera. The rearview cam-
era is installed above the license
Page 235 of 603
or death.
.The Intelligent Around View®
Monitor is a convenience feature
and is not a substitute for proper
vehicle operation because it has
areas where objects cannot be
viewed. The four corners of the
vehicle in particular, are areas
where objects do not always ap-
pear in the bird’s-eye, front, or
rear views. Always check your
surroundings to be sure that it is
safe to move before operating
the vehicle. Always operate the
vehicle slowly. Always look out
the windows and check mirrors to
be sure that it is safe to move.
. The driver is always responsible
for safety during parking and
other maneuvers.
CAUTION
Do not scratch the lens when clean-
ing dirt or snow from the front of the
camera.
The Intelligent Around View® Monitor
system is designed as an aid to the driver
in situations such as slot parking or parallel parking.
The monitor displays various views of the
position of the vehicle in a split screen
format. All views are not available at all
times.
Available views:
.
Front view
An approximately 150-degree view of
the front of the vehicle.
. Rear view
An approximately 150-degree view of
the rear of the vehicle.
. Bird’s-eye view
The surrounding view of the vehicle
from above.
. Front-side view
The view around and ahead of the
front passenger’s side wheel.
. Front-wide view
An approximately 180-degree view of
the front of the vehicle.
. Rear-wide view
An approximately 180-degree view of
the rear of the vehicle.
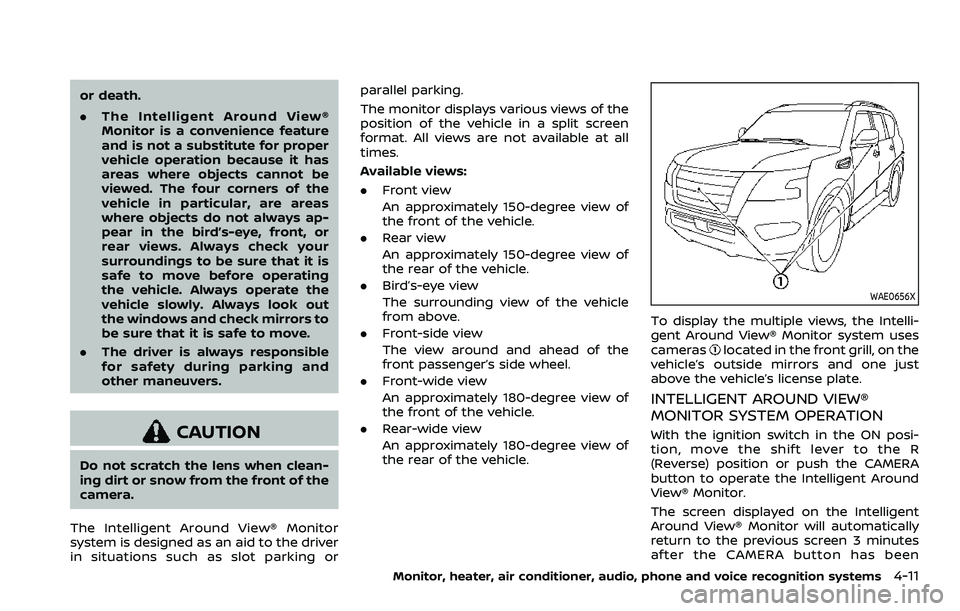
WAE0656X
To display the multiple views, the Intelli-
gent Around View® Monitor system uses
cameras
located in the front grill, on the
vehicle’s outside mirrors and one just
above the vehicle’s license plate.
INTELLIGENT AROUND VIEW®
MONITOR SYSTEM OPERATION
With the ignition switch in the ON posi-
tion, move the shift lever to the R
(Reverse) position or push the CAMERA
button to operate the Intelligent Around
View® Monitor.
The screen displayed on the Intelligent
Around View® Monitor will automatically
return to the previous screen 3 minutes
after the CAMERA button has been
Monitor, heater, air conditioner, audio, phone and voice recognition systems4-11
Page 248 of 603
4-24Monitor, heater, air conditioner, audio, phone and voice recognition systems
WARNING
Failure to follow the warnings and
instructions for proper use of the
sonar function as outlined in this
section could result in serious injury
or death.
.The sonar is a convenience fea-
ture. It is not a substitute for
proper parking.
. This function is designed as an
aid to the driver in detecting large
stationary objects to help avoid
damaging the vehicle.
. The driver is always responsible
for safety during parking and
other maneuvers.
. Always look around and check
that it is safe to move before
parking.
. Read and understand the limita-
tions of the sonar as contained in
this section.
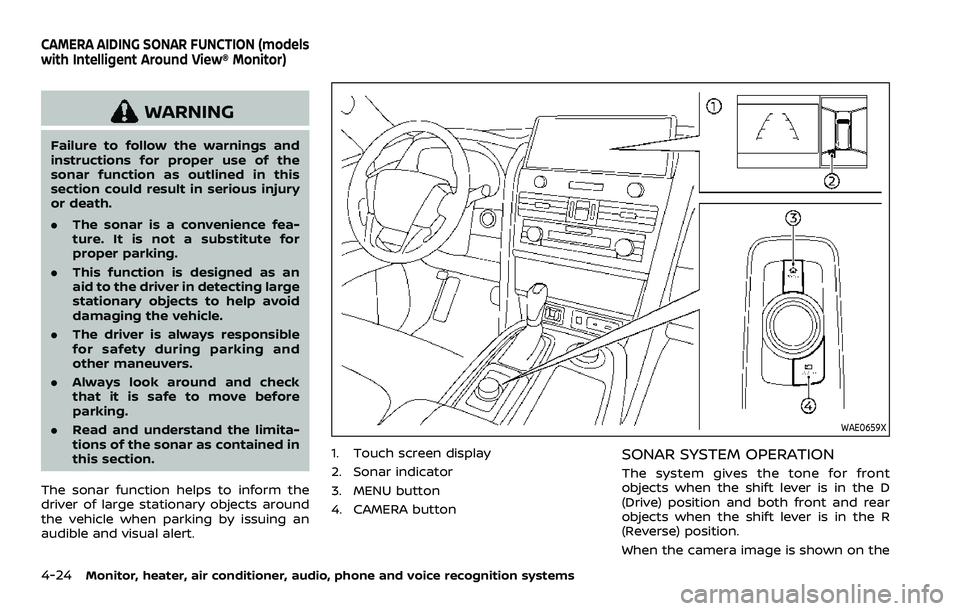
The sonar function helps to inform the
driver of large stationary objects around
the vehicle when parking by issuing an
audible and visual alert.
WAE0659X
1. Touch screen display
2. Sonar indicator
3. MENU button
4. CAMERA buttonSONAR SYSTEM OPERATION
The system gives the tone for front
objects when the shift lever is in the D
(Drive) position and both front and rear
objects when the shift lever is in the R
(Reverse) position.
When the camera image is shown on the
CAMERA AIDING SONAR FUNCTION (models
with Intelligent Around View® Monitor)
Page 260 of 603
4-36Monitor, heater, air conditioner, audio, phone and voice recognition systems
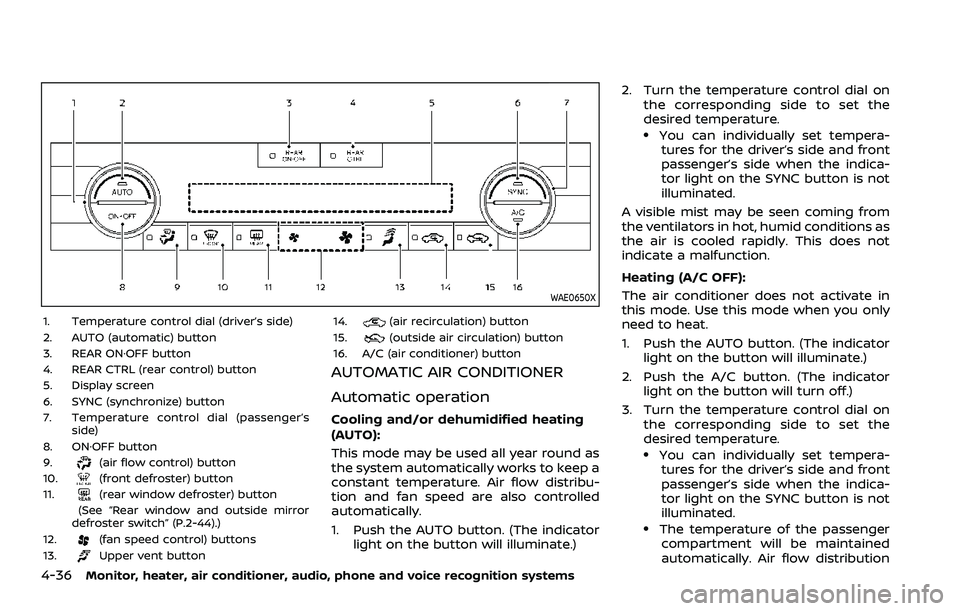
WAE0650X
1. Temperature control dial (driver’s side)
2. AUTO (automatic) button
3. REAR ON·OFF button
4. REAR CTRL (rear control) button
5. Display screen
6. SYNC (synchronize) button
7. Temperature control dial (passenger’sside)
8. ON·OFF button
9.
(air flow control) button
10.(front defroster) button
11.(rear window defroster) button
(See “Rear window and outside mirror
defroster switch” (P.2-44).)
12.
(fan speed control) buttons
13.Upper vent button 14.
(air recirculation) button
15.(outside air circulation) button
16. A/C (air conditioner) button
AUTOMATIC AIR CONDITIONER
Automatic operation
Cooling and/or dehumidified heating
(AUTO):
This mode may be used all year round as
the system automatically works to keep a
constant temperature. Air flow distribu-
tion and fan speed are also controlled
automatically.
1. Push the AUTO button. (The indicator light on the button will illuminate.) 2. Turn the temperature control dial on
the corresponding side to set the
desired temperature.
.You can individually set tempera-tures for the driver’s side and front
passenger’s side when the indica-
tor light on the SYNC button is not
illuminated.
A visible mist may be seen coming from
the ventilators in hot, humid conditions as
the air is cooled rapidly. This does not
indicate a malfunction.
Heating (A/C OFF):
The air conditioner does not activate in
this mode. Use this mode when you only
need to heat.
1. Push the AUTO button. (The indicator light on the button will illuminate.)
2. Push the A/C button. (The indicator light on the button will turn off.)
3. Turn the temperature control dial on the corresponding side to set the
desired temperature.
.You can individually set tempera-tures for the driver’s side and front
passenger’s side when the indica-
tor light on the SYNC button is not
illuminated.
.The temperature of the passengercompartment will be maintained
automatically. Air flow distribution