2021 NISSAN ARMADA center console
[x] Cancel search: center consolePage 27 of 603

SSS1116
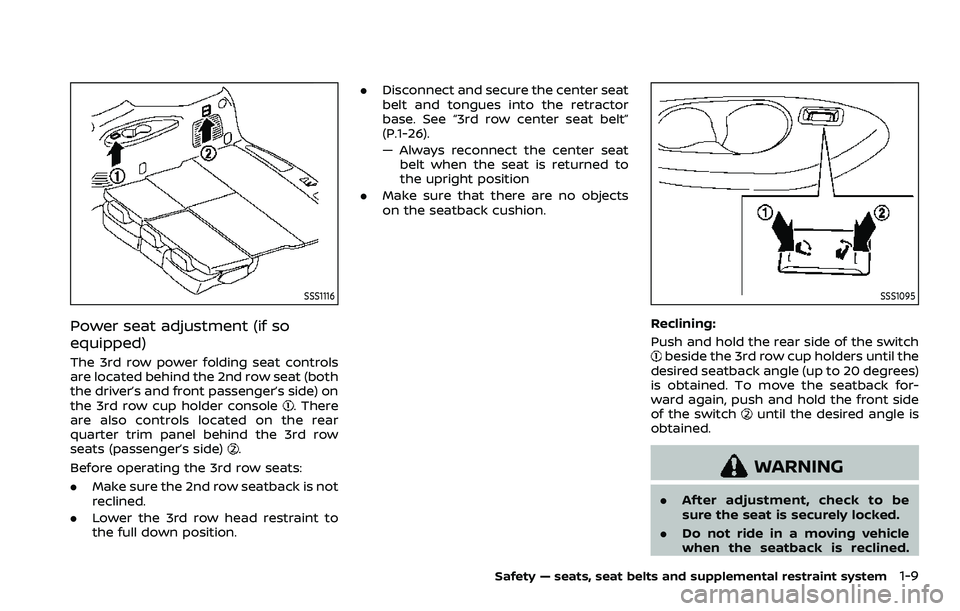
Power seat adjustment (if so
equipped)
The 3rd row power folding seat controls
are located behind the 2nd row seat (both
the driver’s and front passenger’s side) on
the 3rd row cup holder console
. There
are also controls located on the rear
quarter trim panel behind the 3rd row
seats (passenger’s side)
.
Before operating the 3rd row seats:
. Make sure the 2nd row seatback is not
reclined.
. Lower the 3rd row head restraint to
the full down position. .
Disconnect and secure the center seat
belt and tongues into the retractor
base. See “3rd row center seat belt”
(P.1-26).
— Always reconnect the center seat
belt when the seat is returned to
the upright position
. Make sure that there are no objects
on the seatback cushion.
SSS1095
Reclining:
Push and hold the rear side of the switch
beside the 3rd row cup holders until the
desired seatback angle (up to 20 degrees)
is obtained. To move the seatback for-
ward again, push and hold the front side
of the switch
until the desired angle is
obtained.
WARNING
. After adjustment, check to be
sure the seat is securely locked.
. Do not ride in a moving vehicle
when the seatback is reclined.
Safety — seats, seat belts and supplemental restraint system1-9
Page 30 of 603

1-12Safety — seats, seat belts and supplemental restraint system
FLEXIBLE SEATING
WARNING
.Never allow anyone to ride in the
cargo area or on the rear seats
when they are in the fold-down
position. In a collision, people
riding in these areas without
proper restraints are more likely
to be seriously injured or killed.
. Do not allow people to ride in any
area of your vehicle that is not
equipped with seats and seat
belts. Be sure everyone in your
vehicle is in a seat and using a
seat belt properly.
. Do not fold down the rear seats
when occupants are in the rear
seat area or any cargo is on the
rear seats.
. Head restraints should be ad-
justed properly as they may pro-
vide significant protection
against injury in an accident. Al-
ways replace and adjust them
properly if they have been re-
moved for any reason.
. If the head restraints are re-
moved for any reason, they
should be securely stored to pre- vent them from causing injury to
passengers or damage to the
vehicle in case of sudden braking
or an accident.
. When returning the seatbacks to
the upright position, be certain
they are completely secured in
the latched position. If they are
not completely secured, passen-
gers may be injured in an acci-
dent or sudden stop.
. Properly secure all cargo to help
prevent it from sliding or shifting.
Do not place cargo higher than
the seatbacks. In a sudden stop
or collision, unsecured cargo
could cause personal injury.
. When folding the bench seat
seatback down for maximum sto-
rage, make sure the seat base is
in the latched position by rocking
the seat base. If the seat base is
not properly secured, cargo
stored on top of a folded seat-
back may become a projectile
causing personal injury or vehicle
damage.
CAUTION
.When folding the 2nd row seat for
maximum cargo hauling, be sure
that cargo does not contact the
center console of the captain’s
seat (if so equipped) to avoid
possible damage to the console.
. When folding or returning the
seat(s) to the upright position, to
avoid injury to yourself and
others:
— Make sure that the seat path
is clear before moving the
seat.
— Be careful not to allow hands or feet to get caught or
pinched in the seat.
Stowing 2nd and 3rd row seats
To stow 2nd and 3rd row seats for
maximum cargo capacity:
Page 32 of 603

1-14Safety — seats, seat belts and supplemental restraint system
5. Return the 2nd row seat to a seatingposition by raising the 2nd row seat-
backs to an upright position. Make
sure the seatback is locked in position.
CAUTION
When folding the 2nd row seat for
maximum cargo hauling, be sure
that cargo does not contact the
center console of the captain’s seat
(if so equipped) to avoid possible
damage to the console.
WARNING
Head restraint/headrest supplement
the other vehicle safety systems.
They may provide additional protec-
tion against injury in certain rear end
collisions. Adjustable head re-
straints/headrests must be adjusted
properly, as specified in this section.
Check the adjustment after someone
else uses the seat. Do not attach
anything to the head restraint/head-
rest stalks or remove the head re-
straint/headrest. Do not use the seat
if the head restraint/headrest has
been removed. If the head restraint/
headrest was removed, reinstall and
properly adjust the head restraint/
headrest before an occupant uses
the seating position. Failure to follow
these instructions can reduce the
effectiveness of the head restraint/
headrest. This may increase the risk
of serious injury or death in a colli-
sion.
HEAD RESTRAINTS/HEADRESTS
Page 83 of 603

Precautions:
.Make sure that there are no objects
weighing over 9.1 lbs (4 kg) hanging on
the seat or placed in the seatback
pocket.
. Make sure that a child restraint or
other object is not pressing against
the rear of the seatback.
. Make sure that a rear passenger is not
pushing or pulling on the back of the
front passenger seat.
. Make sure that the front passenger
seat or seatback is not forced back
against an object on the seat or floor
behind it.
. Make sure that there is no object
placed under the front passenger
seat.
Steps:
1. Adjust the seat as outlined. (See “Seats” (P.1-3).) Sit upright, leaning
against the seatback, and centered
on the seat cushion with your feet
comfortably extended to the floor.
2. Make sure there are no objects on your lap.
3. Fasten the seat belt as outlined. (See “Seat belts” (P.1-20).)
4. Remain in this position for 30 seconds allowing the system to classify the front passenger before the vehicle is
put into motion.
5. Ensure proper classification by check- ing the front passenger air bag status
light.
NOTE:
This vehicle’s occupant classification
sensor system locks the classification
during driving so it is important that
you confirm that the front passenger is
properly classified prior to driving. Also,
the occupant classification sensor sys-
tem may recalculate the weight of the
occupant when the vehicle comes to a
stop (i.e. stop light, stop sign, etc.), so
the front passenger seat occupant
should continue to remain seated as
outlined above.
Troubleshooting:If you think the front passenger air bag
status light is incorrect:
1. If the light is ON with no front passenger and no objects on the front passenger
seat:
This may be due to the following condi-
tions that may be interfering with the
weight sensors:
.An object weighing over 9.1 lbs (4 kg)
hanging on the seat or placed in the
seatback pocket. .
A child restraint or other object press-
ing against the rear of the seatback.
. A rear passenger pushing or pulling
on the back of the front passenger
seat.
. Forcing the front seat or seatback
against an object on the seat or floor
behind it.
. An object placed under the front
passenger seat.
. An object placed between the seat
cushion and center console or be-
tween the seat cushion and the door.
If the vehicle is moving, please come to a
stop when it is safe to do so. Check and
correct any of the above conditions.
Restart the vehicle and wait 1 minute.
NOTE:
A system check will be performed dur-
ing which the front passenger air bag
status light will remain lit for about 7
seconds initially.
If the light is still ON after this, it is
recommended that the vehicle be
checked by a NISSAN dealer as soon as
possible.
2. If the light is ON with an adult occupying the front passenger seat:
.Occupant is a small adult — the front
passenger air bag status light is func-
tioning as intended. The front passen-
Safety — seats, seat belts and supplemental restraint system1-65
Page 84 of 603

1-66Safety — seats, seat belts and supplemental restraint system
ger air bag and front passenger knee
air bag are suppressed.
However, if the occupant is not a small
adult, then this may be due to the
following conditions that may be interfer-
ing with the weight sensors:
. Occupant is not sitting upright, lean-
ing against the seatback, and cen-
tered on the seat cushion with his/her
feet comfortably extended to the
floor.
. A child restraint or other object press-
ing against the rear of the seatback.
. A rear passenger pushing or pulling
on the back of the front passenger
seat.
. Forcing the front seat or seatback
against an object on the seat or floor
behind it.
. An object placed under the front
passenger seat.
. An object placed between the seat
cushion and center console or be-
tween the seat cushion and the door.
If the vehicle is moving, please come to a
stop when it is safe to do so. Check and
correct any of the above conditions.
Restart the vehicle and wait 1 minute. NOTE:
A system check will be performed dur-
ing which the front passenger air bag
status light will remain lit for about 7
seconds initially.
If the light is still ON after this, the person
should be advised not to ride in the front
passenger seat and it is recommended
that the vehicle be checked by a NISSAN
dealer as soon as possible.
3. If the light is OFF with a small adult, child
or child restraint occupying the front
passenger seat.
This may be due to the following condi-
tions that may be interfering with the
weight sensors:
.Small adult or child is not sitting
upright, leaning against the seatback,
and centered on the seat cushion with
his/her feet comfortably extended to
the floor.
. The child restraint is not properly
installed, as outlined. (See “Child re-
straints” (P.1-32).)
. An object weighing over 9.1 lbs (4 kg)
hanging on the seat or placed in the
seatback pocket.
. A child restraint or other object press-
ing against the rear of the seatback.
. A rear passenger pushing or pulling
on the back of the front passenger
seat. .
Forcing the front seat or seatback
against an object on the seat or floor
behind it.
. An object placed under the front
passenger seat.
. An object placed between the seat
cushion and center console.
If the vehicle is moving, please come to a
stop when it is safe to do so. Check and
correct any of the above conditions.
Restart the vehicle and wait 1 minute.
NOTE:
A system check will be performed dur-
ing which the front passenger air bag
status light will remain lit for about 7
seconds initially.
If the light is still OFF after this, the small
adult, child or child restraint should be
repositioned in the rear seat and it is
recommended that the vehicle be
checked by a NISSAN dealer as soon as
possible.
Other supplemental front-impact
air bag precautions
WARNING
. Do not place any objects on the
steering wheel pad or on the
instrument panel. Also, do not
Page 146 of 603

2-54Instruments and controls
WAC0524X
FRONT (if so equipped)
The front seats can be warmed by built-in
heaters. The switches located on the
instrument panel can be operated inde-
pendently of each other.
1. Start the engine.
2. Push the heated seat switch andselect the desired heat range.
.For high heat, push the switch once..For medium heat, push the switch
twice.
.For low heat, push the switch threetimes.
.The indicator lighton the switch
will illuminate depending on the
heat level when the heater is on. 3. To turn off the heater, push the
heated seat switch until the indicator
light turns off.
The heater is controlled by a control
module, automatically adjusting the
heat level to maintain comfort accord-
ing to the selected heat range.
The indicator light will remain on as
long as the switch is on.
When the vehicle’s interior is warmed,
or before you leave the vehicle, be
sure to turn off the seat heater.
SIC2770
REAR (if so equipped)
The 2nd row outboard seats are warmed
by built-in heaters. The switches located
on the back side of the center console
can be operated independently of each
other.
1. Start the engine.
2. Select heat range.
For high heat, push the HI (High)
side of the switch.
For low heat, push the LO (Low) side
of the switch.
The indicator light in the switch
will
illuminate when the heater is on.
Page 153 of 603

SIC2648
Main switch
Type B (if so equipped)
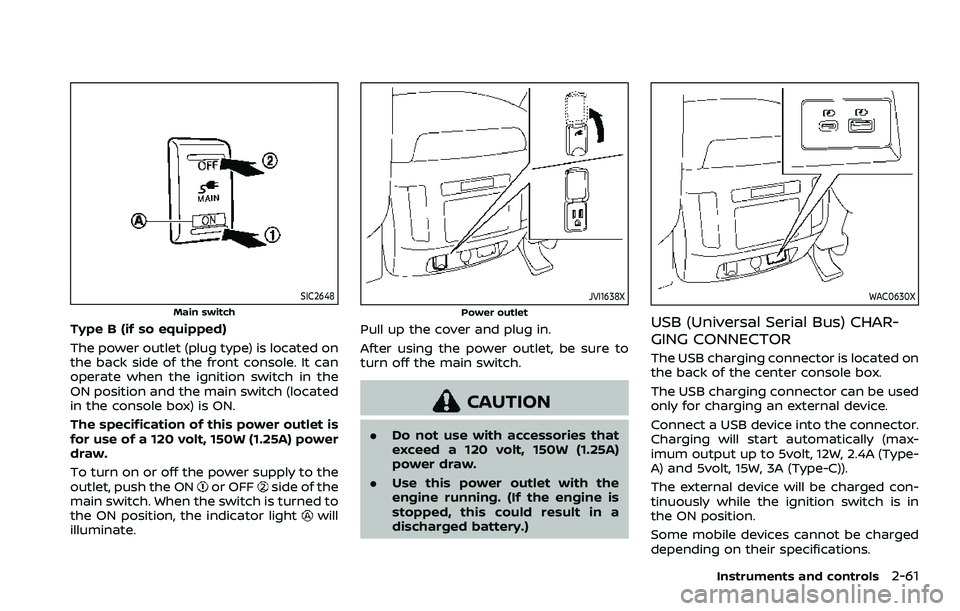
The power outlet (plug type) is located on
the back side of the front console. It can
operate when the ignition switch in the
ON position and the main switch (located
in the console box) is ON.
The specification of this power outlet is
for use of a 120 volt, 150W (1.25A) power
draw.
To turn on or off the power supply to the
outlet, push the ON
or OFFside of the
main switch. When the switch is turned to
the ON position, the indicator light
will
illuminate.
JVI1638X
Power outlet
Pull up the cover and plug in.
After using the power outlet, be sure to
turn off the main switch.
CAUTION
. Do not use with accessories that
exceed a 120 volt, 150W (1.25A)
power draw.
. Use this power outlet with the
engine running. (If the engine is
stopped, this could result in a
discharged battery.)
WAC0630X
USB (Universal Serial Bus) CHAR-
GING CONNECTOR
The USB charging connector is located on
the back of the center console box.
The USB charging connector can be used
only for charging an external device.
Connect a USB device into the connector.
Charging will start automatically (max-
imum output up to 5volt, 12W, 2.4A (Type-
A) and 5volt, 15W, 3A (Type-C)).
The external device will be charged con-
tinuously while the ignition switch is in
the ON position.
Some mobile devices cannot be charged
depending on their specifications.
Instruments and controls2-61
Page 262 of 603

4-38Monitor, heater, air conditioner, audio, phone and voice recognition systems
Turning the system on/off
Push the ON·OFF button.
WAE0641X
REAR AUTOMATIC AIR CONDITION-
ING SYSTEM
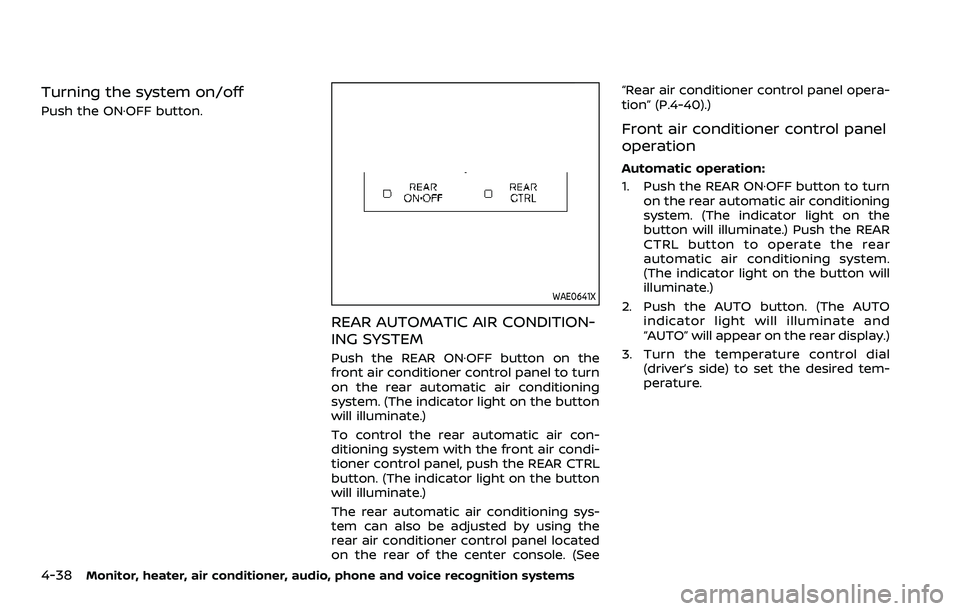
Push the REAR ON·OFF button on the
front air conditioner control panel to turn
on the rear automatic air conditioning
system. (The indicator light on the button
will illuminate.)
To control the rear automatic air con-
ditioning system with the front air condi-
tioner control panel, push the REAR CTRL
button. (The indicator light on the button
will illuminate.)
The rear automatic air conditioning sys-
tem can also be adjusted by using the
rear air conditioner control panel located
on the rear of the center console. (See“Rear air conditioner control panel opera-
tion” (P.4-40).)
Front air conditioner control panel
operation
Automatic operation:
1. Push the REAR ON·OFF button to turn
on the rear automatic air conditioning
system. (The indicator light on the
button will illuminate.) Push the REAR
CTRL button to operate the rear
automatic air conditioning system.
(The indicator light on the button will
illuminate.)
2. Push the AUTO button. (The AUTO indicator light will illuminate and
“AUTO” will appear on the rear display.)
3. Turn the temperature control dial (driver’s side) to set the desired tem-
perature.