2021 NISSAN ARMADA change time
[x] Cancel search: change timePage 143 of 603
WAC0256X
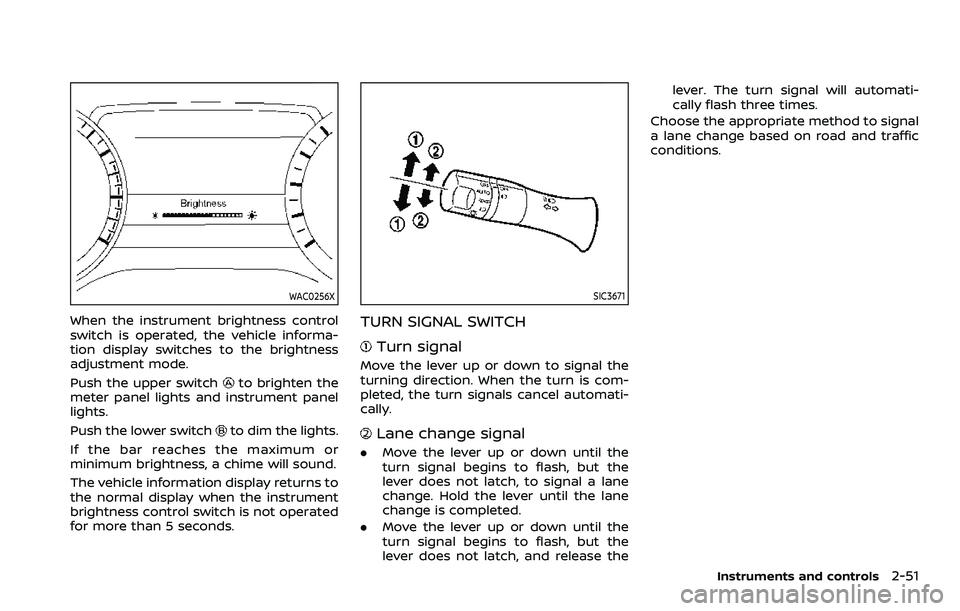
When the instrument brightness control
switch is operated, the vehicle informa-
tion display switches to the brightness
adjustment mode.
Push the upper switch
to brighten the
meter panel lights and instrument panel
lights.
Push the lower switch
to dim the lights.
If the bar reaches the maximum or
minimum brightness, a chime will sound.
The vehicle information display returns to
the normal display when the instrument
brightness control switch is not operated
for more than 5 seconds.
SIC3671
TURN SIGNAL SWITCH
Turn signal
Move the lever up or down to signal the
turning direction. When the turn is com-
pleted, the turn signals cancel automati-
cally.
Lane change signal
. Move the lever up or down until the
turn signal begins to flash, but the
lever does not latch, to signal a lane
change. Hold the lever until the lane
change is completed.
. Move the lever up or down until the
turn signal begins to flash, but the
lever does not latch, and release the lever. The turn signal will automati-
cally flash three times.
Choose the appropriate method to signal
a lane change based on road and traffic
conditions.
Instruments and controls2-51
Page 176 of 603
2-84Instruments and controls
CLEARING THE PROGRAMMED IN-
FORMATION
The following procedure clears the pro-
grammed information from both buttons.
Individual buttons cannot be cleared.
However, individual buttons can be re-
programmed, see “Reprogramming a sin-
gle HomeLink® button” (P.2-84).
To clear all programming
1. Press and hold the two outerHomeLink® buttons until the indicator
light begins to flash in approximately
10 seconds. Do not hold for longer
than 20 seconds.
2. Release both buttons.
HomeLink® is now in the programming
mode and can be programmed at any
time beginning with “Programming
HomeLink®” - Step 1.
REPROGRAMMING A SINGLE
HomeLink® BUTTON
To reprogram a HomeLink® Universal
Transceiver button, complete the follow-
ing.
1. Press and hold the desired HomeLink® button. Do notrelease the button.
2. The indicator light will begin to flash after 20 seconds. Without releasing
the HomeLink® button, proceed with “Programming HomeLink®” - Step 1.
For questions or comments, contact
HomeLink® at: www.homelink.com/
nissan or 1-800-355-3515.
The HomeLink® Universal Transceiver
button has now been reprogrammed.
The new device can be activated by
pushing the HomeLink® button that was
just programmed. This procedure will not
affect any other programmed HomeLink®
buttons.
IF YOUR VEHICLE IS STOLEN
If your vehicle is stolen, you should
change the codes of any non-rolling code
device that has been programmed into
HomeLink®. Consult the Owner’s Manual
of each device or call the manufacturer or
dealer of those devices for additional
information.
When your vehicle is recovered, you will
need to reprogram the HomeLink® Uni-
versal Transceiver with your new trans-
mitter information.
FCC Notice:
For USA:
This device complies with Part 15 of the
FCC Rules. Operation is subject to the
following two conditions: (1) This device
may not cause harmful interference,
and (2) this device must accept any interference received, including inter-
ference that may cause undesired op-
eration.
NOTE:
Changes or modifications not expressly
approved by the party responsible for
compliance could void the user’s
authority to operate the equipment.
For Canada:
This device complies with Industry Ca-
nada licence-exempt RSS standard(s).
Operation is subject to the following
two conditions: (1) this device may not
cause interference, and (2) this device
must accept any interference, including
interference that may cause undesired
operation of the device.
Page 181 of 603
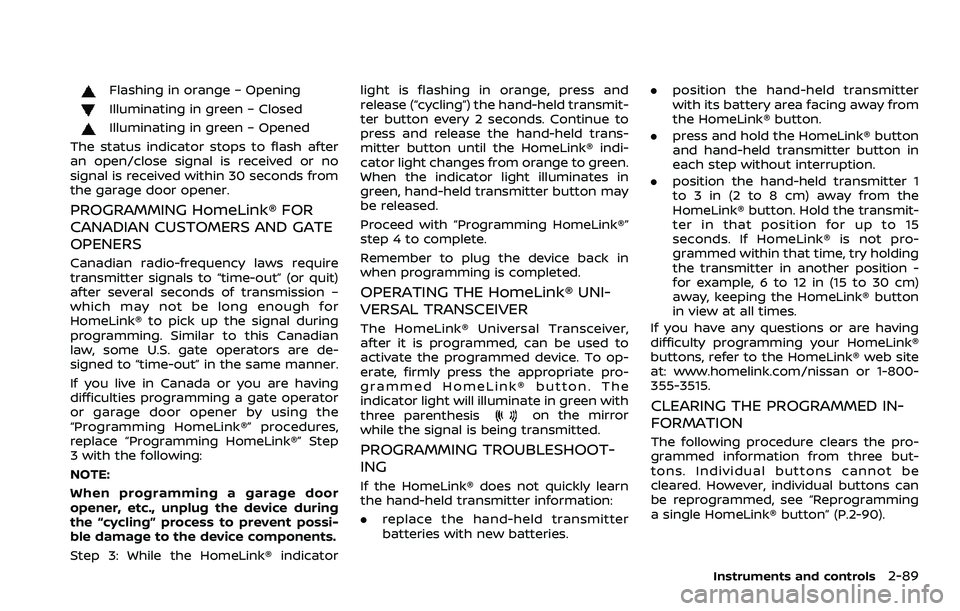
Flashing in orange – Opening
Illuminating in green – Closed
Illuminating in green – Opened
The status indicator stops to flash after
an open/close signal is received or no
signal is received within 30 seconds from
the garage door opener.
PROGRAMMING HomeLink® FOR
CANADIAN CUSTOMERS AND GATE
OPENERS
Canadian radio-frequency laws require
transmitter signals to “time-out” (or quit)
after several seconds of transmission –
which may not be long enough for
HomeLink® to pick up the signal during
programming. Similar to this Canadian
law, some U.S. gate operators are de-
signed to “time-out” in the same manner.
If you live in Canada or you are having
difficulties programming a gate operator
or garage door opener by using the
“Programming HomeLink®” procedures,
replace “Programming HomeLink®” Step
3 with the following:
NOTE:
When programming a garage door
opener, etc., unplug the device during
the “cycling” process to prevent possi-
ble damage to the device components.
Step 3: While the HomeLink® indicator light is flashing in orange, press and
release (“cycling”) the hand-held transmit-
ter button every 2 seconds. Continue to
press and release the hand-held trans-
mitter button until the HomeLink® indi-
cator light changes from orange to green.
When the indicator light illuminates in
green, hand-held transmitter button may
be released.
Proceed with “Programming HomeLink®”
step 4 to complete.
Remember to plug the device back in
when programming is completed.
OPERATING THE HomeLink® UNI-
VERSAL TRANSCEIVER
The HomeLink® Universal Transceiver,
after it is programmed, can be used to
activate the programmed device. To op-
erate, firmly press the appropriate pro-
grammed HomeLink® button. The
indicator light will illuminate in green with
three parenthesis
on the mirror
while the signal is being transmitted.
PROGRAMMING TROUBLESHOOT-
ING
If the HomeLink® does not quickly learn
the hand-held transmitter information:
. replace the hand-held transmitter
batteries with new batteries. .
position the hand-held transmitter
with its battery area facing away from
the HomeLink® button.
. press and hold the HomeLink® button
and hand-held transmitter button in
each step without interruption.
. position the hand-held transmitter 1
to 3 in (2 to 8 cm) away from the
HomeLink® button. Hold the transmit-
ter in that position for up to 15
seconds. If HomeLink® is not pro-
grammed within that time, try holding
the transmitter in another position -
for example, 6 to 12 in (15 to 30 cm)
away, keeping the HomeLink® button
in view at all times.
If you have any questions or are having
difficulty programming your HomeLink®
buttons, refer to the HomeLink® web site
at: www.homelink.com/nissan or 1-800-
355-3515.
CLEARING THE PROGRAMMED IN-
FORMATION
The following procedure clears the pro-
grammed information from three but-
tons. Individual buttons cannot be
cleared. However, individual buttons can
be reprogrammed, see “Reprogramming
a single HomeLink® button” (P.2-90).
Instruments and controls2-89
Page 182 of 603
2-90Instruments and controls
To clear all programming
1. Press and hold the two outerHomeLink® buttons until the indicator
light begins to flash in green and
“CLEARED” is displayed on the mirror,
in approximately 10 seconds. Do not
hold for longer than 20 seconds.
2. Release both buttons.
HomeLink® is now in the programming
mode and can be programmed at any
time beginning with “Programming
HomeLink®” - Step 1.
REPROGRAMMING A SINGLE
HomeLink® BUTTON
To reprogram a HomeLink® button, com-
plete the following.
1. Press and hold the desired HomeLink® button. DO NOT release the button.
2. The indicator light will illuminate in green, and after 20 seconds it will
begin to flash in orange and “TRAIN-
ING” is displayed on the mirror.
3. Release the HomeLink® button and proceed with “Programming
HomeLink®” — Step 3.
For questions or comments, contact
HomeLink® at: www.homelink.com/
nissan or 1-800-355-3515.
The HomeLink® button has now been
reprogrammed. The new device can be activated by pressing the HomeLink®
button that was just programmed. This
procedure will not affect any other pro-
grammed HomeLink® buttons.
If a new device is not programmed to the
HomeLink® button, it will revert to the
previously stored programming.
IF YOUR VEHICLE IS STOLEN
If your vehicle is stolen, you should
change the codes of any non-rolling code
device that has been programmed into
HomeLink®. Consult the Owner’s Manual
of each device or call the manufacturer or
dealer of those devices for additional
information.
When your vehicle is recovered, you will
need to reprogram the HomeLink® Uni-
versal Transceiver with your new trans-
mitter information.
FCC Notice:
For USA:
This device complies with Part 15 of the
FCC Rules. Operation is subject to the
following two conditions: (1) This device
may not cause harmful interference,
and (2) this device must accept any
interference received, including inter-
ference that may cause undesired op-
eration.
NOTE:
Changes or modifications not expressly
approved by the party responsible for
compliance could void the user’s
authority to operate the equipment.
For Canada:
This device complies with Industry Ca-
nada licence-exempt RSS standard(s).
Operation is subject to the following
two conditions: (1) this device may not
cause interference, and (2) this device
must accept any interference, including
interference that may cause undesired
operation of the device.
Page 215 of 603

displayed.
For the operation of the HomeLink®
buttons
, see “HomeLink® Universal
Transceiver (Type B)” (P.2-85).
WAD0191X
How to change the mode:
The mode can be switched when the
ignition switch is in the ON position.
. Pull the mode select lever
to switch
to the Intelligent Rear View Mirror
mode (camera view mode).
. Push the mode select lever
to
switch to the conventional rearview
mirror mode.
WAD0192X
How to make settings of Intelligent Rear
View Mirror:
You can choose display settings of the
Intelligent Rear View Mirror such as
brightness, camera angle, textual indica-
tion ON or OFF and language.
When the Intelligent Rear View Mirror
mode is on, setting menu can be selected
by pushing the MENU button
. Each time
the MENU buttonis pushed, the setting
menu will change as follows:
MENU (initial screen) ?BRIGHTNESS ?
DOWN/UP ?LEFT/RIGHT ?ROTATION
? INDICATION ?DIMMING MIRROR ?
LANGUAGE ?MENU (initial screen)
Pre-driving checks and adjustments3-33
Page 249 of 603
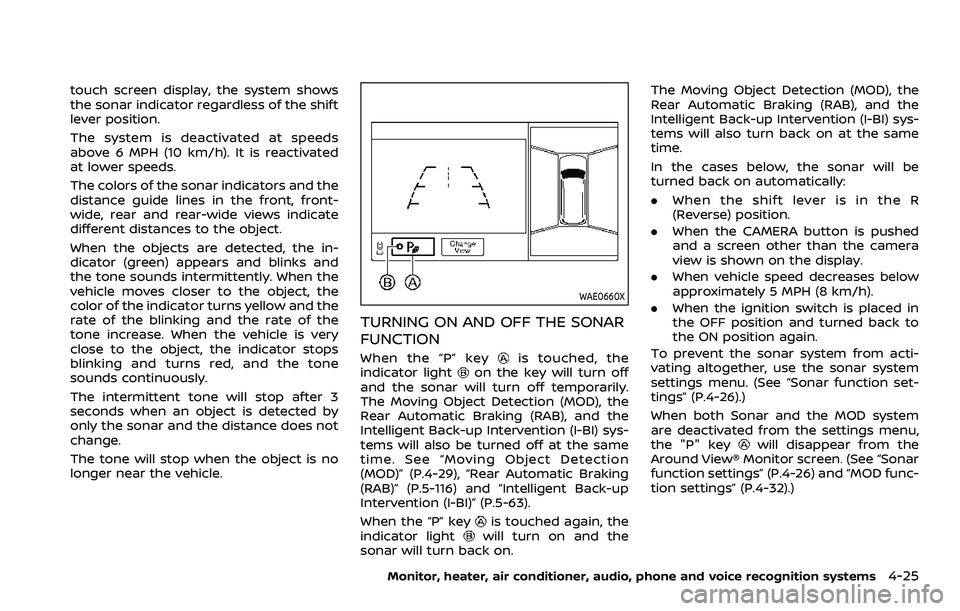
touch screen display, the system shows
the sonar indicator regardless of the shift
lever position.
The system is deactivated at speeds
above 6 MPH (10 km/h). It is reactivated
at lower speeds.
The colors of the sonar indicators and the
distance guide lines in the front, front-
wide, rear and rear-wide views indicate
different distances to the object.
When the objects are detected, the in-
dicator (green) appears and blinks and
the tone sounds intermittently. When the
vehicle moves closer to the object, the
color of the indicator turns yellow and the
rate of the blinking and the rate of the
tone increase. When the vehicle is very
close to the object, the indicator stops
blinking and turns red, and the tone
sounds continuously.
The intermittent tone will stop after 3
seconds when an object is detected by
only the sonar and the distance does not
change.
The tone will stop when the object is no
longer near the vehicle.
WAE0660X
TURNING ON AND OFF THE SONAR
FUNCTION
When the “P” keyis touched, the
indicator lighton the key will turn off
and the sonar will turn off temporarily.
The Moving Object Detection (MOD), the
Rear Automatic Braking (RAB), and the
Intelligent Back-up Intervention (I-BI) sys-
tems will also be turned off at the same
time. See “Moving Object Detection
(MOD)” (P.4-29), “Rear Automatic Braking
(RAB)” (P.5-116) and “Intelligent Back-up
Intervention (I-BI)” (P.5-63).
When the “P” key
is touched again, the
indicator lightwill turn on and the
sonar will turn back on. The Moving Object Detection (MOD), the
Rear Automatic Braking (RAB), and the
Intelligent Back-up Intervention (I-BI) sys-
tems will also turn back on at the same
time.
In the cases below, the sonar will be
turned back on automatically:
.
When the shift lever is in the R
(Reverse) position.
. When the CAMERA button is pushed
and a screen other than the camera
view is shown on the display.
. When vehicle speed decreases below
approximately 5 MPH (8 km/h).
. When the ignition switch is placed in
the OFF position and turned back to
the ON position again.
To prevent the sonar system from acti-
vating altogether, use the sonar system
settings menu. (See “Sonar function set-
tings” (P.4-26).)
When both Sonar and the MOD system
are deactivated from the settings menu,
the "P" key
will disappear from the
Around View® Monitor screen. (See “Sonar
function settings” (P.4-26) and “MOD func-
tion settings” (P.4-32).)
Monitor, heater, air conditioner, audio, phone and voice recognition systems4-25
Page 256 of 603
4-32Monitor, heater, air conditioner, audio, phone and voice recognition systems
system will turn back on.
The sonar, the Rear Automatic Braking
(RAB), and the Intelligent Back-up Inter-
vention (I-BI) systems will also turn back
on at the same time.
To enable or disable the MOD system, use
the camera settings menu. See “MOD
function settings” (P.4-32).
MOD FUNCTION SETTINGS
The MOD function settings can be chan-
ged using the following procedures.
1. Push the MENU button on the DisplayCommander.
2. Touch the “Settings” key on the touch screen display.
3. Touch the “Camera” key.
4. Touch the “Camera” key.
Available setting items:
Moving Object Detection:
When this item is turned on, the MOD
system is activated. When this item is
turned off (indicator turns off), the MOD
system is deactivated.
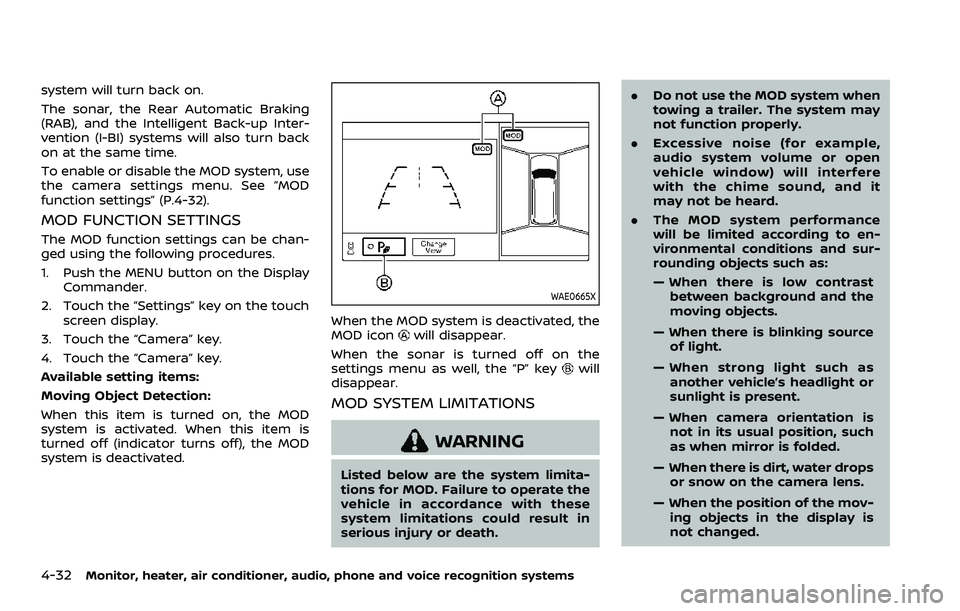
WAE0665X
When the MOD system is deactivated, the
MOD iconwill disappear.
When the sonar is turned off on the
settings menu as well, the “P” key
will
disappear.
MOD SYSTEM LIMITATIONS
WARNING
Listed below are the system limita-
tions for MOD. Failure to operate the
vehicle in accordance with these
system limitations could result in
serious injury or death. .
Do not use the MOD system when
towing a trailer. The system may
not function properly.
. Excessive noise (for example,
audio system volume or open
vehicle window) will interfere
with the chime sound, and it
may not be heard.
. The MOD system performance
will be limited according to en-
vironmental conditions and sur-
rounding objects such as:
— When there is low contrast
between background and the
moving objects.
— When there is blinking source of light.
— When strong light such as another vehicle’s headlight or
sunlight is present.
— When camera orientation is not in its usual position, such
as when mirror is folded.
— When there is dirt, water drops or snow on the camera lens.
— When the position of the mov- ing objects in the display is
not changed.
Page 270 of 603
5-4Starting and driving
WARNING
.Do not leave children or adults
who would normally require the
support of others alone in your
vehicle. Pets should not be left
alone either. They could acciden-
tally injure themselves or others
through inadvertent operation of
the vehicle. Also, on hot, sunny
days, temperatures in a closed
vehicle could quickly become
high enough to cause severe or
possibly fatal injuries to people or
animals.
. Properly secure all cargo to help
prevent it from sliding or shifting.
Do not place cargo higher than
the seatbacks. In a sudden stop
or collision, unsecured cargo
could cause personal injury.
EXHAUST GAS (carbon monoxide)
WARNING
.Do not breathe exhaust gases;
they contain colorless and odor-
less carbon monoxide. Carbon
monoxide is dangerous. It can cause unconsciousness or death.
. If you suspect that exhaust fumes
are entering the vehicle, drive
with all windows fully open, and
have the vehicle inspected imme-
diately.
. Do not run the engine in closed
spaces such as a garage.
. Do not park the vehicle with the
engine running for any extended
length of time.
. Keep the liftgate closed while
driving, otherwise exhaust gases
could be drawn into the passen-
ger compartment. If you must
drive with the liftgate open, fol-
low these precautions:
1) Open all the windows.
2) Set the
air recirculation to
off and the fan control to high
to circulate the air.
. If electrical wiring or other cable
connections must pass to a trailer
through the seal on the liftgate or
the body, follow the manufac-
turer’s recommendation to pre-
vent carbon monoxide entry into
the vehicle.
. The exhaust system and body
should be inspected by a quali- fied mechanic whenever:
— The vehicle is raised for ser-
vice.
— You suspect that exhaust fumes are entering into the
passenger compartment.
— You notice a change in the sound of the exhaust system.
— You have had an accident involving damage to the ex-
haust system, underbody, or
rear of the vehicle.
THREE-WAY CATALYST
The three-way catalyst is an emission
control device installed in the exhaust
system. Exhaust gases in the three-way
catalyst are burned at high temperatures
to help reduce pollutants.
WARNING
. The exhaust gas and the exhaust
system are very hot. Keep people,
animals or flammable materials
away from the exhaust system
components.
. Do not stop or park the vehicle
over flammable materials such as
PRECAUTIONS WHEN STARTING
AND DRIVING