2021 MERCEDES-BENZ GLE COUPE ECO mode
[x] Cancel search: ECO modePage 26 of 525
back conditions, please visit
the national
Mercedes-Benz website foryo ur count ry. Mercedes-Benz GenuineParts
+ ENVIRONMENTAL
NOTEEnvironmental
dama gecaused bynot using recycled
re conditioned components Mercedes‑Benz
AGoffers recycled recondi‐
tioned components and pa rts with the same
qu ality as new parts. The same entitlement
from the implied warranty is valid as for new
parts. #
Recycled reconditioned components
and pa rts from Mercedes‑Benz AG. *
NO
TEImpairment of the operating ef fi‐
ciency of there stra int sy stems from
ins talling accessory parts or from repairs
or we lding Airbags and seat belt
tensioners, as well as
control units and sensors forth ere stra int
sy stems, may be ins talled in thefo llowing
areas of your vehicle:
R Doors
R Door pillars
R Door sills
R Seats
R Cockpit
R Instrument clus ter
R Centre console
R Lateral roof frame #
Do not ins tall accessory parts such as
audio sy stems in these areas. #
Do not car ryout repairs or welding. #
Have accesso ryparts retrofitted at a
qu alified specialist workshop. Yo
u could jeopardise the operating saf ety of your
ve hicle if you use parts, tyres and wheels as well
as accessories releva nt tosaf ety which ha venot
been appr ovedby Mercedes-Benz. Saf ety-re le‐
va nt sy stems, e.g. the brake sy stem, may mal‐
function. Only use Mercedes-Benz GenuineParts
or parts of equal qualit y.Only use tyres, wheels
and accessory parts that ha vebeen specifically
appr ovedfo ryo ur vehicle model.
Mercedes-Benz tests original parts and con ver‐
sion parts and accessory parts that ha vebeen
specifically appr ovedfo ryo ur vehicle model for
th eir reliability, saf ety and suitabilit y.Despite
ongoing ma rket resear ch, Mercedes-Benz is
unable toassess other parts. Mercedes-Benz
th erefore accepts no responsibility forth e use of
such parts in Mercedes-Benz vehicles, even if
th ey have been of ficially appr oved or independ‐
ently appr oved byate sting centre.
Cer tain parts are only of ficially appr ovedfor
ins tallation or modification if they comply wi th
legal requirements. All Mercedes-Benz Genuine‐
Pa rts meet the appr oval requ irements. The use
of non-appr oved parts may in validate theve hi‐
cle's general operating pe rmit. General no
tes23
Page 27 of 525
This is
the case in thefo llowing situations:
R The vehicle type is dif fere nt from that for
which theve hicle's general operating pe rmit
wa s granted.
R Other road users could be endangered.
R The exhaust gas or noise le velge ts wo rse.
Alw ays specify theve hicle identification number
(VIN) (/ page 391) when ordering Mercedes-
Benz GenuineParts. Owner's Manual
This Owner's Manual describes all models and
all standard and optional equipment available for
yo ur vehicle at the time of this Owner's Manual
going topress. Countr y-specific dif fere nces are
possible. No tethat your vehicle may not be fit‐
te d with all features desc ribed. This is also the
case for sy stems and functions releva nt to
saf ety. Therefore, the equipment on your vehicle
may dif fer from that in the descriptions and illus‐
trations. The original pur
chase agreement foryo ur vehicle
contains a list of all of the sy stems in your vehi‐
cle.
Should you ha veany questions concerning
equipment and operation, please consult a
Mercedes-Benz Service Centre.
The Owner's Manual and Service Booklet are
impor tant documents and should be kept inthe
ve hicle. Operating saf
ety
* NO
TEPlug-in hybrid #
Obser vethe no tes in the Supplement.
Yo u could otherwise failto recognise
dangers. &
WARNING Risk of injury duetomalfunc‐
tions or sy stem failure
In order toavo id malfunctions or sy stem fail‐
ures: #
Alw ays ha vethe specified service/
maintenance workas well as any nec‐ essary
repairs car ried out at a qualified
specialist workshop. &
WARNING Risk of accident or inju rydue
to improper modifications toelectronic
components
Modifications toelectronic components,
th eir software or wiring can impair their func‐
tionality and/or the functionality of other
networ ked components or saf ety-re leva nt
sy stems.
This can endanger theve hicle's operating
saf ety. #
You must not tamp er with wiring, elec‐
tronic components, or their software. #
Alw ays ha vewo rkon electrical and
electronic devices car ried out at a quali‐
fi ed specialist workshop. If
yo u modify the on-board electronics, thege n‐
eral operating perm it isrende red in valid.
Obser vethe "On-board electronics" section in
"Technical data". 24
General no tes
Page 70 of 525
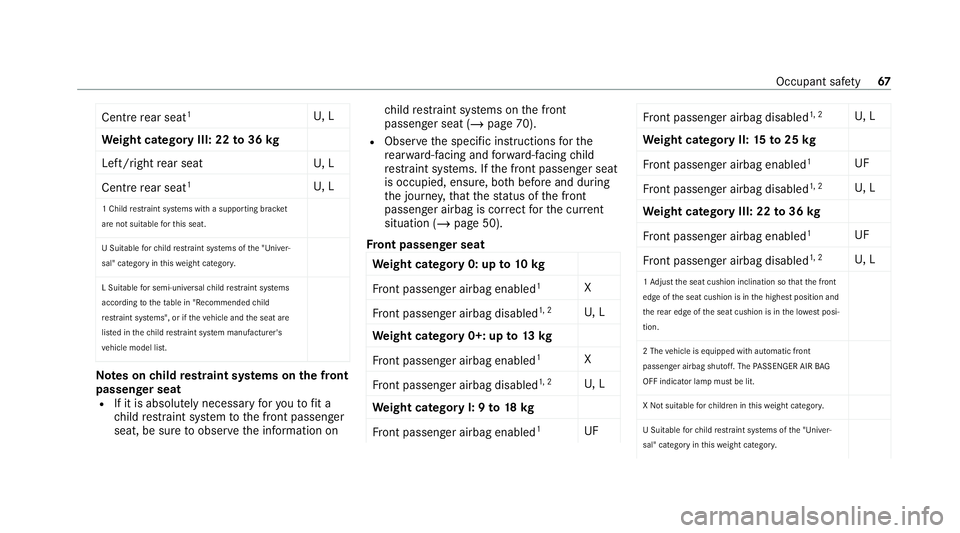
Centre
rear seat 1
U, L
We ight category III: 22 to36 kg
Left/right rear seat U, L
Centre rear seat 1
U, L
1 Child restra int sy stems with a supporting brac ket
are not sui table forth is seat.
U Suitable forch ild restra int sy stems of the "Univer‐
sal" category in this we ight categor y.
L Suitable for semi-universal child restra int sy stems
according totheta ble in "Recommended child
re stra int sy stems", or if theve hicle and the seat are
lis ted in thech ild restrai nt sy stem manufacturer's
ve hicle model list. Note
s onchild restra int sy stems on the front
passenger seat
R If it is absolutely necessary foryo uto fit a
ch ild restra int sy stem tothe front passenger
seat, be sure toobser vethe information on ch
ild restra int sy stems on the front
passenger seat (/ page 70).
R Obser vethe specific instructions forthe
re ar wa rd-facing and forw ard-facing child
re stra int sy stems. If the front passenger seat
is occupied, ensure, bo thbefore and during
th e journe y,that thest atus of the front
passenger airbag is cor rect forth e cur rent
situation (/ page 50).
Fr ont passenger seat
We ight category 0: up to10 kg
Fr ont passenger airbag enabled 1
X
Fr ont passenger airbag disabled 1, 2
U, L
We ight category 0+: up to13 kg
Fr ont passenger airbag enabled 1
X
Fr ont passenger airbag disabled 1, 2
U, L
We ight category I: 9 to18 kg
Fr ont passenger airbag enabled 1
UF Fr
ont passenger airbag disabled 1, 2
U, L
We ight category II: 15to25 kg
Fr ont passenger airbag enabled 1
UF
Fr ont passenger airbag disabled 1, 2
U, L
We ight category III: 22 to36 kg
Fr ont passenger airbag enabled 1
UF
Fr ont passenger airbag disabled 1, 2
U, L
1 Ad just the seat cushion inclination so that the front
edge of the seat cushion is in the highest position and
th ere ar edge of the seat cushion is in the lo west posi‐
tion.
2 The vehicle is equipped with automatic front
passenger airbag shutoff. The PASSENGER AIR BAG
OFF indicator lamp must be lit.
X Not suitable forch ildren in this we ight categor y.
U Suitable forch ild restrai nt sy stems of the "Univer‐
sal" category in this we ight categor y. Occupant saf
ety67
Page 71 of 525
L Suitable
for semi-universal child restra int sy stems
according totheta ble in "Recommended child
re stra int sy stems", or if theve hicle and the seat are
lis ted in thech ild restrai nt sy stem manufacturer's
ve hicle model list.
UF Suitable forfo rw ard-facing child restra int sy stems
of the "Universal" category in this we ight categor y. Securing
thech ild restra int sy stem with the
seat belt on there ar seat &
WARNING Risk of accident if there ar
ben chseat, rear seat and seat backrest
are not engaged
The rear ben chseat, rear seat and seat back‐
re st may fold forw ards, even while theve hi‐
cle is in motion.
R As a result, theve hicle occupant will be
pressed into the seat belt with increased
fo rc e. The seat belt will not be able to
pr otect as intended and could cause
additional injur y. R
Objects or loads in the boot or load com‐
partment cann otbe restra ined bythe
seat backrest. #
Make sure that there ar ben chseat, the
re ar seat and the seat backrest are
engaged before everytrip. If
th ere ar seat backrest is not engaged and
loc ked in place, there d lock verification indica‐
to r will be visible.
When fitting a belt-secured child restra int
sy stem, obser vethefo llowing:
0073 Alw
ays comply with the manufacturer's
ins tallation and operating instructions for
th ech ild restra int sy stem used.
0073 Fo
r a child restra int sy stem in the "Univer‐
sal" or "Semi-Universal" categor y,make
sure that the sy stem has been appr oved for
th eve hicle seat.
Obser vethe no tes under "Suitability of
seats for attaching belt-secu redch ild
re stra int sy stems" (/ page 66). 0073
When using a
weight category 0/0+
baby car seat and a weight category I
re ar wa rd-facing child restra int sy stem
on a rear seat: adjustthe front seat so that
th e seat does not touch thech ild restra int
sy stem.
0073 When using a
weight category I forw ard-
fa cing child restra int sy stem: remo vethe
head restra int from there spective seat, if
possible.
Af terth ech ild restra int sy stem has been
re mo ved, replace the head restra ints again
immediately and adjust them cor rectly.
0073 The ba
ckrest of thefo rw ard-facing child
re stra int sy stem must, as far as possible, be
re sting on the seat backrest of there ar
seat.
0073 If
th e head restra int of thech ild seat cannot
be fully extended when it is ins talled in the
ve hicle, this will result in restrictions on the
maximum size setting forch ild restra int sys‐
te ms in weight category II or III.
Contact with thero of when the head
re stra int is fully extended and lo cked in 68
Occupant saf ety
Page 153 of 525
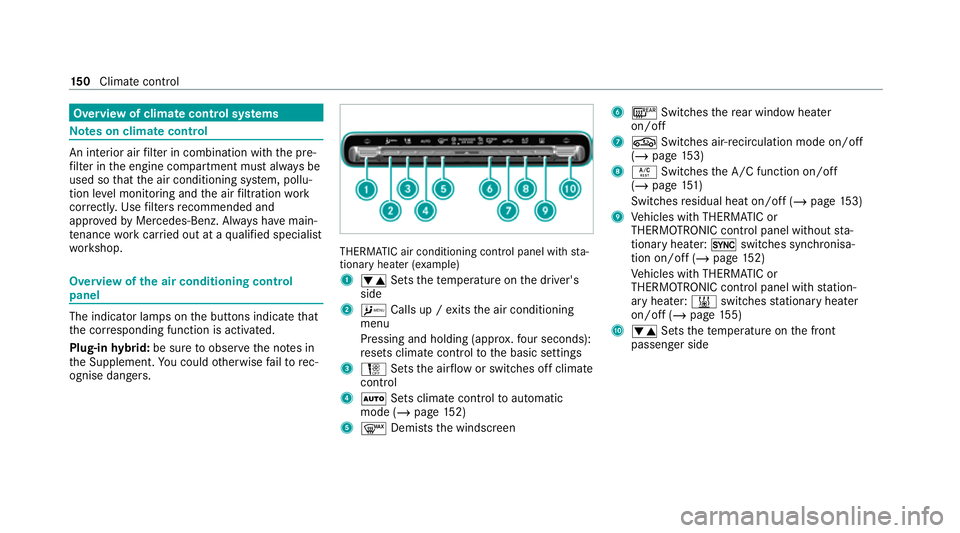
Overview of climate control sy
stems Note
s on climate control An interior air
filter in combination with the pre‐
fi lter in the engine compartment must alw ays be
used so that the air conditioning sy stem, pollu‐
tion le vel monitoring and the air filtration work
cor rectl y.Use filters recommended and
appr ovedby Mercedes-Benz. Alw ays ha vemain‐
te nance workcar ried out at a qualified specialist
wo rkshop. Overview of
the air conditioning control
panel The indicator lamps on
the buttons indicate that
th e cor responding function is activated.
Plug-in hybrid: be sure toobser vethe no tes in
th e Supplement. You could otherwise failto rec‐
ognise dangers. THERMATIC air conditioning control panel wi
th sta‐
tionary heater (e xamp le)
1 0082 Setsthete mp erature on the driver's
side
2 A Calls up / exits the air conditioning
menu
Pressing and holding (appr ox.fo ur seconds):
re sets climate contro lto the basic settings
3 H Setsthe air flow or switches off climate
control
4 0058 Sets climate control toautomatic
mode (/ page152)
5 0064 Demists the windscreen 6
006C Switches there ar wind owheater
on/off
7 0072 Switches air-recirculation mode on/off
(/ page 153)
8 0056 Switches the A/C function on/off
(/ page 151)
Switches residual heat on/off (/ page153)
9 Vehicles with THERMATIC or
THERMOTRONIC contro l panel withoutsta‐
tionary heater: 0switches synchronisa‐
tion on/off (/ page152)
Ve hicles with THERMATIC or
THERMOTRONIC contro l panel withstation‐
ary heater: 003Bswitches stationary heater
on/off (/ page155)
A 0082 Setsthete mp erature on the front
passenger side 15 0
Climate cont rol
Page 154 of 525
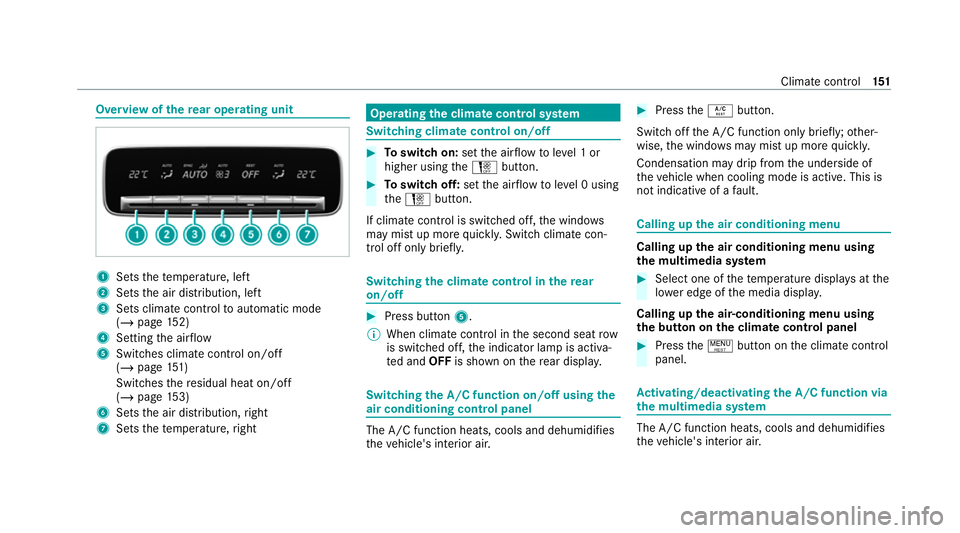
Overview of
there ar operating unit 1
Sets thete mp erature, left
2 Sets the air distribution, left
3 Sets climate control toautomatic mode
(/ page 152)
4 Setting the air flow
5 Switches climate control on/off
(/ page 151)
Switches there sidual heat on/off
(/ page 153)
6 Sets the air distribution, right
7 Sets thete mp erature, right Operating
the clima tecont rol sy stem Switching clima
tecont rol on/off #
Toswitch on: setthe air flow toleve l 1 or
higher using theH button. #
Toswitch off: setthe air flow toleve l 0 using
th eH button.
If climate control is switched off, the windo ws
may mist up more quickl y.Switch climate con‐
trol off only briefl y. Switching
the clima tecont rol in there ar
on/off #
Press button 5.
% When clima tecontrol in the second seat row
is switched off, the indicator lamp is activa‐
te d and OFFis shown on there ar displa y. Switching
the A/C function on/off using the
air conditioning control panel The A/C function heats, cools and dehumidi
fies
th eve hicle's interior air. #
Press the0056 button.
Switch off the A/C function only brief ly;ot her‐
wise, the windo wsmay mist up more quickl y.
Condensation may drip from the underside of
th eve hicle when cooling mode is active. This is
not indicative of a fault. Calling up
the air conditioning menu Calling up
the air conditioning menu using
th e multimedia sy stem #
Select one of thete mp erature displa ysatthe
lo we r edge of the media displa y.
Calling up the air-conditioning menu using
th e but ton on the clima tecont rol panel #
Press the! button on the climate control
panel. Ac
tivating/deactivating the A/C function via
the multimedia sy stem The A/C function heats, cools and dehumidifies
th
eve hicle's interior air. Climate control
151
Page 155 of 525
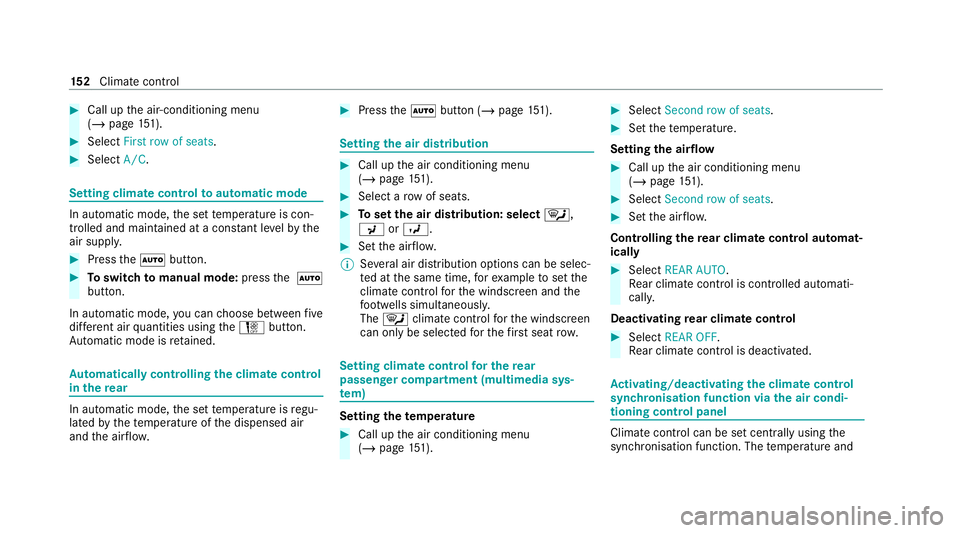
#
Call up the air-conditioning menu
(/ page 151). #
Select First row of seats .#
Select A/C. Setting climate control
toautomatic mode In auto
matic mode, the set temp erature is con‐
trolled and maintained at a const ant levelby the
air suppl y. #
Press the0058 button. #
Toswitch tomanual mode: pressthe 0058
button.
In automatic mode, you can choose between five
dif fere nt air quantities using theH button.
Au tomatic mode is retained. Au
tomatically controlling the climate control
in the rear In auto
matic mode, the set temp erature is regu‐
lated bythete mp erature of the dispensed air
and the air flow. #
Press the0058 button (/ page151). Setting
the air distribution #
Call up the air conditioning menu
(/ page 151). #
Select a rowof seats. #
Toset the air distribution: select 0061,
009C or009B. #
Set the air flow.
% Several air distribution options can be selec‐
te d at the same time, forex ample toset the
climate control forth e windscreen and the
fo ot we lls simultaneousl y.
The 0061 climate contro lfo rth e windscreen
can only be selected forth efirs t seat row. Setting climate control
for the rear
passenger comp artment (multimedia sys‐
te m) Setting the
temperature #
Call up the air conditioning menu
(/ page 151). #
Select Second row of seats . #
Set thete mp erature.
Setting the airflow #
Call up the air conditioning menu
(/ page 151). #
Select Second row of seats . #
Set the air flow.
Controlling there ar climate control automat‐
ical ly #
Select REAR AUTO .
Re ar climate control is controlled automati‐
call y.
Deactivating rear climate control #
Select REAR OFF.
Re ar climate control is deactivated. Ac
tivating/deactivating the climate control
syn chro nisation function via the air condi‐
tioning control panel Climate control can be set centrally using
the
synchronisation function. The temp erature and 15 2
Climate cont rol
Page 156 of 525
air distribution setting
forth e driver's side will be
adop ted automatically for all clima tecontrol
zones. #
Press the0 button.
The synchronisation function will be deactivated
if th e settings for one of theot her climate zones
are changed. Ac
tivating/deactivating the climate control
syn chro nisation function via the multimedia
sy stem Climate control can be set centrally using
the
synchronisation function. The driver's settings
fo rte mp erature, air quantity and air distribution
are adop ted automatically for all clima tezones. #
Call up the air conditioning menu
(/ page 151). #
Select First row of seats . #
Select SYNC. Demisting the windo
ws Wi
ndo wsmis ted up on the inside #
Press the0058 button. #
Ifth e windo wscontinue tomist up: press the
0064 button.
Wi ndo wsmis ted up on the outside #
Switch on the windscreen wipers. #
Press the0058 button. Switching air-recirculation mode on/off
#
Press the0072 button.
The interior air will be recirculated.
Air-reci rculation mode automatically swit ches to
fresh air mode af ter some time.
% If air-recirculation mode is switched on, the
windo wsmay mist up more quickl y.Switch
on air- recirculation mode only brie fly. Switches
there sidual heat on/off Re
quirements:
R theve hicle is par ked.
It is possible tomake use of there sidual heat
from the engine tocontinue heating or ventilat‐
ing the front compartment of theve hicle for
appr oximately 30 minutes, depending on the
te mp erature set. #
Toactivate: press button 0056.
Re sidual heat will be switched off automaticall y. Switching
there sidual heat in there ar
on/off Re
quirements:
R The vehicle is par ked.
When there sidual heat of the engine is activated
in there ar compartment, you can heat or venti‐
la te there ar compartment for appro ximately
30 minutes. #
Press button 5(/ page 151). Clima
tecontrol 15 3