2021 LINCOLN CORSAIR install
[x] Cancel search: installPage 385 of 638

Remove and Reinstall the Battery
To disconnect or remove the battery, do the
following:
1. Apply the parking brake and switch the
ignition off.
2. Switch all electrical equipment off, for example lights and radio.
3. Wait a minimum of two minutes before disconnecting the battery.
Note: The engine management system has
a power hold function and remains powered
for a period of time after you switch the
ignition off. This is to allow diagnostic and
adaptive tables to be stored. Disconnecting
the battery without waiting can cause
damage not covered by the vehicle
Warranty.
4. Disconnect the negative battery cable terminal.
5. Disconnect the positive battery cable terminal.
6. Remove the battery securing clamp.
7. Remove the battery.
8. To install, reverse the removal procedure. Note:
Before reconnecting the battery, make
sure the ignition remains switched off.
Note: Make sure the battery cable terminals
are fully tightened.
If you disconnect or replace the vehicle
battery, you must reset the following
features:
• Window bounce-back. See Windows
and Mirrors (page 112).
• Clock Settings.
• Pre-set radio stations.
• Steering Angle Sensor.
Note: To calibrate the steering angle sensor,
drive the vehicle above
30 mph (50 km/h)
for a minimum of 1.2 mi (2 km). Make sure to
drive straight ahead for a minimum of 30
seconds. Several vehicle functions are
disabled and a warning light could appear
until the sensor is calibrated. Note:
For flexible fuel vehicles, if you are
operating on E85, you could experience poor
starts or an inability to start the engine, and
driveability problems until the fuel trim and
ethanol content have been relearned. Drive
the vehicle at least
10 mi (16 km) to
completely relearn the idle trim and fuel trim
strategy.
Battery Disposal Make sure that you dispose of old
batteries in an environmentally
friendly way. Seek advice from
your local authority about recycling old
batteries.
ADJUSTING THE HEADLAMPS
Vertical Aim Adjustment
The assembly plant properly aims the
headlamps on your vehicle. If your vehicle
has been in an accident, have the alignment
of your headlamps checked by your
authorized dealer.
382
Corsair (CTF) Canada/United States of America, enUSA, Edition date: 202007, First-Printing MaintenanceE107998
Page 388 of 638
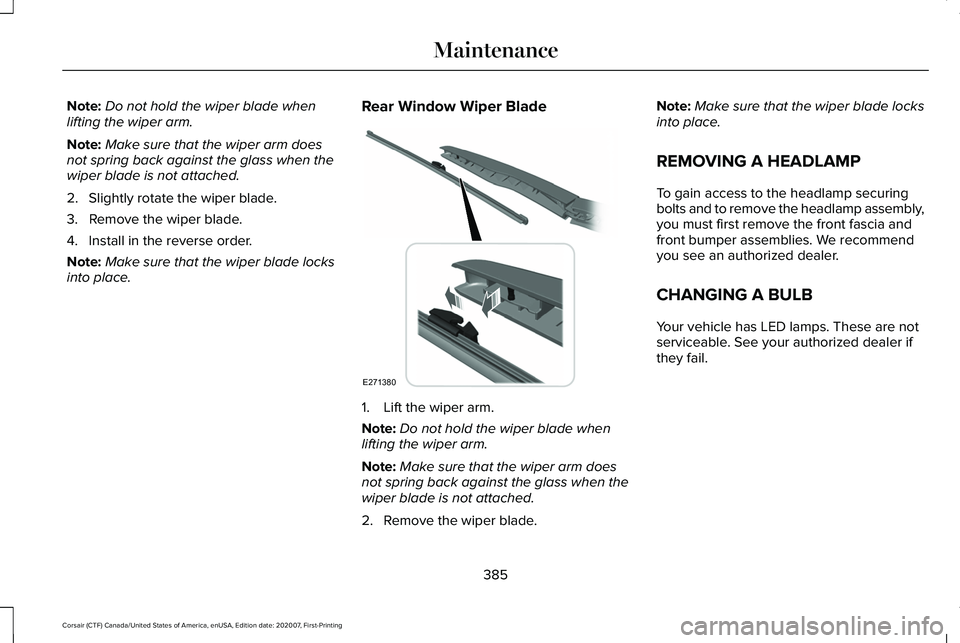
Note:
Do not hold the wiper blade when
lifting the wiper arm.
Note: Make sure that the wiper arm does
not spring back against the glass when the
wiper blade is not attached.
2. Slightly rotate the wiper blade.
3. Remove the wiper blade.
4. Install in the reverse order.
Note: Make sure that the wiper blade locks
into place. Rear Window Wiper Blade 1. Lift the wiper arm.
Note:
Do not hold the wiper blade when
lifting the wiper arm.
Note: Make sure that the wiper arm does
not spring back against the glass when the
wiper blade is not attached.
2. Remove the wiper blade. Note:
Make sure that the wiper blade locks
into place.
REMOVING A HEADLAMP
To gain access to the headlamp securing
bolts and to remove the headlamp assembly,
you must first remove the front fascia and
front bumper assemblies. We recommend
you see an authorized dealer.
CHANGING A BULB
Your vehicle has LED lamps. These are not
serviceable. See your authorized dealer if
they fail.
385
Corsair (CTF) Canada/United States of America, enUSA, Edition date: 202007, First-Printing MaintenanceE271380
Page 398 of 638
GENERAL INFORMATION
The recommended tire inflation pressures
are found on the Tire Label which is located
on the B-pillar or the edge of the driver door.
This information can also be found on the
Safety Compliance Certification Label, affixed
to either the door hinge pillar, door-latch
post, or the door edge that meets the
door-latch post; next to the driver’
s seating
position.
We strongly recommend maintaining these
tire pressures at all times. Failure to follow
the tire pressure recommendations can
cause uneven treadwear patterns, reduced
fuel economy, and adversely affect the way
your vehicle handles.
Note: Check and set the tire pressure at the
ambient temperature in which you are
intending to drive your vehicle and when the
tires are cold.
Note: Check your tire pressures at least once
per month.
If your vehicle has a spare tire, set the
pressure to the highest value given for your
vehicle and tire size combination. Use only approved wheels and tire sizes,
using other sizes could damage your vehicle.
If you change the diameter of the factory
installed tires, the speedometer may not
display the correct speed. Take your vehicle
to an authorized dealer and have the engine
management system reprogrammed.
If you intend to change the size of the factory
installed tires, check the suitability with an
authorized dealer.
Additional information related to the
functionality and maintenance of your tires
can be found in the Wheels and Tire section.
See Tire Care (page 404).
Notice to utility vehicle and truck
owners WARNING:
Vehicles with a higher
center of gravity (utility and four-wheel
drive vehicles) handle differently than
vehicles with a lower center of gravity
(passenger cars). Avoid sharp turns,
excessive speed and abrupt steering in
these vehicles. Failure to drive cautiously
increases the risk of losing control of your
vehicle, vehicle rollover, personal injury
and death. WARNING:
In a rollover crash, an
unbelted person is significantly more likely
to die than a person wearing a seatbelt.
Utility vehicles and trucks handle differently
than passenger cars in the various driving
conditions that are encountered on streets,
highways and off-road. Utility vehicles and
trucks are not designed for cornering at
speeds as high as passenger cars any more
than low-slung sports cars are designed to
perform satisfactorily under off-road
conditions.
395
Corsair (CTF) Canada/United States of America, enUSA, Edition date: 202007, First-Printing Wheels and Tires
Page 404 of 638
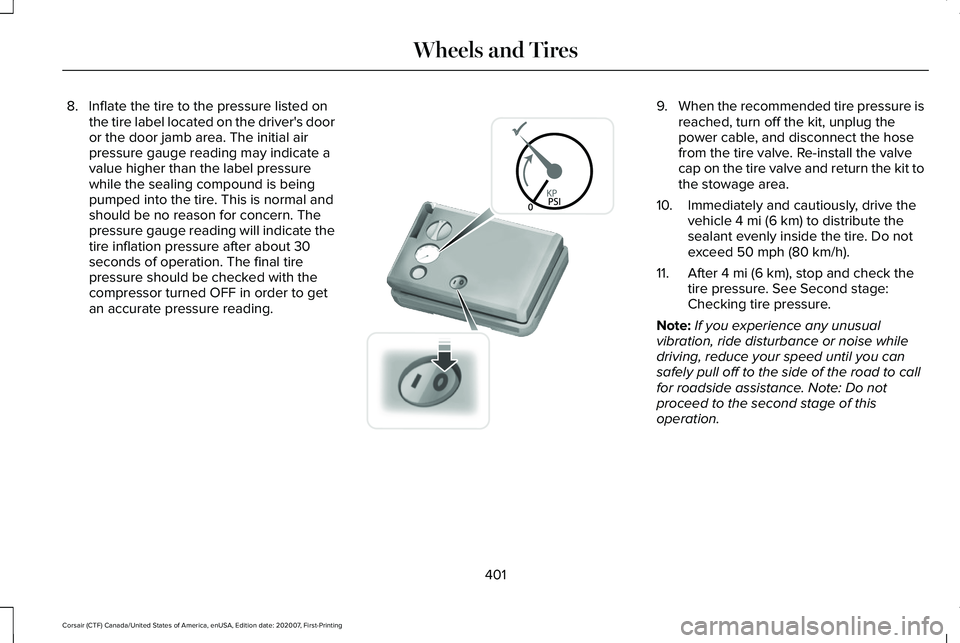
8. Inflate the tire to the pressure listed on
the tire label located on the driver's door
or the door jamb area. The initial air
pressure gauge reading may indicate a
value higher than the label pressure
while the sealing compound is being
pumped into the tire. This is normal and
should be no reason for concern. The
pressure gauge reading will indicate the
tire inflation pressure after about 30
seconds of operation. The final tire
pressure should be checked with the
compressor turned OFF in order to get
an accurate pressure reading. 9.
When the recommended tire pressure is
reached, turn off the kit, unplug the
power cable, and disconnect the hose
from the tire valve. Re-install the valve
cap on the tire valve and return the kit to
the stowage area.
10. Immediately and cautiously, drive the vehicle 4 mi (6 km) to distribute the
sealant evenly inside the tire. Do not
exceed
50 mph (80 km/h).
11. After
4 mi (6 km), stop and check the
tire pressure. See Second stage:
Checking tire pressure.
Note: If you experience any unusual
vibration, ride disturbance or noise while
driving, reduce your speed until you can
safely pull off to the side of the road to call
for roadside assistance. Note: Do not
proceed to the second stage of this
operation.
401
Corsair (CTF) Canada/United States of America, enUSA, Edition date: 202007, First-Printing Wheels and TiresE175982
Page 405 of 638
Second Stage: Checking Tire Pressure
WARNING: If the tire does not inflate
to the recommended tire pressure within
15 minutes, stop and call roadside
assistance. WARNING:
The power plug may get
hot after use and should be handled
carefully when unplugging.
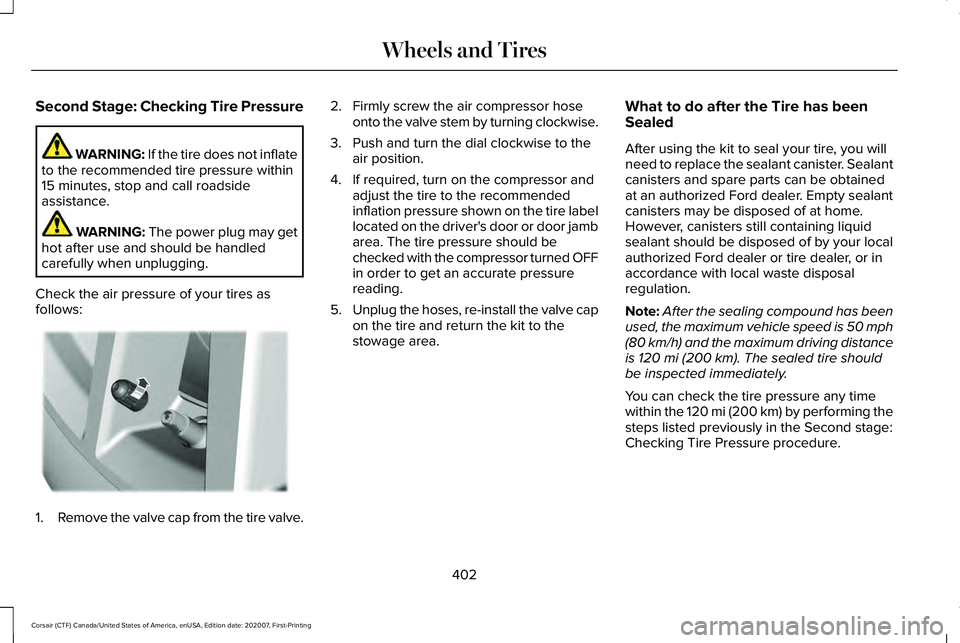
Check the air pressure of your tires as
follows: 1.
Remove the valve cap from the tire valve. 2. Firmly screw the air compressor hose
onto the valve stem by turning clockwise.
3. Push and turn the dial clockwise to the air position.
4. If required, turn on the compressor and adjust the tire to the recommended
inflation pressure shown on the tire label
located on the driver's door or door jamb
area. The tire pressure should be
checked with the compressor turned OFF
in order to get an accurate pressure
reading.
5. Unplug the hoses, re-install the valve cap
on the tire and return the kit to the
stowage area. What to do after the Tire has been
Sealed
After using the kit to seal your tire, you will
need to replace the sealant canister. Sealant
canisters and spare parts can be obtained
at an authorized Ford dealer. Empty sealant
canisters may be disposed of at home.
However, canisters still containing liquid
sealant should be disposed of by your local
authorized Ford dealer or tire dealer, or in
accordance with local waste disposal
regulation.
Note:
After the sealing compound has been
used, the maximum vehicle speed is 50 mph
(80 km/h) and the maximum driving distance
is
120 mi (200 km). The sealed tire should
be inspected immediately.
You can check the tire pressure any time
within the
120 mi (200 km) by performing the
steps listed previously in the Second stage:
Checking Tire Pressure procedure.
402
Corsair (CTF) Canada/United States of America, enUSA, Edition date: 202007, First-Printing Wheels and TiresE175983
Page 406 of 638
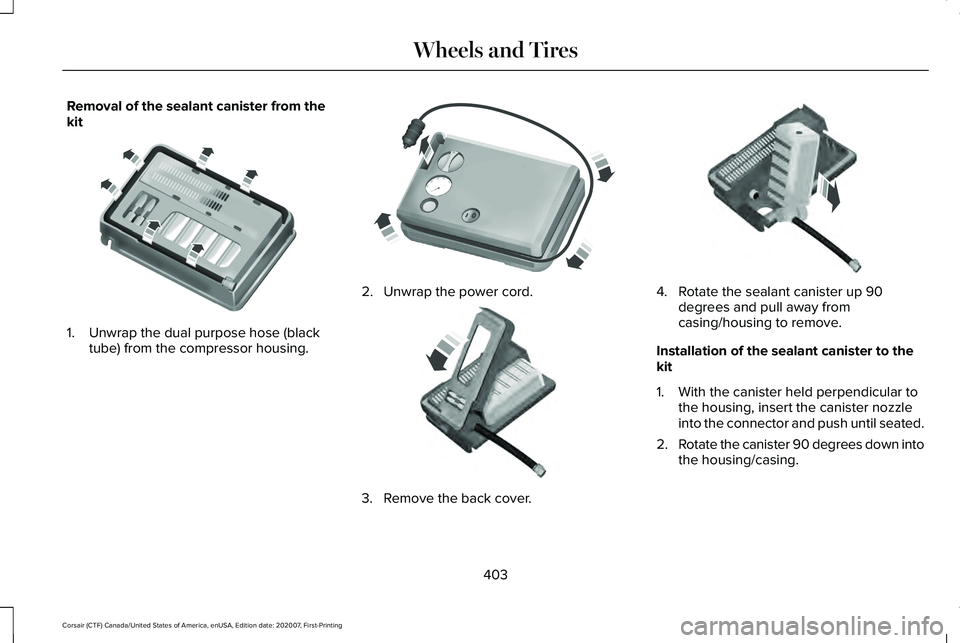
Removal of the sealant canister from the
kit
1. Unwrap the dual purpose hose (black
tube) from the compressor housing. 2. Unwrap the power cord.
3. Remove the back cover. 4. Rotate the sealant canister up 90
degrees and pull away from
casing/housing to remove.
Installation of the sealant canister to the
kit
1. With the canister held perpendicular to the housing, insert the canister nozzle
into the connector and push until seated.
2. Rotate the canister 90 degrees down into
the housing/casing.
403
Corsair (CTF) Canada/United States of America, enUSA, Edition date: 202007, First-Printing Wheels and TiresE175984 E175985 E175986 E175987
Page 407 of 638

3. Snap the back cover back into place.
4.
Wrap the dual purpose hose (black tube)
around the channel on the bottom of the
housing/casing. 5.
Wrap the power cord around the housing
and stow the accessory power plug into
its storage area.
Note: If you experience any difficulties with
the removal or installation of the sealant
canister, consult your authorized Ford dealer
for assistance.
Be sure to check the sealant compound’ s
use-by date regularly. The use-by date is on
a label located on the sealant canister and
can be seen through the rectangular viewing
window on the bottom of the kit. The sealant
canister should be replaced when the sealant
expires. TIRE CARE
Information About Uniform Tire Quality
Grading
Tire Quality Grades apply to new
pneumatic passenger car tires. The
Quality grades can be found where
applicable on the tire sidewall between
tread shoulder and maximum section
width. For example: Treadwear 200
Traction AA Temperature A.
404
Corsair (CTF) Canada/United States of America, enUSA, Edition date: 202007, First-Printing Wheels and TiresE175988 E175989 E175990 E142542
Page 419 of 638

WARNING: When inflating the
tire for mounting pressures up to
20 psi (1.38 bar)
greater than the
maximum pressure on the tire sidewall,
the following precautions must be
taken to protect the person mounting
the tire:
• Make sure that you have the correct
tire and wheel size.
• Lubricate the tire bead and wheel
bead seat area again.
• Stand at a minimum of 12.0 ft (3.66 m)
away from the wheel and tire
assembly.
• Use both eye and ear protection. WARNING:
Always inflate steel
carcass tires with a remote air fill with
the person inflating standing at a
minimum of
12 ft (3.66 m) away from
the wheel and tire assembly. Important:
Remember to replace the
wheel valve stems when the road tires
are replaced on your vehicle.
It is recommended that the two front
tires or two rear tires generally be
replaced as a pair.
The tire pressure sensors mounted in
the wheels (originally installed on your
vehicle) are not designed to be used in
aftermarket wheels.
The use of wheels or tires not
recommended by us, may affect the
operation of your tire pressure
monitoring system.
If the tire pressure monitoring system
indicator is flashing, your system is
malfunctioning. Your replacement tire
might be incompatible with your tire
pressure monitoring system, or some
component of the system may be
damaged. Safety Practices WARNING:
If your vehicle is
stuck in snow, mud or sand, do not
rapidly spin the tires; spinning the tires
can tear the tire and cause an
explosion. A tire can explode in as little
as three to five seconds. WARNING:
Do not spin the
wheels at over 34 mph (55 km/h). The
tires may fail and injure a passenger
or bystander.
Driving habits have a great deal to do
with your tire mileage and safety.
*Observe posted speed limits
*Avoid fast starts, stops and turns
*Avoid potholes and objects on the road
*Do not run over curbs or hit the tire
against a curb when parking
416
Corsair (CTF) Canada/United States of America, enUSA, Edition date: 202007, First-Printing Wheels and Tires