2021 LINCOLN CORSAIR install
[x] Cancel search: installPage 331 of 638
ESSENTIAL TOWING CHECKS
Follow these guidelines for safe towing:
•
Do not tow a trailer until you drive your
vehicle at least 1,000 mi (1,600 km).
• Consult your local motor vehicle laws for
towing a trailer.
• See the instructions included with towing
accessories for the proper installation
and adjustment specifications.
• Service your vehicle more frequently if
you tow a trailer. See your scheduled
maintenance information.
• If you use a rental trailer, follow the
instructions the rental agency gives you.
You can find information on load
specification terms found on the tire label
and Safety Compliance label as well as
instructions on calculating your vehicle's load
in the Load Carrying chapter. See Load Limit
(page
320).
Remember to account for the trailer tongue
weight as part of your vehicle load when
calculating the total vehicle weight. Hitches
Do not use a hitch that either clamps onto
the bumper or attaches to the axle.
Distribute the trailer load so 10-15% of the
total trailer weight is on the tongue.
Safety Chains
Note:
Never attach safety chains to the
bumper.
Always connect the safety chains to the hook
retainers of your vehicle hitch.
To connect the safety chains, cross them
under the trailer tongue and allow enough
slack for turning tight corners. Do not allow
the chains to drag on the ground.
Trailer Brakes WARNING: Do not connect a trailer's
hydraulic brake system directly to your
vehicle's brake system. Your vehicle may
not have enough braking power and your
chances of having a collision greatly
increase. WARNING:
Do not tow a trailer fitted
with electric trailer brakes unless your
vehicle is fitted with a compatible
aftermarket electronic trailer brake
controller. Failure to follow this instruction
could result in the loss of control of your
vehicle, personal injury or death. For
additional information and assistance, we
recommend that you contact an authorized
dealer.
Electric brakes and manual, automatic or
surge-type trailer brakes are safe if you install
them properly and adjust them to the
manufacturer's specifications. The trailer
brakes must meet local and federal
regulations.
The rating for the tow vehicle's braking
system operation is at the gross vehicle
weight rating, not the gross combined
weight rating.
Separate functioning brake systems are
required for safe control of towed vehicles
and trailers weighing more than 1500 lb
(680 kg) when load.
328
Corsair (CTF) Canada/United States of America, enUSA, Edition date: 202007, First-Printing Towing
Page 332 of 638

Trailer Lamps
WARNING: Never connect any trailer
lamp wiring to the vehicle's tail lamp wiring;
this may damage the electrical system
resulting in fire. Contact your authorized
dealer as soon as possible for assistance
in proper trailer tow wiring installation.
Additional electrical equipment may be
required.
Trailer lamps are required on most towed
vehicles. Make sure all running lights, brake
lights, turn signals and hazard lights are
working.
Before Towing a Trailer
Practice turning, stopping and backing up to
get the feel of your vehicle-trailer
combination before starting on a trip. When
turning, make wider turns so the trailer
wheels clear curbs and other obstacles. When Towing a Trailer
•
Do not drive faster than 70 mph
(113 km/h) during the first 500 mi
(800 km).
• Do not make full-throttle starts.
• Check your hitch, electrical connections
and trailer wheel lug nuts thoroughly after
you have traveled
50 mi (80 km).
• When stopped in congested or heavy
traffic during hot weather, place the
transmission in park (P) to aid engine and
transmission cooling and to help A/C
performance.
• Turn off the speed control with heavy
loads or in hilly terrain. The speed control
may turn off automatically when you are
towing on long, steep grades.
• Shift to a lower gear when driving down
a long or steep hill. Do not apply the
brakes continuously, as they may
overheat and become less effective. •
If your transmission is equipped with a
Grade Assist or Tow/Haul feature, use
this feature when towing. This provides
engine braking and helps eliminate
excessive transmission shifting for
optimum fuel economy and transmission
cooling.
• Allow more distance for stopping with a
trailer attached. Anticipate stops and
brake gradually.
• Avoid parking on a grade. However, if
you must park on a grade:
1. Turn the steering wheel to point your vehicle tires away from traffic flow.
2. Set your vehicle parking brake.
3. Place the transmission in park (P).
4. Place wheel chocks in front and back of the trailer wheels. Chocks are not
included with your vehicle.
Launching or Retrieving a Boat or
Personal Watercraft (PWC)
Note: Disconnect the wiring to the trailer
before
backing the trailer into the water.
329
Corsair (CTF) Canada/United States of America, enUSA, Edition date: 202007, First-Printing Towing
Page 338 of 638
To install the floor mats, position the floor
mat eyelet over the retention post and press
down to lock in position.
To remove the floor mat, reverse the
installation procedure.
Note:
Regularly check the floor mats to make
sure they are secure.
335
Corsair (CTF) Canada/United States of America, enUSA, Edition date: 202007, First-Printing Driving Hints
Page 373 of 638

Brake fluid reservoir: See Brake Fluid Check (page 379).
F
Power distribution box:
See Fuses (page 352).
G
Air filter assembly:
See Changing the Engine Air Filter (page 373).
H
ENGINE OIL DIPSTICK Minimum.
A
Nominal.
B
Maximum.
C ENGINE OIL CHECK WARNING:
Do not work on a hot
engine.
To check the engine oil level consistently
and accurately, do the following:
1. Make sure the parking brake is on. Make
sure the transmission is in park (P) or
neutral (N).
2. Run the engine until it reaches normal operating temperature.
3. Make sure that your vehicle is on level ground. 4.
Switch the engine off and wait 15 minutes
for the oil to drain into the oil pan.
Checking the engine oil level too soon
after you switch the engine off may result
in an inaccurate reading.
5. Open the hood. See Opening and
Closing the Hood (page 365).
6. Remove the dipstick and wipe it with a clean, lint-free cloth.
See Under Hood
Overview (page 367).
7. Reinstall the dipstick and remove it again
to check the oil level.
See Engine Oil
Dipstick (page 370).
8. Make sure that the oil level is between the maximum and minimum marks. If the
oil level is at the minimum mark, add oil
immediately.
See Capacities and
Specifications (page 439).
9. If the oil level is correct, replace the dipstick and make sure it is fully seated.
370
Corsair (CTF) Canada/United States of America, enUSA, Edition date: 202007, First-Printing MaintenanceE250320
Page 374 of 638
Note:
Do not remove the dipstick when the
engine is running.
Note: If the oil level is between the
maximum and minimum marks, the oil level
is acceptable. Do not add oil.
Note: The oil consumption of new engines
reaches its normal level after approximately
3,000 mi (5,000 km).
Adding Engine Oil WARNING:
Do not remove the filler
cap when the engine is running. WARNING:
Do not add engine oil
when the engine is hot. Failure to follow
this instruction could result in personal
injury.
Do not use supplemental engine oil additives
because they are unnecessary and could
lead to engine damage that may not be
covered by the vehicle Warranty. Only use oils certified for gasoline engines
by the American Petroleum Institute (API).
An oil with this trademark symbol conforms
to the current engine and emission system
protection standards and fuel economy
requirements of the International Lubricants
Specification Advisory Committee (ILSAC).
To top up the engine oil level do the
following:
1. Clean the area surrounding the engine
oil filler cap before you remove it.
2. Remove the engine oil filler cap.
See
Under Hood Overview (page 367). Turn
it counterclockwise and remove it. 3. Add engine oil that meets our
specifications.
See Capacities and
Specifications (page 439). You may have
to use a funnel to pour the engine oil into
the opening.
4. Recheck the oil level.
5. If the oil level is correct, replace the dipstick and make sure it is fully seated.
6. Replace the engine oil filler cap. Turn it clockwise until you feel a strong
resistance.
Note: Do not add oil further than the
maximum mark. Oil levels above the
maximum mark may cause engine damage.
Note: Make sure you install the oil filler cap
correctly.
Note: Soak up any spillage with an
absorbent cloth immediately.
OIL CHANGE INDICATOR RESET
Use the information display controls on the
steering wheel to reset the oil change
indicator.
371
Corsair (CTF) Canada/United States of America, enUSA, Edition date: 202007, First-Printing MaintenanceE142732
Page 376 of 638
6. Wipe any dirt or debris from the air filter
housing assembly to make sure no dirt
gets in the engine and to make sure you
have a good seal. 7.
Install a new air filter element. Be careful
not to crimp the filter element edges
between the air filter housing and cover.
This could cause filter damage and allow
unfiltered air to enter the engine if it is
not properly seated.
8. Install the air filter housing cover. 9. Engage the clips to secure the air filter
housing cover to the air filter housing.
10. Reconnect the boot to the air filter housing cover and tighten securely.
CHANGING THE ENGINE AIR
FILTER - 2.5L, PLUG-IN HYBRID
ELECTRIC VEHICLE (PHEV) WARNING: To reduce the risk of
vehicle damage and personal burn injuries,
do not start your engine with the air
cleaner removed and do not remove it
while the engine is running.
When changing the air filter element, use
only parts that meet or exceed our
specifications.
Change the air filter element at the proper
interval. See Scheduled Maintenance (page
550
). Note:
If you do not use the correct air filter
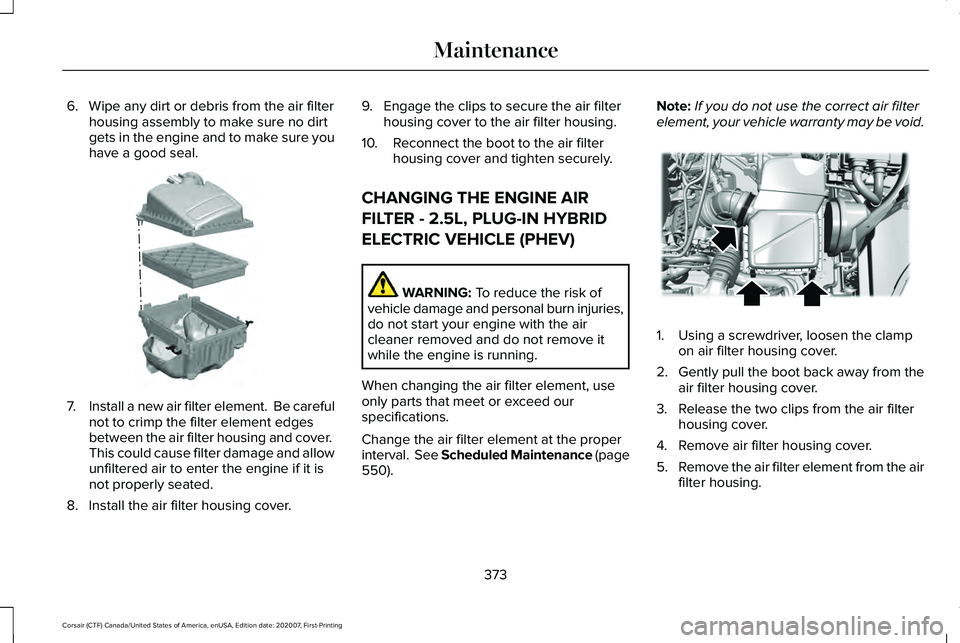
element, your vehicle warranty may be void. 1. Using a screwdriver, loosen the clamp
on air filter housing cover.
2. Gently pull the boot back away from the
air filter housing cover.
3. Release the two clips from the air filter housing cover.
4. Remove air filter housing cover.
5. Remove the air filter element from the air
filter housing.
373
Corsair (CTF) Canada/United States of America, enUSA, Edition date: 202007, First-Printing MaintenanceE299073 E299071
Page 377 of 638

6. Wipe any dirt or debris from the air filter
housing assembly to make sure no dirt
gets in the engine and to make sure you
have a good seal. 7.
Install a new air filter element. Be careful
not to crimp the filter element edges
between the air filter housing and cover.
This could cause filter damage and allow
unfiltered air to enter the engine if it is
not properly seated.
8. Install the air filter housing cover. 9. Engage the clips to secure the air filter
housing cover to the air filter housing.
10. Reconnect the boot to the air filter housing cover and tighten securely.
ENGINE COOLANT CHECK WARNING: Do not remove the
coolant reservoir cap when the engine is
on or the cooling system is hot. Wait 10
minutes for the cooling system to cool
down. Cover the coolant reservoir cap with
a thick cloth to prevent the possibility of
scalding and slowly remove the cap.
Failure to follow this instruction could result
in personal injury. WARNING: Do not put coolant in the
windshield washer reservoir. If sprayed on
the windshield, coolant could make it
difficult to see through the windshield. WARNING:
To reduce the risk of
personal injury, make sure the engine is
cool before unscrewing the coolant
pressure relief cap. The cooling system is
under pressure. Steam and hot liquid can
come out forcefully when you loosen the
cap slightly. WARNING:
Do not add coolant
further than the MAX mark.
When the engine is cold, check the
concentration and level of the coolant at the
intervals listed in the scheduled maintenance
information.
See Scheduled Maintenance
(page 550).
Note: Make sure that the coolant level is
between the
MIN and MAX marks on the
coolant reservoir.
Note: Coolant expands when it is hot. The
level may extend beyond the
MAX mark.
374
Corsair (CTF) Canada/United States of America, enUSA, Edition date: 202007, First-Printing MaintenanceE299074
Page 384 of 638
WARNING: Keep batteries out of
reach of children. Batteries contain sulfuric
acid. Avoid contact with skin, eyes or
clothing. Shield your eyes when working
near the battery to protect against possible
splashing of acid solution. In case of acid
contact with skin or eyes, flush immediately
with water for a minimum of 15 minutes and
get prompt medical attention. If acid is
swallowed, call a physician immediately. WARNING:
Battery posts, terminals
and related accessories contain lead and
lead compounds, chemicals known to the
State of California to cause cancer and
reproductive harm. Wash your hands after
handling
. WARNING:
For vehicles with
Auto-Start-Stop the battery requirement is
different. You must replace the battery with
one of exactly the same specification.
The battery is in the engine compartment.
See
Under Hood Overview (page 367). Your vehicle has a maintenance-free battery.
It does not require additional water during
service.
If the vehicle battery has a cover, make sure
you correctly install it after cleaning or
replacing the battery.
For longer, trouble-free operation, keep the
top of the battery clean and dry and the
battery cables tightly fastened to the battery
terminals. If any corrosion is present on the
battery or terminals, remove the cables from
the terminals and clean with a wire brush.
You can neutralize the acid with a solution
of baking soda and water.
We recommend that you disconnect the
negative battery cable terminal from the
battery if you plan to store your vehicle for
an extended period.
Note:
If you only disconnect the negative
battery cable terminal, make sure it is
isolated or placed away from the battery
terminal to avoid unintended connection or
arcing. To maintain correct operation of the battery
management system, if you add any
electrical devices to your vehicle, do not
connect the ground connection directly to
the negative battery terminal. A connection
at the negative battery terminal can cause
inaccurate measurements of the battery
condition and potential incorrect system
operation.
Note:
If you add electrical accessories or
components to your vehicle this may
adversely affect battery performance,
durability and the performance of other
electrical systems on your vehicle.
If you replace the battery make sure it
matches the electrical requirements of your
vehicle.
If you disconnect or replace the battery and
your vehicle has an automatic transmission,
it must relearn its adaptive strategy. Because
of this, the transmission may shift firmly when
first driven. This is normal operation while
the transmission fully updates its operation
to optimum shift feel.
381
Corsair (CTF) Canada/United States of America, enUSA, Edition date: 202007, First-Printing Maintenance