2021 LINCOLN CORSAIR install
[x] Cancel search: installPage 144 of 638
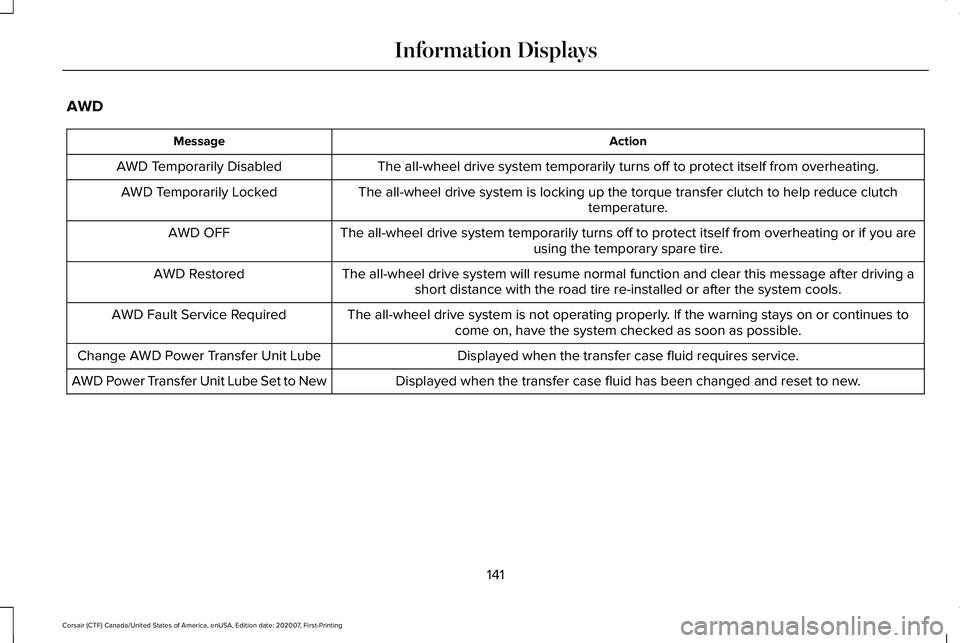
AWD
Action
Message
The all-wheel drive system temporarily turns off to protect itself from \
overheating.
AWD Temporarily Disabled
The all-wheel drive system is locking up the torque transfer clutch to h\
elp reduce clutchtemperature.
AWD Temporarily Locked
The all-wheel drive system temporarily turns off to protect itself from \
overheating or if you areusing the temporary spare tire.
AWD OFF
The all-wheel drive system will resume normal function and clear this me\
ssage after driving ashort distance with the road tire re-installed or after the system cools\
.
AWD Restored
The all-wheel drive system is not operating properly. If the warning stays on or continues tocome on, have the system checked as soon as possible.
AWD Fault Service Required
Displayed when the transfer case fluid requires service.
Change AWD Power Transfer Unit Lube
Displayed when the transfer case fluid has been changed and reset to new\
.
AWD Power Transfer Unit Lube Set to New
141
Corsair (CTF) Canada/United States of America, enUSA, Edition date: 202007, First-Printing Information Displays
Page 172 of 638

WHAT IS THE CABIN AIR FILTER
The cabin air filter improves the quality of air
in your vehicle by trapping dust, pollen and
other particles.
LOCATING THE CABIN AIR FILTER
You can locate the cabin air filter behind the
glove box.
REPLACING THE CABIN AIR FILTER
Replace the filter at regular intervals. See
Scheduled Maintenance (page 550).
Note: Make sure you have a cabin air filter
installed at all times. This prevents foreign
objects from entering the system. Running
the system without a filter in place could
result in degradation or damage to the
system.
Note: Using an aftermarket cabin air filter
could reduce cabin air filtration and climate
control performance.
169
Corsair (CTF) Canada/United States of America, enUSA, Edition date: 202007, First-Printing Interior Air Quality
Page 174 of 638
HEAD RESTRAINTS
WARNING: Fully adjust the head
restraint before you sit in or operate your
vehicle. This will help minimize the risk of
neck injury in the event of a crash. Do not
adjust the head restraint when your vehicle
is moving. WARNING:
The head restraint is a
safety device. Whenever possible it should
be installed and properly adjusted when
the seat is occupied. Failure to adjust the
head restraint properly could reduce its
effectiveness during certain impacts. WARNING: Adjust the head restraints
for all passengers before you drive your
vehicle. This will help minimize the risk of
neck injury in the event of a crash. Do not
adjust the head restraints when your
vehicle is moving. Note:
Adjust the seat backrest to an upright
driving position before adjusting the head
restraint. Adjust the head restraint so that
the top of it is level with the top of your head
and as far forward as possible. Make sure
that you remain comfortable. If you are
extremely tall, adjust the head restraint to
its highest position.
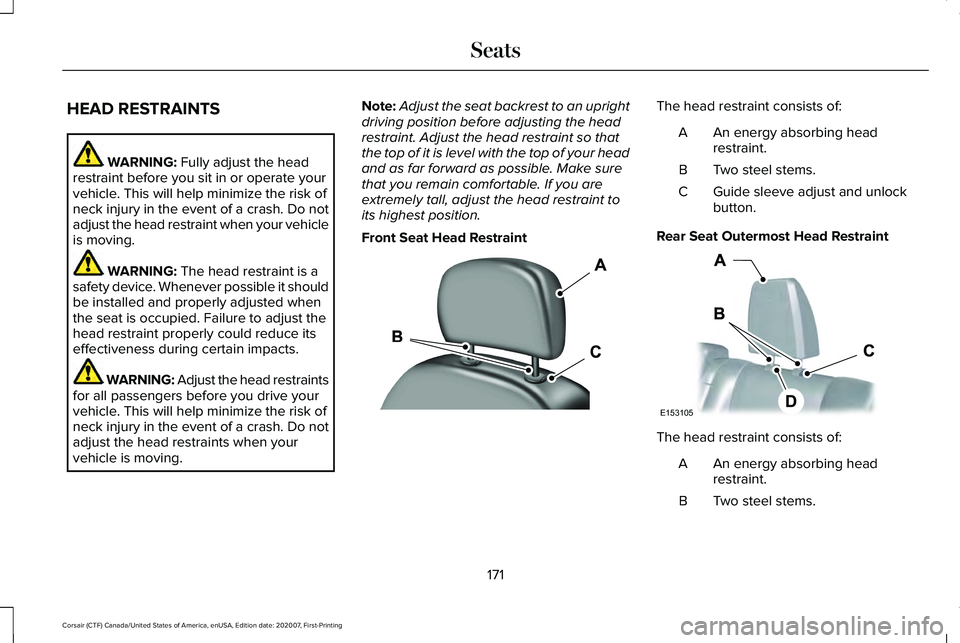
Front Seat Head Restraint The head restraint consists of:
An energy absorbing head
restraint.
A
Two steel stems.
B
Guide sleeve adjust and unlock
button.
C
Rear Seat Outermost Head Restraint The head restraint consists of:
An energy absorbing head
restraint.
A
Two steel stems.
B
171
Corsair (CTF) Canada/United States of America, enUSA, Edition date: 202007, First-Printing SeatsE308781 E153105
Page 176 of 638
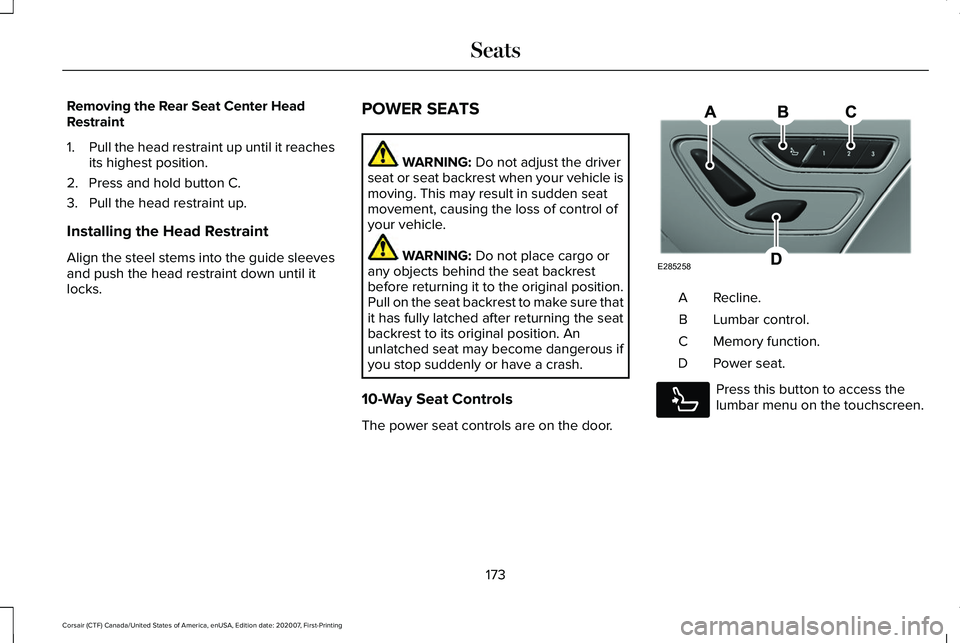
Removing the Rear Seat Center Head
Restraint
1.
Pull the head restraint up until it reaches
its highest position.
2. Press and hold button C.
3. Pull the head restraint up.
Installing the Head Restraint
Align the steel stems into the guide sleeves
and push the head restraint down until it
locks. POWER SEATS WARNING: Do not adjust the driver
seat or seat backrest when your vehicle is
moving. This may result in sudden seat
movement, causing the loss of control of
your vehicle. WARNING:
Do not place cargo or
any objects behind the seat backrest
before returning it to the original position.
Pull on the seat backrest to make sure that
it has fully latched after returning the seat
backrest to its original position. An
unlatched seat may become dangerous if
you stop suddenly or have a crash.
10-Way Seat Controls
The power seat controls are on the door. Recline.
A
Lumbar control.
B
Memory function.
C
Power seat.
D Press this button to access the
lumbar menu on the touchscreen.
173
Corsair (CTF) Canada/United States of America, enUSA, Edition date: 202007, First-Printing SeatsE285258 E285278
Page 197 of 638
FCC ID: L2C0074TR
Canada: 3432A-0074TR
This equipment has been tested and found
to comply with part 18 of the FCC Rules.
•
This equipment generates, uses, and can
radiate radio frequency energy and may
cause harmful interference to radio
communications. There is no guarantee
that interference will not occur in a
particular installation. If this equipment
does cause harmful interference to radio
or television reception, please consult
the dealer.
• This product is not end-user serviceable.
This device contains licence-exempt
transmitter(s)/receiver(s) that comply with
Innovation, Science and Economic
Development Canada's licence-exempt
RSS(s). Operation is subject to the following
two conditions:
• This device may not cause interference.
• This device must accept any interference,
including interference that may cause
undesired operation of the device.
194
Corsair (CTF) Canada/United States of America, enUSA, Edition date: 202007, First-Printing Auxiliary Power Points
Page 206 of 638
WARNING: Do not use your heater
with ungrounded electrical systems or
two-pronged adapters. There is a risk of
electrical shock. WARNING:
Do not fully close the
hood, or allow it to drop under its own
weight when using the engine block
heater. This could damage the power cable
and may cause an electrical short resulting
in fire, injury and property damage.
Note: The heater is most effective when
outdoor temperatures are below
0°F (-18°C).
The heater acts as a starting aid by warming
the engine coolant. This allows the climate
control system to respond quickly. The
equipment includes a heater element,
installed in the engine block and a wire
harness. You can connect the system to a
grounded 120-volt AC electrical source. We recommend that you do the following for
a safe and correct operation:
•
Use a 16-gauge outdoor extension cord
that is product certified by Underwriter’ s
Laboratory (UL) or Canadian Standards
Association (CSA). This extension cord
must be suitable for use outdoors, in cold
temperatures, and be clearly marked
Suitable for Use with Outdoor
Appliances. Do not use an indoor
extension cord outdoors. This could
result in an electric shock or become a
fire hazard.
• Use as short an extension cord as
possible.
• Do not use multiple extension cords.
• Make sure that when in operation, the
extension cord plug and heater cord plug
connections are free and clear of water.
This could cause an electric shock or fire.
• If the block heater cord is under the
hood, Do Not remove the wiring from its
original location. Do Not close the hood
on the extension wiring.
• Make sure your vehicle is parked in a
clean area, clear of combustibles. •
Make sure the heater, heater cord and
extension cord are firmly connected.
• Check for heat anywhere in the electrical
hookup once the system has been
operating for approximately 30 minutes.
• Make sure the system is unplugged and
properly stowed before starting and
driving your vehicle. Make sure the
protective cover seals the prongs of the
block heater cord plug when not in use.
• Make sure the heater system is checked
for proper operation before winter.
Using the Engine Block Heater
Make sure the receptacle terminals are clean
and dry prior to use. Clean them with a dry
cloth if necessary.
The heater uses 0.4 to 1.0 kilowatt-hours of
energy per hour of use. The system does not
have a thermostat. It achieves maximum
temperature after approximately three hours
of operation. Using the heater longer than
three hours does not improve system
performance and unnecessarily uses
electricity.
203
Corsair (CTF) Canada/United States of America, enUSA, Edition date: 202007, First-Printing Starting and Stopping the Engine
Page 229 of 638
WARNING: Do not allow charging
equipment to be immersed in water or
liquids. Failure to follow this warning could
result in fire, serious personal injury or
death. WARNING:
Do not attempt to open
the charging equipment. Failure to follow
this instruction could result in personal
injury, death or property damage. WARNING:
Do not use the charging
equipment if it is faulty or has been
damaged. Failure to follow this instruction
could result in personal injury, death or
property damage. WARNING: You risk death or serious
injury to yourself and others if you do not
follow the instruction highlighted by the
warning symbol. Failure to follow the
specific warnings and instructions could
result in personal injury. WARNING:
Install charging
equipment in compliance with local
regulations. Failure to follow this warning
could result in fire, serious personal injury
or death. WARNING:
Do not use an
ungrounded wall outlet. If you suspect that
the wall outlet is not properly grounded,
have a qualified electrician inspect the wall
outlet. Failure to follow this instruction
could result in personal injury or death. WARNING:
Do not modify the
convenience cord plug. If the convenience
cord plug does not properly fit into the wall
outlet, have a qualified electrician install
the correct wall outlet. Failure to follow this
instruction could result in personal injury
or death. OPERATION INSTRUCTIONS
•
Read all the instructions before using this
product.
• Supervise this device when in use around
children.
• Do not put fingers into the electric vehicle
connector.
• Do not use this product if the flexible
power cord or electric vehicle cable has
broken insulation, or any other signs of
damage.
• Do not use this product if the enclosure
or the electric vehicle connector is
broken, cracked, open, or shows any
other indication of damage.
Note: Ground this product. If it malfunctions
or breaks down, grounding provides a path
of least resistance for electric current to
reduce the risk of electric shock. This product
comes with a cord having an equipment
grounding conductor and a grounding plug.
Make sure you plug it into an appropriate
outlet that is properly installed and grounded
in accordance with all local codes and
ordinances.
226
Corsair (CTF) Canada/United States of America, enUSA, Edition date: 202007, First-Printing High Voltage Battery
(If Equipped)
Page 230 of 638
Charging Equipment
Your vehicle has a convenience cord in the
luggage compartment.
Note:
You need to plug the convenience
cord into a dedicated outlet.
Note: Firmly fit the AC wall plug into the AC
outlet. If the connection feels loose, worn or
the AC outlet is damaged, please have a
qualified electrician replace the AC outlet.
Using a convenience cord with a worn outlet
could cause burns, property damage and
increase the risk of electric shock.
Note: Do not use the 120 volt convenience
cord with an extension cord, two-prong
adapter, surge protector, timer or other
adapter.
Note: If charging for your plug-in vehicle fails,
please call the Customer Relationship
Center, or click on Call for support or Live
Chat at our website. CAUTION: TO REDUCE THE RISK OF FIRE-
Use a three-prong AC outlet that is properly
grounded, 15-20 amps or greater, and in
good condition. Use a dedicated line. You
cannot have other appliances connected to
the same circuit. If you do not use a
dedicated circuit, the circuit breaker could
trip or open. If you do not have a dedicated
circuit, contact a licensed professional
electrician for proper installation.
Note: Make sure the electrical source meets
the requirements for the high-voltage
batteries to charge.
Make sure that the convenience cord is
completely unwrapped before charging.
Always plug the cord into the AC outlet
before connecting the charged coupler into
the charge port on your vehicle.
Note: If the power indicator light is off after
plugging in the convenience cord and you
cannot determine a charge status, use a
different outlet.
Note: Store the convenience cord in a clean
dry place between the temperature of
-39.9–157.9°F (-40–70°C) Note:
For further information on the
convenience cord, please refer to the user
manual provided with the convenience cord.
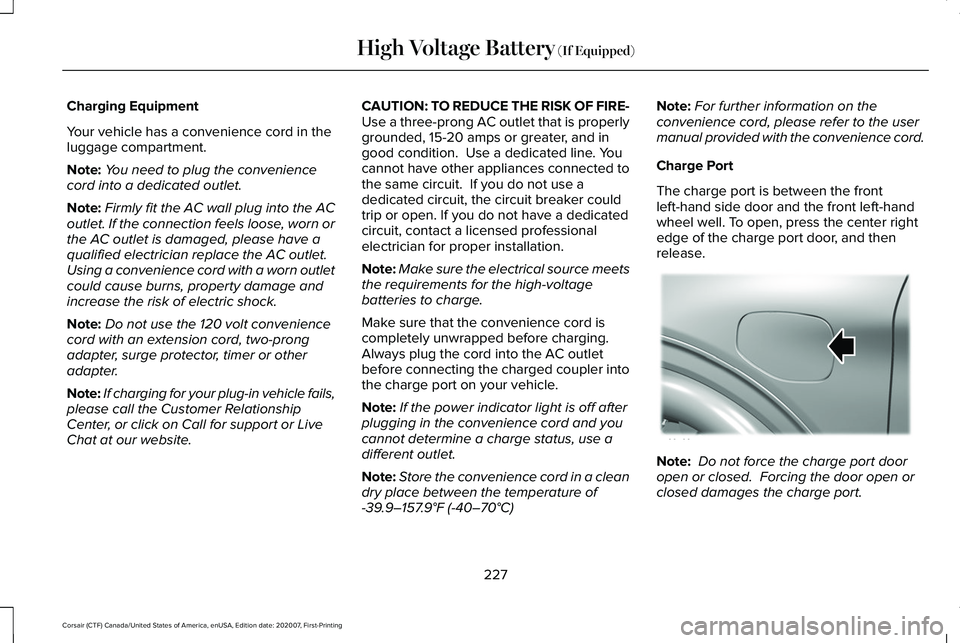
Charge Port
The charge port is between the front
left-hand side door and the front left-hand
wheel well. To open, press the center right
edge of the charge port door, and then
release. Note:
Do not force the charge port door
open or closed. Forcing the door open or
closed damages the charge port.
227
Corsair (CTF) Canada/United States of America, enUSA, Edition date: 202007, First-Printing High Voltage Battery
(If Equipped)E295258