Page 33 of 70

ALWAYS CHECK THE OWNER’S MANUAL FOR COMPLETE OPER ATING INFORMATION AND SAFET Y WARNINGS. *IF EQUIPPED31
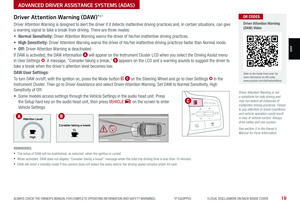
AUDIO SYSTEMS
AUDIOSYSTEMS
MEDIARADIO
TRACK >
SETUP
< SEEK
POWERPUSHVOL ENTER
TUNE
FILE
Audio System Setup Options – Press the SETUP key, then using the touchscreen, press the menu item to enter (Display, Sound, Clock / Calendar, Phone, System). Adjust the available settings for each equipped audio system setup option by pressing the onscreen buttons/arrows. Audio system setup options may include the following:
•Display settings – Adjusting the Brightness, Mode Popup, MP3 Information Display
•Sound settings – Sound Settings, Speed Dependent Volume Control, Voice Recognition Volume, Touchscreen Beep
•Clock/Calendar settings – Clock Settings, Time Format, Calendar Settings, Clock Display
•System settings – Memory Information, Prompt Feedback, Language
Presets: Press the favorite (star) button near the station information
Custom Key H: A programmable key to provide quick access to one of several available system features.
To Program the Custom Key: Press the SETUP key, then press the Custom button. Select one of the available features you would like the Custom button to open.
Your vehicle’s audio system may differ from that in the illustration. For further audio system operations, refer to the Car Infotainment System Quick Reference Guide
Sound Settings – To adjust the Standard Audio Systems sound settings:
1. Press the SETUP key on the audio head unit or the onscreen MENU button, when in MEDIA mode
2. Select the onscreen SOUND button
3. Select the menu item (Position, Tone, Speed Dependent Volume, Beep)
4. Using the touchscreen, press arrows to adjust the settings
Standard Audio System* — FM/AM/Media (USB, Aux, Bluetooth® Au d io)*
•
•Volume level between different audio modes:
– When switching between audio modes (AM, FM, Bluetooth® Audio, etc.), the audio system saves the previous volume level you were listening to. For example, if you were listening to FM radio at volume level 20 then switched to BT Audio and adjusted the volume level to 30, the volume level will be at 20 when you switch back to FM radio
– When using Bluetooth® Audio, the overall volume is dependent on your device’s volume. If the volume is turned down low on your device it will remain low even if the system volume is turned up
•This system supports Android Auto™ (USB & wireless connection) and Apple CarPlay® (wireless connection only)
•When connected to Android Auto™ or Apple CarPlay® on your smartphone, the smartphone’s navigation system may also be available
•A warning screen may appear periodically to remind users that the audio system should be operated when the engine is running to prevent battery discharge
QUICK TIPS
Press briefly to do the following:• FM/AM mode: Play the previous/next frequency.• SiriusXM® mode: Change the channel.• MEDIA mode: Change the track, file or title (except for AUX ).Press and hold to do the following (over 0.8 seconds):• FM/AM mode: Move quickly through all of the frequencies. When released, the system seeks the next available frequency.• MEDIA mode: Rewinds or fast forwards the track or file (except for AUX and Bluetooth® Audio).
A programmable key to provide quick access to one of several available system features
Press to Power ON/OFF. Rotate to adjust Volume
Press to select FM/AM/SiriusXM® modes
Press to enter MEDIA mode
Press to display SE TUP/Settings mode
Rotate to change Radio/SiriusXM® Station/Media tracks/files. Press to select(LCD Display Screen)
REMINDERS: • To help minimize driver distraction, some audio system functionalities have been modified while the vehicle is in Drive, Reverse or moved out of Park.• Prolonged use of the audio head unit in ACC mode may drain the vehicle’s battery
Refer to the inside front cover for more information on QR codes.www.youtube.com/KiaFeatureVideos
QR CODES
Standard Audio System Video
Page 34 of 70

*IF EQUIPPED †LEGAL DISCL AIMERS ON BACK INSIDE COVER32SORENTO FEATURES & FUNCTIONS GUIDE
AUDIO SYSTEMS
AUDIOSYSTEMS
UVO link Activation*†1 (Systems equipped with UVO link only):
Follow these steps to activate your UVO link system:
1. Enter the activation screen on your vehicle’s head unit:
a. Press SETUP key
b. Press UVO icon
c. Press Activate UVO
2. Read and agree to Terms of Service and Privacy Policy and press SUBMIT
3. Enter smartphone number or email address to receive a verification code,
then press SUBMIT
4. Follow these steps to receive your verification code using your phone SMS
or email:
a. Check your phone SMS or email for verification code
b. Open the link in your SMS or email. A page will open requesting that you
create your account
Note: If you already have a Kia Owners Portal account using the email as
your login ID, you will need to provide your password prior to receiving the
verification code
c. Enter your first name, last name, email,
phone number, an account password, and
click CRE ATE ACCOUNT. A page will open
displaying your verification code
d. Enter the code in the head unit and press
ACTIVATE
e. Go back to the page with your verification
code and press “I have entered my PIN.”
A link will be provided to download the Kia
Access with UVO link app from your app store.
After installing the app, log in and enjoy
REMINDER: This vehicle is not equipped with over-the-air system updates.
Driving while distracted can result in a loss of vehicle control that may lead to an accident, severe bodily injury, and death. The driver’s primary responsibility is in the safe and legal operation of a vehicle, and any handheld devices, other equipment, or vehicle systems which take the driver’s eyes, attention and focus away from the safe operation of a vehicle or which are not permissible by law should never be used during operation of the vehicle.
For further UVO link operations, refer to the Car Infotainment System Quick Reference Guide.
UVO Assistance*
Virtual Assistant A – Press to connect to the UVO Center to hear information about the UVO features
UVO Voice Local Search UVO B – Press to connect to the search function to find points of interest or other
locations, like “cafe”
Roadside Assist C – Press to connect to the UVO Center where you can request vehicle towing services
For more information, refer to the Car Infotainment System Quick Reference Guide.
(Buttons on rearview mirror*)
UVO
ABC
Refer to the inside front cover for more information on QR codes.www.youtube.com/KiaFeatureVideos
QR CODES
UVO Assistance Video
Page 35 of 70

ALWAYS CHECK THE OWNER’S MANUAL FOR COMPLETE OPER ATING INFORMATION AND SAFET Y WARNINGS. *IF EQUIPPED33
AUDIO SYSTEMS
AUDIOSYSTEMS
Kia Access with UVO link App DownloadQR CODES
Kia Access with UVO link App Features Guide. Click this dynamic QR code to access the guide. Some phone’s operating systems may need to be updated to scan dynamic QR codes
Download the Kia Access with UVO link App by clicking this dynamic QR code. Some phone’s operating systems may need to be updated to scan dynamic QR codes.
Go to an app marketplace to download the new Kia Access with UVO link App. Once you download, make sure you
register your vehicle and start an account (refer to UVO link Activation page). Get to know your new Kia and the
available convenient features on the app.
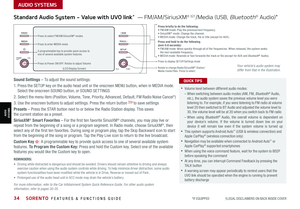
2020 SOULMILEAGE722 mi.
355 miEst. RangeDOOR LOCKSREMOTE STARTFind My Car
•The smartphone and vehicle need to be connected to a cellular network with a good wireless signal strength in order to use UVO. If these conditions are not met, remote command may not execute or takes long time. It will also effect voice commands •
To use Remote Start or Remote Start with Climate Control feature, all doors, hood and trunk /liftgate must be closed and locked •
Activate Remote Start or Remote Start with Climate Control feature at least 10 minutes before getting into the vehicle, which will allow vehicle interior to reach a desired temperature. If the driver does not enter the vehicle within the 10 minutes, the Remote Start will turn off the engine •
The quickest way to obtain accurate vehicle status through the app is by pressing the refresh button on the app or refreshing the web page when using the customer web portal •In order to preserve the vehicle battery, UVO will not turn on seven days after the last ignition was on. You will need to restart the vehicle with a key fob in order to use UVO again
QUICK TIPS
The Kia Access with UVO link App Features Guide is a step-by-guide helping you utilize the app to its full potential
by detailing how to set up and use each feature and adjust various settings. Below are some of the topics included:
•Remote Commands
•Set Climate
•Schedule Remote Start /Climate
•Schedule Charge
•Schedule Service
•Dealer Settings
•Manage Vehicles and Profiles
Kia Access with UVO link App Features Guide
Kia App Screen for illustrative purposes only. Actual App screen and functionality may vary.
For further UVO link operations, refer to the Car Infotainment System Quick Reference Guide.
Page 36 of 70

*IF EQUIPPED †LEGAL DISCL AIMERS ON BACK INSIDE COVER34SORENTO FEATURES & FUNCTIONS GUIDE
AUDIO SYSTEMS
AUDIOSYSTEMS
MEDIARADIO
TRACK >
SETUP
< SEEK
POWERPUSHVOL ENTER
TUNE
FILE
Standard Audio System - Value with UVO link* — FM/AM/SiriusXM® †21/Media (USB, Bluetooth® Au d io)*
•
•Volume level between different audio modes:
– When switching between audio modes (AM, FM, Bluetooth® Audio, etc.), the audio system saves the previous volume level you were listening to. For example, if you were listening to FM radio at volume level 20 then switched to BT Audio and adjusted the volume level to 30, the volume level will be at 20 when you switch back to FM radio
– When using Bluetooth® Audio, the overall volume is dependent on your device’s volume. If the volume is turned down low on your device it will remain low even if the system volume is turned up
•This system supports Android Auto™ (USB & wireless connection) and Apple CarPlay® (wireless connection only)
•
Navigation may be available when connected to Android Auto™ or Apple CarPlay® supported smartphones
•When using the voice command feature, wait for the system to BEEP before speaking the command
•
At any time, you can interrupt Command Feedback by pressing the TALK button
•
A warning screen may appear periodically to remind users that the UVO link should be operated when the engine is running to prevent battery discharge
QUICK TIPS
Press briefly to do the following:• FM/AM mode: Play the previous/next frequency.• SiriusXM® mode: Change the channel.• MEDIA mode: Change the track, file or title (except for AUX ).Press and hold to do the following (over 0.8 seconds):• FM/AM mode: Move quickly through all of the frequencies. When released, the system seeks the next available frequency.• MEDIA mode: Rewinds or fast forwards the track or file (except for AUX and Bluetooth® Audio).A programmable key to provide quick access to one of several available system features
Press to Power ON/OFF. Rotate to adjust Volume
Press to select FM/AM/SiriusXM® modes
Press to enter MEDIA mode
Press to display SE TUP/Settings mode
Rotate to change Radio/SiriusXM® Station/ Media tracks/files. Press to select(LCD Display Screen)
Sound Settings – To adjust the sound settings:
1. Press the SETUP key on the audio head unit or the onscreen MENU button, when in MEDIA mode. Select the onscreen SOUND button, or SOUND SET TINGS
2.
Select the menu item (Position, Volume, Tone, Priority, Advanced, Default, FM Radio Noise Cancel*)
3. Use the onscreen buttons to adjust settings. Press the return button to save settings
Presets – Press the STAR button next to or below the Radio Station display. This saves the current station as a preset.
SiriusXM® Smart Favorites – For the first ten favorite SiriusXM® channels, you may play live or repeat from the beginning of a song or a program segment. In Radio mode, choose SiriusXM®, then select any of the first ten favorites. During song or program play, tap the Skip Backward icon to start from the beginning of the song or program. Tap the Play Live icon to return to the live broadcast.
Custom Key H: A programmable key to provide quick access to one of several available system
features. To Program the Custom Key: Press and hold the Custom key. Select one of the available features you would like the Custom key to open.
For more information, refer to the Car Infotainment System Quick Reference Guide. For other audio system information, refer to pages 30-35.
REMINDERS: • Driving while distracted is dangerous and should be avoided. Drivers should remain attentive to driving and always exercise caution when using the audio system controls while driving. To help minimize driver distraction, some audio system functionalities have been modified while the vehicle is in Drive, Reverse or moved out of Park.• Prolonged use of the audio head unit in ACC mode may drain the vehicle’s battery
Your vehicle’s audio system may differ from that in the illustration.
Page 37 of 70

ALWAYS CHECK THE OWNER’S MANUAL FOR COMPLETE OPER ATING INFORMATION AND SAFET Y WARNINGS. *IF EQUIPPED †LEGAL DISCL AIMERS ON BACK INSIDE COVER35
AUDIO SYSTEMS
AUDIOSYSTEMS
Sound Settings: To adjust the sound settings (Fader/Balance, Tone, Touch-Screen Beep ON/OFF and Speed-Dependent Volume Control ON/OFF ) from any audio mode:
1. Press the SETUP button on the Audio Head Unit
2. Select the onscreen SOUND button
3. Select the menu item to change settings
4. Use the onscreen buttons to adjust settings
Radio Presets: You can listen to FM, AM and SiriusXM® radio and save frequently used stations
How to Save a Preset: Press the STAR button next to or below the Radio Station display. This saves the current station as a preset
SiriusXM® Smart Favorites: For the first ten favorite SiriusXM® channels, you may play live or repeat from the beginning of a song or a program segment. In Radio mode, choose SiriusXM®, then select any of the first six favorites. During song or program play, tap the Skip Backward icon to start from the beginning of the song or program. Tap the Play Live icon to return to the live broadcast
Custom Key H: A programmable button to provide quick access to one of several available system features
To Program the Custom Key: Press and hold the Custom Key. Select one of the available features you would like the Custom Key to open
UVO link†1 with Navigation*†1 4 – FM/AM/SiriusXM® †21/Media (USB, Aux, Bluetooth® Au d io)
•Volume level between different audio modes: – When switching between audio modes (AM, FM, Bluetooth® Audio, etc.), the audio system saves the previous volume level you were listening to. For example, if you were listening to FM radio at volume level 20 then switched to BT Audio and adjusted the volume level to 30, the volume level will be at 20 when you switch back to FM radio
•When connected to Android Auto™ or Apple CarPlay® on your smartphone, the smartphone’s navigation system may also be available
•This system supports Android Auto™ and Apple CarPlay® (USB connection only)
•A warning screen may appear periodically to remind users that the navigation system should be operated when the engine is running to prevent battery discharge
•At any time, you can interrupt UVO link Command Feedback by pressing the TALK button on the steering wheel
QUICK TIPS
Your vehicle’s audio system may differ from that in the illustration.
For further UVO link with Navigation operations, refer to the Car Infotainment System Quick Reference Guide.
REMINDERS: • To help minimize driver distraction, some audio system functionalities have been modified while the vehicle is in Drive, Reverse or moved out of Park.• Prolonged use of the audio head unit in ACC mode may drain the vehicle’s battery
Press briefly to do the following:• FM/AM mode: Play the previous/next frequency.• SiriusXM® mode: Change the channel.• MEDIA mode: Change the track, file or title (except for AUX ).Press and hold to do the following (over 0.8 seconds):• FM/AM mode: Move quickly through all of the frequencies. When released, the system seeks the next available frequency.• MEDIA mode: Rewinds or fast forwards the track or file (except for AUX and Bluetooth® Audio).
A programmable key to provide quick access to one of several available system features Press to display SE TUP/Settings mode
SETUP
N AV
MAP
MEDIA SEEK
RADIO
TRACK
POWERPUSHVOL ENTER
TUNE
FILE
(LCD Display Screen)
Press to Power ON/OFF. Rotate to adjust Volume
Press to select FM/AM/SiriusXM® modes
Press to enter MEDIA mode
Press to display the MAP screen for the current position/ Voice mode
Press to display the Navigation menu screen
Rotate to change Radio/SiriusXM® Station/Media tracks/files. Press to select
For other audio system information, see pages 30-34.
UVO link with Navigation Video
To view a video on your mobile device, snap this QR Code or visit the listed website.
Refer to the inside front cover for more information on QR codes.
www.youtube.com/KiaFeatureVideos
QR CODE
Page 38 of 70

*IF EQUIPPED36SORENTO FEATURES & FUNCTIONS GUIDE
Multimedia USB Ports, Power Outlets, & USB Charger Ports* Digital Clock
Press SETUP, then select General, scroll
down and select Date/ Time from the menu
to adjust.
Multimedia USB Port*
A Use the Multimedia USB port to
connect USB audio devices and
smartphones
Power Outlets
B Use the power outlets for mobile
phones and other devices
designed to operate on a
12V (180W max) power outlet
USB Charger Ports*
C USB charger ports* and power
ports are located in the Center
Panel, inside and on the back of
the Center Console
(Located on Center Console below Climate Controls)
REMINDERS:
• Using the Power Outlet (accessory plug) and USB charger for prolonged periods of time with the Engine Start /Stop button in the ACC position (Engine OFF ) for prolonged period time could cause the battery to discharge
• Use only the charging cables that your device manufacturer supplied. Third party cables may cause damage to device
• The USB data port (Multimedia USB port) is located next to the Power Outlets. The USB Charger ports do not support data transfer
Refer to section 4 in the Owner’s Manual for more information.
For illustrative purposes only. Your actual display, buttons and/or features may vary.
(Located on Back of Center Console)
• Press the Return button on the audio head unit to ensure changes are saved
• When needed, Daylight Savings must be enabled in the Clock Settings screen
• To access manual date and time setting, turn GPS time OFF in the Clock Settings (UVO link with Navigation*)
QUICK TIPS
The power outlets are inactive when the Engine Start /Stop button is OFF.
QUICK TIP
Seat warmers / ventilation Wireless charge center console, back seat
USB / Multimedia
USB
180W12V
Seat warmers / ventilationWireless charge center console, back seat
USB / Multimedia
USB
180W12V
Seat warmers / ventilationWireless charge center console, back seat
USB / Multimedia
USB
180W12V
ABB
C
Refer to the Car Infotainment System Quick Reference Guide for more information.
CENTER PANEL
CENTER PANEL
Page 39 of 70

ALWAYS CHECK THE OWNER’S MANUAL FOR COMPLETE OPER ATING INFORMATION AND SAFET Y WARNINGS. *IF EQUIPPED37
CENTER PANEL
CENTER PANEL
REMINDERS:
•
If the driver door is opened, charging will be disabled
•
Wireless charging technology allows for a device to be charged using inductive charging. See your Owner’s Manual for more detailed information and the back page for legal disclaimers
•
Inductive charging systems are less ef ficient than conventional charging through a cable. As a result, higher device operating temperatures may be experienced during use
•
Charging Performance – Device position on the wireless charging system can affect charging performance. Other factor that may affect the charging rate includes foreign objects, such as coins or pens, and phone case thickness
Charge a compatible smartphone wirelessly by placing it on the tray B at the front of the console, near the Multimedia USB ports and the charging indicator, while the ignition is on.
1. Enable Wireless Charging in the User Settings
2. Slide open cover A. Place the smartphone on the center of the charging pad B
3. Indicator light C may change to amber once wireless charging begins
4. Once charging is complete, the amber light may change to green
•
•
The smartphone must be a compatible phone with QI function available
•Wireless charging must be enabled in user settings
•
If wireless charging does not work, move the smartphone around the pad until the charging indicator turns amber. Avoid placing other metal items in the bin while charging as to not impede the charging area
•
For wireless charging to occur, all doors (excluding the rear hatch) must be closed & the Smart Key Fob must be detected inside the vehicle
QUICK TIPS
Wireless Smartphone Charging System*
Seat warmers / ventilation Wireless charge center console, back seat
USB / Multimedia
USB
180W12V
Seat warmers / ventilationWireless charge center console, back seat
USB / Multimedia
USB
180W12V
A
B
C
Refer to the inside front cover for more information on QR codes.www.youtube.com/KiaFeatureVideos
QR CODES
Wireless Charging Video
Refer to section 4 in the Owner’s Manual for more information.
Page 40 of 70

*IF EQUIPPED38SORENTO FEATURES & FUNCTIONS GUIDE
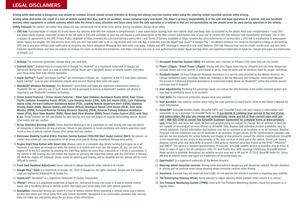
AUTOOFF
DRIVER
ONLYA/CREAR
SYNC
REAR FRONT
A/C
68.568.5
Automatic Climate Control*
3rd Row Climate Control*
A Driver’s temperature control knob
B AUTO (automatic control) button (High, Medium, Low)
C AUTO (automatic control) button (High, Medium, Low)
D Turn the Auto Climate Control system OFF button
E FRONT windshield defroster button
F REAR window defroster button
G Fan speed control button
H MODE Selection button
I CLIMATE information screen
J A /C Rear Control ON/OFF button
K Air intake control button
L Passenger’s temperature control knob
M SYNC temperature control selection button*
N 3rd Row air conditioning ON/OFF button
O 3rd Row fan speed control knob
(Type B shown)
Climate Control Auto Function
1.
Press AUTO B to select Full Auto Operation. Press once for the air flow
high setting, twice for medium setting and once more for the lower setting.
The Auto setting automatically controls the airflow modes, fan speeds, air
intake and air conditioning according to the temperature setting selected
2. Set desired driver’s Temperature A
3. Press SYNC* M to select Sync Temperature Control Operation*, which
synchronizes the passenger’s temperature to the driver’s setting
Defrost Outside and/or Inside Windshield::
1. Set Front Fan Speed G to the highest position
2. Set Temperature A to Hot
3. Press the Front Defrost button E
CA
A
B
D
E
F
GMH
I
JK
L
REAR A/C
ON/OFF
N
O
(Rear climate control)
CENTER PANEL
CENTER PANEL