Page 25 of 58

23
AUDIO SYSTEMS
ALWAYS CHECK THE OWNER’S MANUAL FOR COMPLETE OPER ATING INFORMATION AND SAFET Y WARNINGS *IF EQUIPPED
Radio Presets: You can listen to FM and AM radio and save frequently used stations
How to Save a Preset: Press and hold the desired slot* This saves the current station
in the selected slot
Custom Key
H: A programmable key to provide quick access to one of several
available system features
To Program the Custom Key: Press and hold the Custom Key Select one of the
available features you would like the Custom Key to open
Sound Settings – To adjust the Standard Audio Systems sound settings:
1 Press the SETUP key on the audio control unit or the on-screen MENU button,
when in MEDIA mode
2 Select the on-screen SOUND button
3 Select the menu item (Position, Tone, Speed Dependent Volume, Beep)
4 Using the touchscreen, press arrows to adjust the settings
Your vehicle’s audio system may differ from that in the illustration.
For further UVO eServices operation, refer to the Car Multimedia System User’s Manual.
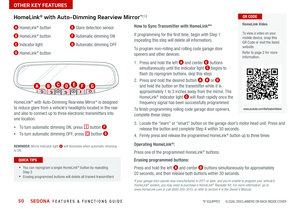
Standard Audio System *
– FM/AM/Media (USB, AUX ,
Bluetooth® Audio, My Music)*
POWER
VOLPUSH
APPS
RADIO
MEDIA
SEEK
TRACK
ENTER
FILE TUNE
HOME
PHONE
SETUPPress to enter HOME mode
Press to enter PHONE mode
Press to enter SETUP mode
Press to enter CUSTOM
mode
or to set
Rotate to change
radio station/media
tracks/songs/files
Press to select
Press briefly to do the following:
• FM/AM mode: Play the previous/next frequency
• MEDIA mode: Change the track, file or title (except
for AUX )
Press and hold to do the following:
• FM/AM mode: Move quickly through all of the frequencies
When released, the system seeks the next available
frequency
• MEDIA mode: Rewinds or fast forwards the track or file
(except for AUX and Bluetooth
® Audio)
Press to Power On/Off Rotate to adjust volume
Press to select FM/AM modes
Press to select MEDIA modes
•Navigation may be available when connected to Android Auto™ or Apple
CarPlay® supported smartphones
•A warning screen may appear periodically to remind users that the audio
system should be operated when the engine is running to prevent battery
discharge
•Prolonged use of the audio control unit in ACC mode may drain the
vehicle’s battery
QUICK TIPS
Standard Audio System
Videos
To view these videos
on your mobile device,
snap this QR Code or
visit the listed website
Refer to page 2 for more
information QR CODE
www.youtube.com/KiaFeatureVideos
REMINDER: Driving while distracted is dangerous and should be avoided Drivers
should remain attentive to driving and always exercise caution when using the audio
system controls while driving To help reduce driver distraction, some audio system
functionalities have been modified while the vehicle is in Drive, Reverse or moved out
of Park
Page 26 of 58

SEDONA FEATURES & FUNCTIONS GUIDE24
AUDIO SYSTEMS
Using a compatible smartphone to access your app store or marketplace, download the Kia UVO eServices app†1 In your
smartphone’s settings, ensure that location services are enabled Using the Kia UVO eServices app†1, register for a new
https://owners.kia.com/ account Follow the “In Car Setup Instructions” on the Kia UVO eServices app to complete the
UVO eServices Activation
UVO eServices Activation *†1 (Systems equipped with UVO eServices only)
REMINDER: This vehicle is not equipped with over-the-air system updates
Driving while distracted can result in a loss of vehicle control that may lead to an accident, severe
bodily injury, and death. The driver’s primary responsibility is in the safe and legal operation of
a vehicle, of any handheld devices, other equipment, or vehicle systems which take the driver’s
eyes, attention and focus away from the safe operation of a vehicle or which are not permissible
by law should never be used during operation of the vehicle.
For further UVO eServices operation, refer to the Car Multimedia System User’s Manual.
*IF EQUIPPED †LEGAL DISCL AIMERS ON BACK INSIDE COVER
Page 27 of 58

25
AUDIO SYSTEMS
ALWAYS CHECK THE OWNER’S MANUAL FOR COMPLETE OPER ATING INFORMATION AND SAFET Y WARNINGS *IF EQUIPPED †LEGAL DISCL AIMERS ON BACK INSIDE COVER
POWER
VOLPUSH
APPS
RADIO
MEDIA
SEEK
TRACK
ENTER
FILE TUNE
HOME
PHONE
SETUP
UVO eServices *†1
– FM/AM/SiriusXM® †2 0/Media (USB, My Music, AUX , Bluetooth® Au d io)
Sound Settings: To adjust the audio control unit’s sound settings:
1 Press the SETUP key on the audio control unit or the on-screen MENU button,
when in MEDIA mode
2 Select the on-screen SOUND button, or SOUND SET TINGS
3 Select the menu item (Position, Tone, Advanced, Default)
4 Use the on-screen buttons to adjust settings
Radio Presets: You can listen to FM, AM and SiriusXM
® radio and save frequently
used stations
How to Save a Preset: Press and hold the desired slot* This saves the current
station in the selected slot SiriusXM
®
Smart Favorites: For the first ten favorite SiriusXM® channels, you may play live or
repeat from the beginning of a song or a program segment
In Radio mode, choose SiriusXM
®, then select any of the first ten favorites During
song or program play, tap the Skip Backward icon to start from the beginning of
the song or program Tap the Play Live icon to return to the live broadcast
Custom Key
H: A programmable key to provide quick access to one of several
available system features
To Program the Custom Key: Press and hold the Custom Key Select one of
the available features you would like the Custom Key to open
•Navigation may be available when connected to Android Auto™ or Apple
CarPlay® supported smartphones
•A warning screen may appear periodically to remind users that the navigation
system should be operated when the engine is running to prevent battery
discharge
•At any time, you can interrupt UVO eServices Command Feedback by pressing
the TALK button on the steering wheel
•Prolonged use of the audio control unit in ACC mode may drain the vehicle’s
battery
QUICK TIPS
Y our vehicle’s audio system may differ from that in the illustration. For further UVO eServices
operation, refer to the Car Multimedia System User’s Manual. See your Owner’s Manual for
other details.
Press briefly to do the following:
• FM/AM mode: Play the previous/next
frequency
• SiriusXM
® mode: Change the channel
• MEDIA mode: Change the track, file or title
(except for AUX )
Press and hold to the do the following
(over 0.8 seconds):
• FM/AM/SiriusXM
® mode: Move quickly through all
of the frequencies When released, the system
seeks the next available frequency
• MEDIA mode: Rewinds or fast forwards the track
or file (except for AUX and Bluetooth
® Audio)
REMINDER: To help minimize driver distraction, some audio system functionalities have been
modified while the vehicle is in Drive, Reverse or moved out of Park Driving while distracted
is dangerous and should be avoided Drivers should remain attentive to driving and always
exercise caution when using the steering-wheel-mounted controls while driving
UVO eServices Videos
To view these videos on
your mobile device, snap
this QR Code or visit the
listed website
Refer to page 2 for more
information QR CODE
www.youtube.com/KiaFeatureVideos
Press to enter HOME screen
Press to enter PHONE mode
Press to enter SETUP mode
Programmable key to provide quick
access to one of several available
system features
Rotate to change Radio Station/
Media tracks/songs/files
Press to Power On/Off Rotate to adjust volume
Press to select FM/AM/SiriusXM
® modes
Press to select MEDIA modes
Page 28 of 58

SEDONA FEATURES & FUNCTIONS GUIDE26
AUDIO SYSTEMS
*IF EQUIPPED †LEGAL DISCL AIMERS ON BACK INSIDE COVER
VOL FILE
TUNE
APPS
RADIO
MEDIA SEEKMAPN AVSETUP
TRACK
MEDIA
SEEK
TRACK
ENTER
FILE TUNE
MAP
N AV
SETUP
POWERPUSH
Sound Settings: To adjust the sound settings (Fader/Balance, Tone, Touch-Screen
Beep ON/OFF and Speed-Dependent Volume Control ON/OFF ) from any audio mode:
1 Press the SETUP button on the Audio Control Unit, then the on-screen SOUND button
2 Select the menu item to change settings
3 Use the on-screen buttons to adjust settings
Radio Presets: You can listen to FM, AM and SiriusXM
® radio and save frequently
used stations
How to Save a Preset: Press and hold the desired slot* This saves the current station
in the selected slot
SiriusXM
® Smart Favorites: For the first ten favorite SiriusXM® channels, you may
play live or repeat from the beginning of a song or a program segment In Radio mode,
choose SiriusXM
®, then select any of the first ten favorites During song or program
play, tap the Skip Backward icon to start from the beginning of the song or program
Tap the Play Live icon to return to the live broadcast
Custom Key
H: A programmable key to provide quick access to one of several
available system features
To Program the Custom Key: Press and hold the Custom Key Select one of the
available features you would like the Custom Key to open
Press briefly to do the following:
• FM/AM mode: Play the previous/next frequency
• SiriusXM
® mode: Change the channel
• MEDIA mode: Change the track, file or title
Press and hold to do the following
(over 0.8 seconds):
• FM/AM/SiriusXM
® mode: Move quickly through
all of the frequencies When released, the
system seeks the next available frequency
• MEDIA mode: Rewinds or fast forwards the
track or file (except for Bluetooth
® Audio)
Press to Power ON/OFF Rotate to adjust Volume
Press to select FM/AM/SiriusXM® modes
Press to enter MEDIA mode Press to display SE TUP/Settings mode
Press to display the Map screen for the current position/ Voice mode
Press to display the Navigation menu screen
Programmable key to provide quick access to one of several available system features Rotate to change
Radio/SiriusXM
®
Station/Media
tracks/files
Press to select
UVO eServices with Premium Navigation *†1,1 4
– FM/AM/SiriusXM® †2 0/Media (USB, Bluetooth® Au d io)
•The volume level for each source (FM, AM,
SiriusXM, USB, etc ) can be set individually in
system sound settings When the source is
changed, the volume level will revert to the
previously set volume for that source
•Navigation may be available when connected
to Android Auto™ or Apple CarPlay® supported
smartphones
•Prolonged use of the audio control unit in ACC
mode may drain the vehicle’s battery
•A warning screen may appear periodically to
remind users that the navigation system should
be operated when the engine is running to prevent
battery discharge
•At any time, you can interrupt UVO eServices
Command Feedback by pressing the TALK button
on the steering wheel
QUICK TIPS
Your vehicle’s audio system may
differ from that in the illustration
For further UVO eServices with
Premium Navigation operation, refer
to the Car Multimedia System User’s
Manual.
UVO eServices with
Premium Navigation Videos
To view these videos
on your mobile device,
snap this QR Code or
visit the listed website
Refer to page 2 for more
information
www.youtube.com/KiaFeatureVideos
QR CODE
REMINDER: To help minimize
driver distraction, some audio
system functionalities have been
modified while the vehicle is in
Drive, Reverse or moved out of
Park Driving while distracted is
dangerous and should be avoided
Drivers should remain attentive to
driving and always exercise caution
when using the steering-wheel-
mounted controls while driving
Page 29 of 58

27ALWAYS CHECK THE OWNER’S MANUAL FOR COMPLETE OPER ATING INFORMATION AND SAFET Y WARNINGS *IF EQUIPPED
Front SVM operation:
• The camera view will display on the audio system's screen in both Drive
and Neutral
• In Drive, the camera view will continue to display until the vehicle speed
is above approximately 9 mph
• The camera view will reappear on the audio system's screen whenever
the vehicle speed drops below approximately 9 mph if the SVM button
A is pressed
The Front SVM camera is ON when:
1 The Engine Start /Stop button is On
2 The gear shift is in Drive or Neutral
3 The SVM button
A is pressed ON
(LED illuminated)
Rear SVM operation:
• The camera view will automatically display on the audio head unit screen when the vehicle is shifted into Reverse
• The camera view will turn off when the vehicle is shifted out of Reverse
Camera View Modes – To change camera view modes, press the icons shown below on the audio head unit’s screen
to select the view mode
Surround View
Monitoring (SVM)
Video
To view a video on your
mobile device, snap this
QR Code or visit the listed
website
Refer to page 2 for more
information QR CODE
www.youtube.com/KiaFeatureVideos
Front SVM - when in Drive & Neutral: Rear SVM - when in Reverse:
Displays all of the images around the
vehicle
Displays the front side image
Displays the front side and left side images
simultaneously
Displays the front side and right side
images simultaneously
Displays all of the images around the
vehicle
Displays the rear side image
Displays the rear and left side images
simultaneously
Displays the rear and right side images
simultaneously
P
R
N D
DRIVE
MODE
+
_
(Located below Gear Shift)
Surround View Monitoring (SVM) *
The Surround View Monitoring (SVM) system is a parking support system that shows the areas around the front, rear, left,
and right sides of the vehicle via four cameras displayed in the audio head unit screen
REMINDER: The SVM camera is equipped
with an optical lens to provide a wider range of
vision and may appear different from the actual
distance
The Surround View Monitoring (SVM) system
is only a supplemental device. Drivers should
not rely solely on the SVM information when
parking and backing up. Drivers should always
pay attention and directly check the left/right
and rear of the vehicle.
Image is for illustrative purposes only and may
not reflect actual feature or operation.
Refer to section 4 in the Owner’s Manual for
more information.
The Front SVM camera will turn off when the gear
shift is moved into Park or Reverse or the SVM
button is pressed QUICK TIPA
CENTER PANEL
Page 30 of 58

Your Automatic Climate Control system may differ from those in the illustrations.
Refer to section 4 in the Owner’s Manu")
SEDONA FEATURES & FUNCTIONS GUIDE28*IF EQUIPPED
CENTER PANEL
(Type B shown)
Your Automatic Climate Control system may differ from those in the illustrations.
Refer to section 4 in the Owner’s Manual for more information.
Automatic Climate Control *
Q Rear temperature control buttons
R Rear AUTO climate control button
S Rear mode selection button
T Rear air conditioning off button
U Rear fan speed control buttons
A Driver's temperature control knob
B AUTO (automatic control) button
C Climate information screen selection button
D Passenger’s temperature control knob
E SYNC temperature control selection button
F Front fan speed control button
G Front air conditioning off button
H Front mode selection button
I Rear fan speed control button
J A /C on button
K Air intake control button
L Front windshield defroster button
M Rear window defroster button
N Rear control lock button
O Rear control on button
P Rear temperature control knob
R
ear Climate Control*
A
B
F
J
Q
RST
U
KLMNO
PG
C
HI
E
D
Page 31 of 58

29ALWAYS CHECK THE OWNER’S MANUAL FOR COMPLETE OPER ATING INFORMATION AND SAFET Y WARNINGS *IF EQUIPPED
Your Automatic Climate Control
system may differ from those in the
illustrations.
Refer to section 4 in the Owner’s
Manual for more information.
Automatic Climate Control * (Continued)
Climate Control Auto Function
1 Press AUTO
B to select Full Auto Operation
The Auto setting
automatically controls the airflow modes, fan speeds, air intake and
air conditioning according to the temperature setting selected
2 Set desired Temperature
A
3 Press SYNC E to select Sync Temperature Control operation, which
synchronizes the passenger’s temperature to the driver’s setting
Defrost Outside Windshield:
1 Set Fan Speed
F to the highest position
2 Set Temperature
A to Hot
3 Press the Front Defrost button
L
Defog Inside Windshield:
1 Set Front Fan Speed
F to the highest position
2 Set Temperature
A to the highest position
3 Press the Front Defrost button
L
•Defrost Mode activates A /C and opens Fresh Air Vent to help
dehumidify the air and improve Defroster performance
•During Auto Operation, the A /C indicator will NOT illuminate The fan
speed, air intake, air flow and air conditioning may automatically be
engaged at any time to reach the desired temperature and reduce
humidity
•Keep the inside glass as clean as possible to reduce window fogging
QUICK TIPS
Face-Level
Bi-Level F lo o r- L evel
Floor/Defrost-Level
REMINDERS:
•
Pressing any button during AUTO operation will deactivate
the AUTO function and switch to manual mode, except for
Temperature Control
•
When in AUTO mode, Air Flow Mode and Fan Speed do not
display on the Climate Control Display
•
Cold or warm ambient air may flow in through vents if
Recirculated Air button is not pressed ON (LED lit)
Auto Defogging System
Video
To view a video on your
mobile device, snap this
QR Code or visit the listed
website
Refer to page 2 for more
information QR CODE
www.youtube.com/KiaFeatureVideos
Auto Defogging System
Auto defogging is designed to reduce the fogging
up of the inside of the windshield by automatically
sensing the moisture of the inside of the
windshield The system will automatically
change to defrost mode when needed
Auto Defogging is set ON by default To cancel
Auto Defogging, press the Front Defrost button
for three seconds when the ignition is in on (ADS
OFF icon will illuminate) To turn Auto Defogging
on again, press the Front Defrost button
for
three seconds
Air Flow Modes
To select Air Flow Modes, press the MODE button
H to cycle through to desired mode:
CENTER PANEL
Page 32 of 58

SEDONA FEATURES & FUNCTIONS GUIDE30*IF EQUIPPED
L Rear air conditioning OFF button
M Rear fan speed control buttons
N Rear mode selection buttons
O Rear temperature control buttons
REMINDER: Warm air may flow in
through vents if Recirculated Air
button is not pressed ON (LED lit)
• Defrost Mode activates A /C and opens Fresh Air Vent
• MA X A /C Mode automatically engages Recirculated Air
• Keep the inside glass as clean as possible to reduce window fogging
QUICK TIPS
Manual Climate Control *Rear Climate Control*
A Front fan speed control knob
B Front window defroster button
C Rear window defroster button
D Air conditioning button
E Air intake control button
F Front temperature control knob
G Front mode selection buttons
H Rear fan speed control knob
I Rear temperature control knob
J Rear control lock button
K Rear control on button Air Flow Modes
To select Air Flow Modes, press the Mode
selection buttons
G:
Defrost Outside Windshield:
1 Set Fan Speed
A to the highest position
2 Set desired Temperature
F
3 Press the Front Defrost button A
Defog Inside Windshield:
1 Set Fan Speed
A to desired position
2 Set desired Temperature
F
3 Press the Front Defrost button B
Your Manual Climate Control system may differ from those in the illustrations. Refer to section 4 in the Owner’s Manual for more information.
Face-Level
Bi-Level
F lo o r- L evel
Floor/Defrost-Level
A
LMNO
BF
G
C
HI
JK
ED
CENTER PANEL