Page 1 of 58
Page 2 of 58

GETTING TO KNOW YOUR SEDONA
Welcome to the Kia Family!
Your new Kia vehicle has been designed, engineered and manufactured to provide you with years of comfortable and dependable
driving. Kia is committed to quality, innovation, safety and — above all — your satisfaction.
Using This Guide
The information contained in this guide is a brief overview that will help you become familiar with the operation and features of your
new Kia vehicle. The flipbook format facilitates information access, while the detailed illustrations help to ensure the instructions are
easy to follow.
This Features & Functions Guide, and the specific operational and safety information it provides, is not a substitute for your Owner’s
Manual. In the interest of your safety and that of the vehicle’s occupants, and to help you avoid risks that may result in death or serious
injury, Kia reminds you to carefully read your Owner’s Manual in order to fully familiarize yourself with the important information and
safety warnings it contains.
While Kia endeavors to ensure that the information contained in this guide is accurate at the time of printing, Kia may change
vehicle specifications without notice in advance or after the fact and assumes no liability in connection with such changes.
www.kia.com
Consumer - Roadside Assistance
†16
1-800-333-4KIA (4542)
See Back Pages for Vehicle Maintenance Schedule
Always check the Owner’s Manual for complete operating information and safety warnings. †LEGAL DISCL AIMERS ON BACK INSIDE COVER
Page 3 of 58

ESSENTIAL FEATURES
SEDONA FE ATURES & FUNCTIONS GUIDE
Air Conditioning / Automatic Climate Control* 28
Android Auto
™ / Apple CarPlay® Setup 22
Audio System – Standard Audio System* 23
Audio System – UVO eServices Activation* 24
Audio System – UVO eServices* 25
Audio System – UVO eServices with Premium Navigation* 26
Aux /Multimedia USB Ports, Power Outlets,
USB Charger Ports & AC Inverter* 31
Bluetooth
® Wireless Technology 20
Cruise Control 17
Digital Clock* 31
Passenger Airbag Off Indicator 51
Service Interval Mode 07
Smart Key* 42
Tire Pressure Monitoring System (TPMS) 05
Trip Modes / Trip Computer 06
User Settings 07
Windshield/Rear Wipers & Washers 16VIDEOS & QR CODES
02
INSTRUMENT CLUSTER Instrument Cluster Overview 03
Indicators & Warning Lights 04
Tire Pressure Monitoring System (TPMS) 05
Fuel Economy 05
Drive Mode Integrated Control System* 06
ECO Mode (Active ECO)* 06
VEHICLE SETTINGS LCD Instrument Cluster Modes 07
Trip Modes / Trip Computer 07
User Settings 08
Service Interval Mode 08
DRIVER’S PANEL Electronic Stability Control (ESC) 09
Hill-Start Assist Control (HAC) 09
Instrument Cluster Control 09
AC Inverter* 09
Blind-Spot Collision Warning (BCW ) 10
Rear Cross-Traffic Collision Warning (RCCW )* 10
Lane Departure Warning (LDW )* 11
Forward Collision-Avoidance Assist (FCA)* 12
Manual Folding Mirrors* 12
Power Windows, Window Lock & Central Door Lock 13
Power Folding Outside Mirrors* 13
Power/Heated Outside Mirrors* 13
Automatic Door Lock /Unlock 13
Fuel Filler Lid Release Button 13
Reverse Parking Aid Function* 14
Engine Start/Stop Button* 14
STEERING WHEEL CONTROLS Tilt/ Telescoping Steering Wheel 15
Headlights & High Beams 15
Turn Signals & Fog Lights* 16
Windshield/Rear Wipers & Washers 16
Cruise Control 17
Smart Cruise Control (SCC) with Stop & Go System* 18
Audio Controls 19
Bluetooth
® Wireless Technology 20
AUDIO SYSTEMS Android Auto
™ / Apple CarPlay® Setup 22
Standard Audio System* 23
UVO eServices Activation* 24
UVO eServices* 25
UVO eServices with Premium Navigation* 26CENTER PANEL
Surround View Monitoring (SVM)* 27
Automatic Climate Control* 28
Manual Climate Control* 30
Digital Clock* 31
Aux/Multimedia USB Ports, Power Outlets,
USB Charger Ports & AC Inverter 31
Wireless Smartphone Charging System* 32
Electronic Parking Brake (EPB)* / Auto Hold* 33
Automatic Gear Shift with Sportmatic
® Shifting 34
Heated Steering Wheel* 35
Seat Warmers / Ventilated Seats* 35
S E AT I N G Front Seat Headrest Adjustment 36
Driver Position Memory System* 36
Power Adjustable Driver’s Seat* 37
Manual Adjustable Driver’s Seat* 37
2nd-Row Seat 38
2nd-Row Walk-In Seat* 38
2nd-Row Tumble (Center) Seat* 39
Unfastening Center Seat Belt 39
3rd-Row Seat - Folding and Stowing 40
OTHER KEY FEATURES Remote Keyless Entry (Folding Key)* 41
Double-Turn Lock /Unlock All 41
Smart Key* 42
Map/Room Lamps 43
Sunvisor 43
Sunroof Operation* 44
Parking Distance Warning–Forward* and Reverse* 45
Rear View Monitor 45
Power Sliding Doors 46
Smart Power Liftgate* 46
Hood Release Lever and Latch 48
Fuel Cap / Malfunction Indicator (Check Engine Light) 48
Child-Protector Rear Door Lock 48
Driver Attention Warning (DAW)* 49
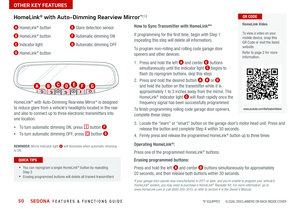
HomeLink
® with Auto-Dimming Rearview Mirror* 50
SAFETY FEATURES Occupant Detection System (ODS) /
Passenger Airbag Off Indicator 51
Seat Belts 51
LEGAL DISCLAIMERS See Inside Back Cover
NORMAL MAINTENANCE SCHEDUL E (Back Cover)
Driving while distracted can result in a loss of vehicle control
that may lead to an accident, severe personal injury and
death. The driver’s primary responsibility is in the safe and
legal operation of a vehicle, and any handheld devices, other
equipment or vehicle systems which take the driver’s eyes,
attention and focus away from the safe operation of a vehicle
or that are not permissible by law should never be used during
operation of the vehicle.
*IF EQUIPPED
Page 4 of 58

SEDONA FEATURES & FUNCTIONS GUIDE2*IF EQUIPPED
REMINDER:
When accessing videos
on your mobile device, standard
cellular data rates may apply
VIDEOS & QR CODES - SMARTPHONES, TABLETS AND COMPUTERS
One-Click Fuel Cap Video
To view a video on your
mobile device, snap this
QR Code or visit the listed
website
www.youtube.com/KiaFeatureVideos
QR CODEKia provides a number of video resources to assist you with becoming familiar with the features and functions found in your
Kia vehicle You can access these resources by snapping the QR Codes with your mobile device using the built-in QR Code
Reader or a downloaded QR Code Reader App
After opening the QR Code Reader App on your mobile device, the app will utilize your device’s camera Center the code in
the camera viewing area With some apps, as soon as the app recognizes the code, it will launch the corresponding video
With other apps, you will have to snap or “take a picture” of the code The app will then launch the corresponding video
For operation specifics, refer to the instructions that come with the QR Code Reader app
You can also view the videos by visiting the following website: www.youtube.com/KiaFeatureVideos
1 If you’re having trouble scanning codes, check the following:
•The code should be centered and focused in your mobile
device’s camera screen
•Consider moving your device closer to or farther away from
the code
•The code should be well lit, without significant shadow
•Avoid scanning from a significant angle
•Confirm that the device’s app supports 2D QR Code
scanning
•Try another QR Code Reader App; not all apps are created
equal
2 After scanning, if a “connecting” message appears and then nothing happens or there’s a “connection error” message,
this typically indicates that your device is having trouble connecting to the Internet
QUICK TIPS
Page 5 of 58
3ALWAYS CHECK THE OWNER’S MANUAL FOR COMPLETE OPER ATING INFORMATION AND SAFET Y WARNINGS *IF EQUIPPED
Instrument Cluster Overview
EPB
C
HEF
(Type A Cluster)
Your vehicle’s instrument cluster & indicator light locations may differ from those in the
illustrations. For more information on the instrument cluster, the LCD Warning Messages and
the function of all indicator and warning lights, please refer to section 2 in the Owner’s Manual.
This illustration is for demonstration purposes only. Some indicators and warning lights may not
appear in illustration. On the vehicle, they may appear in the LCD.
A Tachometer
B Turn Signal Indicators
C Speedometer
D Engine Temperature Gauge
E Indicators & Warning Lights
F Gear Shift Position Indicator
G Odometer / Trip Computer / Tripmeter
H Fuel Gauge
A
BB
FG
C
HED
INSTRUMENT CLUSTER
Page 6 of 58

Your vehicle’s instrument cluster & indicator light locations may differ
from those in the illustra")
SEDONA FEATURES & FUNCTIONS GUIDE4*IF EQUIPPED
Indicators & Warning Lights
EPB
(Type B Cluster)
Your vehicle’s instrument cluster & indicator light locations may differ
from those in the illustrations. For more information on the instrument
cluster, the LCD Warning Messages and the function of all indicator
and warning lights, please refer to section 2 in the Owner’s Manual.
This illustration is for demonstration purposes only. Some indicators
and warning lights may not appear in illustration. On the vehicle, they
may appear in the LCD.
ECO Mode Indicator Light*
Malfunction Indicator Lamp (MIL)
Low Tire Pressure Light / Tire Pressure Monitoring
System (TPMS) Malfunction Indicator
Engine Oil Pressure Warning Light
Electric Parking Brake (EPB) Warning Light*
Adaptive Front-Lighting System-Height (AFS-H)*
Warning Light*
Master Warning Light
Parking Brake & Brake Fluid Warning Light
Front Fog Light Indicator*
Light ON Indicator Light
Washer Fluid Warning Light*
High Beam Indicator
AUTO HOLD Indicator*
High Beam Assist Indicator*
Seat Belt Warning Light
Airbag Warning Light
Charging System Warning Light
Electronic Power Steering (EPS) Warning Light*
Immobilizer Indicator Light*
Anti-Lock Braking System (ABS) Warning Light
Electronic Brake Force Distribution (EBD)
System Warning Light ( Two separate indicators
on Instrument Cluster lit at same time)
KE Y OUT Indicator*
Lane Departure Warning (LDW ) System* Indicator Light
Forward Collision-Avoidance Assist (FCA) Warning Light*
Electronic Stability Control (ESC) Indicator Light
Electronic Stability Control (ESC) OFF Indicator Light
Low Fuel Level Warning Light
Cruise Indicator Light*
Cruise SET Indicator
Door Ajar Warning Light*
Liftgate Open Warning Light*
Sunroof Open Warning Light*
COMFORT Mode Indicator Light*
Icy Road Warning Indicator Light*
LED Headlamp Warning Indicator*
INSTRUMENT CLUSTER
Page 7 of 58

5ALWAYS CHECK THE OWNER’S MANUAL FOR COMPLETE OPER ATING INFORMATION AND SAFET Y WARNINGS *IF EQUIPPED †LEGAL DISCL AIMERS ON BACK INSIDE COVER
The TPMS indicator functions as both Low Tire Pressure Light
and TPMS Malfunction Indicator
The indicator
is designed to illuminate if it detects one or more
tires is significantly underinflated, the vehicle has a spare tire installed
without TPMS or the outside temperature becomes significantly lower
Inflate tire(s) to specifications using an
accurate digital tire pressure gauge to
turn off the Low Tire Pressure Light
See the front driver’s door jamb for PSI
specification The Low Tire Pressure
Position Indicator
A is displayed on the
LCD screen in the Instrument Cluster
when the tire(s) is underinflated
When there is a problem with the TPMS,
the TPMS Malfunction Indicator
will
blink for approximately one minute and
then illuminate See dealer for service
35
24
35
35
psi
Low Tire Pressure
To view these videos on
your mobile device, snap
these QR Codes or visit the
listed website
Refer to page 2 for more
information
Tire Pressure
Monitoring System Video
Fuel Economy Video QR CODES
www.youtube.com/KiaFeatureVideos
www.youtube.com/KiaFeatureVideos
Tire Pressure Monitoring System (TPMS)†2 6
Fuel Economy
There are several factors that contribute to your vehicle’s fuel economy, such as maintenance of your vehicle, driving style,
environmental conditions, vehicle weight and vehicle aerodynamics Below are some tips on how to help improve fuel economy:
• Keep your vehicle in good condition with regular maintenance
• Don’t let the engine idle longer than necessary
• Drive at a moderate speed, accelerating smoothly and at a moderate rate
• Keep tires inflated to the recommended pressure
• Travel lightly, without carrying unnecessary weight in your vehicles
• Avoid placing large or heavy items on roof racks
• Avoid hilly, winding or poorly maintained roads
Refer to section 4 in the Owner’s Manual for more information or snap the QR Code above to view a video.
•Even with TPMS, tire pressure should be checked
manually at least once a month Only adjust tire
pressure on “cold tires” that have been sitting for at
least 20 minutes tires and are not hot in temperature
from direct sunlight or heat
•For proper maintenance and optimal fuel economy,
maintain recommended tire inflation pressures and
stay within the load limits and weight distribution
recommended for your vehicle
•In winter or cold weather, the TPMS light may illuminate
if the tire pressure was adjusted to the recommended
tire inflation pressure during warm weather
QUICK TIPS
REMINDERS:
• Chec k the recommended tire pressure label located on the left
side of driver’s door jamb, visible when the door is opened
• Consult your dealer for service if the Low Tire Pressure Light
remains illuminated after inflating your tire(s)
• Personal electronic devices (such as laptops, wireless
chargers, remote start systems, etc ) may interfere with the
TPMS system, which may cause the Malfunction Warning
Indicator (Check Engine Light) to illuminate
This illustration is for demonstration
purposes only. Actual image on
vehicle may vary.
Refer to section 6 in the Owner’s
Manual for more information.
A
INSTRUMENT CLUSTER
Page 8 of 58

SEDONA FEATURES & FUNCTIONS GUIDE6*IF EQUIPPED
P
R
N D
DRIVE
MODE
+
_
Drive Mode Integrated
Control System Video
To view a video on your
mobile device, snap this
QR Code or visit the listed
website
Refer to page 2 for more
information QR CODE
www.youtube.com/KiaFeatureVideos
(Located on Center Panel below Gear Shift)* (Located in Instrument Cluster Type C Cluster shown)
Drive Mode Integrated Control System *
The Drive Mode may be selected depending on the driver’s
preferences and road conditions
To cycle through the different Drive Modes
A, press the
DRIVE MODE button B The Instrument Cluster will display
COMFORT or ECO when selected When in Normal mode, it
will not display in the Instrument Cluster
REMINDERS:
•
The system is turned ON and in Normal mode when the ignition is in
the ON position
•
When ECO mode is selected, the indicator will display and the system
remains on, even when the ignition is cycled
•Steering effort may be slightly increased in Sport mode
Your vehicle’s buttons may differ from those in the illustrations.
Refer to section 5 in the Owner’s Manual for more information.
ECO Mode (Active ECO) *
The Active ECO system is designed to help improve fuel
economy by controlling several vehicle components When
activated, it can help optimize drivetrain operations such
as engine power and transmission to help improve fuel
economy
To turn ON, press the DRIVE MODE button
B and scroll
through the options until in the ECO mode The green ECO
indicator light
C in the instrument cluster will illuminate,
indicating that Active ECO is operating
The Active ECO system will remain on even when the
ignition is cycled
To turn Active ECO OFF, press the DRIVE MODE
button
B again and change to another mode
To help improve your fuel economy:
•Drive at a moderate speed, accelerating smoothly and at a moderate rate
•Keep tires inflated to the recommended pressure
•Be sure the wheels are properly aligned
QUICK TIPS
Image is for illustrative purposes only and may not reflect actual feature or operation.
Refer to section 5 in the Owner’s Manual for more information.
A
B
C
INSTRUMENT CLUSTER


Your vehicle’s instrument cluster &")