2021 HYUNDAI TUCSON HYBRID display
[x] Cancel search: displayPage 183 of 630

Convenient features
5-26
ODN8A059243
ODN8A059132
Digital key (Card key) deletion
Note that the remote Smart Key must be
in your possession and inside the vehicle
in order to delete the Digital Key Card.
1.
Access the v
ehicle using the Smart
Key.
2.
Start the v
ehicle and then access
the Digital Key Card Key functions in
the User Settings menu in either the
LCD display or from the Navigation
infotainment screen (on some
models.)
à With Naviga
tion screen : From the
infotainment screen menu, go to
[Setup] - [Vehicle] - [Digital Key] -
[Card Key] then select the [Delete]
from submenu.
à Without naviga
tion screen : From
cluster menu, go to [Digital Key] -
[Card Key] and select [Delete].
If there is no saved digital key(card key),
[Delete] menu will not be activated. •
To delete the saved digital key card,
you must have the Smart Key in your
possession and be inside the vehicle
• Note that if the digital key card is
deleted, it can be re-registered to the
same vehicle as long as a new card
has not already been registered
• If you try to register a new digital key
card, the previously registered card
will no longer be active and cannote
be re-registeredODN8059237
[1] : Door handle authentication pad
NFC door lock/unlock
To unlock your vehicle using the NFC
card key, touch the card key near the
door handle NFC touch sensor of either
the driver side or passenger side door.
Hold the card key near the touch sensor
area for about 2 seconds. You will hear
the doors lock or unlock.
If you unlock your vehicle from the
passenger side door handle, then all the
doors will unlock. If you unlock your
vehicle from the driver side door handle,
then either the driver door only or all
the doors will unlock depending on the
setting of the Two Press Unlock feature.
Refer to User Settings to change the
Driver Door unlock mode.
To lock your vehicle using the NFC card
key, touch the card key near the door
handle NFC touch sensor of either the
driver side or passenger side door.
Page 188 of 630
05
5-31
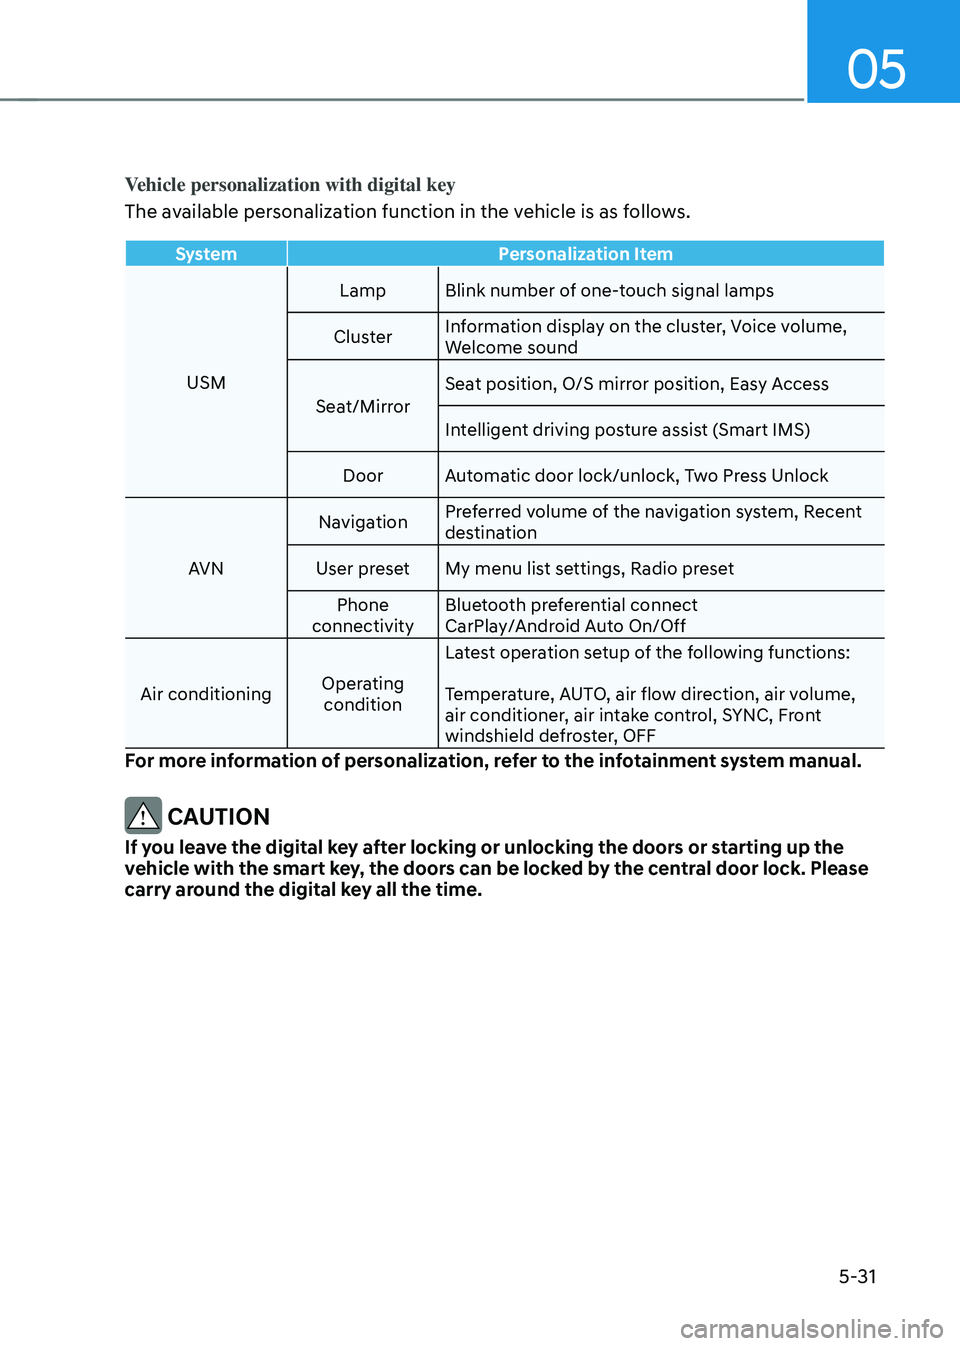
Vehicle personalization with digital key
The available personalization function in the vehicle is as follows.
SystemPersonalization Item
USM Lamp Blink number of one-touch signal lamps
Cluster Information display on the cluster, Voice volume,
Welcome sound
Seat/Mirror Seat position, O/S mirror position, Easy Access
Intelligent driving posture assist (Smart IMS)
Door Automatic door lock/unlock, Two Press Unlock
AVN Navigation
Preferred volume of the navigation system, Recent
destination
User preset My menu list settings, Radio preset Phone
connectivity Bluetooth preferential connect
CarPlay/Android Auto On/Off
Air conditioning Operating
condition Latest operation setup of the following functions:
Temperature, AUTO, air flow direction, air volume,
air conditioner, air intake control, SYNC, Front
windshield defroster, OFF
For more information of personalization, refer to the infotainment system manual.
CAUTION
If you leave the digital key after locking or unlocking the doors or starting up the
vehicle with the smart key, the doors can be locked by the central door lock. Please
carry around the digital key all the time.
Page 195 of 630
Convenient features
5-38
ONX4050007
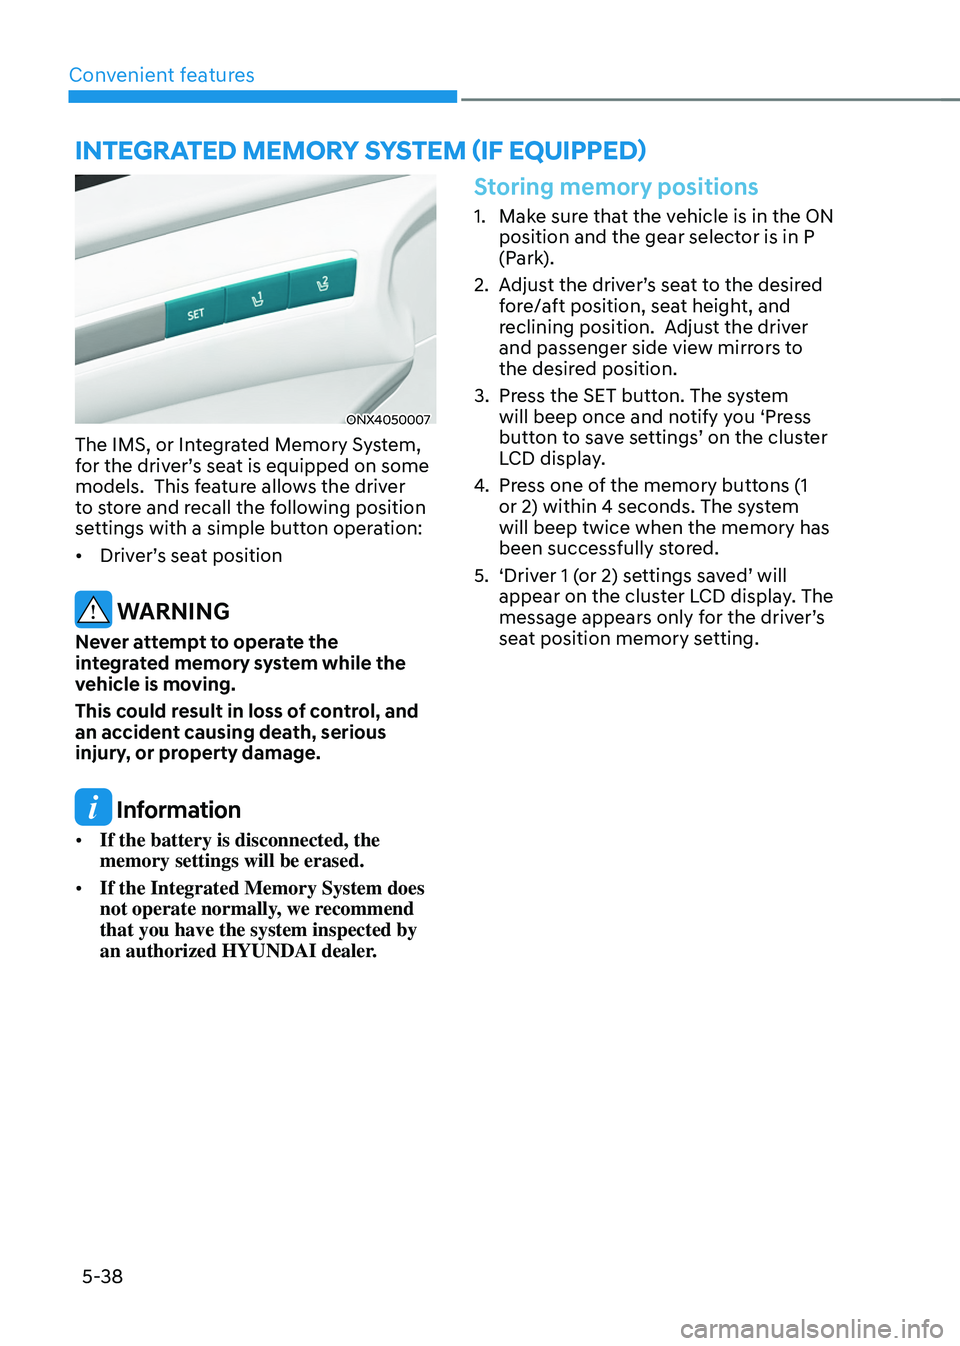
The IMS, or Integrated Memory System,
for the driver’s seat is equipped on some
models. This feature allows the driver
to store and recall the following position
settings with a simple button operation:
• Driver’s seat position
WARNING
Never attempt to operate the
integrated memory system while the
vehicle is moving.
This could result in loss of control, and
an accident causing death, serious
injury, or property damage.
Information
• If the battery is disconnected, the
memory settings will be erased.
• If the Integrated Memory System does
not operate normally, we recommend
that you have the system inspected by
an authorized HYUNDAI dealer.
Storing memory positions
1. Make sure that the vehicle is in the ON
position and the gear select
or is in P
(Park).
2.
Adjus
t the driver’s seat to the desired
fore/aft position, seat height, and
reclining position. Adjust the driver
and passenger side view mirrors to
the desired position.
3.
Press the SET butt
on. The system
will beep once and notify you ‘Press
button to save settings’ on the cluster
LCD display.
4.
Press one o
f the memory buttons (1
or 2) within 4 seconds. The system
will beep twice when the memory has
been successfully stored.
5.
‘Driver 1 (
or 2) settings saved’ will
appear on the cluster LCD display. The
message appears only for the driver’s
seat position memory setting.
InTegraTed memor y sysTem (If eQUIPPed)
Page 196 of 630
05
5-39
Recalling memory positions
1. Make sure that the vehicle is in the ON
position and the gear selector is in P
(Park).
2.
Press the desir
ed button (1 or 2). The
system will beep once and the driver’s
seat position and side view mirror
position will be automatically adjusted
to the stored positions.
3.
‘Driver 1 (
or 2) settings applied’ will
appear on the cluster LCD display.
Information
• Note that while the memory settings
are being recalled, if you press the
SET button or the corresponding IMS
memory button (1 or 2) for which the
settings are being recalled, the IMS will
temporarily deactivate. If you select
the alternate IMS memory button (1 or
2), the IMS will activate according to
the settings of the alternate button.
For example, if you press the SET
button or the number 1 button with the
number 1 setting in operation, the IMS
will temporarily deactivate.
If you press the number 2 button, then
the IMS memory settings according to
number 2 will activate.
• If you adjust the driver seat settings
or side mirror settings while the IMS
is recalling the stored positions, the
memory settings will not be applied.
Resetting the system
Follow the below procedures to reset the
Integrated Memory System (IMS) if it is
not operating properly:
Resetting the Integrated Memory
System (IMS)
1. Make sure that the vehicle is in Park
(P) and the engine is ON. Open the
driv
er’s door.
2.
Adjus
t the driver’s seat and seatback
angle to the most forward positions.
3.
Press the SET butt
on and push
the driver’s seat switch forward
simultaneously for about 2 seconds.
Page 197 of 630

Convenient features
5-40
While resetting integrated memory
system
1. Resetting starts with a notification
sound.
2.
The driver’
s seat and seatback is
adjusted to the rearward position with
the notification sound.
3.
The driver’
s seat and seatback is
re-adjusted to the default position
(central position) with the notification
sound.
However, in the following cases, the
resetting procedure and the notification
sound may stop.
• The memory button is pressed.
• The seat control switch is operated.
• The gear is shifted out of P (Park).
• The driving speed exceeds
2 mph (3 km/h).
• The driver’s door is closed.
NOTICE
• While integrated memory system
is being reset, if the resetting
and notification sound stops
incompletely, restart the resetting
procedure again.
• Before performing the IMS memory
reset operation, make sure there are
no objects on or around the driver’s
seat.
Seat Easy Access Operation (if
equipped)
The system will move the driver’s seat
automatically as follows:
• Vehicles equipped with Driver’s Power
Seat and Smart Key
- The driver’
s seat will move rearward
when the Engine Start/Stop button
is pressed to turn the engine OFF.
- The driver’
s seat will move forward
when the Engine Start/Stop button
is pressed to the ACC or engine
START position.
Note that Seat Easy Access operation
may be limited when the driver’s seat
position setting is already close to the
maximum rearward travel position.
You can enable or disable the Seat Easy
Access feature in the User Settings menu
on the LCD display or the navigation
infotainment screen on some models.
‘Convenience
→ Sea
t
E
asy
A
ccess
→ Off/
N
ormal/Extended’.
For more details, refer to “LCD Display”
In chapter 4.
CAUTION
The driver should be aware and be
cautious to avoid injury or damage
when using this feature if there are
objects or passengers in the driver’s
side rear seat or seat floor.
In case of emergency or to stop
movement of the front seat when the
Seat Easy Access is operating, press the
SET button or any of the driver’s seat
control switches.
Page 206 of 630
05
5-49
3) Two-Way Communication
Programming (For select garage door
openers)
If your garage door opener has the
‘myQ’ logo on its side, your opener
likely has Two-Way Communication
capability. HomeLink has the capability
to establish Two-Way Communication
with your garage door opener. HomeLink
can receive and display “closing”
or “opening” status messages from
compatible garage door openers. At
any time, Home-Link can also recall
and display the last recorded status
communicated by the garage door
opener to indicate your garage door
being “closed” or “opened”.
To check if your garage door opener is
compatible with this feature, refer to
www.homelink.com/compatible/Two-
way-Communication. If your garage
door opener has this functionality, AND
the Two-Way Communication indicators
(4), (6) in the mirror appear while the
garage door is opening/closing, then
no further steps are needed. Two-Way
Communication Programming is already
complete. However, if your garage door
opener has this functionality, AND the
Two-Way Communication indicators (4),
(6) in the mirror DO NOT appear while
the garage door is opening/closing, use
the following instructions to enable this
functionality.
1.
In your v
ehicle, press and hold the
programmed HomeLink button for 2
seconds, then release. Confirm that
the garage door is moving. AFTER it
stops, you will have one minute to
complete the following steps:
à A ladder and/or second person ma
y
simplify the following steps. 2.
On your gar
age door opener in your
garage, locate the “Learn” button
(usually near where the hanging
antenna wire is attached to the garage
door opener). If there is difficulty
locating this button, reference the
device’s owner’s manual.
3.
Press and r
elease the “Learn” button.
4.
A light on y
our garage door opener
may flash, and your Two-Way
Communication indicators (4), (6) in
your vehicle may flash, confirming
completion of the process.
5.
Re
turn to the vehicle and firmly
press and release the programmed
HomeLink button to activate
your garage door. The Two-Way
Communication indicators (4), (6)
flash in orange when the door is
moving. Do not make any additional
button presses until AFTER the garage
door has come to a complete stop.
6.
Your T
wo-Way Communication
programming is now complete.
Information
If your garage door opener has Two-
Way Communication functionality,
it is possible for HomeLink to stop
functioning the garage door shortly
after initial programming, IF the Two-
Way Communication Programming
wasn’t properly completed. This
usually happens after the first 10 times
a programmed HomeLink button is
pressed. If you experience this, completing
the “Programming a New HomeLink
Button” and “Two-Way Communication
Programming” will restore door
operation.
Page 207 of 630
Convenient features
5-50
4) Canadian Programming
Canadian radio-frequency laws require
transmitter remote signals to “time-
out” (or quit) after a couple seconds of
transmission, which may not be long
enough for HomeLink to pick up the signal
during programming.
If you live in Canada or you are having
difficulties programming a gate operator
or garage door opener by using the
programming procedures, replace
“Programming a New HomeLink Button”
step 3 with the following:
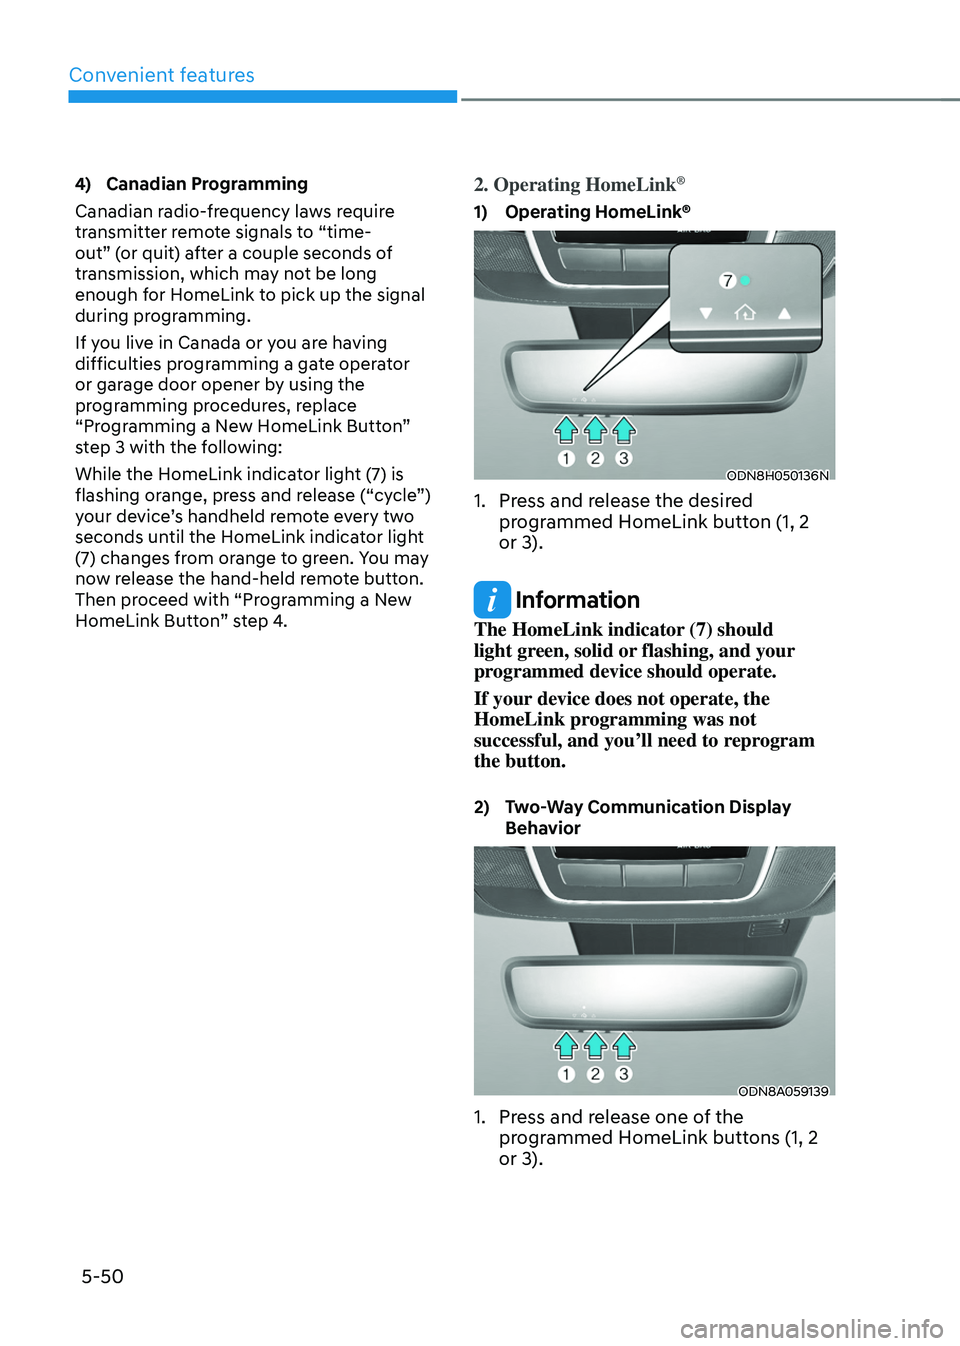
While the HomeLink indicator light (7) is
flashing orange, press and release (“cycle”)
your device’s handheld remote every two
seconds until the HomeLink indicator light
(7) changes from orange to green. You may
now release the hand-held remote button.
Then proceed with “Programming a New
HomeLink Button” step 4.2. Operating HomeLink®
1) Operating HomeLink®
ODN8H050136N
1. Press and release the desired
pr ogrammed HomeLink button (1, 2
or 3).
Information
The HomeLink indicator (7) should
light green, solid or flashing, and your
programmed device should operate.
If your device does not operate, the
HomeLink programming was not
successful, and you’ll need to reprogram
the button.
2) Two-Way Communication Display
Beha
vior
ODN8A059139
1. Press and release one of the
programmed HomeLink buttons (1, 2
or 3).
Page 223 of 630
Convenient features
5-66
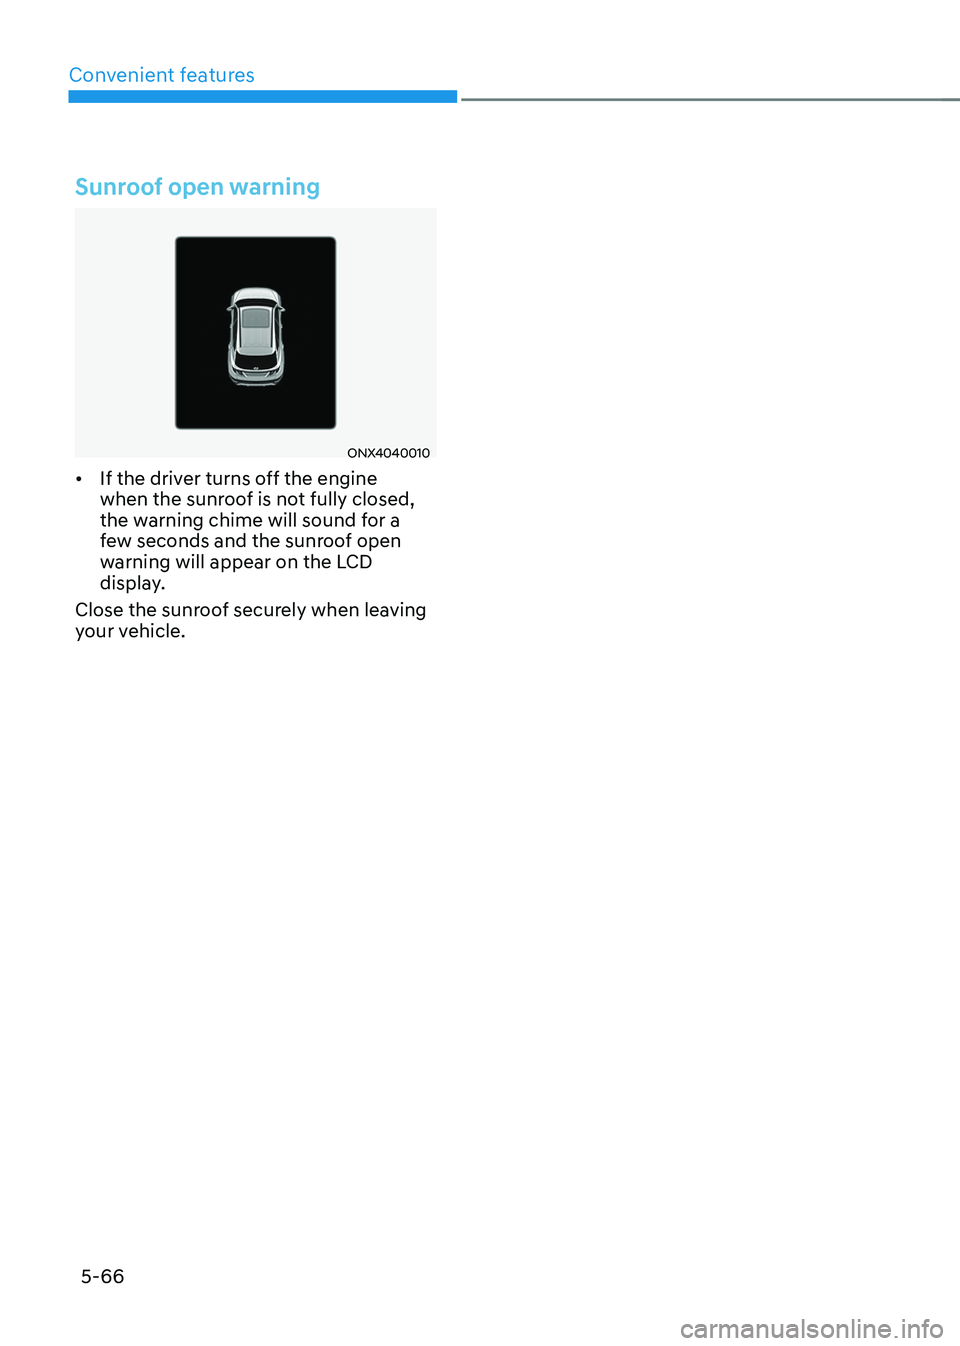
Sunroof open warning
ONX4040010
• If the driver turns off the engine
when the sunroof is not fully closed,
the warning chime will sound for a
few seconds and the sunroof open
warning will appear on the LCD
display.
Close the sunroof securely when leaving
your vehicle.