Page 588 of 630

09
9-41
WARNING
NEVER replace a fuse with anything but
another fuse of the same rating.
• A higher capacity fuse could cause
damage and possibly cause a fire.
• Do not install a wire or aluminum
foil instead of the proper fuse -
even as a temporary repair. It may
cause extensive wiring damage and
possibly a fire.
NOTICE
Do not use a screwdriver or any other
metal object to remove fuses because
it may cause a short circuit and damage
the system.
Instrument panel fuse
replacement
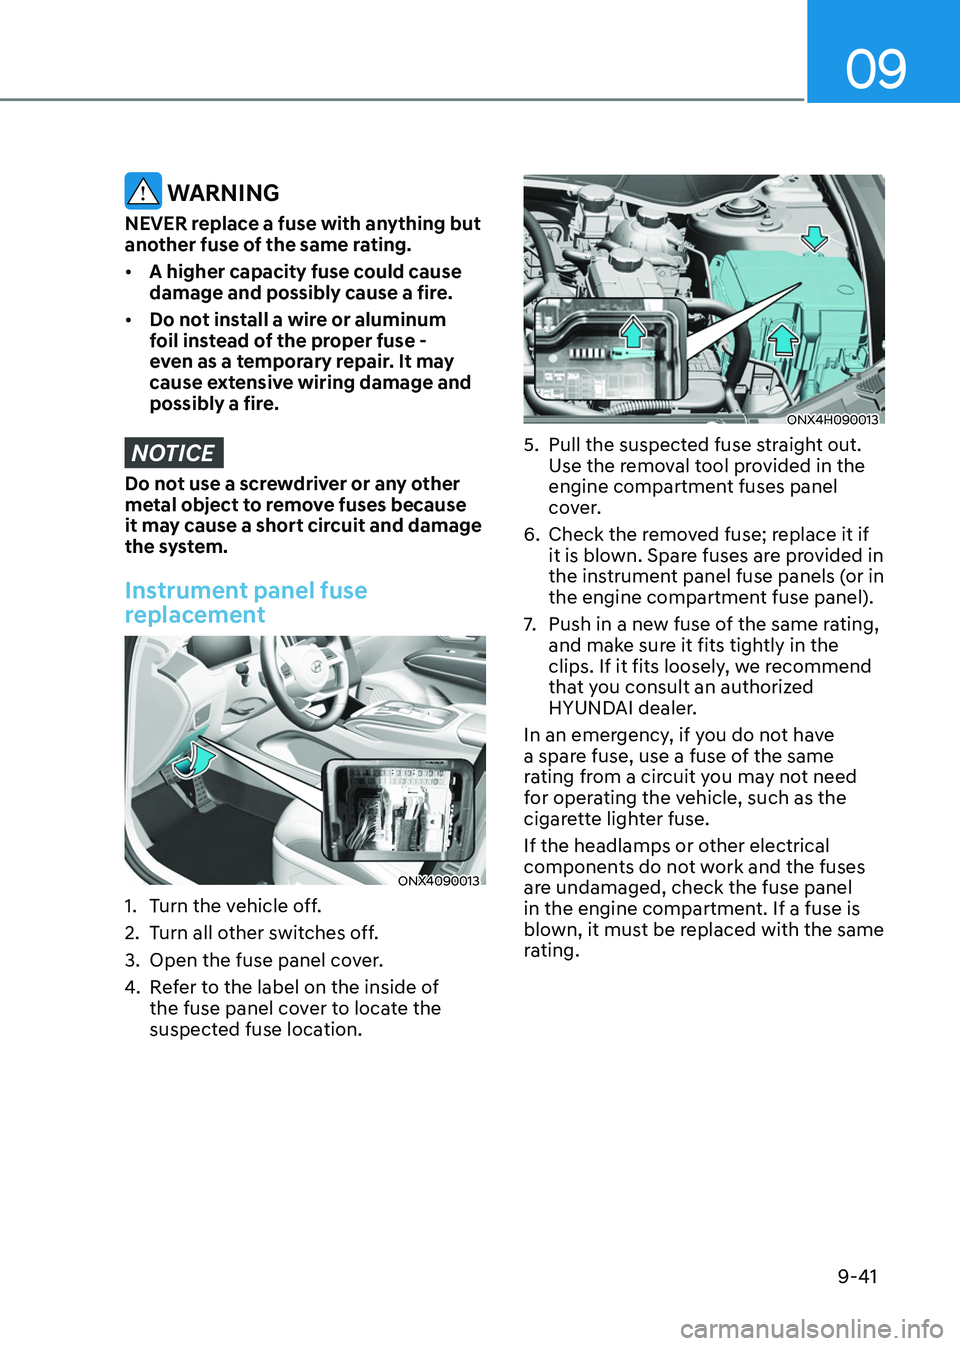
ONX4090013
1. Turn the vehicle off.
2.
Turn all o
ther switches off.
3.
Open the fuse panel cov
er.
4.
Re
fer to the label on the inside of
the fuse panel cover to locate the
suspected fuse location.
ONX4H090013
5. Pull the suspected fuse s traight out.
Use the removal tool provided in the
engine compartment fuses panel
cover.
6.
Check the remo
ved fuse; replace it if
it is blown. Spare fuses are provided in
the instrument panel fuse panels (or in
the engine compartment fuse panel).
7.
Push in a new fuse o
f the same rating,
and make sure it fits tightly in the
clips. If it fits loosely, we recommend
that you consult an authorized
HYUNDAI dealer.
In an emergency, if you do not have
a spare fuse, use a fuse of the same
rating from a circuit you may not need
for operating the vehicle, such as the
cigarette lighter fuse.
If the headlamps or other electrical
components do not work and the fuses
are undamaged, check the fuse panel
in the engine compartment. If a fuse is
blown, it must be replaced with the same
rating.
Page 589 of 630
Maintenance
9-42
Engine compartment panel fuse
replacement
„„Blade type fuse
ONX4H090016
„„Cartridge type fuse
ONX4H090017
1. Turn the vehicle off.
2.
Turn all o
ther switches off.
3.
Remo
ve the fuse panel cover by
pressing the tap and pulling up.
4.
Check the remo
ved fuse; replace it
if it is blown. To remove or insert the
fuse, use the fuse puller in the engine
compartment fuse panel.
5.
Push in a new fuse o
f the same rating,
and make sure it fits tightly in the
clips. If it fits loosely, we recommend
that you consult an authorized
HYUNDAI dealer.
NOTICE
After checking the fuse panel in the
engine compartment, securely
install the fuse panel cover. You may
hear a clicking sound if the cover is
securely latched. If it is not securely
latched, electrical failure may occur
from water contact.
Multi fuse
ONX4H090015
If the multi fuse is blown, we recommend
that you consult an authorized HYUNDAI
dealer.
Page 594 of 630
09
9-47
Engine compartment fuse panel
ONX4H090014
Inside the fuse/relay box cover, you can
find the fuse/relay label describing fuse/
relay names and ratings.
Information
Not all fuse panel descriptions in this
manual may be applicable to your vehicle;
the information is accurate at the time of
printing. When you inspect the fuse panel
in your vehicle, refer to the fuse panel
label.
ONX4H090024N
Page 595 of 630
Maintenance
9-48
Engine compartment fuse panel
Fuse Name Fuse ratingCircuit Protected
MDPS 80A/100A MDPS Unit (Column Type-80A) / MDPS Unit (Rack Type-
100A)
C/FAN 80ACooling Fan Motor
B+1 60AICU Junction Block (IPS01, IPS02, IPS03, IPS04, IPS05)
B+3 60AICU Junction Block (Power Window Main Relay, Fuse : F2,
F3, F5, F6, F8, F9, F11, F12, F18, F15)
CVVD 50ACVVD Actuator
Bower 40AE/R Junction Block (RLY.10)
IEB3 40AIEB Unit
Rear Defogger 40AE/R Junction Block (RLY.14)
Trailer1 50ATrailer Connector Unit
B+4 50AICU Junction Block (Long Term Load Latch Relay, Fuse : F1,
F4, F14, F17, F20, F21, F24, F27)
IEB2 60AIEB Unit
IEB1 60AIEB Unit
B+2 50AICU Junction Block (IPS06, IPS07, IPS08, IPS10, IPS11)
PTC Heater 50AE/R Junction Block (RLY.13)
PTG 40APower Tailgate Unit
E-Shifter1 30ASCU
Fuel Pump 20AE/R Junction Block (RLY.7)
AWD 20AAWD ECM
ECU4 10AECM
IG3 20AE/R Junction Block (RLY.3)
Page 596 of 630
09
9-49
Fuse Name Fuse ratingCircuit Protected
OPCU 20AOPU
BATT C/FAN 15A E/R Junction Block (RLY.2) E-Shifter2 10ASCU, Electronic Shift Switch (SBW)
HPCU1 10AHPCU
Trailer2 20ATrailer Connector Unit
RR HTD 10ADriver Power Outside Mirror, Passenger Power Outside
Mirror
IG1 30APCB Block (PDM(IG1) Relay)
IG2 30APCB Block (PDM(IG2) Relay)
ECU3 10ACVVD Actuator, ECM
TCU2 15A TCM, OPU
IEB4 10AIEB Unit
Module 7.5A Electronic Water Pump (Engine) AEB 10AFront Radar
HPCU2 10AHCPU
Sensor1 20AIgnition Coil #1~#4
Sensor2 15A Oxygen Sensor (Up/Down) ECU1 20AECM
Sensor4 10AE/R Junction Block (RLY.7)
Sensor3 10AOil Control Valve #1~#2, Purge Control Solenoid Valve,
RCV Control Solenoid Valve, Variable Oil Pump, Cooling
Fan Motor
B/Horn 15A PCB Block (Burglar Alarm Horn Relay)
Page 597 of 630
Maintenance
9-50
Fuse Name Fuse ratingCircuit Protected
MDPS2 10AMDPS Unit (Rack Type)
Sensor5 15A Active Purge Pump Horn 15A PCB Block (Horn Relay)
Wiper(FR)2 7.5A IBU Wiper(RR) 15A ICU Junction Block (Rear Wiper Relay)
Wiper(FR)1 25A PCB Block (Front Wiper(Low) Relay), Front Wiper Motor P/Outlet1 20ALuggage Power Outlet
P/Outlet2 20AFront Power Outlet
ACC 20AICU Junction Block (Fuse : F33, F36)
TCU1 15ATCM
EWP 10AElectronic Water Pump (Engine)
BMS 10ABMS
ECU2 15AECM
Page 600 of 630

09
9-53
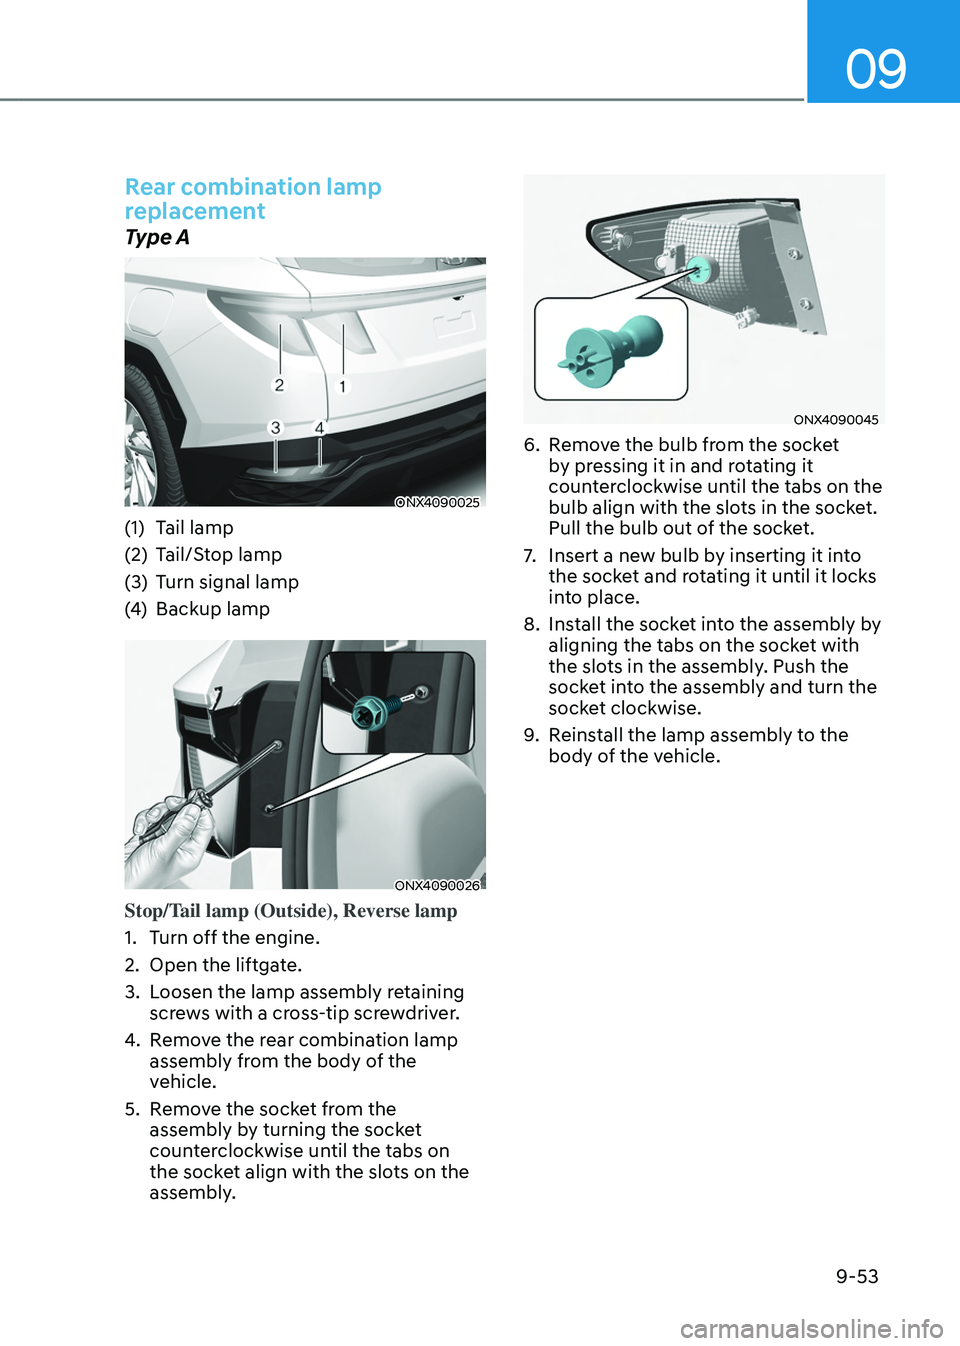
Rear combination lamp
replacement
Type A
ONX4090025
(1) Tail lamp
(2)
Tail/S
top lamp
(3)
Turn signal lamp
(4
)
Backup lamp
ONX4090026
Stop/Tail lamp (Outside), Reverse lamp
1.
Turn o
ff the engine.
2.
Open the liftga
te.
3.
Loosen the lamp assembly r
etaining
screws with a cross-tip screwdriver.
4.
Remo
ve the rear combination lamp
assembly from the body of the
vehicle.
5.
Remo
ve the socket from the
assembly by turning the socket
counterclockwise until the tabs on
the socket align with the slots on the
assembly.
ONX4090045
6. Remove the bulb from the socket
b y pressing it in and rotating it
counterclockwise until the tabs on the
bulb align with the slots in the socket.
Pull the bulb out of the socket.
7.
Insert a new bulb b
y inserting it into
the socket and rotating it until it locks
into place.
8.
Install the sock
et into the assembly by
aligning the tabs on the socket with
the slots in the assembly. Push the
socket into the assembly and turn the
socket clockwise.
9.
Reins
tall the lamp assembly to the
body of the vehicle.
Page 601 of 630
Maintenance
9-54
ONX4090027
Tail lamp (Inside)
1.
Turn o
ff the engine.
2.
Open the liftga
te.
3.
Remo
ve the service cover using a
flat-blade screwdriver.
4.
Remo
ve the socket from the
assembly by turning the socket
counterclockwise until the tabs on
the socket align with the slots on the
assembly.
ONX4090028
5. Remove the bulb from the socket
b y pressing it in and rotating it
counterclockwise until the tabs on the
bulb align with the slots in the socket.
Pull the bulb out of the socket.
6.
Insert a new bulb b
y inserting it into
the socket and rotating it until it locks
into place.
7.
Install the sock
et into the assembly by
aligning the tabs on the socket with
the slots in the assembly. Push the
socket into the assembly and turn the
socket clockwise.
8.
Reins
tall the lamp assembly to the
body of the vehicle.