2021 HYUNDAI SANTA FE CALLIGRAPHY transmission
[x] Cancel search: transmissionPage 8 of 636
Introduction
1-2
FOREWORD
Congratulations, and thank you for choosing HYUNDAI. We are pleased to welcome
you to the growing number of discerning people who drive HYUNDAI. We are very
proud of the advanced engineering and high-quality construction of each HYUNDAI
we build.
Your Owner’s Manual will introduce you to the features and operation of your new
HYUNDAI. To become familiar with your new HYUNDAI, so that you can fully enjoy it,
read this Owner’s Manual carefully before driving your new vehicle.
This manual contains important safety information and instructions intended to
familiarize you with your vehicle’s controls and safety features so you can safely
operate your vehicle.
This manual also contains information on maintenance designed to enhance safe
operation of the vehicle. It is recommended that all service and maintenance on your
car be performed by an authorized HYUNDAI dealer. An authorized HYUNDAI dealer
are prepared to provide high-quality service, maintenance and any other assistance
that may be required.
This Owner’s Manual should be considered a permanent part of your vehicle, and
should be kept in the vehicle so you can refer to it at any time. The manual should stay
with the vehicle if you sell it to provide the next owner with important operating, safety
and maintenance information.
HYUNDAI MOTOR AMERICA
CAUTION
Severe engine and transmission damage may result from the use of poor quality
fuels and lubricants that do not meet HYUNDAI specifications. You must always use
high quality fuels and lubricants that meet the specifications listed on Page 2-14 in
the Vehicle Specifications section of the Owner’s Manual.
Copyright 2020 HYUNDAI Motor America. All rights reserved. No part of this
publication may be reproduced, stored in any retrieval system or transmitted in
any form or by any means without the prior written permission of HYUNDAI Motor
America.
Page 26 of 636
Vehicle Information, Consumer Information and Reporting Safety Defects
2-12
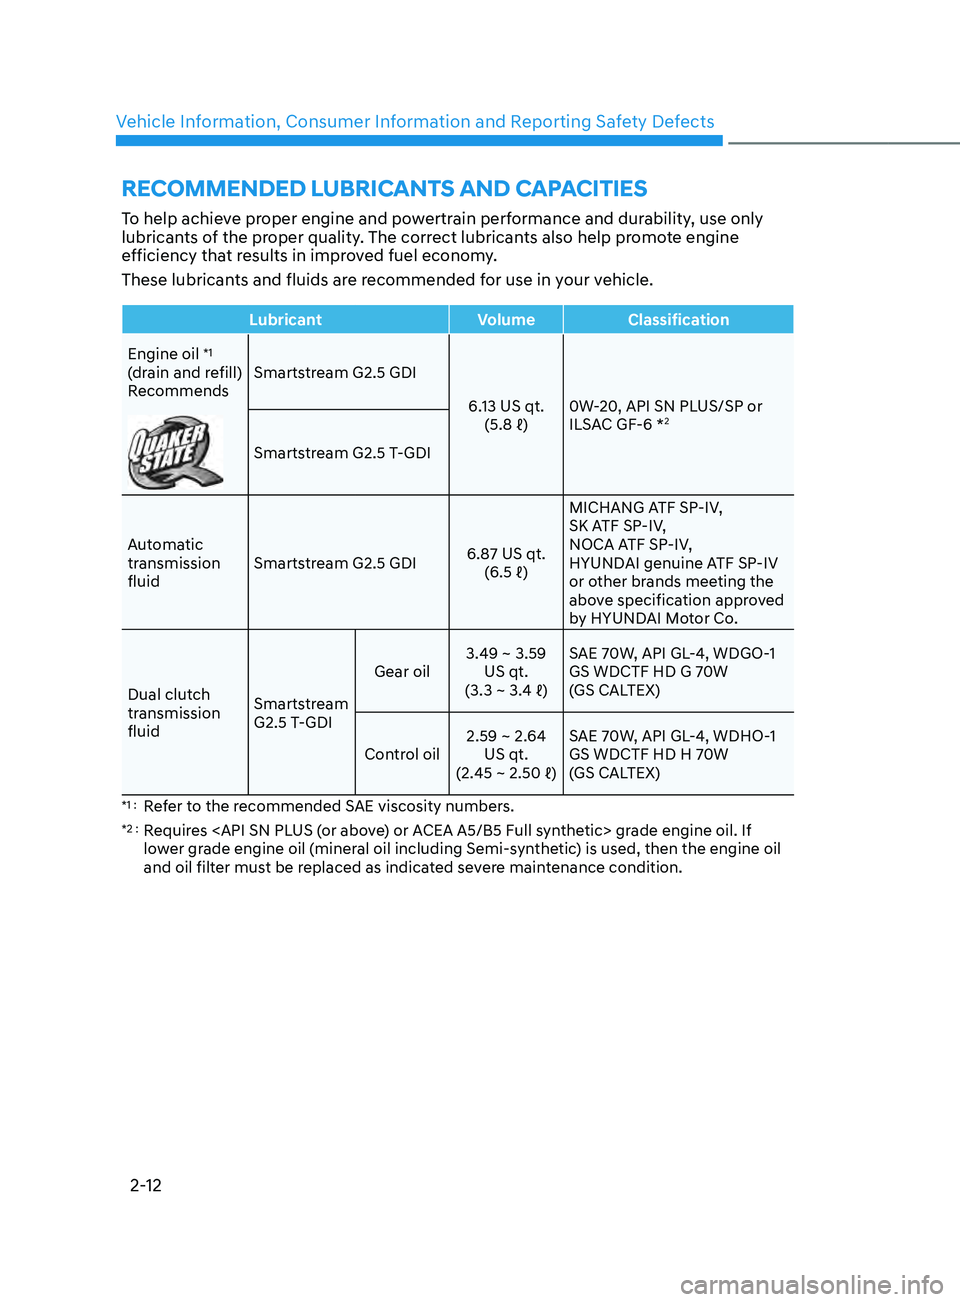
RECOMMENDED LUBRICANTS AND CAPACITIES
To help achieve proper engine and powertrain performance and durability, use only
lubricants of the proper quality. The correct lubricants also help promote engine
efficiency that results in improved fuel economy.
These lubricants and fluids are recommended for use in your vehicle.
LubricantVolumeClassification
Engine oil
*1
(drain and refill)
Recommends Smartstream G2.5 GDI
6.13 US qt.(5.8
ℓ) 0
W-20, API SN PLUS/SP or
ILSAC GF-6 *
2
Smartstream G2.5 T-GDI
Automatic
transmission
fluid Smartstream G2.5 GDI
6.87 US qt.
(6.5
ℓ) MICHANG A
TF SP-IV,
SK ATF SP-IV,
NOCA ATF SP-IV,
HYUNDAI genuine ATF SP-IV
or other brands meeting the
above specification approved
by HYUNDAI Motor Co.
Dual clutch
transmission
fluid Smartstream
G2.5 T-GDIGear oil
3.49 ~ 3.59
US qt.
(3.3
~ 3.4 ℓ) S
AE 70W, API GL-4, WDGO-1
GS WDCTF HD G 70W
(GS CALTEX)
Control oil 2.59 ~ 2.64
US qt.
(2.45
~ 2.50 ℓ) S
AE 70W, API GL-4, WDHO-1
GS WDCTF HD H 70W
(GS CALTEX)
*1 : Refer to the recommended SAE viscosity numbers.
*2 : Requires
lower grade engine oil (mineral oil including Semi-synthetic) is used, then the engine oil
and oil filter must be replaced as indicated severe maintenance condition.
Page 27 of 636

02
2-13
LubricantVolumeClassification
Coolant Smartstream G2.5 GDI
7.5 US qt.
(7.1
ℓ) Mixtur
e of antifreeze and
water (Phosphate-based
Ethylene glycol coolant
for aluminum radiator)
Smartstream G2.5 T-GDI 8.17 US qt.
(7.73
ℓ)
Br
ake fluid As required SAE J1704 DOT-4 LV,
FMVSS 116 DOT-4,
ISO4925 CLASS-6
Rear differential oil (4WD) 0.56 ~ 0.67 US qt.
(0.53
~ 0
.63
ℓ)HYPOID GEAR OIL API
GL
-5, SAE 75W/85
(SK HCT-5 GEAR OIL
75W/85 or EQUIVALENT)
Transfer case oil
(4WD) DCT
0.51 ~ 0.55 US qt.
(0.48
~ 0
.52
ℓ)
A/T 0
.66 ~ 0.72 US qt.(0.62
~ 0
.68
ℓ)
F
uel 70.8 US qt.
(67
ℓ) R
efer to “Fuel
requirements” in chapter
1.
DCT : Dual clutch transmission
A/T : Automatic transmission
Page 99 of 636

Instrument cluster
Instrument cluster ........................................................................\
....................4-4Instrument cluster control ........................................................................\
...................4-5
Instrumen t panel illumination ........................................................................\
........... 4-5
Gauges and me
ters
........................................................................\
.............................. 4-5
Speedome
ter
........................................................................\
..................................... 4-5
T
achometer
........................................................................\
.....................................
...4-5
Engine coolant temperature gauge
........................................................................\
. 4-6
Fuel gauge ........................................................................\
.....................................
....4-6
Outside temperature gauge
........................................................................\
.............. 4
-7
Odometer
........................................................................\
.....................................
.....4-8
Distance to empty
........................................................................\
............................ 4-8
F
uel economy (for 12.3-inch cluster)
...................................................................... 4-9
T
ransmission shift indicator
........................................................................\
................ 4-9
A
utomatic transmission / Dual clutch transmission shift indicator
..................... 4-9
W
arning and indicator lights
........................................................................\
............. 4-
10
Seat belt warning light
........................................................................\
.................... 4-
10
Air bag warning light
........................................................................\
....................... 4-
10
Parking brake & Brake fluid warning light
.............................................................. 4-10
An
ti-lock Brake System (ABS) warning light
........................................................... 4-
11
Electronic Brake Force Distribution (EBD) system warning light
.......................... 4-
11
Electric Power Steering (EPS) warning light
.......................................................... 4-
12
Charging system warning light
........................................................................\
....... 4-
12
Engine oil pressure warning light
........................................................................\
... 4-
13
Low fuel level warning light
........................................................................\
............ 4-
13
Malfunction Indicator Lamp (MIL)
........................................................................\
.. 4-13
Exhaus
t system (GPF) warning light (for gasoline engine)
................................... 4-
14
Electronic Parking Brake (EPB) warning light
........................................................ 4-
14
AUTO HOLD indicator light
........................................................................\
............. 4-
15
Low tire pressure warning light
........................................................................\
...... 4-
15
Forward Safety warning light
........................................................................\
.......... 4-16
Lane Sa
fety indicator light
........................................................................\
.............. 4-
16
4 Wheel Drive (4WD) warning light
........................................................................\
4-
16
4 Wheel Drive (4WD) LOCK Indicator Light
............................................................ 4-17
LED headligh
t warning light
........................................................................\
............. 4-
17
Icy road warning light
........................................................................\
...................... 4-
18
Electronic Stability Control (ESC) indicator light
................................................... 4-
18
Electronic Stability Control (ESC) OFF indicator light
........................................... 4-
18
Immobilizer Indicator Light (without smart key)
.................................................. 4-
19
Immobilizer Indicator Light (with smart key)
......................................................... 4-
19
Downhill Brake Control (DBC) indicator light
........................................................
4-20
4. Instrument cluster
4
Page 107 of 636

04
4-9
Fuel economy (for 12.3-inch cluster)
OTMA040002
The average fuel economy (1) and instant
fuel economy (2) is displayed at the
bottom of the cluster.
Automatic reset
To automatically reset the average fuel
economy, select between "After Ignition"
or "After Refueling" from the Settings
menu in the infotainment system screen.
Transmission shift indicator
Automatic transmission / Dual
clutch transmission shift indicator
„„4.2-inch„„12.3-inch
OTM040016OCN7040013N
This indicator informs the current gear
engaged.
Page 131 of 636
04
4-33
OTM080005L
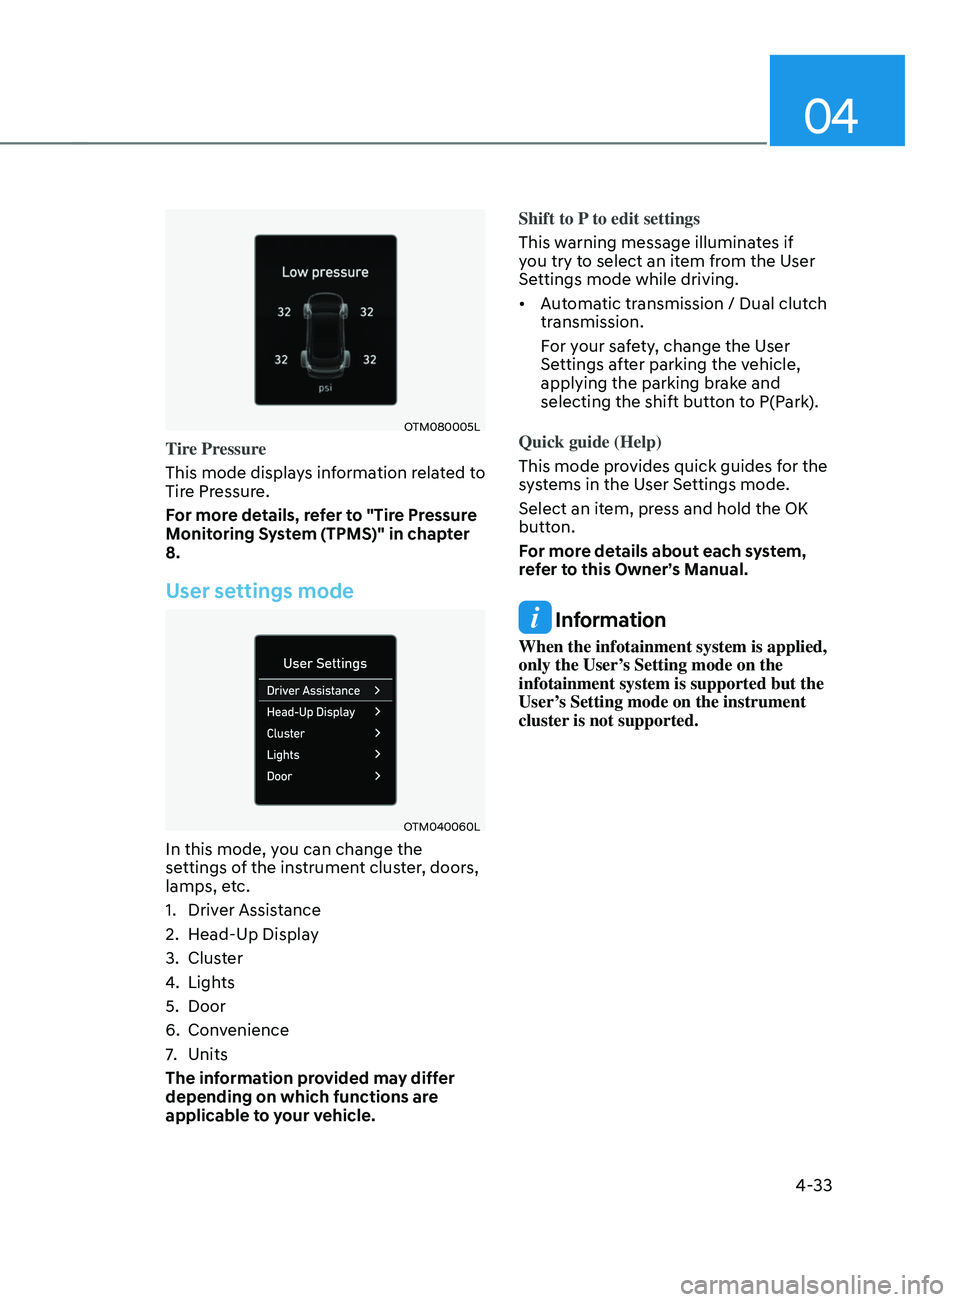
Tire Pressure
This mode displays information related to
Tire Pressure.
For more details, refer to "Tire Pressure
Monitoring System (TPMS)" in chapter
8.
User settings mode
OTM040060L
In this mode, you can change the
settings of the instrument cluster, doors,
lamps, etc.
1.
Driver Assis
tance
2.
Head-Up Displa
y
3.
Clust
er
4.
Lights
5.
Door
6.
Conv
enience
7.
Units
The inf
ormation provided may differ
depending on which functions are
applicable to your vehicle. Shift to P to edit settings
This warning message illuminates if
you try to select an item from the User
Settings mode while driving.
•
Automatic transmission / Dual clutch
transmission.
For your safety, change the User
Settings after parking the vehicle,
applying the parking brake and
selecting the shift button to P(Park).
Quick guide (Help)
This mode provides quick guides for the
systems in the User Settings mode.
Select an item, press and hold the OK
button.
For more details about each system,
refer to this Owner’s Manual.
Information
When the infotainment system is applied,
only the User’s Setting mode on the
infotainment system is supported but the
User’s Setting mode on the instrument
cluster is not supported.
Page 191 of 636
05
5-47
Integrated HomeLink® Wireless Control
System
The HomeLink® Wireless Control System
provides a convenient way to replace
up to three hand held radio-frequency
transmitters used to activate compatible
devices such as gate operators, garage
door openers, entry door locks, security
systems, and home lighting.
NOTICE
HomeLink® operates while the ignition
switch is in the ACC or ON position
for safety reasons. It is to prevent
unintentional security problems from
happening when the vehicle is parked
outside the garage.
WARNING
Before programming HomeLink® to a
garage door opener or gate operator,
make sure people and objects are out
of the way of the device to prevent
potential harm or damage. Do not
use the HomeLink® with any garage
door opener that lacks the safety
stop and reverse features required
by U.S. federal safety standards (this
includes any garage door opener model
manufactured before April 1, 1982).
A garage door that cannot detect an
object - signaling the door to stop and
reverse - does not meet current U.S.
federal safety standards. Using a garage
door opener without these features
increases the risk of serious injury or
death.
For more information, contact
HomeLink® at www.homelink.com, or
call Home-Link customer support at
1-800-355-3515.
It is also recommended that a new
battery be replaced in the handheld
transmitter of the device being trained
to HomeLink® for quicker training and
accurate transmission of the radio
frequency. 1. Programming HomeLink
®
The following steps show how to
program HomeLink. If you have any
questions or are having difficulty
programming your HomeLink buttons,
refer to the HomeLink website or call the
HomeLink customer support toll-free
number. Do this before going back to the
dealer who sold you the car.
•
Visit the HomeLink website at: www.
homelink.com. Then at the top of the
page, choose your vehicle make. Then
watch the You Tube video, and/or
access additional website information.
• If you choose to access the website
via your cell phone, scan the QR code.
• Or call HomeLink customer support
at 1-800-355-3515 (Please have the
vehicle make/model and the opener
device make/model readily available.)
Page 192 of 636
Convenient features
5-48
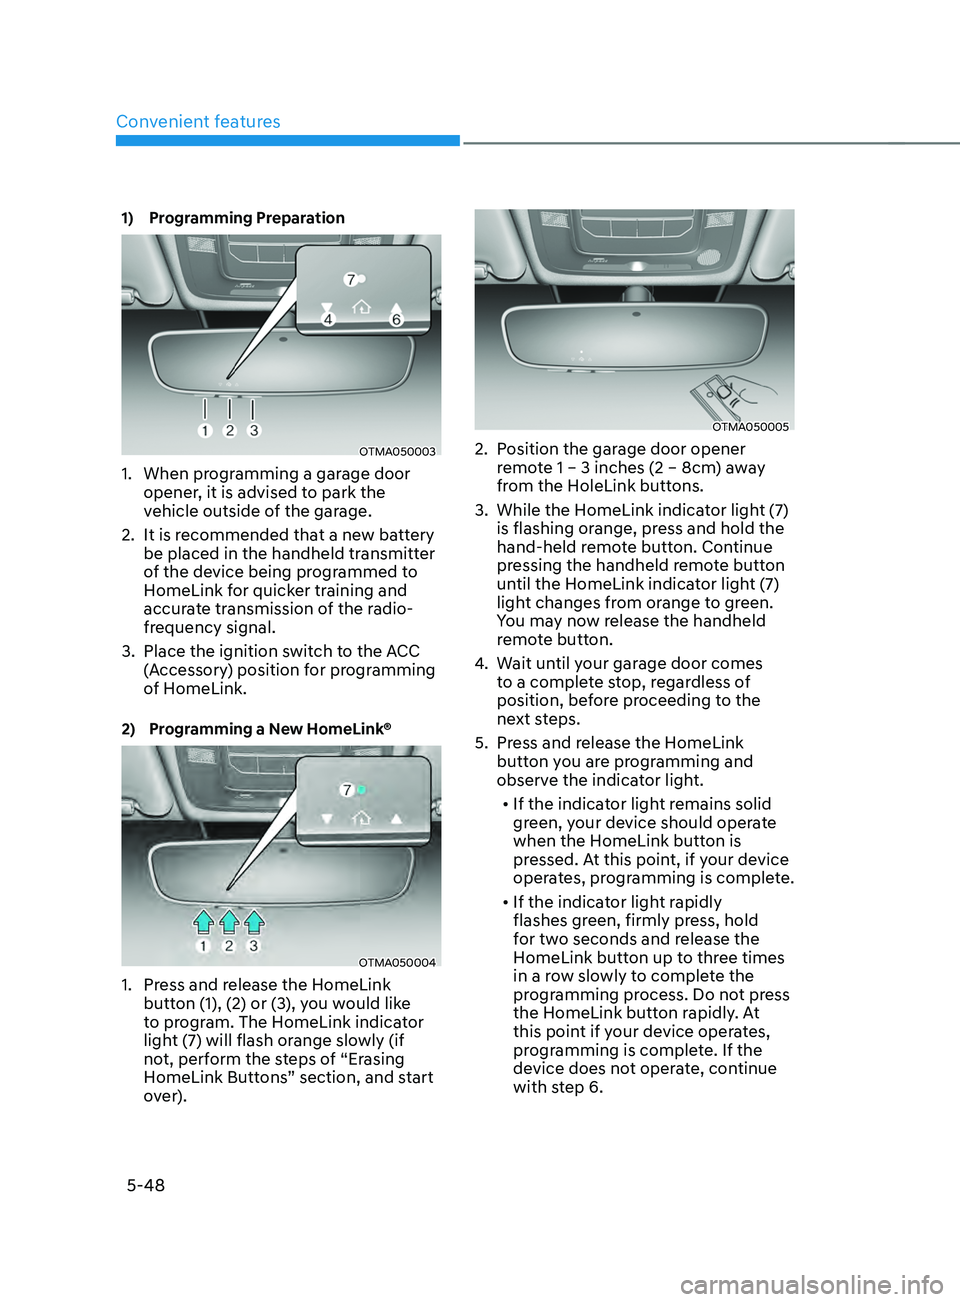
1) Programming Preparation
OTMA050003
1. When programming a garage door
opener, it is advised to park the
vehicle outside of the garage.
2.
It is recommended tha
t a new battery
be placed in the handheld transmitter
of the device being programmed to
HomeLink for quicker training and
accurate transmission of the radio-
frequency signal.
3.
Place the ignition swit
ch to the ACC
(Accessory) position for programming
of HomeLink.
2) Programming a New HomeLink®
OTMA050004
1. Press and release the HomeLink
butt on (1), (2) or (3), you would like
to program. The HomeLink indicator
light (7) will flash orange slowly (if
not, perform the steps of “Erasing
HomeLink Buttons” section, and start
over).
OTMA050005
2. Position the garage door opener
r emote 1 – 3 inches (2 – 8cm) away
from the HoleLink buttons.
3.
While the HomeLink indica
tor light (7)
is flashing orange, press and hold the
hand-held remote button. Continue
pressing the handheld remote button
until the HomeLink indicator light (7)
light changes from orange to green.
You may now release the handheld
remote button.
4.
Wait un
til your garage door comes
to a complete stop, regardless of
position, before proceeding to the
next steps.
5.
Press and r
elease the HomeLink
button you are programming and
observe the indicator light.
• If the indicator light remains solid
green, your device should operate
when the HomeLink button is
pressed. At this point, if your device
operates, programming is complete.
• If the indicator light rapidly
flashes green, firmly press, hold
for two seconds and release the
HomeLink button up to three times
in a row slowly to complete the
programming process. Do not press
the HomeLink button rapidly. At
this point if your device operates,
programming is complete. If the
device does not operate, continue
with step 6.