Page 145 of 444

6-17
06
Operating door locks from
inside the vehicle
With the door lock button
OBI3050003OBI3050003
• To unlock a door, push the door lock
button (1) to the “Unlock” position.
• To lock a door, push the door lock
button (1) to the “Lock” position.
• To open a door, pull the door handle
(2) outward.
• If the inner door handle of the driver’s
door is pulled when the door lock
button is in the lock position, the
button is unlocked and door opens.
• Front doors cannot be locked if the
key is in the ignition switch and any
front door is open.
• Doors cannot be locked if the smart
key is in the vehicle and any door is
open.
i Information
If a power door lock ever fails to function
while you are in the vehicle try one or
more of the following techniques to exit:
Operate the door unlock feature
repeatedly (both electronic and manual)
while simultaneously pulling on the door
handle.
Operate the other door locks and handles,
front and rear.
Lower a front window and use the
mechanical key to unlock the door from
outside.
Page 146 of 444

6-18
Convenient features
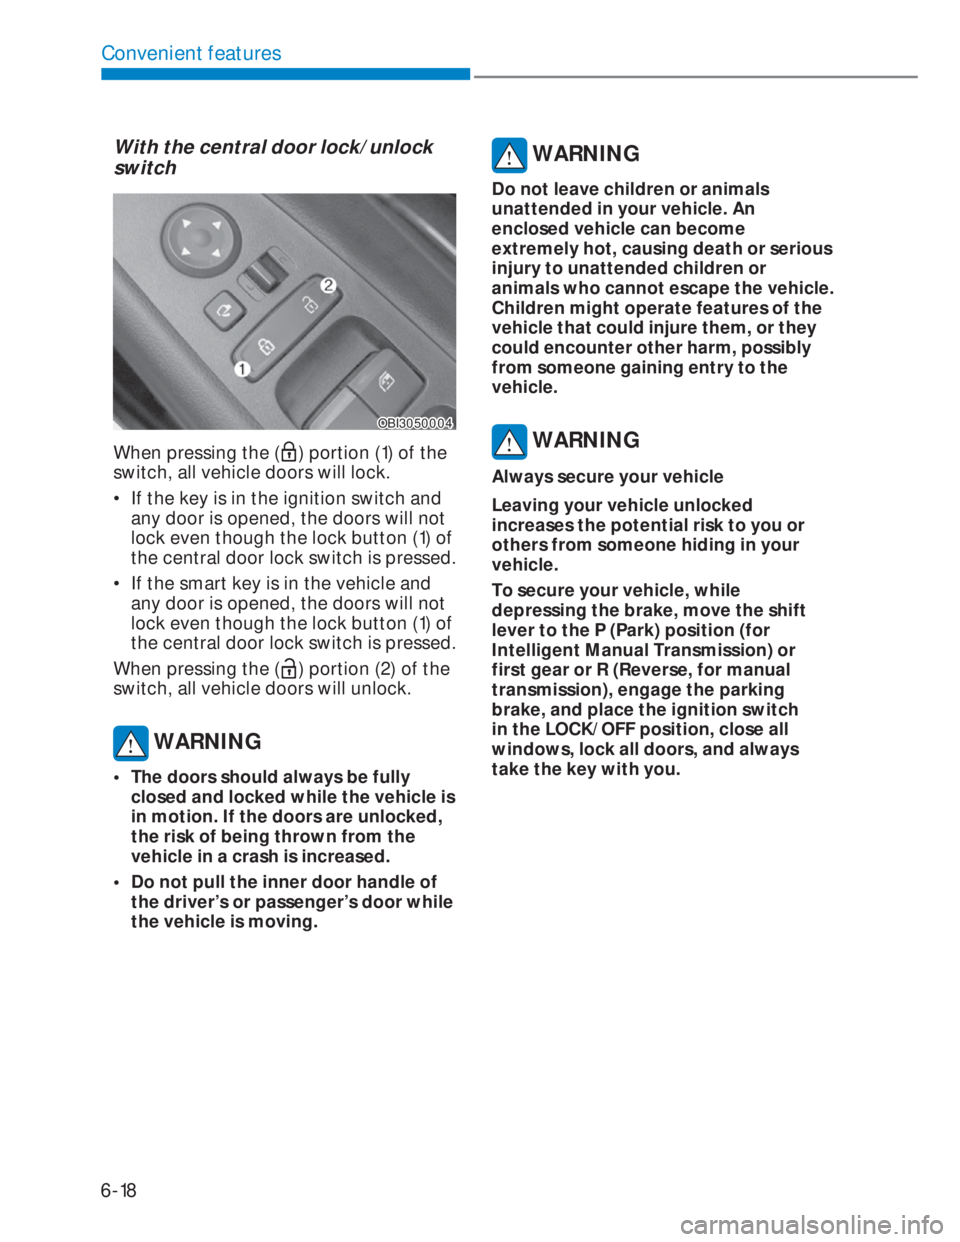
With the central door lock/unlock
switch
OBI3050004OBI3050004
When pressing the () portion (1) of the
switch, all vehicle doors will lock.
• If the key is in the ignition switch and
any door is opened, the doors will not
lock even though the lock button (1) of
the central door lock switch is pressed.
• If the smart key is in the vehicle and
any door is opened, the doors will not
lock even though the lock button (1) of
the central door lock switch is pressed.
When pressing the (
) portion (2) of the
switch, all vehicle doors will unlock.
WARNING
• The doors should always be fully
closed and locked while the vehicle is
in motion. If the doors are unlocked,
the risk of being thrown from the
vehicle in a crash is increased.
• Do not pull the inner door handle of
the driver’s or passenger’s door while
the vehicle is moving.
WARNING
Do not leave children or animals
unattended in your vehicle. An
enclosed vehicle can become
extremely hot, causing death or serious
injury to unattended children or
animals who cannot escape the vehicle.
Children might operate features of the
vehicle that could injure them, or they
could encounter other harm, possibly
from someone gaining entry to the
vehicle.
WARNING
Always secure your vehicle
Leaving your vehicle unlocked
increases the potential risk to you or
others from someone hiding in your
vehicle.
To secure your vehicle, while
depressing the brake, move the shift
lever to the P (Park) position (for
Intelligent Manual Transmission) or
first gear or R (Reverse, for manual
transmission), engage the parking
brake, and place the ignition switch
in the LOCK/OFF position, close all
windows, lock all doors, and always
take the key with you.
Page 147 of 444

6-19
06
WARNING
Opening a door when something is
approaching may cause damage or
injury. Be careful when opening doors
and watch for vehicles, motorcycles,
bicycles or pedestrians approaching
the vehicle in the path of the door.
WARNING
If you stay in the vehicle for a long time
while the weather is very hot or cold,
there are risks of injuries or danger to
life. Do not lock the vehicle from the
outside when someone is in the vehicle.
Auto door lock/unlock features
(if equipped)
Impact sensing door unlock system
All doors will be automatically unlocked
when an impact causes the air bags to
deploy.
Speed sensing door lock system
All doors will be automatically locked
when vehicle speed exceeds 15 km/h (9
mph).
Child-protector rear door locks
OBC3050012OBC3050012
The child safety lock is provided to help
prevent children seated in the rear from
accidentally opening the rear doors. The
rear door safety locks should be used
whenever children are in the vehicle.
The child safety lock is located on the
edge of each rear door. When the child
safety lock is in the lock position (
),
the rear door will not open if the inner
door handle is pulled.
To lock the child safety lock, insert a key
(or screwdriver) into the hole (1) and turn
it to the lock (
) position.
To allow a rear door to be opened from
inside the vehicle, unlock the child
safety lock.
WARNING
If children accidently open the rear
doors while the vehicle is in motion,
they could fall out of the vehicle. The
rear door safety locks should always
be used whenever children are in the
vehicle.
Page 148 of 444

6-20
Convenient features
Electric power steering (EPS)
The system assists you with steering
the vehicle. If the engine is off or if
the power steering system becomes
inoperative, the vehicle may still be
steered, but it will require increased
steering effort.
Also, the steering effort becomes
heavier as the vehicle’s speed increases
and becomes lighter as the vehicle’s
speed decreases for better control of the
steering wheel.
Should you notice any change in the
effort required to steer during normal
vehicle operation, we recommend that
the system be checked by an authorized
HYUNDAI dealer.
NOTICE
If the Electric Power Steering System
does not operate normally, the
warning light (
) will illuminate on
the instrument cluster. The steering
wheel may become difficult to control
or operate. Take your vehicle to an
authorized HYUNDAI dealer and
have the system checked as soon as
possible.
i Information
The following symptoms may occur
during normal vehicle operation:
• The steering effort may be high
immediately after placing the ignition
switch in the ON position.
This happens as the system performs
the EPS system diagnostics. When
the diagnostics is completed, the
steering wheel will return to its normal
condition.
• When the battery voltage is low, you
might have to put more steering effort.
However, it is a temporary condition so
that it will return to normal condition
after charging the battery.
• A click noise may be heard from the
EPS relay after the ignition switch
is placed to the ON or LOCK/OFF
position.
• Motor noise may be heard when the
vehicle is at stop or at a low driving
speed.
• When you operate the steering wheel
in low temperature, abnormal noise
may occur. If temperature rises, the
noise will disappear. This is a normal
condition.
WARNING
Never adjust the steering wheel while
driving. You may lose steering control
and cause severe personal injury, death
or accidents.
STEERING WHEEL
Page 149 of 444

6-21
06
Tilt steering / Telescope
steering (if equipped)
WARNING
Never adjust the steering wheel while
driving. You may lose steering control
and cause severe personal injury, death
or accidents.
i Information
After adjustment, sometimes the lock-
release lever may not lock the steering
wheel.
It is not a malfunction. This occurs when
two gears are not engaged correctly. In
this case, adjust the steering wheel again
and then lock the steering wheel.
OBI3050005OBI3050005
To change the steering wheel angle and
height:
1. Pull down the lock-release lever (1).
2. Adjust the steering wheel to the
desired angle (2) and height (3, if
equipped). Move the steering wheel,
so it points toward your chest, not
toward your face. Make sure you can
see the instrument panel warning
lights and gauges.
3. Pull up the lock-release lever to lock
the steering wheel in place.
Push the steering wheel both up and
down to be certain it is locked in
position.
CAUTION
While adjusting the steering wheel
height, please do not push or pull it
hard since the fixture can be damaged.
Page 150 of 444
6-22
Convenient features
Horn
OBC3050051ROBC3050051R
To sound the horn, press the area
indicated by the horn symbol on your
steering wheel (see illustration). The
horn will operate only when this area is
pressed.
NOTICE
Do not strike the horn severely to
operate it, or hit it with your fist. Do not
press on the horn with a sharp-pointed
object.
Page 151 of 444

6-23
06
Inside rearview mirror
Before you start driving, adjust the
rearview mirror to the center on the view
through the rear window.
WARNING
Make sure your line of sight is not
obstructed. Do not place objects in the
rear seat, cargo area, or behind the rear
headrests which could interfere with
your vision through the rear window.
WARNING
To prevent serious injury during an
accident or deployment of the air bag,
do not modify the rearview mirror and
do not install a wide mirror.
WARNING
NEVER adjust the mirror while driving.
This may cause loss of vehicle control
resulting in an accident.
Day/night rearview mirror
OBC3050054OBC3050054
[A] : Day, [B] :Night
Make this adjustment before you start
driving and while the day/night lever is
in the day position.Pull the day/night lever toward you to
reduce glare from the headlights of the
vehicles behind you during night driving.
Remember that you lose some rearview
clarity in the night position.
Blue Link® center (if equipped)
OQXI049073OQXI049073
For details, refer to the Blue Link®
Owner’s Guide, infotainment system
manual.
(1) SOS : Emergency assistance
(2) RSA (Road Side Assistance)
- Flat tire
- Vehicle break down
- Vehicle towing
- Emergency fuel
(3) BlueLink
- Push maps by call center
- General assistance
MIRRORS
Page 152 of 444

6-24
Convenient features
Outside rearview mirror
Your vehicle is equipped with both left-
hand and right-hand outside rearview
mirrors.
WARNING
Rearview mirrors
• Both right and left outside rear view
mirror are convex.
Objects seen in the mirror are closer
than they appear.
• Use your interior rearview mirror or
turn your head and look to determine
the actual distance of following
vehicles when changing lanes.
WARNING
Do not adjust or fold the outside
rearview mirrors while the vehicle is
moving. This could result in loss of
control, and an accident which could
cause death, serious injury or property
damage.
NOTICE
• Do not scrape ice off the mirror face;
this may damage the surface of the
glass.
• If the mirror is jammed with ice, do
not adjust the mirror by force. Use an
approved spray de-icer (not radiator
antifreeze) spray, or a sponge or soft
cloth with very warm water, or move
the vehicle to a warm place and allow
the ice to melt.
Adjustion the rearview mirror
OBI3050073LOBI3050073L
Manual type (if equipped)
To adjust an outside mirror, move the
control lever.
OBI3050006OBI3050006
Electric type (if equipped)
Move the lever (1) to the L (Left) or R
(Right) to select the rearview mirror you
would like to adjust.
Use the mirror adjustment control (2) to
position the selected mirror up, down,
left or right.