2021 HONDA RIDGELINE ECU
[x] Cancel search: ECUPage 546 of 597

Continued545
uuIf a Tire Goes Flat uChanging a Flat Tire
Handling the Unexpected
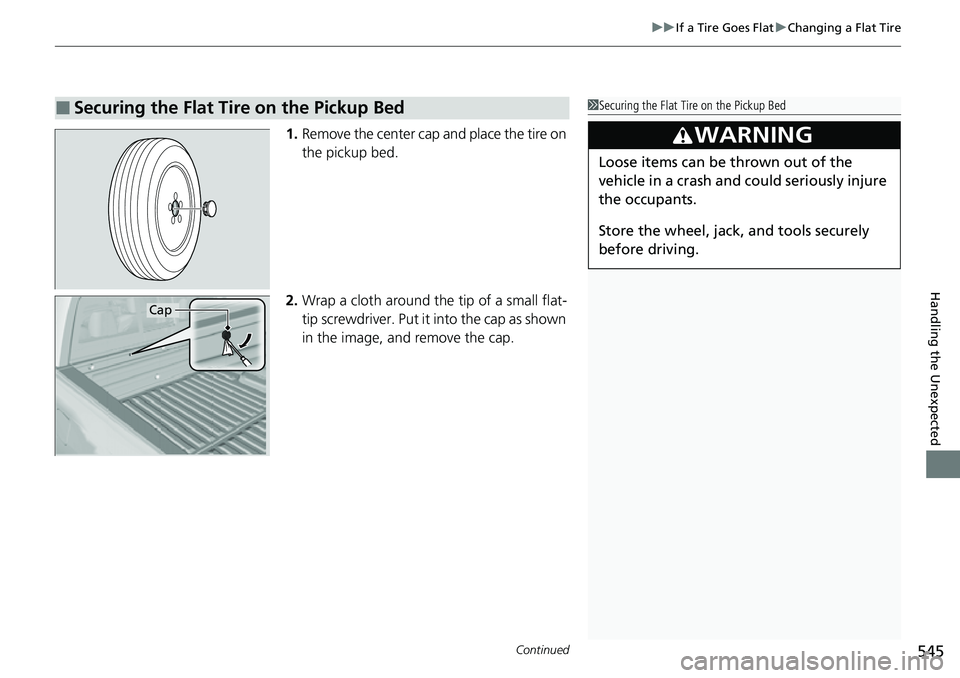
1. Remove the center cap and place the tire on
the pickup bed.
2. Wrap a cloth around the tip of a small flat-
tip screwdriver. Put it into the cap as shown
in the image, and remove the cap.
■Securing the Flat Tire on the Pickup Bed1Securing the Flat Tire on the Pickup Bed
3WARNING
Loose items can be thrown out of the
vehicle in a crash and could seriously injure
the occupants.
Store the wheel, jack, and tools securely
before driving.
Cap
Page 547 of 597

546
uuIf a Tire Goes Flat uChanging a Flat Tire
Handling the Unexpected
3. Place the spacer cone onto the wheel hub,
then secure the flat tire to the pickup bed
with the wing bolt as shown.
4. Securely store the jack on the tire tray using
the strap.
5. Release the tire tray and slide it back in
place.
6. Tighten the tire tray holding bolts securely.
7. Store the center cap and the tool box in the
trunk.
u Make sure it does not get scratched or
damaged.
If you remove the tire from the pickup bed,
reinstall the cap to its original location.
Wing BoltSpacer Cone
Page 548 of 597

Continued547
uuIf a Tire Goes Flat uChanging a Flat Tire
Handling the Unexpected
As a temporary mounting location, you ma y secure the compact spare tire on the
pickup bed, if needed. 1.Wrap a cloth around the tip of a small flat-
tip screwdriver. Put it into the cap as shown
in the image, and remove the cap.
2. Remove the compact spare tire from the
tire tray.
2 Getting Ready to Replace the Flat Tire
P. 540
3. Place the compact spar e tire on the pickup
bed as shown.
4. Place the spacer cone on the wheel hub and
the spacer washer within the spacer cone.
Then secure the compact spare tire to the
pickup bed with the wing bolt as shown.
5. Store or secure the tool box.
If you remove the compact spare tire from the
pickup bed, reinstall the cap to its original
location.
■Securing a Compact Spare Tire on the Pickup Bed1 Securing a Compact Spare Tire on the Pickup Bed
The spacer washer is stored in the tool box.
3WARNING
Loose items can be thrown out of the
vehicle in a crash and could seriously injure
the occupants.
Store the wheel and tools securely before
driving.
Cap
Spacer Cone
Wing BoltSpacer Washer
Page 553 of 597

552
Handling the Unexpected
If the Battery Is Dead
Turn off the power to electric devices, such as audio and lights. Turn off the engine,
then open the hood. 1.Pull up on the engine cover, remove it from
the pins.
u Start on the passenger side and lift the
outermost edge of the cover.
u Move towards the driver side while
applying uniform upward pressure.
2. Connect the first jump er cable to your
vehicle’s battery + terminal.
3. Connect the other end of the first jumper
cable to the booster battery + terminal.
u Use a 12-volt booster battery only.
u When using an automotive battery
charger to boost your 12-volt battery,
select a lower charging voltage than
15-volt. Check the charger manual for
the proper setting.
4. Connect the second jumper cable to the
booster battery - terminal.
■Jump Starting Procedure1If the Battery Is Dead
Securely attach the jumper cables clips so that they
do not come off when the e ngine vibrates. Also be
careful not to tangle the ju mper cables or allow the
cable ends to touch each other while attaching or
detaching the jumper cables.
Battery performance degrades in cold conditions and
may prevent the engi ne from starting.
3WARNING
A battery can explode if you do not follow
the correct procedure, seriously injuring
anyone nearby.
Keep all sparks, open flames, and smoking
materials away from the battery.
Pins
Engine Cover
Booster Battery
Page 571 of 597

570
Handling the Unexpected
If You Cannot Unlock the Tailgate
If you cannot unlock the tailgate, use the following procedure.1.Press the unlock button on the smart entry
remote.
2. Remove the built-in key from the smart
entry remote.
3. Fully insert the key into the cover located on
the underside of the tailgate beside the
lower handle and turn it as shown in the
image.
4. Remove the cover.
5. Pull the emergency release cable.
6. Open the tailgate in either swing out or flip
down position by pulling either handle.
2 Opening/Closing the Tailgate P. 132
■What to Do If Unable to Unlock the Tailgate1What to Do If Unable to Unlock the Tailgate
Following up:
After taking these steps, cont act a dealer to have the
vehicle checked.
Alarm may sound if you pull the emergency release
cable without pressing the unlock button on the
smart entry remote. 2 Security System P. 136
Emergency
Release Cable
Page 573 of 597

uuRefueling uRefueling From a Portable Fuel Container
572
Handling the Unexpected
1Refueling From a Portable Fuel Container
Your vehicle has a warning label for filling a portable
fuel container on the left re ar side of the pickup bed.
Whenever filling a fuel container, use an approved
fuel container, and place it on the ground. Do not fill
the fuel container in the vehicle, including the pickup
bed and the trunk. Make sure to put the fuel pump
nozzle in the fuel filler of the container securely and
to handle it properly.
Page 583 of 597

582
uuWarranty Coverages u
Information
Replacement Battery Limited Warranty – provides prorated coverage for a
replacement battery purchased from your dealer.
Replacement Muffler Life time Limited Warranty – provides coverage for as
long as the purchaser of the muffler owns the vehicle.
Restrictions and exclusions apply to a ll these warranties. Please read the Honda
warranty information booklet that came wi th your vehicle for precise information on
warranty coverages. Your vehi cle’s original tires are covered by their manufacturer.
Tire warranty information is in a separate booklet.
■Statement on Warranty Coverage for Aftermarket and Recycled Parts
The Magnuson-Moss Warranty Act, 15 U.S.C. s.2301 et seq., makes it illegal for
motor vehicle manufacturers to void a motor vehicle warranty or deny warranty
coverage solely because an aftermarket or recycled part has been used to repair the
vehicle or someone other than the authorized service provider performed service on
the vehicle. This provision does not apply to a new motor vehicle purchased solely
for commercial or industrial use.
Under federal law, a manufacturer may deny warranty coverage and charge for repairs
to a vehicle if it is discovered that an aftermarket or recycled part installed on the
vehicle is defective or was in stalled incorrectly and caused damage to another part of
the vehicle otherwise covered under warran ty. The Federal Trade Commission requires
that a manufacturer demonstrate that an aftermarket or recycled part or service
performed by a person other than an authorized service provider caused damage to
another part of the vehicle otherwise covered under warranty before denying
warranty coverage. Additionally, federal law allows a manufacturer to void a motor
vehicle warranty or deny warranty coverage if the manufacturer provides the article or
service to consumers free of charge unde r the warranty or the manufacturer has
secured a waiver from the Federal Trade Commission.
Page 588 of 597

Index
587
Index
Index
A
ABS (Anti-lock Brake System).................. 470
AC Power Outlet ...................................... 191
Accessories and Modifications ................ 535
Accessory Power Sockets ......................... 182
Adaptive Cruise Control (ACC) ................ 438
Indicator ................................................... 91
Additives
Coolant .................................................. 504
Engine Oil ............................................... 499
Washer ................................................... 507
Adjusting Armrest .................................................. 174
Front Seats.............................................. 166
Head Restraints ............................... 171, 172
Mirrors.................................................... 164
Rear Seats ............................................... 169
Steering Wheel ....................................... 163
Temperature ........................................... 113
Agile Handling Assist ............................... 414
Air Conditioning System (Climate Control System) .................................................... 195
Changing the Mode................................ 195
Defrosting the Windshield and Windows .............................................. 196
Dust and Pollen Filter .............................. 528
Recirculation/Fresh Air Mode................... 196
Sensor .................................................... 201
Synchronized Mode ................................ 198
Using Automatic Climate Control............ 195
Air Pressure ...................................... 517, 575 Airbags
........................................................ 44
Advanced Airbags ..................................... 50
After a Collision ......................................... 47
Airbag Care ............................................... 58
Event Data Recorder .................................... 0
Front Airbags (SRS) .................................... 47
Indicator .............................................. 55, 82
Passenger Airbag Off Indicator .................. 56
Sensors ...................................................... 44
Side Airbags .............................................. 52
Side Curtain Airbags .................................. 54
All-wheel drive (AWD) Indicator ............... 88
AM/FM Radio ............................................ 236
Android Auto ............................................ 273
Anti-lock Brake System (ABS) .................. 470
Indicator .................................................... 82
Apple CarPlay ........................................... 269
Armrest ..................................................... 174
Audio Remote Controls ............................ 209
Audio System ............................................ 204
Adjusting the Sound ................................ 229
Audio/Information Screen ........................ 212
Auxiliary Input Jack .................................. 207
Changing the Home Screen Icon Layout ................................................... 216
Closing Apps ........................................... 226
Display Setup ........................................... 230
Error Messages ........................................ 278
General Information ................................ 281
Home Screen ........................................... 219
Limitations for Manua l Operation ............ 231 MP3/WMA/AAC ...................................... 256
Reactivating ............................................ 208
Remote Controls ..................................... 209
Security Code .......................................... 208
Selecting an Audio Source ....................... 231
Status Area ............................................. 225
Theft Protection ...................................... 208
Truck Bed Audio...................................... 277
USB Flash Drives .............................. 256, 282
USB Port.................................................. 205
Wallpaper Setup...................................... 217
Audio/Information Screen ....................... 212
Authorized Manuals ................................ 584
Auto Door Locking/Unlocking ................. 130
Customize ....................................... 314, 315
Auto High-Beam ....................................... 154
Indicator.................................................... 86
Auto Idle Stop .......................................... 406
OFF Button .............................................. 407
Auto Idle Stop Indicator (Green) ............... 89
Auto Idle Stop System Indicator (Amber) ..................................................... 89
Automatic Intermittent Wipers ............... 158
Automatic Lighting .................................. 150
Automatic Transmission ........................... 394
Creeping ................................................. 394
Fluid ................. .....................
.................. 506
Kickdown ................................................ 394
Operating the Shift Button ...................... 397
Shifting ................................................... 395
Auxiliary Input Jack .................................. 207