2021 FORD EXPLORER reset
[x] Cancel search: resetPage 99 of 577
POWER WINDOWS
WARNING: Do not leave children
unattended in your vehicle and do not
let them play with the power windows.
Failure to follow this instruction could
result in personal injury. WARNING:
When closing the
power windows, verify they are free of
obstruction and make sure that children
and pets are not in the proximity of the
window openings. Press the control to open the
window. Lift the control to close
the window.
Note: If you hear a pulsing noise when just
one of the windows is open. Lower the
opposite window slightly to reduce this
noise.
One-Touch Down
Note: One-touch down applies to the front
windows only.
Fully press the switch and release it. Press
again or lift it to stop the window.
One-Touch Up
Note: One-touch up applies to the front
windows only.
Fully lift the switch and release it. Press or
lift it again to stop the window.
Resetting One-Touch Up
Start the engine.
1. Lift and hold the window switch until you fully close the door window.
Continue to hold the switch for a few
seconds after you close the window.
2. Release the window switch. 3.
Press and hold the window switch until
you fully open the door window.
4. Release the window switch.
5. Lift and hold the window switch until you fully close the window.
6. Test for correct window operation by carrying out the one-touch down and
one-touch up features.
Bounce-Back
The window stops when closing. It reverses
some distance if there is an obstacle in the
way.
Overriding the Bounce-Back Feature WARNING:
If you override
bounce-back, the window does not
reverse if it detects an obstacle. Take
care when closing the windows to avoid
personal injury or damage to your
vehicle.
The window stops if you release the switch
before the window fully closes. Pull up the
window switch and hold within a few
seconds of the window reaching the
bounce-back position. The window travels
up with no bounce-back protection.
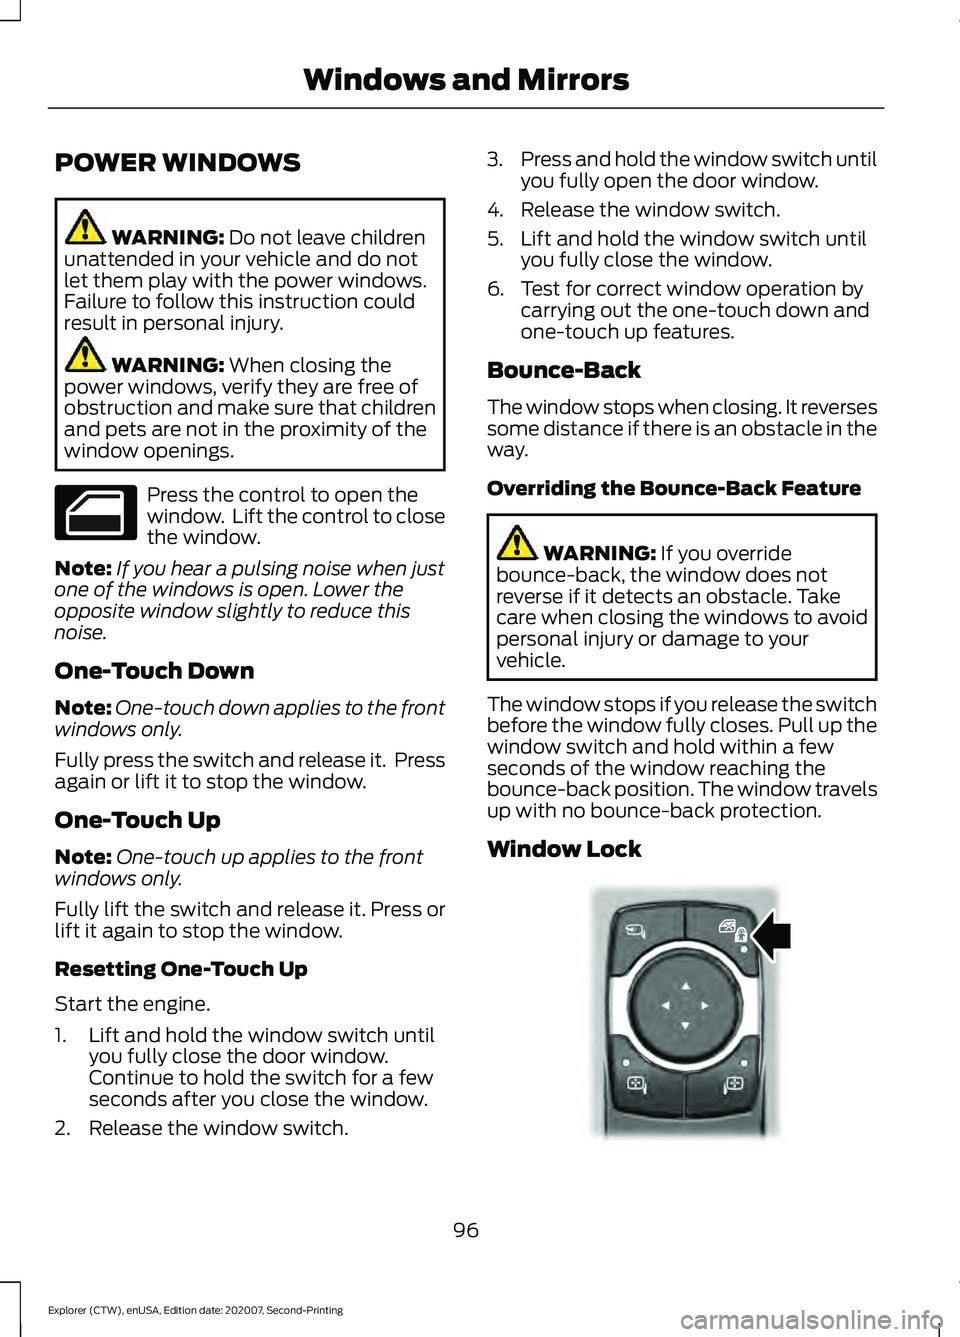
Window Lock 96
Explorer (CTW), enUSA, Edition date: 202007, Second-Printing Windows and Mirrors E295318
Page 101 of 577
You can switch this feature on and off
through the information display. See
General Information (page 117).
You can fold the mirrors on demand by
pressing the power-folding mirror control
on the door. The control lights and the
mirrors fold in toward the glass. Press the
control again to unfold the mirrors. The
control light turns off.
Note: If you use the power-folding control
to fold the mirrors on demand with the auto
fold feature on, you must use the control
again to unfold them.
Loose Mirror
If you manually fold your power-folding
mirrors, they may not work properly even
after you re-position them. You need to
reset them if:
• The mirrors vibrate when you drive.
• The mirrors feel loose.
• The mirrors do not stay in the folded or
unfolded position.
• One of the mirrors is not in its normal
driving position.
To reset the power-fold feature, use the
power-folding mirror control to fold and
unfold the mirrors. You may hear a loud
noise as you reset the power-folding
mirrors. This sound is normal. Repeat this
process as needed each time you manually
fold the mirrors.
Heated Exterior Mirrors
(If Equipped)
See
Heated Exterior Mirrors (page 144).
Memory Mirrors
(If Equipped)
You can save and recall the mirror
positions through the memory function.
See
Memory Function (page 152). Auto-dimming Feature
(If Equipped)
The driver exterior mirror dims when the
interior auto-dimming mirror turns on.
Direction Indicator Mirrors (If Equipped)
When the vehicle is running, the
forward-facing portion of the appropriate
mirror housing blinks when you switch on
the direction indicator.
Puddle Lamps
(If Equipped)
The lamps on the bottom part of the mirror
housing light when you use your
transmitter to unlock the doors or when
you open a door.
360-Degree Camera
(If Equipped)
See
360 Degree Camera (page 241).
Blind Spot Information System
See
Blind Spot Information System
(page 264).
EXTERIOR MIRRORS - ST
Power Exterior Mirrors WARNING:
Do not adjust the
mirrors when your vehicle is moving. This
could result in the loss of control of your
vehicle, serious personal injury or death.
98
Explorer (CTW), enUSA, Edition date: 202007, Second-Printing Windows and Mirrors
Page 102 of 577
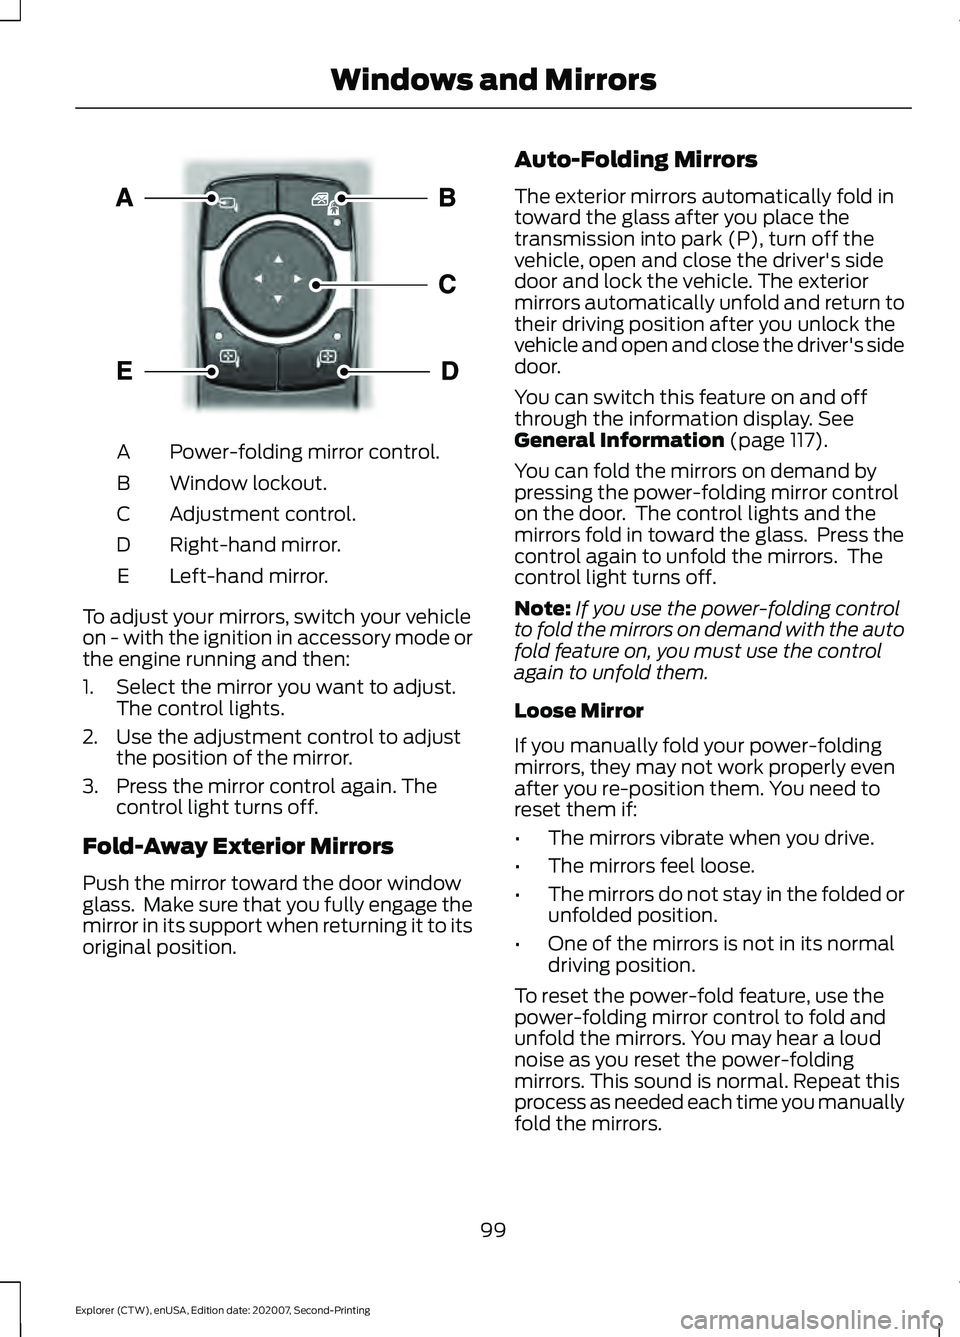
Power-folding mirror control.
A
Window lockout.
B
Adjustment control.
C
Right-hand mirror.
D
Left-hand mirror.
E
To adjust your mirrors, switch your vehicle
on - with the ignition in accessory mode or
the engine running and then:
1. Select the mirror you want to adjust. The control lights.
2. Use the adjustment control to adjust the position of the mirror.
3. Press the mirror control again. The control light turns off.
Fold-Away Exterior Mirrors
Push the mirror toward the door window
glass. Make sure that you fully engage the
mirror in its support when returning it to its
original position. Auto-Folding Mirrors
The exterior mirrors automatically fold in
toward the glass after you place the
transmission into park (P), turn off the
vehicle, open and close the driver's side
door and lock the vehicle. The exterior
mirrors automatically unfold and return to
their driving position after you unlock the
vehicle and open and close the driver's side
door.
You can switch this feature on and off
through the information display. See
General Information (page 117).
You can fold the mirrors on demand by
pressing the power-folding mirror control
on the door. The control lights and the
mirrors fold in toward the glass. Press the
control again to unfold the mirrors. The
control light turns off.
Note: If you use the power-folding control
to fold the mirrors on demand with the auto
fold feature on, you must use the control
again to unfold them.
Loose Mirror
If you manually fold your power-folding
mirrors, they may not work properly even
after you re-position them. You need to
reset them if:
• The mirrors vibrate when you drive.
• The mirrors feel loose.
• The mirrors do not stay in the folded or
unfolded position.
• One of the mirrors is not in its normal
driving position.
To reset the power-fold feature, use the
power-folding mirror control to fold and
unfold the mirrors. You may hear a loud
noise as you reset the power-folding
mirrors. This sound is normal. Repeat this
process as needed each time you manually
fold the mirrors.
99
Explorer (CTW), enUSA, Edition date: 202007, Second-Printing Windows and MirrorsE295322
Page 116 of 577
Select Screens
Select Screens
Menu options covered in Personalized Settings. See Personalized Settings (page
119).
Audio Audio
Menu options covered in the SYNC chapter. See
General Information (page 433).
Navigation Navigation
Menu options covered in the SYNC chapter. See
General Information (page 433).
Phone Phone
Menu options covered in the SYNC chapter. See
General Information (page 433).
Settings Settings
Brake Coach Percent Oil Life Indication XXX%
Hold Ok to Reset
Oil Life
Hold Ok to Reset
Tire Monitor
Hold Ok to Initialize
Neutral Tow
Note: Additional vehicle settings are
available through your touchscreen. See
Settings
(page 464).
113
Explorer (CTW), enUSA, Edition date: 202007, Second-Printing Information Displays
Page 117 of 577
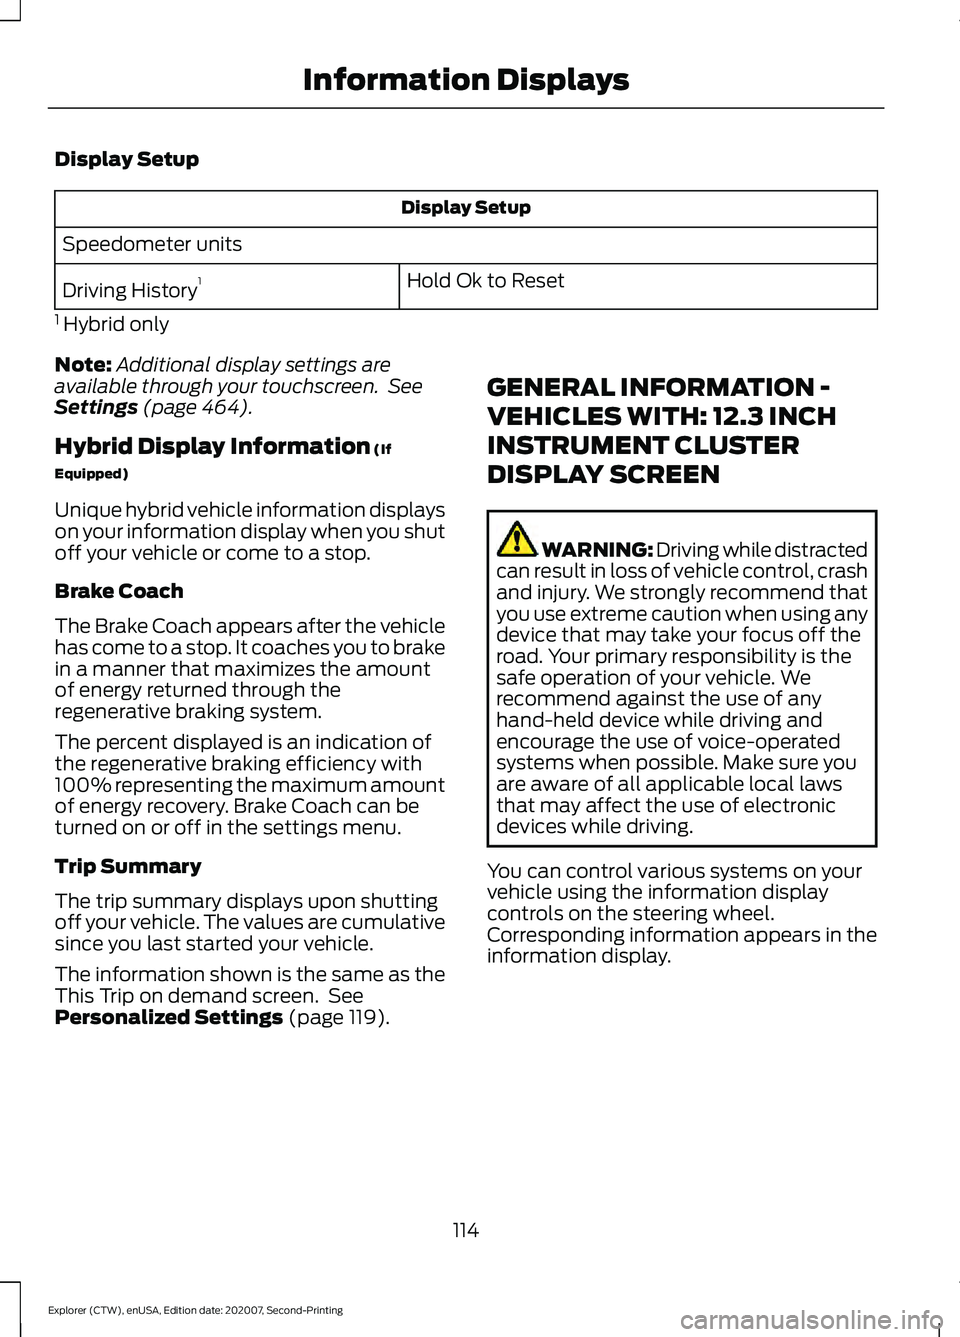
Display Setup
Display Setup
Speedometer units Hold Ok to Reset
Driving History 1
1 Hybrid only
Note: Additional display settings are
available through your touchscreen. See
Settings (page 464).
Hybrid Display Information
(If
Equipped)
Unique hybrid vehicle information displays
on your information display when you shut
off your vehicle or come to a stop.
Brake Coach
The Brake Coach appears after the vehicle
has come to a stop. It coaches you to brake
in a manner that maximizes the amount
of energy returned through the
regenerative braking system.
The percent displayed is an indication of
the regenerative braking efficiency with
100% representing the maximum amount
of energy recovery. Brake Coach can be
turned on or off in the settings menu.
Trip Summary
The trip summary displays upon shutting
off your vehicle. The values are cumulative
since you last started your vehicle.
The information shown is the same as the
This Trip on demand screen. See
Personalized Settings
(page 119). GENERAL INFORMATION -
VEHICLES WITH: 12.3 INCH
INSTRUMENT CLUSTER
DISPLAY SCREEN WARNING: Driving while distracted
can result in loss of vehicle control, crash
and injury. We strongly recommend that
you use extreme caution when using any
device that may take your focus off the
road. Your primary responsibility is the
safe operation of your vehicle. We
recommend against the use of any
hand-held device while driving and
encourage the use of voice-operated
systems when possible. Make sure you
are aware of all applicable local laws
that may affect the use of electronic
devices while driving.
You can control various systems on your
vehicle using the information display
controls on the steering wheel.
Corresponding information appears in the
information display.
114
Explorer (CTW), enUSA, Edition date: 202007, Second-Printing Information Displays
Page 119 of 577
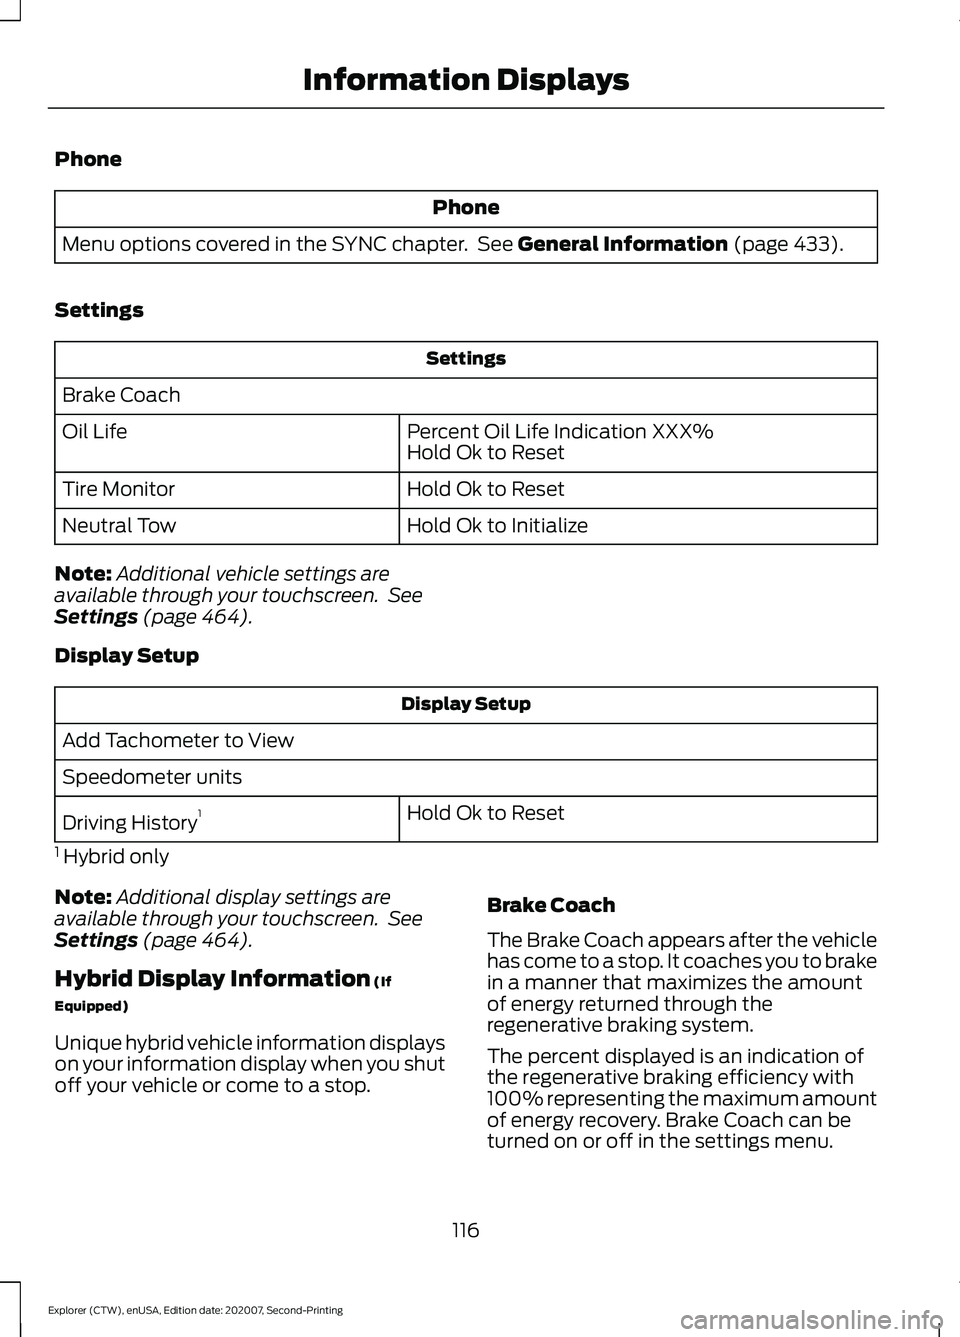
Phone
Phone
Menu options covered in the SYNC chapter. See General Information (page 433).
Settings Settings
Brake Coach Percent Oil Life Indication XXX%
Hold Ok to Reset
Oil Life
Hold Ok to Reset
Tire Monitor
Hold Ok to Initialize
Neutral Tow
Note: Additional vehicle settings are
available through your touchscreen. See
Settings
(page 464).
Display Setup Display Setup
Add Tachometer to View
Speedometer units Hold Ok to Reset
Driving History 1
1 Hybrid only
Note: Additional display settings are
available through your touchscreen. See
Settings
(page 464).
Hybrid Display Information
(If
Equipped)
Unique hybrid vehicle information displays
on your information display when you shut
off your vehicle or come to a stop. Brake Coach
The Brake Coach appears after the vehicle
has come to a stop. It coaches you to brake
in a manner that maximizes the amount
of energy returned through the
regenerative braking system.
The percent displayed is an indication of
the regenerative braking efficiency with
100% representing the maximum amount
of energy recovery. Brake Coach can be
turned on or off in the settings menu.
116
Explorer (CTW), enUSA, Edition date: 202007, Second-Printing Information Displays
Page 121 of 577

Trip Menu
Trip Menu
Trip 1
Trip 2 Select Your Setting
Reset Individual Values
Select Your Setting
Configure View
• Trip Odometer - Registers the distance traveled of individual journeys or the total
distance since the function was last reset.
• Trip Timer - Registers the elapsed time of individual journeys or the total time since
the function was last reset.
• Average Fuel - Indicates the average fuel consumption of individual journeys or the
average fuel consumption since the function was last reset.
• Average Speed - Indicates the average vehicle speed of individual journeys or the
average vehicle speed since the function was last reset.
• Distance to Empty - Indicates the approximate distance your vehicle can travel on
the fuel remaining in the tank. Changes in driving pattern can cause the value to not
only decrease but also increase or stay constant for periods of time.
Note: Hold OK to reset fuel history and average fuel economy.
MyView MyView
Digital Speedometer
Fuel Economy
Trip/Audio
Calm Screen
Navigation Navigation
Menu options covered in the SYNC chapter. See
General Information (page 433).
118
Explorer (CTW), enUSA, Edition date: 202007, Second-Printing Information Displays
Page 123 of 577

Note:
Some options may appear slightly
different or not at all if the items are
optional. Select Screens
Calm Screen
Fuel Economy
Trip 1
Trip 2
This Trip 1
EV Coach 1
Tire Pressure
Intelligent AWD
Off Road
Trailer Light Check
Seatbelts
Auto StartStop 2
Now Playing
1 Hybrid only
2 Non-hybrid only
After making your selection:
1. Select a setting and press the OK
button. This can offer more
information on some features.
Note: Hold
OK to reset fuel history and
average fuel economy.
Fuel Economy
An Instant Fuel Economy gauge is provided
along with average fuel economy. Average
fuel economy is continuously averaged
since the last reset. Hybrid features:
•
When the gasoline engine is off the
instant fuel economy gauge is replaced
with an electric driving message.
Note: Hold OK to reset fuel history and
average fuel economy.
Trip 1 and 2
Provides trip timer, trip average fuel
economy and total trip distance traveled.
For hybrid vehicles, the trip also shows the
distance traveled on electric power only.
120
Explorer (CTW), enUSA, Edition date: 202007, Second-Printing Information Displays