2021 FORD EXPLORER reset
[x] Cancel search: resetPage 124 of 577
Hybrid Information (If Equipped)
This Trip
Provides trip timer, trip average fuel
economy, total trip distance traveled, and
distance traveled on electric power only
with the engine off. If the gasoline engine
has not turned on during the trip then trip
average fuel economy is not shown. This
Trip automatically resets each time you
start your vehicle.
EV Coach
EV Coach can help you to get the most out
of your vehicle ’s electric driving and
regenerative braking capabilities.
When you are accelerating or maintaining
speed you will see a blue or white solid bar
indicating vehicle power. You may also see
a blue rectangular box which shows the
power level at which the engine will turn
on.
• When your power level is within the box
the color of the bar will be blue. This
means you are in Electric operation and
the engine is off.
• When your power level is outside of the
box the color of the bar will be white.
This means you are in Hybrid operation
with a combination of the electric
motor and the engine providing vehicle
power.
When you are decelerating with either your
foot off the accelerator pedal or on the
brake pedal you will see a green or white
solid bar indicating the power being used
to slow down the vehicle. You may also
see a green rectangular box which shows
the amount of power that can be
recaptured by the regenerative braking
system and returned to the high voltage
battery. •
When your power level is completely
within the box the color of the bar will
be all green. This means that the
regenerative braking system is being
used to efficiently slow the vehicle
down and return the maximum
percentage of energy to the high
voltage battery.
• When your power level is outside of the
green box then the bar will be white.
This means that both the regenerative
braking system and conventional
braking system are being used.
INFORMATION MESSAGES
Note: Depending on your vehicle options
and instrument cluster type, not all of the
messages display or are available. Certain
messages may be abbreviated or shortened
depending upon which cluster type you
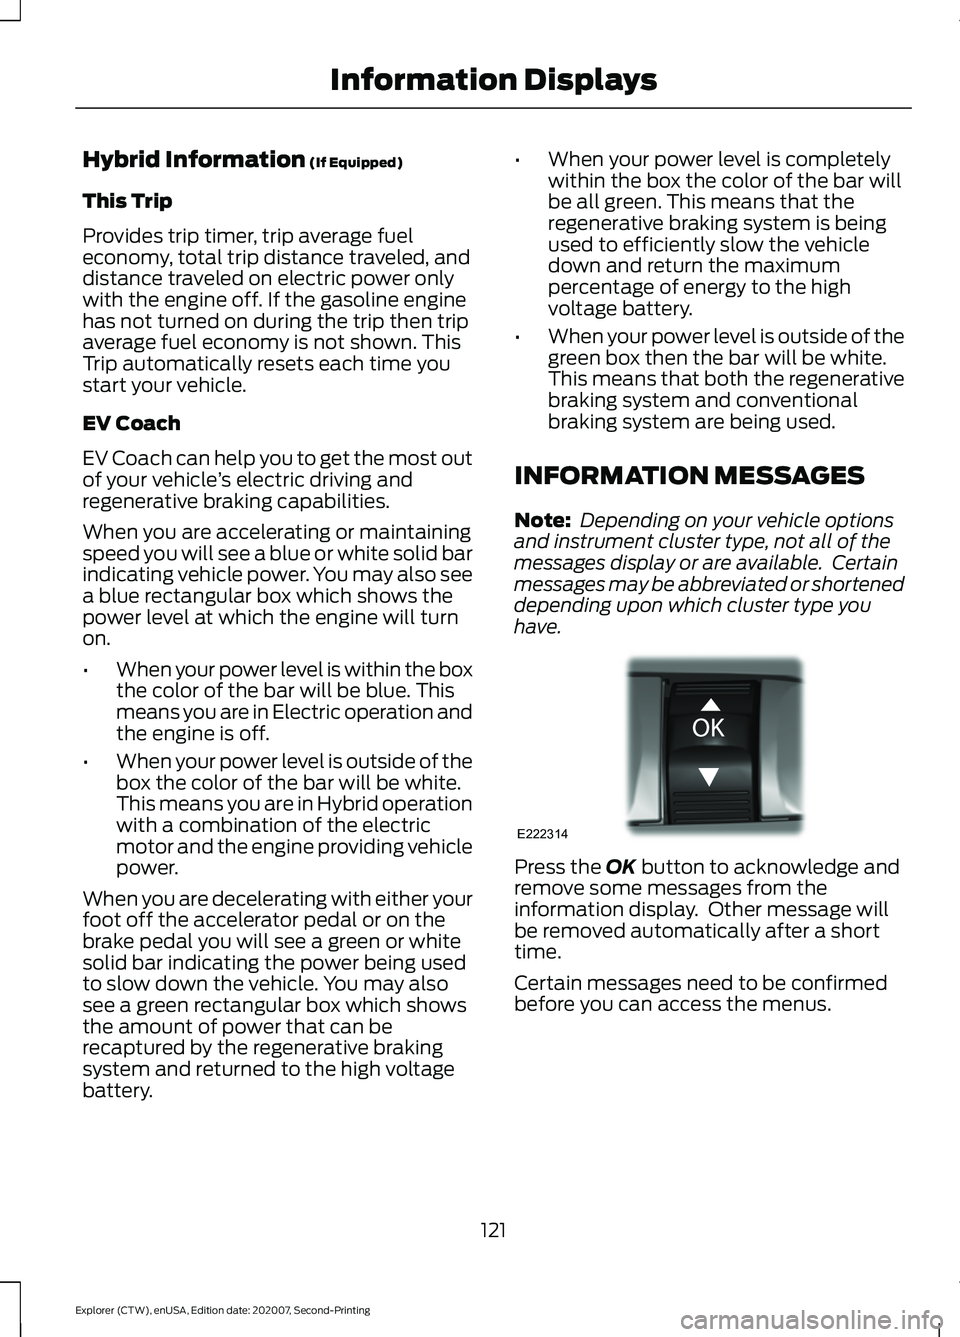
have. Press the
OK button to acknowledge and
remove some messages from the
information display. Other message will
be removed automatically after a short
time.
Certain messages need to be confirmed
before you can access the menus.
121
Explorer (CTW), enUSA, Edition date: 202007, Second-Printing Information DisplaysE222314
Page 129 of 577
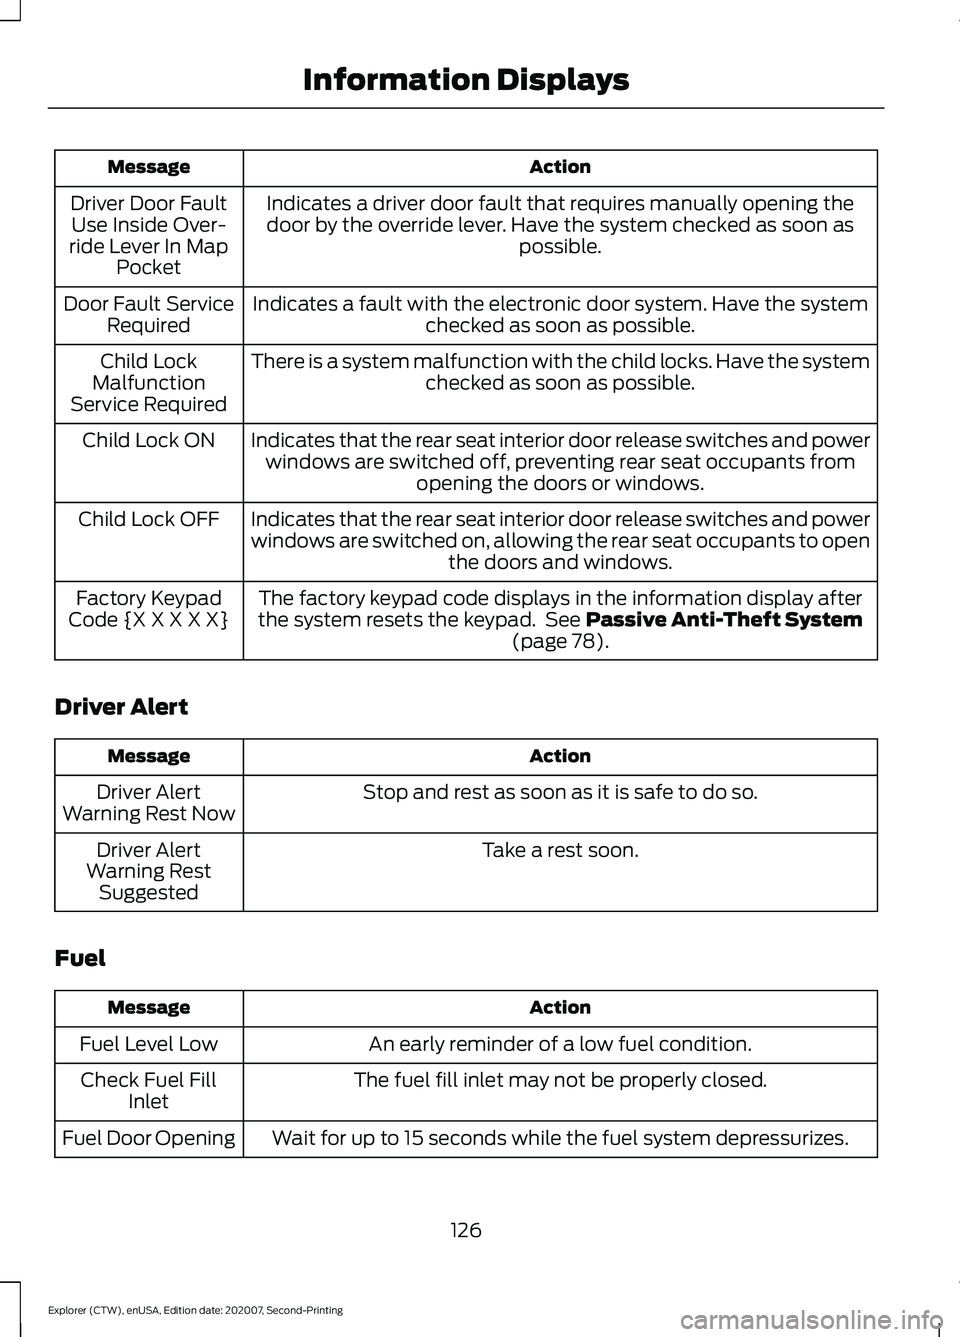
Action
Message
Indicates a driver door fault that requires manually opening thedoor by the override lever. Have the system checked as soon as possible.
Driver Door Fault
Use Inside Over-
ride Lever In Map Pocket
Indicates a fault with the electronic door system. Have the system checked as soon as possible.
Door Fault Service
Required
There is a system malfunction with the child locks. Have the system checked as soon as possible.
Child Lock
Malfunction
Service Required
Indicates that the rear seat interior door release switches and powerwindows are switched off, preventing rear seat occupants from opening the doors or windows.
Child Lock ON
Indicates that the rear seat interior door release switches and power
windows are switched on, allowing the rear seat occupants to open the doors and windows.
Child Lock OFF
The factory keypad code displays in the information display after
the system resets the keypad. See Passive Anti-Theft System
(page 78).
Factory Keypad
Code {X X X X X}
Driver Alert Action
Message
Stop and rest as soon as it is safe to do so.
Driver Alert
Warning Rest Now
Take a rest soon.
Driver Alert
Warning Rest Suggested
Fuel Action
Message
An early reminder of a low fuel condition.
Fuel Level Low
The fuel fill inlet may not be properly closed.
Check Fuel Fill
Inlet
Wait for up to 15 seconds while the fuel system depressurizes.
Fuel Door Opening
126
Explorer (CTW), enUSA, Edition date: 202007, Second-Printing Information Displays
Page 141 of 577

4WD
Action
Message
The four wheel drive system has automatically disabled itself due to the system overheating.
4WD Temporarily
Disabled
The four wheel drive system is locking up the torque transfer clutch to help reduce clutch temperature.
4WD Temporarily
Locked
Displays when the system automatically disables to protect itself.
This may be caused by operating the vehicle with a mini spare tire installed, if the system detects dissimilar size tires, or if there is an
issue with another vehicle system preventing 4WD operation. The system resumes normal operation and clears this message after
you cycle the ignition on and off and drive a short distance with the road tire re-installed or after the other vehicle system issues are resolved.
4WD Off
Displays after the system cools and the four wheel drive system resumes normal function.
4WD Restored
The four wheel drive system is not operating properly and the
powertrain fault indicator illuminates. If the warning stays illumin- ated or continues to illuminate, contact an authorized dealer as soon as possible.
4WD Fault Service
Required
Displayed when the transfer case fluid requires service.
Change 4WD
Power Transfer Unit Lube
Displayed when the transfer case fluid has been changed and reset to new.
4WD Power
Transfer Unit Lube Set to New
138
Explorer (CTW), enUSA, Edition date: 202007, Second-Printing Information Displays
Page 151 of 577
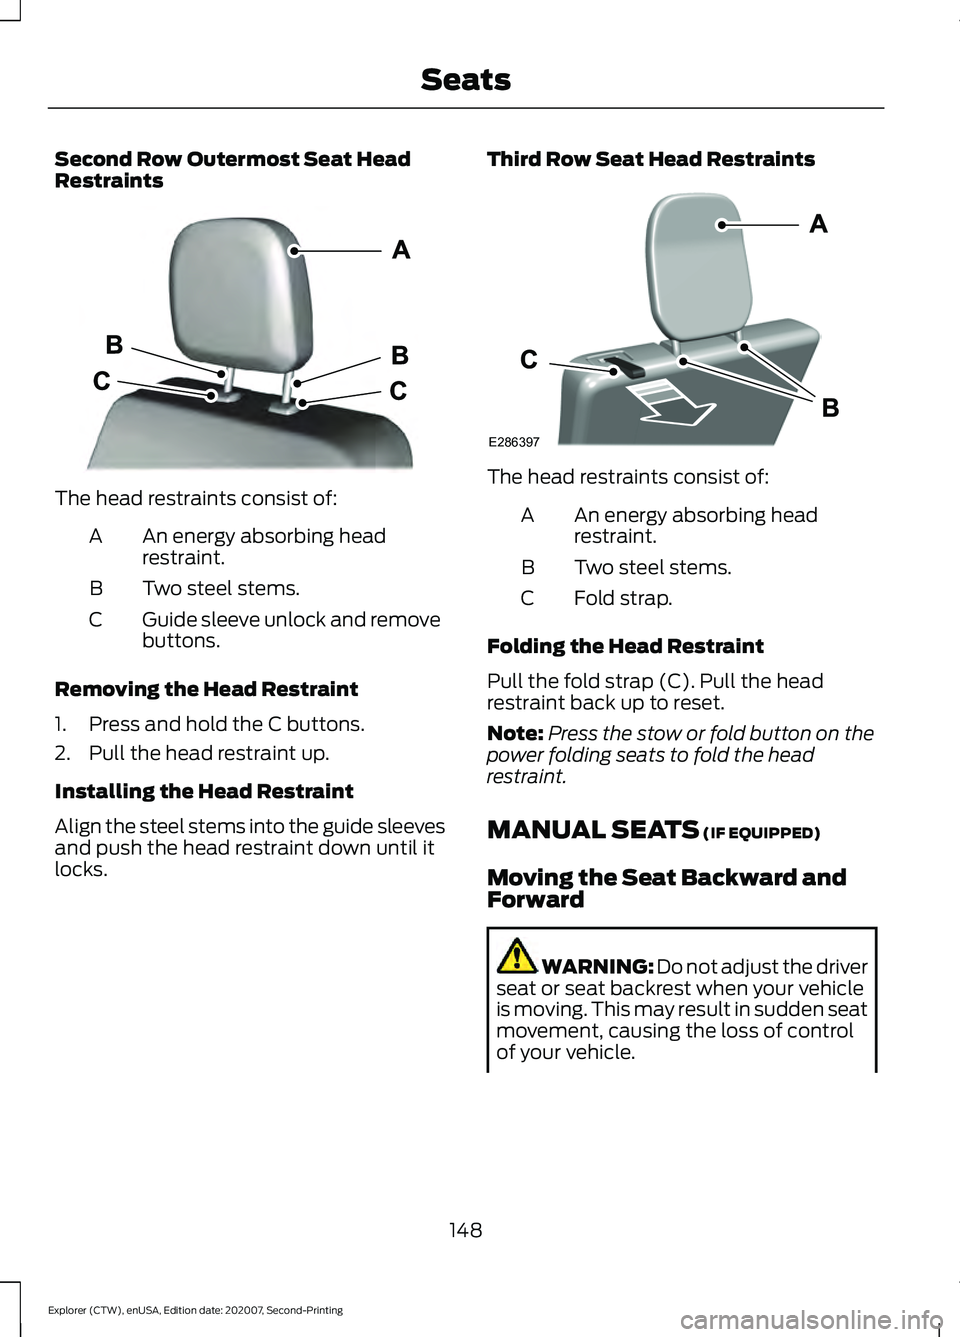
Second Row Outermost Seat Head
Restraints
The head restraints consist of:
An energy absorbing head
restraint.
A
Two steel stems.
B
Guide sleeve unlock and remove
buttons.
C
Removing the Head Restraint
1. Press and hold the C buttons.
2. Pull the head restraint up.
Installing the Head Restraint
Align the steel stems into the guide sleeves
and push the head restraint down until it
locks. Third Row Seat Head Restraints The head restraints consist of:
An energy absorbing head
restraint.
A
Two steel stems.
B
Fold strap.
C
Folding the Head Restraint
Pull the fold strap (C). Pull the head
restraint back up to reset.
Note: Press the stow or fold button on the
power folding seats to fold the head
restraint.
MANUAL SEATS (IF EQUIPPED)
Moving the Seat Backward and
Forward WARNING: Do not adjust the driver
seat or seat backrest when your vehicle
is moving. This may result in sudden seat
movement, causing the loss of control
of your vehicle.
148
Explorer (CTW), enUSA, Edition date: 202007, Second-Printing SeatsE333253 E286397
Page 155 of 577
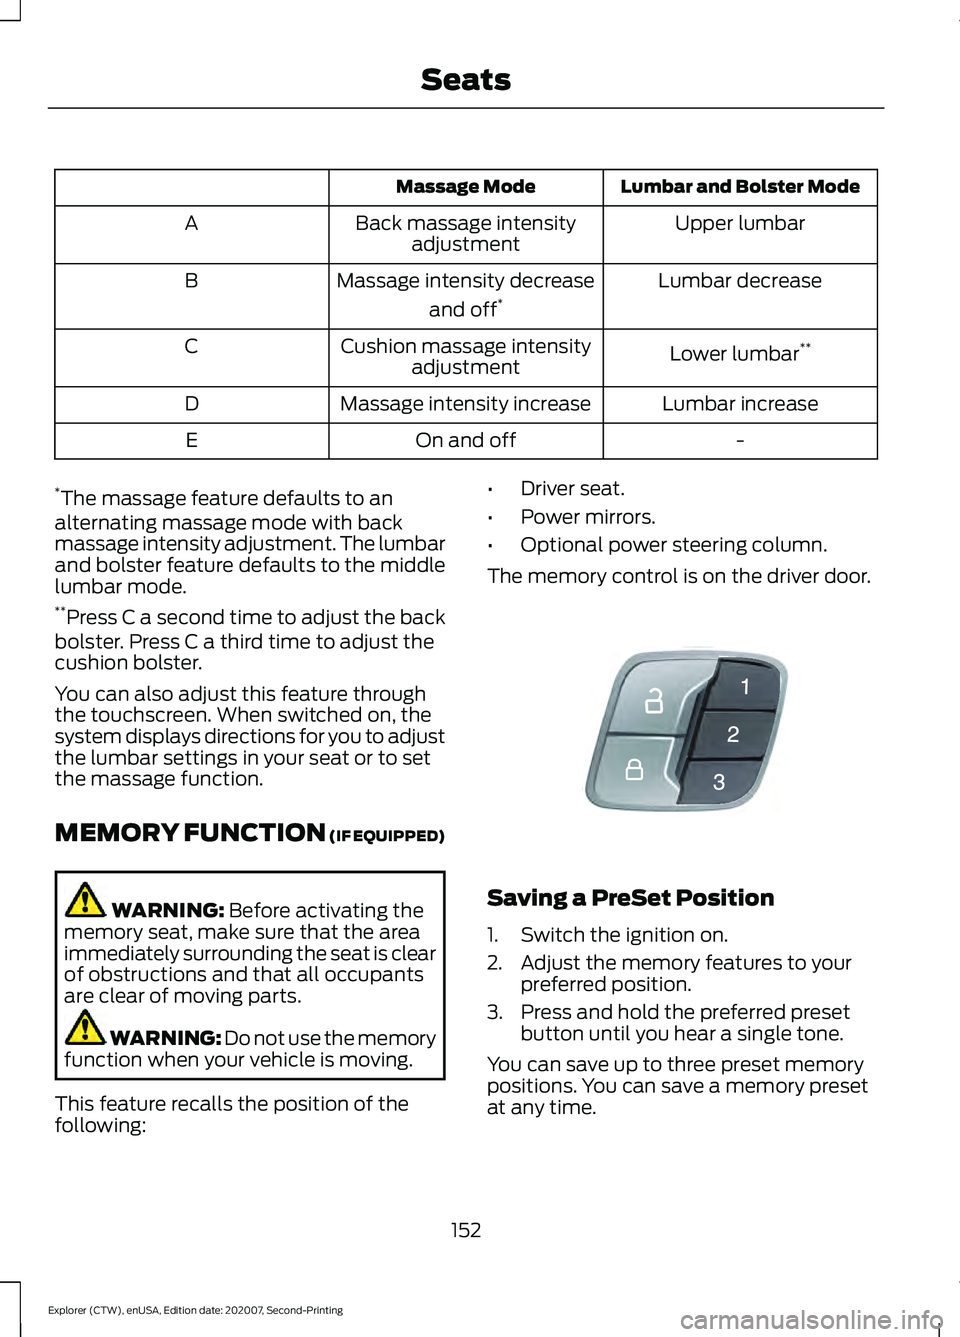
Lumbar and Bolster Mode
Massage Mode
Upper lumbar
Back massage intensity
adjustment
A
Lumbar decrease
Massage intensity decrease
and off*
B
Lower lumbar**
Cushion massage intensity
adjustment
C
Lumbar increase
Massage intensity increase
D
-
On and off
E
* The massage feature defaults to an
alternating massage mode with back
massage intensity adjustment. The lumbar
and bolster feature defaults to the middle
lumbar mode.
** Press C a second time to adjust the back
bolster. Press C a third time to adjust the
cushion bolster.
You can also adjust this feature through
the touchscreen. When switched on, the
system displays directions for you to adjust
the lumbar settings in your seat or to set
the massage function.
MEMORY FUNCTION (IF EQUIPPED) WARNING:
Before activating the
memory seat, make sure that the area
immediately surrounding the seat is clear
of obstructions and that all occupants
are clear of moving parts. WARNING:
Do not use the memory
function when your vehicle is moving.
This feature recalls the position of the
following: •
Driver seat.
• Power mirrors.
• Optional power steering column.
The memory control is on the driver door. Saving a PreSet Position
1. Switch the ignition on.
2. Adjust the memory features to your
preferred position.
3. Press and hold the preferred preset button until you hear a single tone.
You can save up to three preset memory
positions. You can save a memory preset
at any time.
152
Explorer (CTW), enUSA, Edition date: 202007, Second-Printing SeatsE142554
Page 156 of 577
Recalling a PreSet Position
Press and release the preset button
associated with your preferred driving
position. The memory features move to
the position stored for that preset.
Note:
You can only recall a preset memory
position when the ignition is off, or when the
transmission is in park (P) or neutral (N)
and the vehicle is not moving if the ignition
is on.
You can also recall a preset memory
position by:
• Pressing the unlock button on your
remote control if it is linked to a preset
position.
• Unlocking the driver door handle if a
linked remote control is present.
Note: Using a linked remote control to
recall your memory position when the
ignition is off moves the seat to the Easy
Entry position.
Note: Pressing any active memory feature
adjustment control, or any memory button
during a memory recall, cancels the
operation.
Linking a PreSet Position to your
Remote Control
Your vehicle can save the preset memory
positions for up to three remote controls.
1. With the ignition on, move the memory
features to the preferred positions.
2. Press and hold the preferred preset button for about five seconds. A tone
sounds after about two seconds.
Continue holding until you hear a
second tone.
3. Within three seconds, press the lock button on the remote control you are
linking.
To unlink a remote control, follow the
same procedure – except in step 3, press
the unlock button on the remote control. Note:
If more than one linked remote
control or intelligent access key is in range,
the memory function moves to the settings
of the first key to recall a memory position.
Easy Entry and Exit Feature
If you enable the easy entry and exit
feature, it moves the driver seat position
rearward up to 2 in (5 cm) when you switch
the ignition off.
The driver seat returns to the previous
position when you switch the ignition on.
You can enable or disable this feature
through the touchscreen. See Settings
(page 464).
REAR SEATS
Adjusting the Second Row Rear
Seats WARNING:
Always drive and ride
with your seatback upright and the lap
belt snug and low across the hips. WARNING: Do not recline the seat
backrest too far as this can cause the
occupant to slide under the seatbelt,
resulting in personal injury in the event
of a crash.
153
Explorer (CTW), enUSA, Edition date: 202007, Second-Printing Seats
Page 163 of 577
WHAT IS THE REAR
OCCUPANT ALERT SYSTEM
The rear occupant alert system monitors
vehicle conditions and notifies you to check
for rear seat occupants when you switch
the ignition off.
HOW DOES THE REAR
OCCUPANT ALERT SYSTEM
WORK
The system monitors when rear doors have
been opened and closed to indicate the
potential presence of an occupant in the
rear seat.
A message displays in the information and
entertainment display screen and an
audible warning sounds when you switch
the ignition off after any of the following
conditions have been met:
•
A rear door is opened or closed while
the ignition is on.
• You switch the ignition on within 15
minutes of a rear door opening and
closing.
• You switch the ignition on within 15
minutes of the alert having displayed
or sounded.
REAR OCCUPANT ALERT
SYSTEM PRECAUTIONS WARNING: On hot days, the
temperature inside the vehicle can rise
very quickly. Exposure of people or
animals to these high temperatures for
even a short time can cause death or
serious heat related injuries, including
brain damage. Small children are
particularly at risk. WARNING:
Do not leave children
or pets unattended in your vehicle.
Failure to follow this instruction could
result in personal injury or death.
REAR OCCUPANT ALERT
SYSTEM LIMITATIONS
The system does not detect the presence
of objects or passengers in the rear seat.
It monitors when rear doors are opened
and closed.
Note: It is possible to receive an alert when
there is no rear seat occupant, but alert
conditions are met.
Note: It is possible to receive no alert when
there is an occupant in the rear seat, if alert
conditions are not met. For example, if a rear
seat occupant does not enter the vehicle
through a rear door.
Note: The audible warning does not sound
when the front door is opened before you
switch the ignition off.
SWITCHING REAR OCCUPANT
ALERT SYSTEM ON AND OFF
1. Press
Settings on the touchscreen.
2. Press
Vehicle.
3. Switch
Rear Occupant Alert on or off.
Note: The default setting is on.
Note: Performing a master reset causes the
system to switch on again.
Semiannual Reminder
(If Equipped)
When you switch the system off, a
message appears every six months as a
reminder that the system is off. You can
switch the system back on or leave it off.
160
Explorer (CTW), enUSA, Edition date: 202007, Second-Printing Rear Occupant Alert System
(If Equipped)
Page 171 of 577

When the indicator light on the power point
is:
•
On: The power point is working, the
ignition is ON or the vehicle is in
accessory mode.
• Off: The power point is OFF, the ignition
is OFF or the vehicle is not in accessory
mode.
• Flashing: The power point is in fault
mode.
Due to the different technologies used on
its construction, some devices may exceed
the capacity shown on its label when they
are initially plugged-in.
The power outlet temporarily turns off
power when in fault mode if the device
exceeds the 150 watt limit. Unplug your
device and switch the ignition off. Switch
the ignition back on, but do not plug your
device back in. Let the system cool off and
switch the ignition off to reset the fault
mode. Switch the ignition back on and
make sure the indicator light remains on.
Do not use the power point for certain
electric devices, including:
• Cathode-ray, tube-type televisions.
• Motor loads, such as vacuum cleaners,
electric saws and other electric power
tools or compressor-driven
refrigerators. •
Measuring devices, which process
precise data, such as medical
equipment or measuring equipment.
• Other appliances requiring an
extremely stable power supply such as
microcomputer-controlled electric
blankets or touch-sensor lamps.
WIRELESS ACCESSORY
CHARGER (IF EQUIPPED) WARNING:
Wireless charging
devices can affect the operation of
implanted medical devices, including
cardiac pacemakers. If you have any
implanted medical devices, we
recommend that you consult with your
physician.
Note: Devices without built-in Qi wireless
charging receivers require an additional Qi
receiver or sleeve.
Note: For compatible devices with built-in
Qi wireless charging capability, the charging
performance may be affected if your device
is in a case. It may be necessary to remove
the case to wirelessly charge your device.
The system supports one Qi wireless
charging compatible device on the
charging area.
Keep the charging area clean and remove
foreign objects prior to charging a device.
Do not place items with a magnetic strip,
for example passports, parking tickets or
credit cards, near the charging area when
charging a device. Damage may occur to
the magnetic strip.
Do not place metal objects, for example
remote controls, coins and candy
wrappers, on or near the charging area
when charging a device. Metal objects may
heat up and degrade the charging
performance.
168
Explorer (CTW), enUSA, Edition date: 202007, Second-Printing Auxiliary Power PointsE247586