2021 FORD EXPLORER ECO mode
[x] Cancel search: ECO modePage 353 of 577

Tires
•
Maintain recommended air pressure.
Miscellaneous
• Make sure all linkages, cables, levers
and pins under your vehicle are covered
with grease to prevent rust.
• Move vehicles at least 25 ft (7.5 m)
every 15 days to lubricate working parts
and prevent corrosion.
Removing Vehicle From Storage
When your vehicle is ready to come out of
storage, do the following:
• Wash your vehicle to remove any dirt
or grease film build-up on window
surfaces.
• Check windshield wipers for any
deterioration.
• Check under the hood for any foreign
material that may have collected
during storage such as mice or squirrel
nests.
• Check the exhaust for any foreign
material that may have collected
during storage.
• Check tire pressures and set tire
inflation per the Tire Label.
• Check brake pedal operation. Drive
your vehicle
15 ft (4.5 m) back and
forth to remove rust build-up.
• Check fluid levels (including coolant,
oil and gas) to make sure there are no
leaks, and fluids are at recommended
levels.
• If you remove the battery, clean the
battery cable ends and check for
damage.
Contact an authorized dealer if you have
any concerns or issues. BODY STYLING KITS
(IF EQUIPPED)
The distance between the underside of
your vehicle and the ground is less than
that of other models. Drive with extreme
care to avoid damage to your vehicle.
350
Explorer (CTW), enUSA, Edition date: 202007, Second-Printing Vehicle Care
Page 355 of 577

Utility vehicles and trucks handle
differently than passenger cars in the
various driving conditions that are
encountered on streets, highways and
off-road. Utility vehicles and trucks are not
designed for cornering at speeds as high
as passenger cars any more than low-slung
sports cars are designed to perform
satisfactorily under off-road conditions.
Study your owner's manual and any
supplements for specific information about
equipment features, instructions for safe
driving and additional precautions to
reduce the risk of an accident or serious
injury.
Four-Wheel Drive system (if
equipped)
WARNING: Do not become
overconfident in the ability of four-wheel
drive vehicles. Although a four-wheel
drive vehicle may accelerate better than
a two-wheel drive vehicle in low traction
situations, it won't stop any faster than
two-wheel drive vehicles. Always drive
at a safe speed.
A vehicle equipped with Four-Wheel Drive
has the ability to use all four wheels to
power itself. This increases traction which
may enable you to safely drive over terrain
and road conditions that a conventional
two-wheel drive vehicle cannot. Power is
supplied to all four wheels through a
transfer case. Four-wheel drive vehicles
allow you to select different modes as
necessary. You can find more information
on transfer case operation, drive mode
selection, and transfer case maintenance
in this manual. See
Four-Wheel Drive
(page 207). You should become thoroughly
familiar with this information before you
operate your vehicle. We recommend installing the temporary
spare wheel and tire on the front axle when
possible. This could provide limited 4WD
traction.
Four-wheel drive: Never use a spare tire of
a different size than the one provided with
your vehicle. This could cause the
four-wheel drive system to default to
rear-wheel drive.
How your vehicle differs from
other vehicles
Sport utility vehicles and trucks can differ
from some other vehicles in a few
noticeable ways. Your vehicle may be:
•
Higher - to allow higher load carrying
capacity and to allow it to travel over
rough terrain without getting hung up
or damaging underbody components.
• Shorter - to give it the capability to
approach inclines and drive over the
crest of a hill without getting hung up
or damaging underbody components.
All other things held equal, a shorter
wheelbase may make your vehicle
quicker to respond to steering inputs
than a vehicle with a longer wheelbase.
• Narrower - to provide greater
maneuverability in tight spaces,
particularly in off-road use.
As a result of the above dimensional
differences, sport utility vehicles and trucks
often have a higher center of gravity and a
greater difference in center of gravity
between the loaded and unloaded
condition. These differences that make
your vehicle so versatile also make it
handle differently than an ordinary
passenger car.
352
Explorer (CTW), enUSA, Edition date: 202007, Second-Printing Wheels and Tires
Page 376 of 577
•
To reduce the chances of interference
from another vehicle, perform the
system reset procedure at least 3 ft
(1 m) away from another Ford Motor
Company vehicle undergoing the
system reset procedure at the same
time.
• Do not wait more than two minutes
between resetting each tire sensor or
the system can time-out and you have
to repeat the entire procedure on all
four wheels.
• A double horn sounds indicating the
need to repeat the procedure.
Performing the System Reset Procedure
Read the entire procedure before
attempting.
1. Drive the vehicle above
20 mph
(32 km/h) for at least two minutes,
then park in a safe location where you
can easily get to all four tires and have
access to an air pump.
2. Place the ignition in the off position and
keep the key in the ignition.
3. Cycle the ignition to the on position with the engine off.
4. Turn the hazard flashers on then off three times. You must accomplish this
within 10 seconds. If you successfully
enter the reset mode, the horn sounds
once, the system indicator flashes and
a message shows in the information
display. If this does not occur, please
try again starting at step 2. If after
repeated attempts to enter the reset
mode, the horn does not sound, the
system indicator does not flash and no
message shows in the information
display, seek service from your
authorized dealer. 5. Train the tire pressure monitoring
system sensors in the tires using the
following system reset sequence
starting with the left front tire in the
following clockwise order: Left front -
driver side front tire, Right front -
passenger side front tire, Right rear -
passenger side rear tire, Left rear -
driver side rear tire.
6. Remove the valve cap from the valve stem on the left front tire. Decrease the
air pressure until the horn sounds.
Note: The single horn tone confirms that
the sensor identification code has been
learned by the module for this position. If a
double horn is heard, the reset procedure
was unsuccessful, and you must repeat it.
7. Remove the valve cap from the valve stem on the right front tire. Decrease
the air pressure until the horn sounds.
8. Remove the valve cap from the valve stem on the right rear tire. Decrease the
air pressure until the horn sounds.
9. Remove the valve cap from the valve stem on the left rear tire. Decrease the
air pressure until the horn sounds.
Training is complete after the horn
sounds for the last tire trained, driver
side rear tire, the system indicator
stops flashing, and a message shows
in the information display.
10. Turn the ignition off. If two short horn
beeps are heard, the reset procedure
was unsuccessful and you must
repeat it. If after repeating the
procedure and two short beeps are
heard when the ignition is turned to
off, seek assistance from your
authorized dealer.
373
Explorer (CTW), enUSA, Edition date: 202007, Second-Printing Wheels and Tires
Page 379 of 577
WARNING: Do not work on your
vehicle when the jack is the only support
as your vehicle could slip off the jack.
Failure to follow this instruction could
result in personal injury or death. WARNING:
Use only the specified
jacking points. If you use other positions,
you may damage the body, steering,
suspension, engine, braking system or
the fuel lines. WARNING:
Never place anything
between the vehicle jack and your
vehicle. WARNING:
Never place anything
between the vehicle jack and the ground. WARNING:
Park your vehicle so
that you do not obstruct the flow of
traffic or place yourself in any danger and
set up a warning triangle. WARNING:
Do not attempt to
change a tire on the side of the vehicle
close to moving traffic. Pull far enough
off the road to avoid the danger of being
hit when operating the jack or changing
the wheel.
Note: Passengers should not remain in your
vehicle when the vehicle is being jacked.
Note: Jack at the specified locations to
avoid damage to the vehicle. Note:
No maintenance or additional
lubrication of your jack is required over the
service life of your vehicle.
1. Park on a level surface, set the parking
brake and switch on the hazard
flashers.
2. Apply the parking brake, place the transmission in park (P) or reverse (R)
for manual transmission. Turn the
engine off.
3. If your vehicle has air suspension, use the touch screen to switch on the Air
Suspension Service Mode prior to
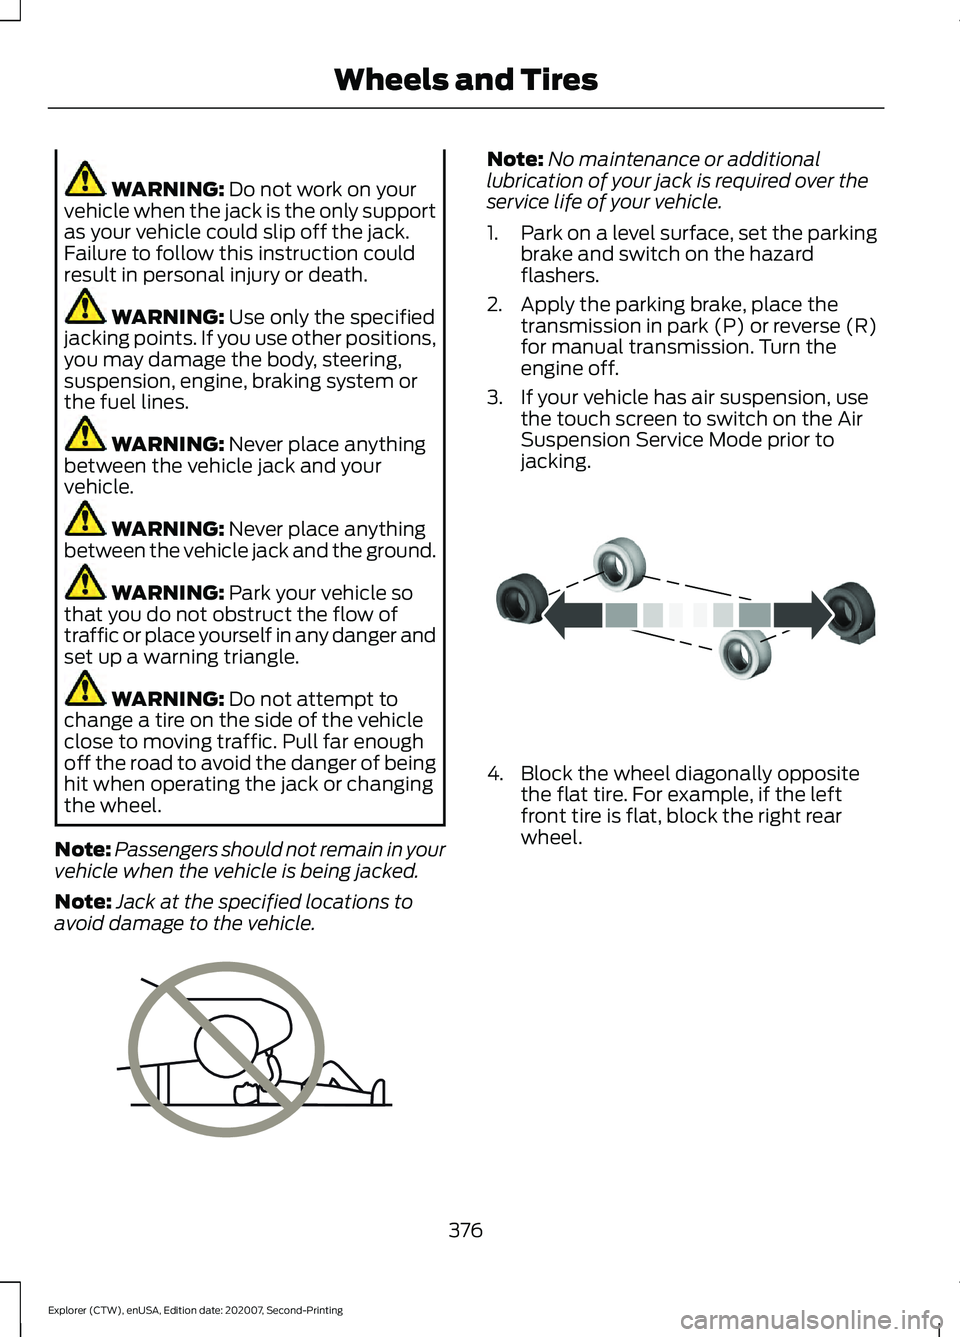
jacking. 4. Block the wheel diagonally opposite
the flat tire. For example, if the left
front tire is flat, block the right rear
wheel.
376
Explorer (CTW), enUSA, Edition date: 202007, Second-Printing Wheels and TiresE166722 E142551
Page 382 of 577
18.
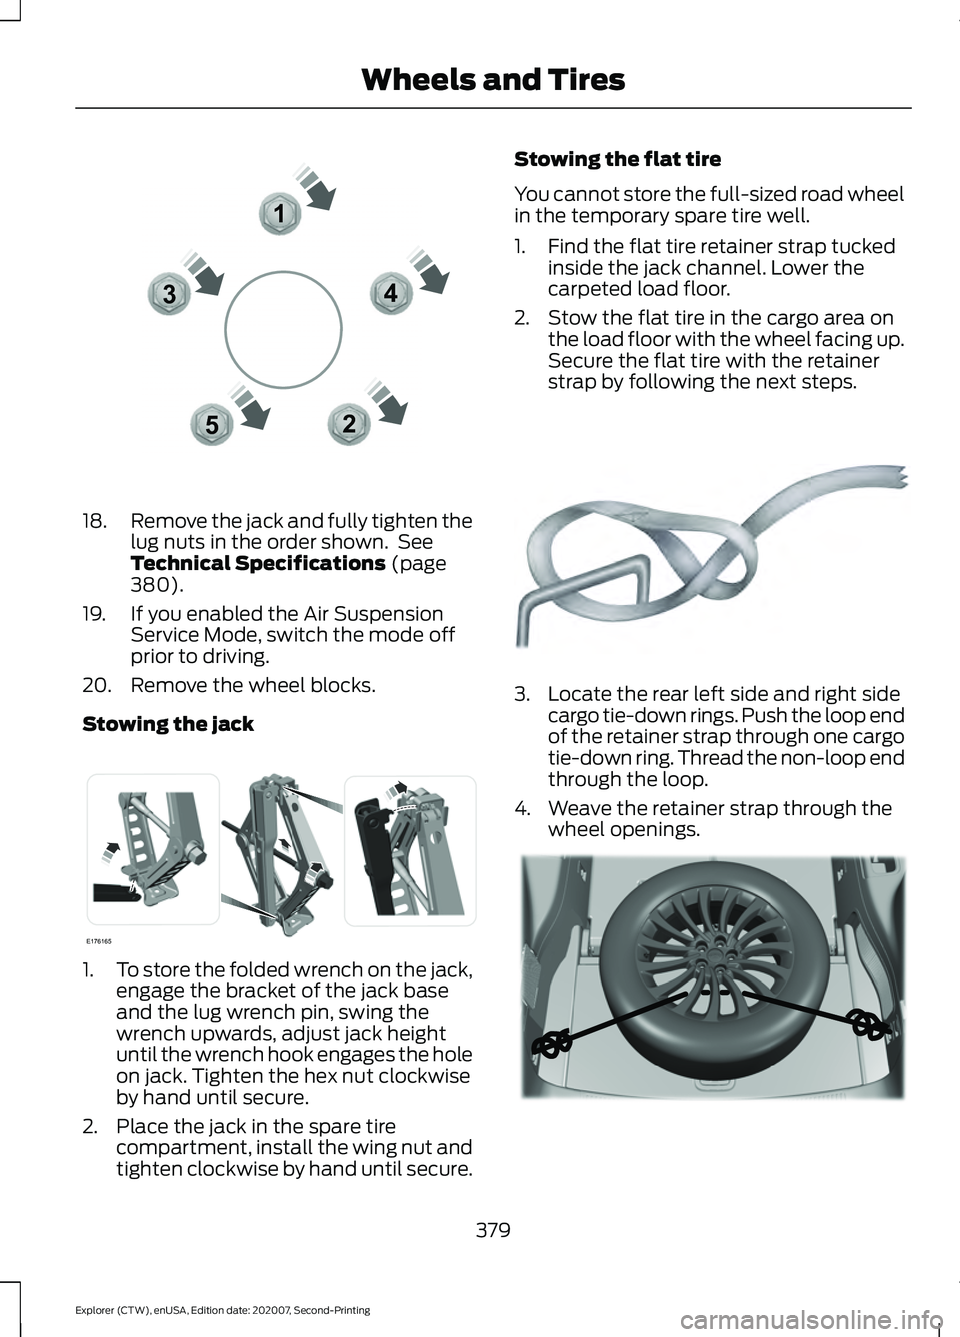
Remove the jack and fully tighten the
lug nuts in the order shown. See
Technical Specifications (page
380).
19. If you enabled the Air Suspension Service Mode, switch the mode off
prior to driving.
20. Remove the wheel blocks.
Stowing the jack 1.
To store the folded wrench on the jack,
engage the bracket of the jack base
and the lug wrench pin, swing the
wrench upwards, adjust jack height
until the wrench hook engages the hole
on jack. Tighten the hex nut clockwise
by hand until secure.
2. Place the jack in the spare tire compartment, install the wing nut and
tighten clockwise by hand until secure. Stowing the flat tire
You cannot store the full-sized road wheel
in the temporary spare tire well.
1. Find the flat tire retainer strap tucked
inside the jack channel. Lower the
carpeted load floor.
2. Stow the flat tire in the cargo area on the load floor with the wheel facing up.
Secure the flat tire with the retainer
strap by following the next steps. 3. Locate the rear left side and right side
cargo tie-down rings. Push the loop end
of the retainer strap through one cargo
tie-down ring. Thread the non-loop end
through the loop.
4. Weave the retainer strap through the wheel openings. 379
Explorer (CTW), enUSA, Edition date: 202007, Second-Printing Wheels and Tires12
3
4
5E306781 E176165 E142906 E294325
Page 394 of 577
VEHICLE IDENTIFICATION
NUMBER
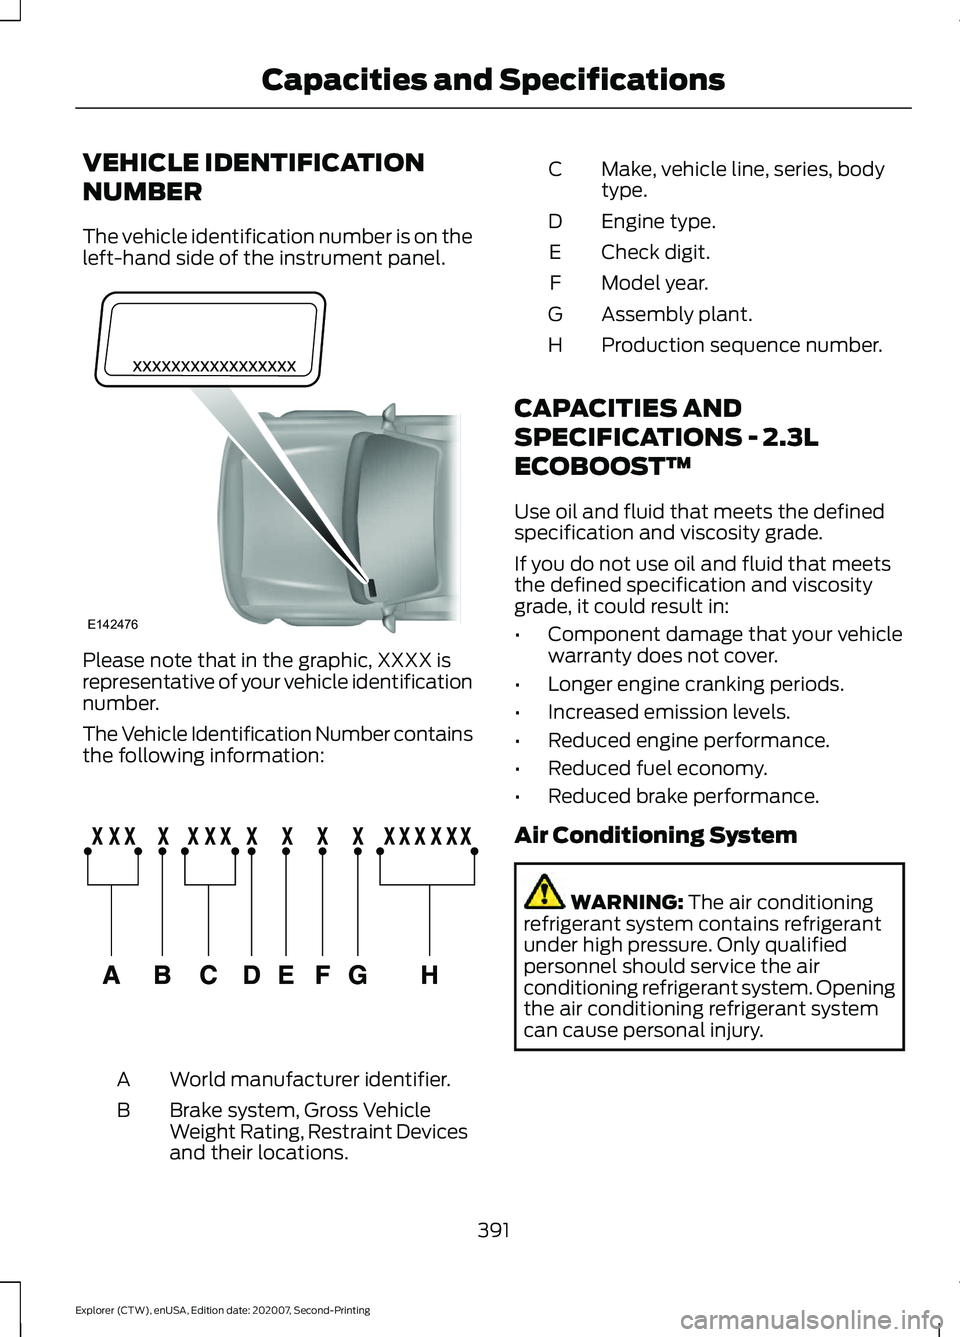
The vehicle identification number is on the
left-hand side of the instrument panel.
Please note that in the graphic, XXXX is
representative of your vehicle identification
number.
The Vehicle Identification Number contains
the following information:
World manufacturer identifier.
A
Brake system, Gross Vehicle
Weight Rating, Restraint Devices
and their locations.
B Make, vehicle line, series, body
type.
C
Engine type.
D
Check digit.
E
Model year.
F
Assembly plant.
G
Production sequence number.
H
CAPACITIES AND
SPECIFICATIONS - 2.3L
ECOBOOST™
Use oil and fluid that meets the defined
specification and viscosity grade.
If you do not use oil and fluid that meets
the defined specification and viscosity
grade, it could result in:
• Component damage that your vehicle
warranty does not cover.
• Longer engine cranking periods.
• Increased emission levels.
• Reduced engine performance.
• Reduced fuel economy.
• Reduced brake performance.
Air Conditioning System WARNING: The air conditioning
refrigerant system contains refrigerant
under high pressure. Only qualified
personnel should service the air
conditioning refrigerant system. Opening
the air conditioning refrigerant system
can cause personal injury.
391
Explorer (CTW), enUSA, Edition date: 202007, Second-Printing Capacities and SpecificationsE142476 E142477
Page 424 of 577
WHAT IS A CONNECTED
VEHICLE
A connected vehicle has technology that
allows your vehicle to connect to a mobile
network and for you to access a range of
features. When used in conjunction with
the FordPass app, it could allow you to
monitor and control your vehicle further,
for example checking the tire pressures,
the fuel level and the vehicle location. For
additional information, refer to the local
Ford website.
CONNECTED VEHICLE
REQUIREMENTS
Connected service and related feature
functionality requires a compatible vehicle
network.
Some remote features require additional
service activation. Log in to your Ford
account for details. Some restrictions, third
party terms and message or data rates
may apply.
CONNECTED VEHICLE
LIMITATIONS
Evolving technology, cellular networks, or
regulations could affect functionality and
availability, or continued provision of some
features. These changes could even stop
some features from functioning.
CONNECTING THE VEHICLE TO
A MOBILE NETWORK
What Is the Modem
The modem allows access to a
range of features built into your
vehicle. Enabling and Disabling the Modem
1. Press Settings.
2. Press
FordPass Connect.
3. Press
Connectivity Settings.
4. Switch connectivity features on or off.
Connecting FordPass to the
Modem
1. Make sure that the modem is enabled using the vehicle settings menu.
2. Open the FordPass app on your device
and log in.
3. Add your vehicle or select your vehicle if already added.
4. Select the option for vehicle details.
5. Select the option to activate your vehicle.
6. Make sure that the name on the screen
matches the name shown in your
FordPass account.
7. Confirm that FordPass account is connected to the modem.
CONNECTING THE VEHICLE TO
A WI-FI NETWORK - VEHICLES
WITH: SYNC 3
1. Press
Settings.
2. Press
Wi-Fi.
3. Switch
Wi-Fi on.
4. Press
View Available Networks.
5. Select an available Wi-Fi network.
Note: Enter the network password to
connect to a secure network.
421
Explorer (CTW), enUSA, Edition date: 202007, Second-Printing Connected Vehicle
Page 425 of 577
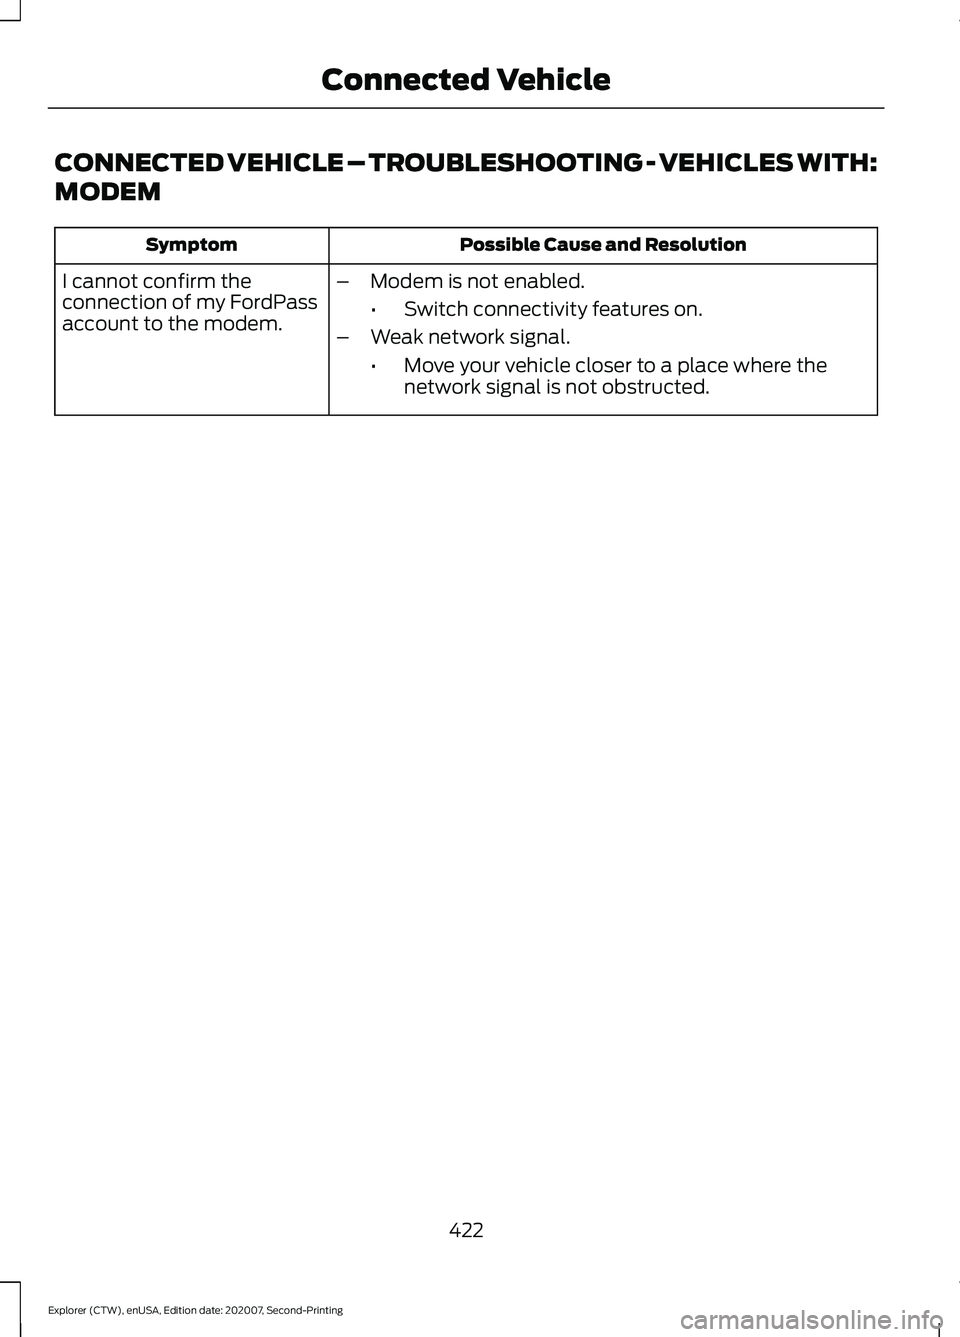
CONNECTED VEHICLE – TROUBLESHOOTING - VEHICLES WITH:
MODEM
Possible Cause and Resolution
Symptom
I cannot confirm the
connection of my FordPass
account to the modem. –
Modem is not enabled.
•Switch connectivity features on.
– Weak network signal.
•Move your vehicle closer to a place where the
network signal is not obstructed.
422
Explorer (CTW), enUSA, Edition date: 202007, Second-Printing Connected Vehicle