2021 FORD EXPLORER ignition
[x] Cancel search: ignitionPage 6 of 577

Instrument Cluster
Gauges - Vehicles With: 6.5 Inch
Instrument Cluster Display Screen
........................................................................\
.103
Gauges - Vehicles With: 12.3 Inch Instrument Cluster Display Screen
........................................................................\
104
Gauges - Vehicles With: 4.2 Inch Instrument Cluster Display Screen
........................................................................\
106
Warning Lamps and Indicators ..............
107
Audible Warnings and Indicators .............
111
Information Displays
General Information - Vehicles With: 6.5 Inch Instrument Cluster Display Screen
........................................................................\
..
112
General Information - Vehicles With: 12.3 Inch Instrument Cluster Display Screen
........................................................................\
..
114
General Information - Vehicles With: 4.2 Inch Instrument Cluster Display Screen
........................................................................\
..
117
Personalized Settings .................................
119
Information Messages ................................
121
Climate Control
Automatic Climate Control .....................
139
Hints on Controlling the Interior Climate ........................................................................\
..
141
Rear Passenger Climate Controls .........
142
Heated Windshield .....................................
143
Heated Rear Window .................................
144
Heated Exterior Mirrors .............................
144
Remote Start ................................................
144
Interior Air Quality
What Is the Cabin Air Filter ......................
145
Replacing the Cabin Air Filter ..................
145
Seats
Sitting in the Correct Position .................
146Head Restraints
...........................................
146
Manual Seats ................................................
148
Power Seats ..................................................
149
Memory Function .........................................
152
Rear Seats ......................................................
153
Heated Seats ................................................
158
Ventilated Seats ..........................................
159
Rear Occupant Alert System
What is the Rear Occupant Alert System ........................................................................\
160
How Does the Rear Occupant Alert System Work ............................................
160
Rear Occupant Alert System Precautions ........................................................................\
160
Rear Occupant Alert System Limitations ........................................................................\
160
Switching Rear Occupant Alert System On and Off .................................................
160
Rear Occupant Alert System Indicators ........................................................................\
..
161
Rear Occupant Alert System Audible Warnings ......................................................
161
Garage Door Opener
Universal Garage Door Opener ..............
162
Auxiliary Power Points
Auxiliary Power Points ...............................
167
Wireless Accessory Charger ....................
168
Storage Compartments
Cup Holders .....................................................
171
Overhead Console ........................................
171
Starting and Stopping the Engine
General Information ....................................
172
Ignition Switch ...............................................
172
Keyless Starting ............................................
172
3
Explorer (CTW), enUSA, Edition date: 202007, Second-Printing Table of Contents
Page 24 of 577

INSTRUMENT PANEL
Air vents.
A
Direction indicator. See Direction Indicators (page 90).
B
Cruise control. See
Cruise Control (page 83). Audio control. See Audio
Control (page 82).
C
Information display.
See General Information (page 117).
D
Information display control. See
Information Display Control (page 83).
E
Wiper lever.
See Windshield Wipers (page 84).
F
Ignition switch.
See Keyless Starting (page 172).
G
Information and Entertainment display.
H
Hazard flasher switch.
See Hazard Flashers (page 299).
I
Climate control.
See Automatic Climate Control (page 139).
J
Horn.
K
21
Explorer (CTW), enUSA, Edition date: 202007, Second-Printing At a GlanceE282065
A
Page 44 of 577
How to Disengage the Automatic
Locking Mode
Unbuckle the combination lap and
shoulder belt and allow it to retract
completely to disengage the automatic
locking mode and turn on the vehicle
sensitive (emergency) locking mode.
SEATBELT HEIGHT
ADJUSTMENT
WARNING: Position the seatbelt
height adjuster so that the seatbelt rests
across the middle of your shoulder.
Failure to adjust the seatbelt correctly
could reduce its effectiveness and
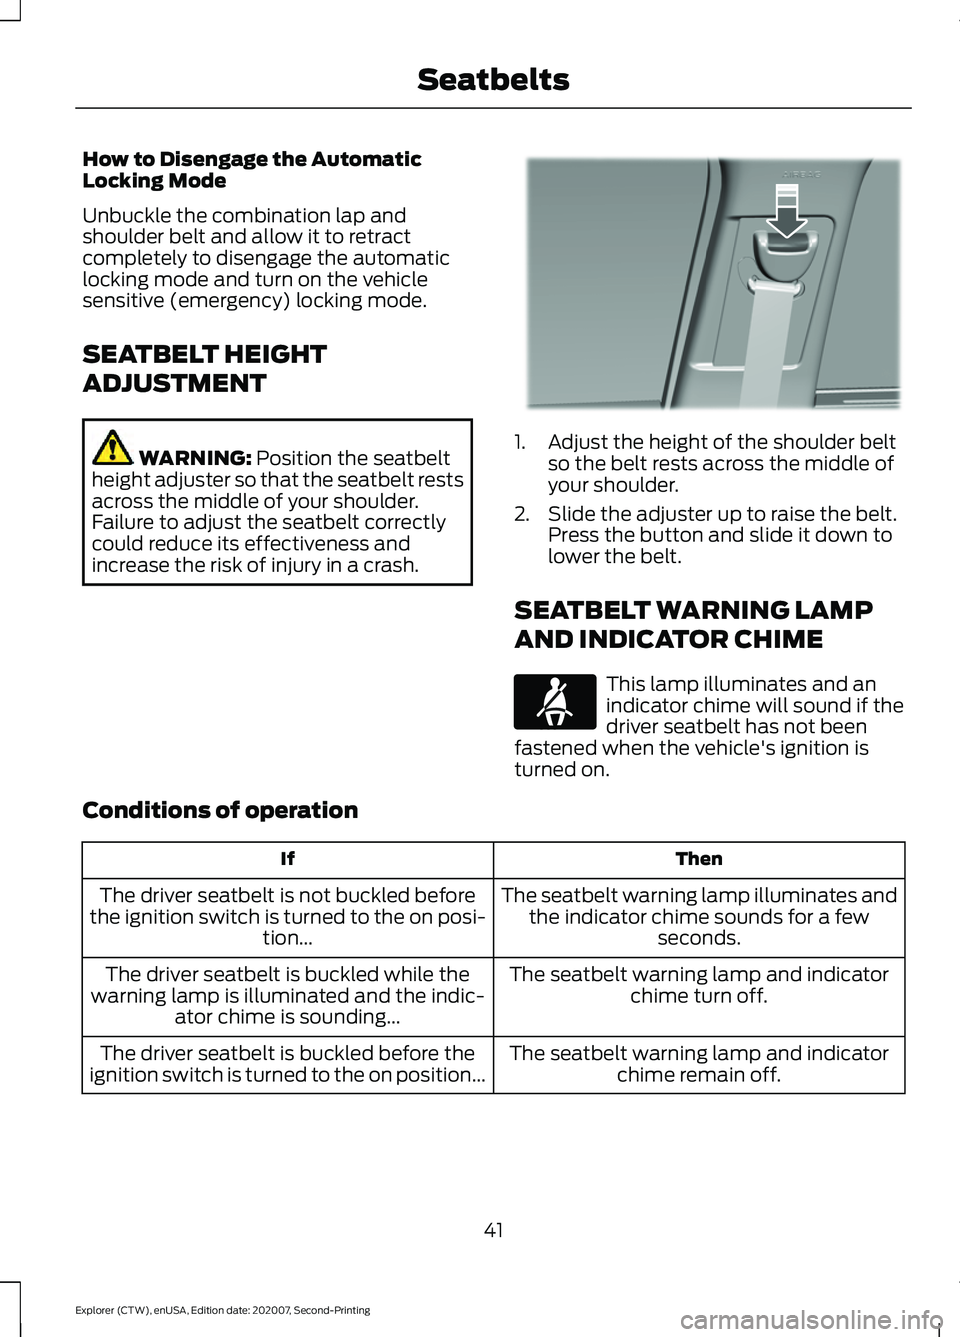
increase the risk of injury in a crash. 1. Adjust the height of the shoulder belt
so the belt rests across the middle of
your shoulder.
2. Slide the adjuster up to raise the belt. Press the button and slide it down to
lower the belt.
SEATBELT WARNING LAMP
AND INDICATOR CHIME This lamp illuminates and an
indicator chime will sound if the
driver seatbelt has not been
fastened when the vehicle's ignition is
turned on.
Conditions of operation Then
If
The seatbelt warning lamp illuminates andthe indicator chime sounds for a few seconds.
The driver seatbelt is not buckled before
the ignition switch is turned to the on posi- tion...
The seatbelt warning lamp and indicatorchime turn off.
The driver seatbelt is buckled while the
warning lamp is illuminated and the indic- ator chime is sounding...
The seatbelt warning lamp and indicatorchime remain off.
The driver seatbelt is buckled before the
ignition switch is turned to the on position...
41
Explorer (CTW), enUSA, Edition date: 202007, Second-Printing SeatbeltsE201573 E71880
Page 45 of 577
SEATBELT REMINDER
WARNING: The system will only
provide protection when you use the
seatbelt correctly.
This system monitors all seating positions
and provides audio and graphic feedback. This lamp illuminates and a
warning tone sounds if you do
not fasten your seatbelt when
you switch the ignition on. The lamp and
tone switch off when you fasten your
seatbelt or about one minute has elapsed.
When the initial warning expires for the
driver, more warnings are provided for the
driver and front outermost passenger. This
lamp illuminates and a warning tone
sounds if you or your front passenger do
not fasten the seatbelt buckle and the
vehicle speed exceeds
6 mph (9.7 km/h).
To deactivate the warning, see
Deactivating and Activating the
Belt-Minder Feature.
Note: To avoid inadvertent warnings, do
not place large objects on the front
passenger seat. This lamp illuminates when you
switch the ignition on, identifying
the number of seating positions
with fastened buckles. It illuminates again
when a seating position changes from
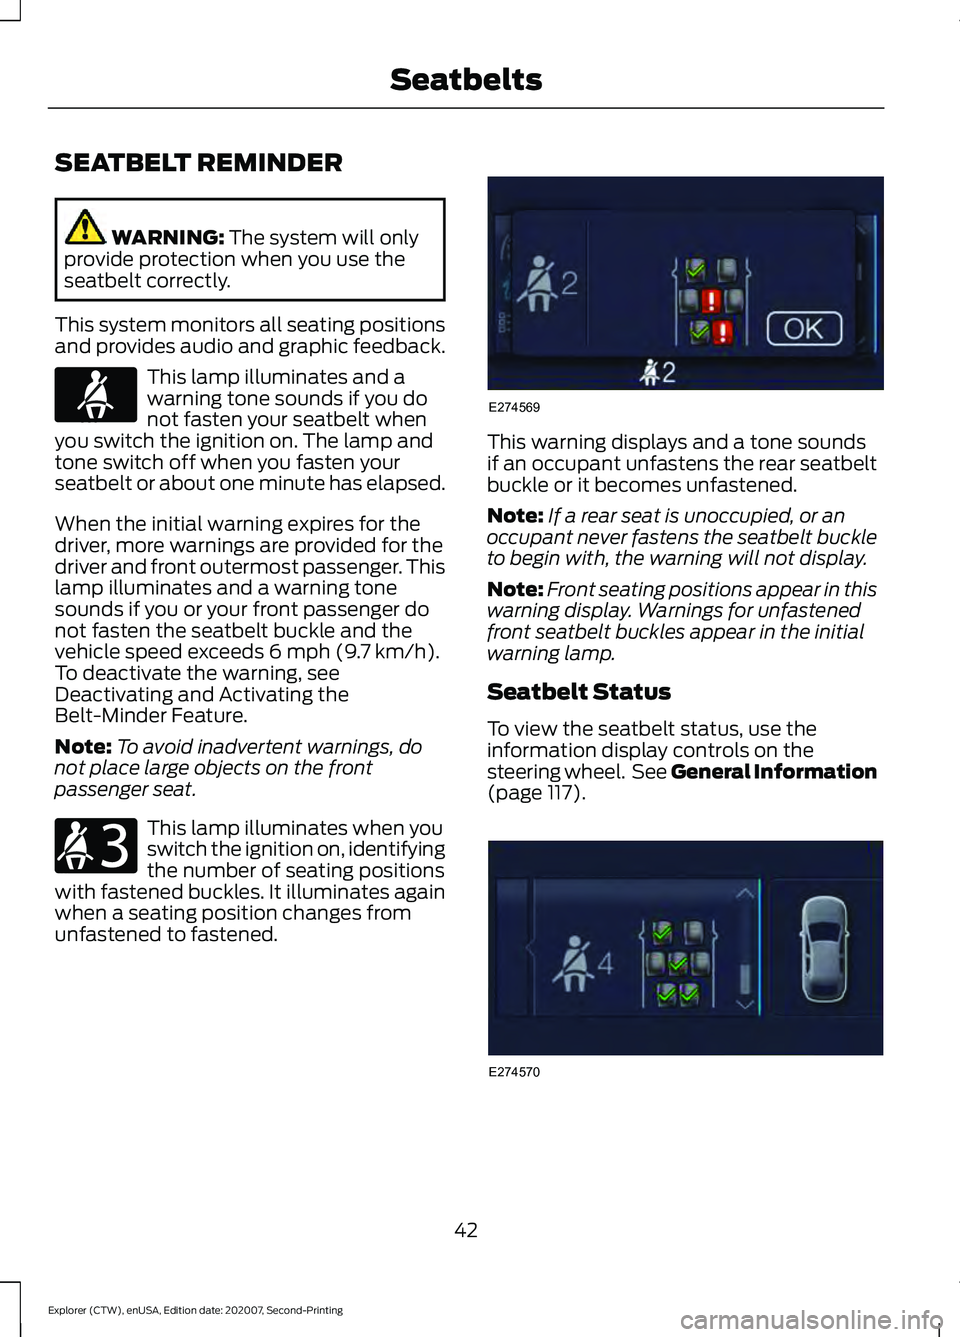
unfastened to fastened. This warning displays and a tone sounds
if an occupant unfastens the rear seatbelt
buckle or it becomes unfastened.
Note:
If a rear seat is unoccupied, or an
occupant never fastens the seatbelt buckle
to begin with, the warning will not display.
Note: Front seating positions appear in this
warning display. Warnings for unfastened
front seatbelt buckles appear in the initial
warning lamp.
Seatbelt Status
To view the seatbelt status, use the
information display controls on the
steering wheel. See General Information
(page
117). 42
Explorer (CTW), enUSA, Edition date: 202007, Second-Printing SeatbeltsE71880 E206718 E274569 E274570
Page 46 of 577
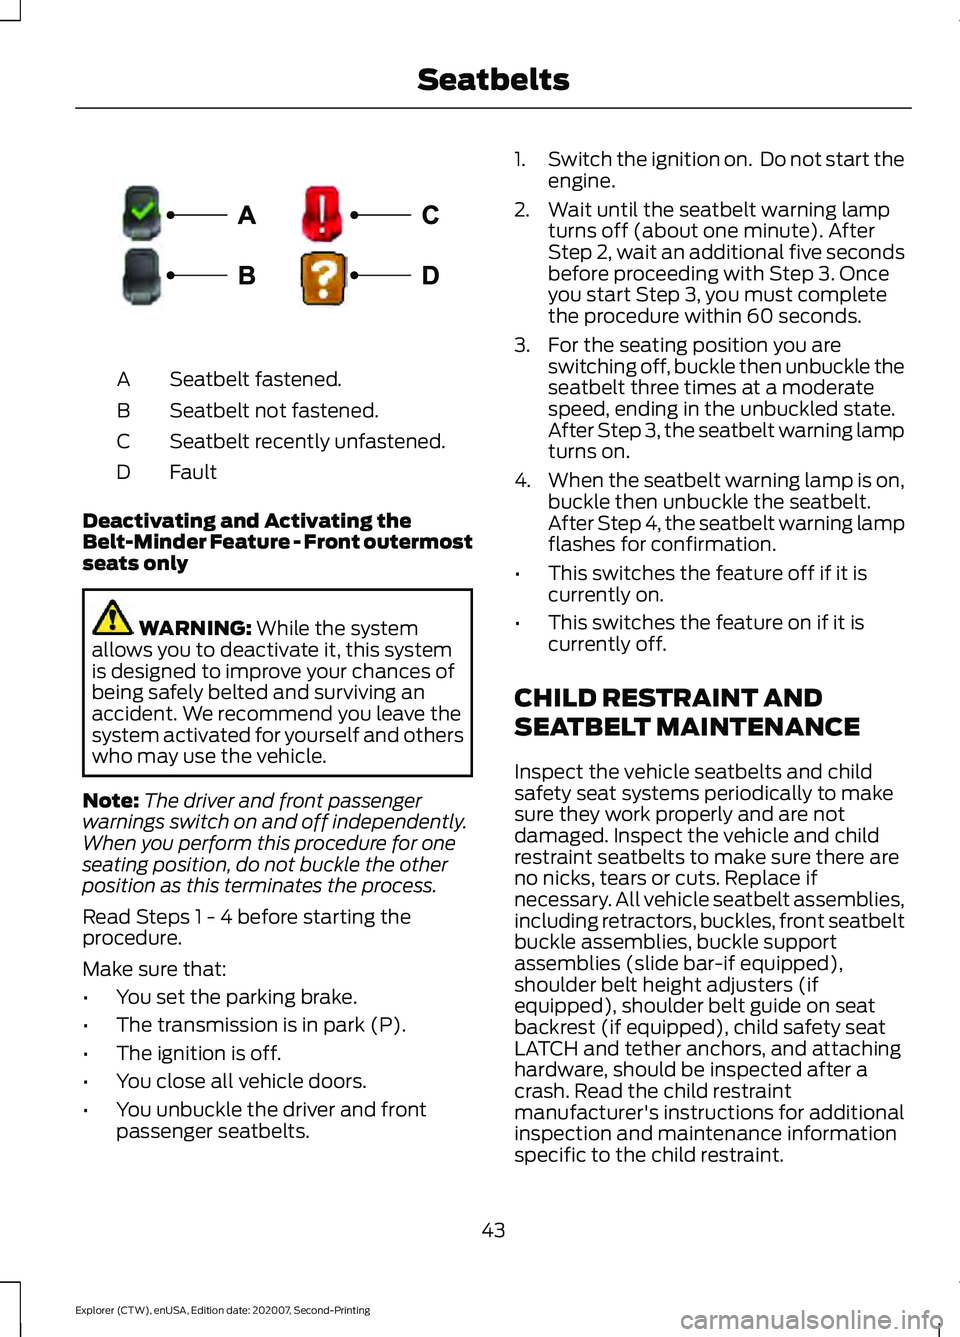
Seatbelt fastened.
A
Seatbelt not fastened.
B
Seatbelt recently unfastened.
C
Fault
D
Deactivating and Activating the
Belt-Minder Feature - Front outermost
seats only WARNING: While the system
allows you to deactivate it, this system
is designed to improve your chances of
being safely belted and surviving an
accident. We recommend you leave the
system activated for yourself and others
who may use the vehicle.
Note: The driver and front passenger
warnings switch on and off independently.
When you perform this procedure for one
seating position, do not buckle the other
position as this terminates the process.
Read Steps 1 - 4 before starting the
procedure.
Make sure that:
• You set the parking brake.
• The transmission is in park (P).
• The ignition is off.
• You close all vehicle doors.
• You unbuckle the driver and front
passenger seatbelts. 1.
Switch the ignition on. Do not start the
engine.
2. Wait until the seatbelt warning lamp turns off (about one minute). After
Step 2, wait an additional five seconds
before proceeding with Step 3. Once
you start Step 3, you must complete
the procedure within 60 seconds.
3. For the seating position you are switching off, buckle then unbuckle the
seatbelt three times at a moderate
speed, ending in the unbuckled state.
After Step 3, the seatbelt warning lamp
turns on.
4. When the seatbelt warning lamp is on,
buckle then unbuckle the seatbelt.
After Step 4, the seatbelt warning lamp
flashes for confirmation.
• This switches the feature off if it is
currently on.
• This switches the feature on if it is
currently off.
CHILD RESTRAINT AND
SEATBELT MAINTENANCE
Inspect the vehicle seatbelts and child
safety seat systems periodically to make
sure they work properly and are not
damaged. Inspect the vehicle and child
restraint seatbelts to make sure there are
no nicks, tears or cuts. Replace if
necessary. All vehicle seatbelt assemblies,
including retractors, buckles, front seatbelt
buckle assemblies, buckle support
assemblies (slide bar-if equipped),
shoulder belt height adjusters (if
equipped), shoulder belt guide on seat
backrest (if equipped), child safety seat
LATCH and tether anchors, and attaching
hardware, should be inspected after a
crash. Read the child restraint
manufacturer's instructions for additional
inspection and maintenance information
specific to the child restraint.
43
Explorer (CTW), enUSA, Edition date: 202007, Second-Printing SeatbeltsE274703
Page 52 of 577
The indicators are on the overhead
console.
Note:
The indicators illuminate briefly when
you first switch the ignition on to confirm
they are functional.
The front passenger sensing system is
designed to disable (will not inflate) the
front passenger frontal airbag when the
front passenger seat is unoccupied, or a
rear facing infant seat, a forward-facing
child restraint, or a booster seat is
detected. Even with this technology,
parents are strongly encouraged to
always properly restrain children in the rear
seat.
• When the front passenger sensing
system disables (will not inflate) the
front passenger frontal airbag, the
airbag off indicator illuminates and
stays lit to remind you that the front
passenger frontal airbag is disabled.
• If you have installed the child restraint
and the airbag on indicator illuminates,
switch the vehicle off, remove the child
restraint from the vehicle and reinstall
the restraint according to the child
restraint manufacturer's instructions. The front passenger sensing system is
designed to enable (may inflate) the front
passenger frontal airbag anytime the
system senses that a person of adult size
is sitting properly in the front passenger
seat.
•
When the front passenger sensing
system enables the front passenger
frontal airbag (may inflate), the airbag
on indicator illuminates and remains
illuminated.
If a person of adult size is sitting in the front
passenger seat, but the airbag off indicator
is lit, it is possible that the person is not
sitting properly in the seat. If this happens:
• Switch the vehicle off and ask the
person to place the seat backrest in an
upright position.
• Have the person sit upright in the seat,
centered on the seat cushion, with the
person ’s legs comfortably extended.
• Restart the vehicle and have the person
remain in this position for about two
minutes. This allows the system to
detect that person and enables the
passenger frontal airbag.
• If the airbag off indicator remains lit
even after this, advise the person to
ride in the rear seat. Passenger Airbag
Passenger Airbag Status
Indicator
Occupant
Disabled
OFF: Lit
Empty
ON: Unlit Disabled
OFF: Lit
Child
ON: Unlit Enabled
OFF: Unlit
Adult
ON: Lit
49
Explorer (CTW), enUSA, Edition date: 202007, Second-Printing Supplementary Restraints System
Page 56 of 577

The restraints control module also
monitors the readiness of the above safety
devices plus the crash and occupant
sensors. The readiness of the safety
system is indicated by a warning indicator
light in the instrument cluster or by a
backup tone if the warning light is not
working. Routine maintenance of the
airbag is not required.
A difficulty with the system is indicated by
one or more of the following:
•
The readiness light will not illuminate
immediately after you switch the
ignition on.
• The readiness light either flashes or
stays lit.
• A series of five beeps is heard. The tone
pattern repeats periodically until the
problem, the light or both are repaired.
If any of these things happen, even
intermittently, have the supplemental
restraint system serviced at an authorized
dealer immediately. Unless serviced, the
system may not function properly in the
event of a crash.
The restraint system is designed to
activate when the vehicle sustains
conditions sufficient to cause the restraint
control module to deploy a safety device. The fact that not all the safety devices
activate for all occupants in a crash does
not mean something is wrong with the
system. Rather, it means the restraints
control module determined the accident
conditions (crash severity, type of crash,
belt usage) were not appropriate to
activate these safety devices.
•
The front airbags are designed to
activate only in frontal and near-frontal
crashes (not rollovers, side impacts or
rear impacts) unless the crash causes
sufficient frontal deceleration.
• The seatbelt pretensioners are
designed to activate in frontal,
near-frontal and side crashes, and in
rollovers.
• The knee airbag(s) may deploy based
on crash severity and occupant
conditions.
• The side airbags are designed to inflate
in certain side impact crashes or
rollover events. Side airbags may
activate in other types of crashes if your
vehicle experiences sufficient sideways
motion or deformation, or a certain
likelihood of rollover.
• The Safety Canopy is designed to
inflate in certain side impact crashes
or rollover events. The Safety Canopy
may activate in other types of crashes
if your vehicle experiences sufficient
sideways motion or deformation, or a
certain likelihood of rollover.
AIRBAG DISPOSAL
Contact your authorized dealer as soon as
possible. Airbags must be disposed of by
qualified personnel.
53
Explorer (CTW), enUSA, Edition date: 202007, Second-Printing Supplementary Restraints SystemE67017
Page 60 of 577
GENERAL INFORMATION ON
RADIO FREQUENCIES
This device complies with Part 15 of the
FCC Rules and with Industry Canada
license-exempt RSS standard(s).
Operation is subject to the following two
conditions: (1) This device may not cause
harmful interference, and (2) This device
must accept any interference received,
including interference that may cause
undesired operation.
WARNING: Changes or
modifications not expressively approved
by the party responsible for compliance
could void the user's authority to operate
the equipment. The term "IC:" before the
radio certification number only signifies
that Industry Canada technical
specifications were met.
The typical operating range for your
transmitter is approximately
33 ft (10 m).
Vehicles with the remote start feature will
have a greater range.
One of the following could cause a
decrease in operating range:
• Weather conditions.
• Nearby radio towers.
• Structures around the vehicle.
• Other vehicles parked next to your
vehicle.
The radio frequency used by your remote
control can also be used by other radio
transmitters, for example amateur radios,
medical equipment, wireless headphones,
wireless remote controls, cell phones,
battery chargers and alarm systems. If the
frequencies are jammed, you will not be
able to use your remote control. You can
lock and unlock the doors with the key.
Note: Make sure to lock your vehicle before
leaving it unattended. Note:
If you are in range, the remote control
will operate if you press any button
unintentionally.
Note: The remote control contains sensitive
electrical components. Exposure to moisture
or impact may cause permanent damage.
Intelligent Access
(If Equipped)
The system uses a radio frequency signal
to communicate with your vehicle and
authorize your vehicle to unlock when one
of the following conditions are met:
• You activate the front exterior door
handle switch.
• You press the luggage compartment
button.
• You press a button on the transmitter.
If excessive radio frequency interference
is present in the area or if the transmitter
battery is low, you may need to
mechanically unlock your door. You can
use the mechanical key blade in your
intelligent access key to open the driver
door in this situation. See
Remote
Control (page 57).
REMOTE CONTROL
Integrated Keyhead Transmitter
Use the key blade to start your vehicle and
unlock or lock the driver door from outside
your vehicle. The integrated keyhead
transmitter functions as a programmed
ignition key that operates all the locks and
starts your vehicle, as well as a remote
control.
57
Explorer (CTW), enUSA, Edition date: 202007, Second-Printing Keys and Remote Controls