Page 121 of 244
 11 9
Driving
6Activating the function deactivates the Blind Spot Monitoring System.
You can deactivate the function at any time until the parking space entry or exit
manoeuvre begins, by pressing the")
11 9
Driving
6Activating the function deactivates the Blind Spot Monitoring System.
You can deactivate the function at any time until the parking space entry or exit
manoeuvre begins, by pressing the arrow
located in the top left-hand corner of the
display page.
Selecting the type of manoeuvre
A manoeuvre selection page is displayed on the
touch screen: by default, the "Entry" page if the
vehicle has been running since the ignition was
switched on, otherwise, the "Exit" page.
► Select the type and side of the manoeuvre to activate the parking space search.
The selected manoeuvre can be changed at
any time, even while searching for an available
space.
Parking space search
► You should drive at a distance of between 0.50 m and 1.50 m from the row of parked vehicles, without ever exceeding 19 mph (30 km/h), until the system finds an available space.
The parking space search is suspended at
higher speeds. The function is automatically
deactivated if the vehicle speed exceeds 31 mph
(50 km/h).
For "parallel" parking, the space must
measure at least the length of your
vehicle plus 0.60 m.
For "bay" parking, the space must be at least
as wide as your vehicle plus 0.70 m.
If the parking sensors function has been
deactivated in the Driving/Vehicle touch
screen menu, it will be automatically
reactivated when the system is activated.
When the system finds an available space, " OK"
is displayed on the parking view, accompanied
by an audible signal.
Preparing for the manoeuvre
► Move very slowly until the request to stop the vehicle is displayed: " Stop the vehicle“,
accompanied by the “ STOP” sign and an audible
signal.
Once the vehicle has stopped, an instructions
page is displayed on the screen.
► To prepare for the manoeuvre, follow the instructions.
The start of the manoeuvre is indicated by the
"Manoeuvre under way" onscreen message
and an accompanying audible signal.
Reversing is indicated by this message:
“Release the steering wheel, reverse ”.
The Top Rear Vision and the parking sensors
are automatically activated to help you monitor
the area immediately surrounding your vehicle
during the manoeuvre.
During the manoeuvre
The system controls the vehicle’s steering. It gives instructions on the manoeuvring direction
when starting "parallel" entry and exit parking
manoeuvres, and for all "bay" entry manoeuvres.
These instructions are displayed as a symbol
accompanied by a message:
"Reverse".
Page 122 of 244
 120
Driving
“Go forwards\".
The manoeuvring status is indicated by these
symbols:
Manoeuvre in progress (green).
Manoeuvre cancelled or finished (red) (the arrows indicate that the driver must")
120
Driving
“Go forwards".
The manoeuvring status is indicated by these
symbols:
Manoeuvre in progress (green).
Manoeuvre cancelled or finished (red) (the arrows indicate that the driver must
resume control of the vehicle).
The maximum speeds during manoeuvres are
indicated by these symbols:
75 mph or 7 km/h, for parking space entry.
53 mph or 5 km/h, for parking space exit.
During manoeuvring phases, the steering
wheel performs rapid turns: do not hold
the steering wheel or put your hands between
the spokes of the steering wheel. Watch out
for any objects that could interfere with the
manoeuvre (loose clothing, scarf, tie, etc.).
Risk of injury!
It is the driver's responsibility to constantly
monitor the traffic, especially vehicles coming
towards you.
The driver should check that no objects or
people are obstructing the vehicle’s path.
The images from the camera(s) displayed on the touch screen may be
distorted by the terrain.
In shady areas, or in inadequate sunlight
or lighting conditions, the image may be
darkened and with lower contrast.
The manoeuvre can be permanently interrupted
at any time, either by the driver or automatically
by the system.
Interruption by the driver:
– taking over control of the steering.– activating the direction indicator lamps on the opposite side to that of the manoeuvre.– unfastening the driver's seat belt.– switching off the ignition.Interruption by the system:– vehicle exceeding the speed limit of 5 mph (7 km/h) during parking space entry manoeuvres, or 3 mph (5 km/h) during parking space exit manoeuvres.– activation of anti-slip regulation on a slippery road.
– opening of a door or the boot.– engine stall.– system malfunction.– after 10 manoeuvres to enter or exit a parallel parking space and after 7 manoeuvres to enter a
parking bay.
Interrupting the manoeuvre automatically
deactivates the function. The manoeuvre symbol is displayed in red,
accompanied by the "
Manoeuvre cancelled"
message on the touch screen.
A message prompts the driver to take back
control of the vehicle.
End of the parking space entry or exit
manoeuvre
The vehicle stops as soon as the manoeuvre is
completed.
The manoeuvre symbol is displayed in red,
accompanied by the message “ Manoeuvre
completed” on the touch screen.
When entering a parking space, the driver may
be required to complete the manoeuvre.
Operating limits
– The system may suggest an unsuitable parking space (No Parking area, work in
progress with damaged road surface, location
alongside a ditch, etc.).
– The system may indicate that a space has been found but not offer it because of a fixed
obstacle on the opposite side of the manoeuvre,
which would not allow the vehicle to follow the
necessary trajectory for parking.
– The system may indicate that a space has been found but not engage the manoeuvre
because the road is too narrow.
– The system is not designed to perform the parking manoeuvre on a sharp bend.– The system does not detect spaces that are much larger than the vehicle or are bounded by
obstacles that are very low (pavements, studs, etc.) or very thin (trees, posts, wire fences, etc.).– Certain obstacles located in the sensors’ blind spots may not be detected or may no longer be
detected during the manoeuvre.
– Certain materials (fabrics) absorb sound waves: pedestrians may not be detected.– A front or rear impact to the vehicle can upset the sensors’ settings, which is not always
detected by the system: distance measurements
may be distorted.
– If the boot is heavily loaded, the vehicle may tilt, affecting distance measurements.
The vehicle's sensors and camera(s) may be
impaired by:
– accumulated snow or fallen leaves on the road,– adverse weather conditions (heavy rain, thick fog, falling snow),– noise interference from noisy vehicles and machinery (lorries, pneumatic drills, etc.).
Do not use the function under the
following exterior conditions:
– Alongside a soft shoulder (e.g. ditch) or quay or on the edge of a drop.– When the road surface is slippery (e.g. ice).
If any of the following malfunctions
occurs, do not use the system:
– If a tyre is under-inflated.– If one of the bumpers is damaged.– If one of the cameras is faulty.
Page 123 of 244
 121
Driving
6obstacles that are very low (pavements, studs,
etc.) or very thin (trees, posts, wire fences, etc.).
– Certain obstacles located in the sensors’ blind spots may not be detected or ma")
121
Driving
6obstacles that are very low (pavements, studs,
etc.) or very thin (trees, posts, wire fences, etc.).
– Certain obstacles located in the sensors’ blind spots may not be detected or may no longer be
detected during the manoeuvre.
– Certain materials (fabrics) absorb sound waves: pedestrians may not be detected.– A front or rear impact to the vehicle can upset the sensors’ settings, which is not always
detected by the system: distance measurements
may be distorted.
– If the boot is heavily loaded, the vehicle may tilt, affecting distance measurements.
The vehicle's sensors and camera(s) may be
impaired by:
– accumulated snow or fallen leaves on the road,– adverse weather conditions (heavy rain, thick fog, falling snow),– noise interference from noisy vehicles and machinery (lorries, pneumatic drills, etc.).
Do not use the function under the
following exterior conditions:
– Alongside a soft shoulder (e.g. ditch) or quay or on the edge of a drop.– When the road surface is slippery (e.g. ice).
If any of the following malfunctions
occurs, do not use the system:
– If a tyre is under-inflated.– If one of the bumpers is damaged.– If one of the cameras is faulty.
If the vehicle has undergone any of the
following modifications, do not use the
function:
– When carrying an object extending beyond the dimensions of the vehicle (ladder on the
roof bars, bicycle carrier on the tailgate, etc.).
– With a non-approved towball in place.– With snow chains fitted.– When driving on a small-diameter or "space-saver" type spare wheel.– When the wheels fitted are a different size from the original ones.– After modifying one or both bumpers (added protection).– If the sensors have been repainted other than by the CITROËN dealer network.– With sensors not approved for the vehicle.
Malfunctions
If the parking sensor malfunction occurs during use, indicated by this warning lamp
coming on, it causes the function to deactivate.
In the event of a malfunction, have the system
checked by a CITROËN dealer or a qualified
workshop.
In the event of a power steering malfunction, this warning lamp is
displayed on the instrument panel, accompanied
by a warning message.
You must stop as soon as it is safe to do so.
Contact a CITROËN dealer or a qualified
workshop.
Page 124 of 244

prefers
Compatibility of fuels
Petrol fuels conforming to the EN228 standard
containing up to 5% and 10% ethanol
respectively.
Diesel fuels conforming to the EN590, EN16734
and EN1670")
prefers
Compatibility of fuels
Petrol fuels conforming to the EN228 standard
containing up to 5% and 10% ethanol
respectively.
Diesel fuels conforming to the EN590, EN16734
and EN16709 standards and containing up to
7%, 10%, 20% and 30% fatty acid methyl ester
respectively. The use of B20 or B30 fuels, even
occasionally, imposes special maintenance
conditions referred to as "Arduous conditions".
Paraffinic Diesel fuel conforming to the EN15940
standard.
The use of any other type of (bio) fuel (vegetable or animal oils, pure or diluted,
domestic fuel, etc.) is strictly prohibited (risk
of damage to the engine and fuel system).
The only fuel additives authorised for use are those that meet the B715001 (petrol)
or B715000 (Diesel) standards.
Diesel at low temperature
At temperatures below 0 °C (+32 °F), the formation of paraffins in summer-type Diesel
WITH TOTAL QUARTZ LUBRICANTS
FILL UP WITH
CONFIDENCE
For more than 50 years, TOTAL and CITROËN
have shared common values: excellence, creativity
and technological innovation.
It is in this same spirit that TOTAL has developed
a range of TOTAL QUARTZ lubricants adapted
to CITROËN engines, making them ever more
�
Page 125 of 244

123
Practical information
7Compatibility of fuels
Petrol fuels conforming to the EN228 standard
containing up to 5% and 10% ethanol
respectively.
Diesel fuels conforming to the EN590, EN167")
123
Practical information
7Compatibility of fuels
Petrol fuels conforming to the EN228 standard
containing up to 5% and 10% ethanol
respectively.
Diesel fuels conforming to the EN590, EN16734
and EN16709 standards and containing up to
7%, 10%, 20% and 30% fatty acid methyl ester
respectively. The use of B20 or B30 fuels, even
occasionally, imposes special maintenance
conditions referred to as "Arduous conditions".
Paraffinic Diesel fuel conforming to the EN15940
standard.
The use of any other type of (bio) fuel (vegetable or animal oils, pure or diluted,
domestic fuel, etc.) is strictly prohibited (risk
of damage to the engine and fuel system).
The only fuel additives authorised for use are those that meet the B715001 (petrol)
or B715000 (Diesel) standards.
Diesel at low temperature
At temperatures below 0 °C (+32 °F), the formation of paraffins in summer-type Diesel fuels could prevent the engine from operating
correctly. In these temperature conditions, use
winter-type Diesel fuel and keep the fuel tank
more than 50 % full.At temperatures below -15 °C (+5 °F) to avoid problems starting, it is best to park the vehicle
under shelter (heated garage).
Travelling abroad
Certain fuels could damage your vehicle’s
engine.
In certain countries, the use of a particular
fuel may be required (specific octane rating,
specific trade name, etc.) to ensure correct
operation of the engine.
For all additional information, consult a dealer.
Refuelling
Fuel tank capacity: approximately 45 litres.
Reserve level: approximately 5 litres.
Low fuel level
/2
1 1When the low fuel level is reached, one of these warning lamps comes
on on the instrument panel, accompanied by an
onscreen message and an audible signal. When
it first comes on, about 5 litres of fuel remain.
Until sufficient fuel is added, this warning lamp
appears every time the ignition is switched on,
accompanied by an onscreen message and
an audible signal. When driving, this message
and audible signal are repeated with increasing
frequency as the fuel level drops towards 0.
You must refuel as soon as possible to avoid
running out of fuel.
For more information on Running out of fuel
(Diesel), refer to the corresponding section.
Stop & Start
Never refuel with the engine in STOP
mode; you must switch off the ignition.
Refuelling
Additions of fuel must be of at least 5 litres, in
order to be registered by the fuel gauge.
Opening the filler cap may create a noise caused
by an inrush of air. This vacuum is entirely
normal, resulting from the sealing of the fuel
system.
To refuel in complete safety:
► You must switch off the engine.
Page 126 of 244
 124
Practical information
► With the vehicle unlocked, press the rear-central part of the filler flap to open it.► Take care to select the pump that delivers the correct fuel type for the vehicle&")
124
Practical information
► With the vehicle unlocked, press the rear-central part of the filler flap to open it.► Take care to select the pump that delivers the correct fuel type for the vehicle's engine (see a
reminder label on the inside of the filler flap).
► Turn the filler cap to the left.
► Remove the filler cap and hang it on its carrier (on the filler flap).► Introduce the filler nozzle and push it in as far as possible before starting to refuel (risk of
blowback).
► Fill the tank.Do not continue past the third cut-off of the
nozzle, as this may cause malfunctions.
► Refit the filler cap.► Turn it to the right.► Push the filler flap to close it.
If you have put in the wrong fuel for the
vehicle, you must have the fuel tank
drained and filled with the correct fuel before
starting the engine. The vehicle is fitted with a catalytic converter, a
device which helps to reduce the level of harmful
emissions in the exhaust gases.
For petrol engines, you must use unleaded
fuel.
The filler neck is narrower, admitting unleaded
petrol nozzles only.
Fuel cut-off
Your vehicle is equipped with a safety device
which cuts off the fuel supply in the event of a
collision.
Misfuel prevention (Diesel)
(Depending on country of sale.)
This mechanical device prevents filling the tank
of a Diesel vehicle with petrol.
Located in the filler neck, the misfuel prevention
device is visible when the filler cap is removed.
Operation
When a petrol filler nozzle is inserted into the
fuel filler neck of a Diesel vehicle, it comes into
contact with the flap. The system remains closed
and prevents filling.
Do not persist but introduce a Diesel type
filler nozzle.
It remains possible to use a fuel jerrycan
to fill the tank.
Travelling abroad
As Diesel fuel pump nozzles may be
different in other countries, the presence
of the misfuel prevention device may make
refuelling impossible.
Before travelling abroad, it is advisable to
check with a CITROËN dealer if the vehicle is
suitable for the distribution equipment of the
countries visited.
Snow chains
In wintry conditions, snow chains improve
traction as well as the behaviour of the vehicle
when braking.
The snow chains must be fitted only to the front wheels. They must never be
fitted to "space-saver" type spare wheels.
Take account of the legislation specific to each country on the use of snow chains
and the maximum authorised speed.
Use only the chains designed to be fitted to the type of wheel fitted to the vehicle:
Original tyre size Chain types
195/65 R15
Maximum 9 mm link
195/60 R16
205/60 R16 Cannot be fitted with
chains
215/50 R17
For more information on snow chains, contact a
CITROËN dealer or a qualified workshop.
Installation tips
► To fit the chains during a journey, stop the vehicle on a flat surface on the side of the road.► Apply the parking brake and position any wheel chocks under the wheels to prevent
movement of the vehicle.
► Fit the chains following the instructions provided by the manufacturer.► Move off gently and drive for a few moments, without exceeding 31 mph (50 km/h).► Stop the vehicle and check that the snow chains are correctly tightened.
It is strongly recommended that before
you leave, you practise fitting the snow
chains on a level and dry surface.
Avoid driving with snow chains on roads that have been cleared of snow to avoid
damaging the vehicle's tyres and the road
Page 127 of 244
 125
Practical information
7Use only the chains designed to be fitted to the
type of wheel fitted to the vehicle:
Original tyre sizeChain types
195/65 R15
Maximum 9 mm link
195/60 R16
205/60 R16 Canno")
125
Practical information
7Use only the chains designed to be fitted to the
type of wheel fitted to the vehicle:
Original tyre sizeChain types
195/65 R15
Maximum 9 mm link
195/60 R16
205/60 R16 Cannot be fitted with
chains
215/50 R17
For more information on snow chains, contact a
CITROËN dealer or a qualified workshop.
Installation tips
► To fit the chains during a journey, stop the vehicle on a flat surface on the side of the road.► Apply the parking brake and position any wheel chocks under the wheels to prevent
movement of the vehicle.
► Fit the chains following the instructions provided by the manufacturer.► Move off gently and drive for a few moments, without exceeding 31 mph (50 km/h).► Stop the vehicle and check that the snow chains are correctly tightened.
It is strongly recommended that before
you leave, you practise fitting the snow
chains on a level and dry surface.
Avoid driving with snow chains on roads that have been cleared of snow to avoid
damaging the vehicle's tyres and the road
surface. If the vehicle is fitted with alloy
wheels, check that no part of the chain or its
fixings is in contact with the wheel rim.
Towbar with quickly detachable towball
No tools are required to install or remove the
towball on this genuine towbar system.
Presentation
This genuine towing device can be fitted and
removed with no need for tools.
1. Carrier
2. Protective plug
3. Connection socket
4. Safety eye
5. Detachable towball
6. Locking/unlocking wheel
7. Security key lock
8.Label to note the key references
A.Locked position (green mark opposite the
white mark); the wheel is in contact with the
towball (no gap).
B. Unlocked position (red mark opposite the
white mark); the wheel is no longer in contact
with the towball (gap of around 5 mm).
Trailers with LED lamps are not
compatible with the wiring harness of this
device.
To ensure complete safety while driving with a Towing device , refer to the
corresponding section.
Before each use
Check that the towball is correctly fitted,
verifying the follow points:
Page 128 of 244
 126
Practical information
– the green mark on the star wheel is in line
with the white mark on the ball joint,
– the locking wheel is in contact with the towball (position A),– the security ke")
126
Practical information
– the green mark on the star wheel is in line
with the white mark on the ball joint,
– the locking wheel is in contact with the towball (position A),– the security key lock is on and the key removed; the locking wheel can no longer be
operated,
– the towball must not be able to move in its carrier; test by shaking it with your hand.
If the towball is not locked, the trailer can
detach - accident risk!
During use
Never release the locking system with a
trailer or load carrier on the towball.
Never exceed the maximum authorised
weight for the vehicle - the Gross Train
Weight or GTW.
It is essential that the maximum authorised
load be complied with on the towing device:
if it is exceeded, this device may detach from
the vehicle, which is a serious accident risk.
Check that the trailer lamps work correctly.
Before setting off, check the adjustment of the
headlamp beam height.
For more information on Headlamp
adjustment, refer to the corresponding
section.
Following use
When travelling without a trailer or load
on a towbar-mounted carrier, the towball
must be removed and the protective plug
inserted in the carrier. This measure applies
particularly where the towball might obscure
visibility of the number plate or its lighting.
Fitting the towball
► Below the rear bumper , remove the protective plug 2 from the towball carrier 1.
► Insert the end of towball 5 into carrier 1 and
push it upwards; the locking will take place
automatically.
► The locking wheel 6 turns a quarter of a turn
anti-clockwise ; take care to keep your hands
clear!
► Check that the mechanism has correctly locked into place and that the green mark on the
star wheel is in line with the white mark on the
towball (position A).
► Close the lock 7 using the key.
 1
1 2
2 3
3 4
4 5
5 6
6 7
7 8
8 9
9 10
10 11
11 12
12 13
13 14
14 15
15 16
16 17
17 18
18 19
19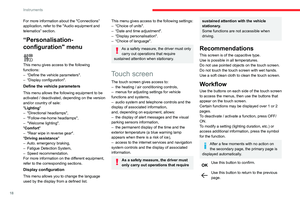 20
20 21
21 22
22 23
23 24
24 25
25 26
26 27
27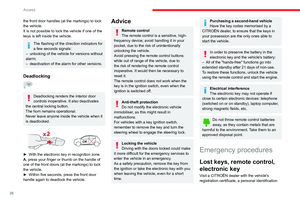 28
28 29
29 30
30 31
31 32
32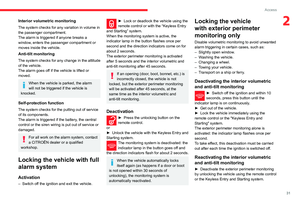 33
33 34
34 35
35 36
36 37
37 38
38 39
39 40
40 41
41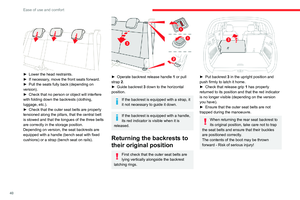 42
42 43
43 44
44 45
45 46
46 47
47 48
48 49
49 50
50 51
51 52
52 53
53 54
54 55
55 56
56 57
57 58
58 59
59 60
60 61
61 62
62 63
63 64
64 65
65 66
66 67
67 68
68 69
69 70
70 71
71 72
72 73
73 74
74 75
75 76
76 77
77 78
78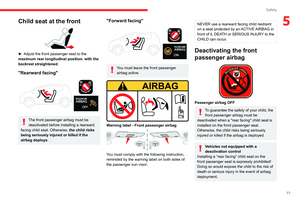 79
79 80
80 81
81 82
82 83
83 84
84 85
85 86
86 87
87 88
88 89
89 90
90 91
91 92
92 93
93 94
94 95
95 96
96 97
97 98
98 99
99 100
100 101
101 102
102 103
103 104
104 105
105 106
106 107
107 108
108 109
109 110
110 111
111 112
112 113
113 114
114 115
115 116
116 117
117 118
118 119
119 120
120 121
121 122
122 123
123 124
124 125
125 126
126 127
127 128
128 129
129 130
130 131
131 132
132 133
133 134
134 135
135 136
136 137
137 138
138 139
139 140
140 141
141 142
142 143
143 144
144 145
145 146
146 147
147 148
148 149
149 150
150 151
151 152
152 153
153 154
154 155
155 156
156 157
157 158
158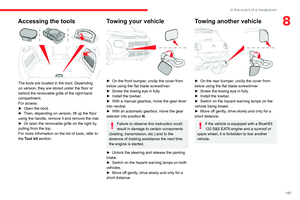 159
159 160
160 161
161 162
162 163
163 164
164 165
165 166
166 167
167 168
168 169
169 170
170 171
171 172
172 173
173 174
174 175
175 176
176 177
177 178
178 179
179 180
180 181
181 182
182 183
183 184
184 185
185 186
186 187
187 188
188 189
189 190
190 191
191 192
192 193
193 194
194 195
195 196
196 197
197 198
198 199
199 200
200 201
201 202
202 203
203 204
204 205
205 206
206 207
207 208
208 209
209 210
210 211
211 212
212 213
213 214
214 215
215 216
216 217
217 218
218 219
219 220
220 221
221 222
222 223
223 224
224 225
225 226
226 227
227 228
228 229
229 230
230 231
231 232
232 233
233 234
234 235
235 236
236 237
237 238
238 239
239 240
240 241
241 242
242 243
243