2021 CHRYSLER 300 center console
[x] Cancel search: center consolePage 33 of 268
GETTING TO KNOW YOUR VEHICLE 31
Rear Heated Seats — If Equipped
On some models, the two rear outboard seats may
be equipped with heated seats. There are two
heated seat switches that allow the rear
passengers to operate the seats independently.
The heated seat switches for each heater are
located on the rear of the center console. You can choose from HI, LO, or OFF heat settings.
A
m
ber indicator lights in each switch indicate the
level of heat in use. Two indicator lights will
illuminate for HI, one for LO and none for OFF.
Push the heated seat button once to turn the
HI setting on.
Push the heated seat button a second time
to turn the LO setting on.
Push the heated seat button a third time to
turn the heating elements off.
When the HI-level setting is selected, the heater
w i
ll provide a boosted heat level during the first
four minutes of operation. Then, the heat output
will drop to the normal HI-level. If the HI-level
setting is selected, the system will automatically
switch to LO-level after approximately 60 minutes
of
continuous operation. At that time, the number
of indicator lights changes from two to one,
indicating the change. The LO-level setting will turn
off automatically after approximately 45 minutes.
NOTE:
Once a heat setting is selected, heat will be felt
within two to five minutes.
The engine must be running for the heated
seats to operate.
FRONT VENTILATED SEATS —
I
F EQUIPPED
The ventilated seats are equipped with fans that
can be controlled through the climate and control
screen in the Uconnect system. The fans operate
at two speeds, HI and LO.
Press the ventilated seat button once to
choose HI.
Press the ventilated seat button a second
time to choose LO.
Press the ventilated seat button a third time
to turn the ventilated seat off.
WARNING!
Persons who are unable to feel pain to the
skin because of advanced age, chronic illness,
diabetes, spinal cord injury, medication,
alcohol use, exhaustion or other physical
condition must exercise care when using the
seat heater. It may cause burns even at low
temperatures, especially if used for long
periods of time.
Do not place anything on the seat or seatback
that insulates against heat, such as a blanket
or cushion. This may cause the seat heater to
overheat. Sitting in a seat that has been over -
heated could cause serious burns due to the
i n
creased surface temperature of the seat.
WARNING!
Persons who are unable to feel pain to the skin
because of advanced age, chronic illness,
diabetes, spinal cord injury, medication, alcohol
use, exhaustion or other physical condition
must exercise care when using the seat heater.
It may cause burns even at low temperatures,
especially if used for long periods of time.
Do not place anything on the seat or seatback
that insulates against heat, such as a blanket or
cushion. This may cause the seat heater to
overheat. Sitting in a seat that has been over -
heated could cause serious burns due to the
i n
creased surface temperature of the seat.
2
Page 39 of 268

GETTING TO KNOW YOUR VEHICLE 37
UNIVERSAL GARAGE DOOR OPENER
(HOMELINK®)
HomeLink® Buttons And Indicator Light
HomeLink® replaces up to three hand-held
transmitters that operate devices such as
garage door openers, motorized gates, lighting,
or home security systems. The HomeLink® unit
is powered by your vehicle’s 12 Volt battery.
The HomeLink® buttons that are located in the
overhead console or sunvisor designate the
three different HomeLink® channels.
To operate HomeLink®, push and release any
of the programmed HomeLink® buttons. These
buttons will activate the devices they are
programmed to with each press of the corre
-
sponding HomeLink® button.
The HomeLink® indicator light is located above
the center button.
BEFORE YOU BEGIN PROGRAMMING
H
OMELINK®
For efficient programming and accurate
transmission of the radio-frequency signal, it is
recommended that a new battery be placed in the
hand-held transmitter of the device that is being
programmed to the HomeLink® system. Make
sure your hand-held transmitter is programmed to
activate the device you are trying to program your
HomeLink® button to.
Ensure that your vehicle is parked outside of the
g a
rage before you begin programming.
It is recommended that you erase all the channels
of
your HomeLink® before you use it for the first
time.
ERASING ALL THE HOMELINK®
C
HANNELS
To erase the channels, follow this procedure:
1. P lace the ignition switch into the ON/RUN
p
osition.
2. Push and hold the two outside HomeLink® b
uttons (I and III) for up to 20 seconds, or until
the HomeLink® indicator light flashes.
NOTE:
Erasing all channels should only be performed
w h
en programming HomeLink® for the first time.
Do not erase channels when programming addi -
tional buttons.
IDENTIFYING WHETHER YOU HAVE A
R
OLLING CODE OR NON-ROLLING CODE
D
EVICE
Before programming a device to one of your
HomeLink® buttons, you must determine whether
the device has a rolling code or non-rolling code.
Rolling Code Devices
To determine if your device has a rolling code, a
g ood
indicator is its manufacturing date. Typically,
devices manufactured after 1995 have rolling
codes. A device with a rolling code will also have a
“LEARN” or “TRAIN” button located where the
antenna is attached to the device. The button may
not be immediately visible when looking at the
device. The name and color of the button may vary
slightly by manufacturer.
NOTE:
The “LEARN” or “TRAIN” button is not the button
y ou
normally use to operate the device.
Non-rolling Code Devices
Most devices manufactured before 1995 will not
h a
ve a rolling code. These devices will also not
have a “LEARN” or “TRAIN” button.
2
Page 46 of 268
44 GETTING TO KNOW YOUR VEHICLE
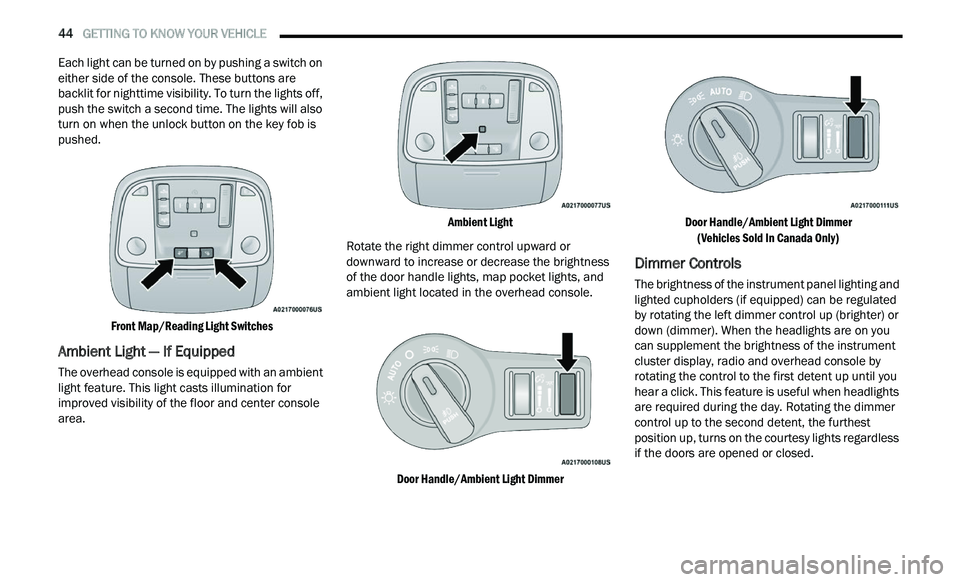
Each light can be turned on by pushing a switch on
either side of the console. These buttons are
backlit for nighttime visibility. To turn the lights off,
push the switch a second time. The lights will also
turn on when the unlock button on the key fob is
pushed.
Front Map/Reading Light Switches
Ambient Light — If Equipped
The overhead console is equipped with an ambient
light feature. This light casts illumination for
improved visibility of the floor and center console
area.
Ambient Light
Rotate the right dimmer control upward or
d ow
nward to increase or decrease the brightness
of the door handle lights, map pocket lights, and
ambient light located in the overhead console.
Door Handle/Ambient Light Dimmer Door Handle/Ambient Light Dimmer
(V
ehicles Sold In Canada Only)
Dimmer Controls
The brightness of the instrument panel lighting and
lighted cupholders (if equipped) can be regulated
by rotating the left dimmer control up (brighter) or
down (dimmer). When the headlights are on you
can supplement the brightness of the instrument
cluster display, radio and overhead console by
rotating the control to the first detent up until you
hear a click. This feature is useful when headlights
are required during the day. Rotating the dimmer
control up to the second detent, the furthest
position up, turns on the courtesy lights regardless
if the doors are opened or closed.
Page 54 of 268
52 GETTING TO KNOW YOUR VEHICLE
Console Features
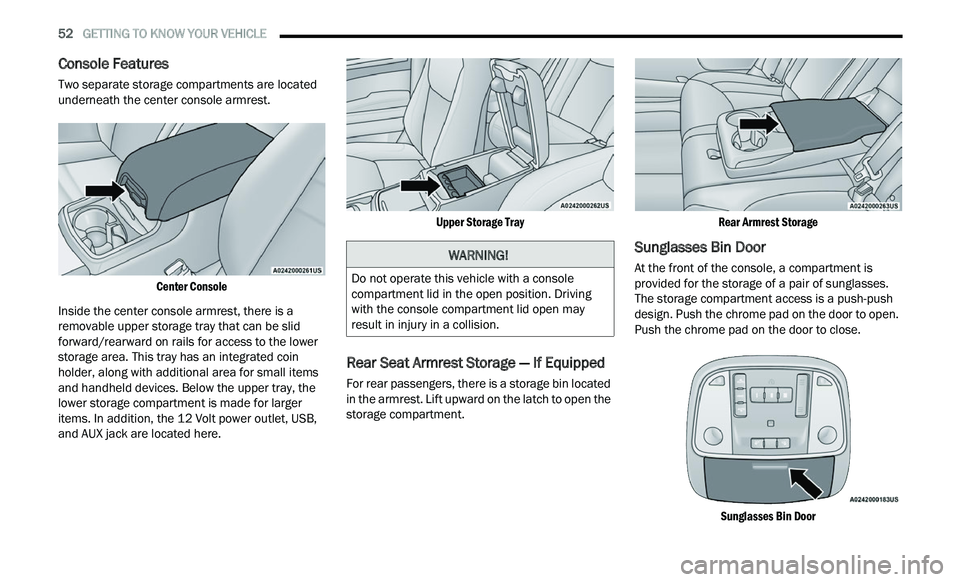
Two separate storage compartments are located
underneath the center console armrest.
Center Console
Inside the center console armrest, there is a
r e
movable upper storage tray that can be slid
forward/rearward on rails for access to the lower
storage area. This tray has an integrated coin
holder, along with additional area for small items
and handheld devices. Below the upper tray, the
lower storage compartment is made for larger
items. In addition, the 12 Volt power outlet, USB,
and AUX jack are located here.
Upper Storage Tray
Rear Seat Armrest Storage — If Equipped
For rear passengers, there is a storage bin located
in the armrest. Lift upward on the latch to open the
storage compartment.
Rear Armrest Storage
Sunglasses Bin Door
At the front of the console, a compartment is
provided for the storage of a pair of sunglasses.
The storage compartment access is a push-push
design. Push the chrome pad on the door to open.
Push the chrome pad on the door to close.
Sunglasses Bin Door
WARNING!
Do not operate this vehicle with a console
compartment lid in the open position. Driving
with the console compartment lid open may
result in injury in a collision.
Page 55 of 268

GETTING TO KNOW YOUR VEHICLE 53
USB/AUX CONTROL
This feature allows an external USB device to be
plugged into the USB port.
Plugging in a smartphone device to a USB port may
ac
tivate Android Auto™ or Apple CarPlay®
features, if equipped. For further information, refer
to “Android Auto™” or “Apple CarPlay®” in the
Owner’s Manual Supplement.
AUX/USB Ports
Located on the rear of the front center console are
du
al USB “Charge Only” ports. The USB “Charge
Only” ports will recharge battery operated USB
devices when connected.
Rear USB Charging Ports
LIGHTED CUPHOLDERS — IF EQUIPPED
On some vehicles, the front cupholders are
equipped with a light ring that illuminates the
cupholders for the front passengers.
Light Ring In Front Cupholder
The rear cupholders may also be equipped with a
li
ght ring that illuminates the cupholders for the
rear passengers. The light ring is controlled by the
Dimmer Control
Ú page 44.
Light Ring In Rear Cupholder
HEATED AND COOLED CUPHOLDERS —
I
F EQUIPPED
Your vehicle may be equipped with heated and
cooled cupholders. The cupholders are designed
to help keep warm beverages warm and cool
beverages cool.
1 — USB 1 Port
2 — AUX Jack
3 — USB 2 Port
2
Page 56 of 268
54 GETTING TO KNOW YOUR VEHICLE
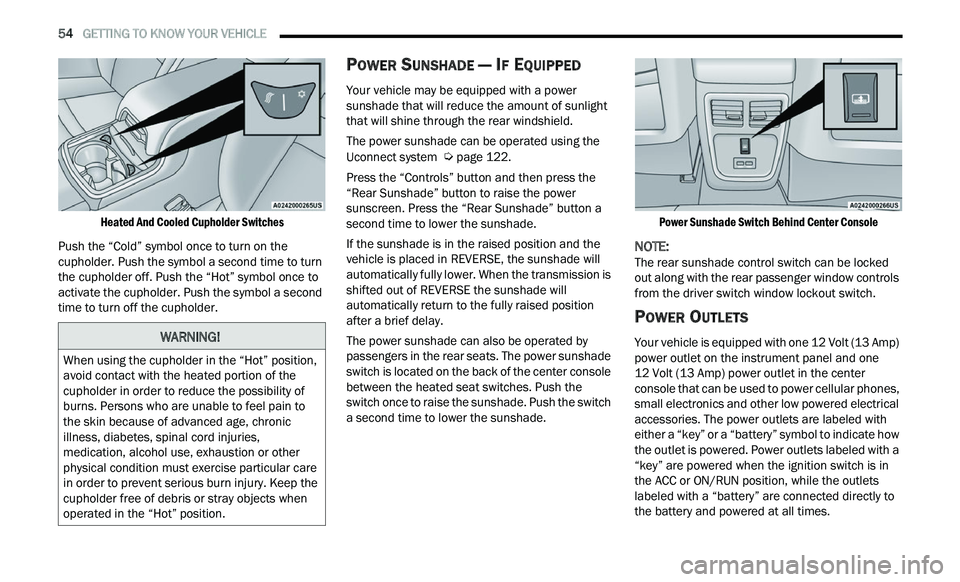
Heated And Cooled Cupholder Switches
Push the “Cold” symbol once to turn on the
cu
pholder. Push the symbol a second time to turn
the cupholder off. Push the “Hot” symbol once to
activate the cupholder. Push the symbol a second
time to turn off the cupholder.
POWER SUNSHADE — IF EQUIPPED
Your vehicle may be equipped with a power
sunshade that will reduce the amount of sunlight
that will shine through the rear windshield.
The power sunshade can be operated using the
U c
onnect system Ú page 122.
Press the “Controls” button and then press the
“ R
ear Sunshade” button to raise the power
sunscreen. Press the “Rear Sunshade” button a
second time to lower the sunshade.
If the sunshade is in the raised position and the
ve
hicle is placed in REVERSE, the sunshade will
automatically fully lower. When the transmission is
shifted out of REVERSE the sunshade will
automatically return to the fully raised position
after a brief delay.
The power sunshade can also be operated by
p a
ssengers in the rear seats. The power sunshade
switch is located on the back of the center console
between the heated seat switches. Push the
switch once to raise the sunshade. Push the switch
a second time to lower the sunshade.
Power Sunshade Switch Behind Center Console
NOTE:
The rear sunshade control switch can be locked
ou t
along with the rear passenger window controls
from the driver switch window lockout switch.
POWER OUTLETS
Your vehicle is equipped with one 12 Volt (13 Amp)
power outlet on the instrument panel and one
12 Volt (13 Amp) power outlet in the center
c on
sole that can be used to power cellular phones,
small electronics and other low powered electrical
accessories. The power outlets are labeled with
either a “key” or a “battery” symbol to indicate how
the outlet is powered. Power outlets labeled with a
“key” are powered when the ignition switch is in
the ACC or ON/RUN position, while the outlets
labeled with a “battery” are connected directly to
the battery and powered at all times.
WARNING!
When using the cupholder in the “Hot” position,
avoid contact with the heated portion of the
cupholder in order to reduce the possibility of
burns. Persons who are unable to feel pain to
the skin because of advanced age, chronic
illness, diabetes, spinal cord injuries,
medication, alcohol use, exhaustion or other
physical condition must exercise particular care
in order to prevent serious burn injury. Keep the
cupholder free of debris or stray objects when
operated in the “Hot” position.
Page 57 of 268
GETTING TO KNOW YOUR VEHICLE 55
NOTE:
All accessories connected to the “battery” powered
ou t
lets should be removed or turned off when the
vehicle is not in use to protect the battery against
discharge.
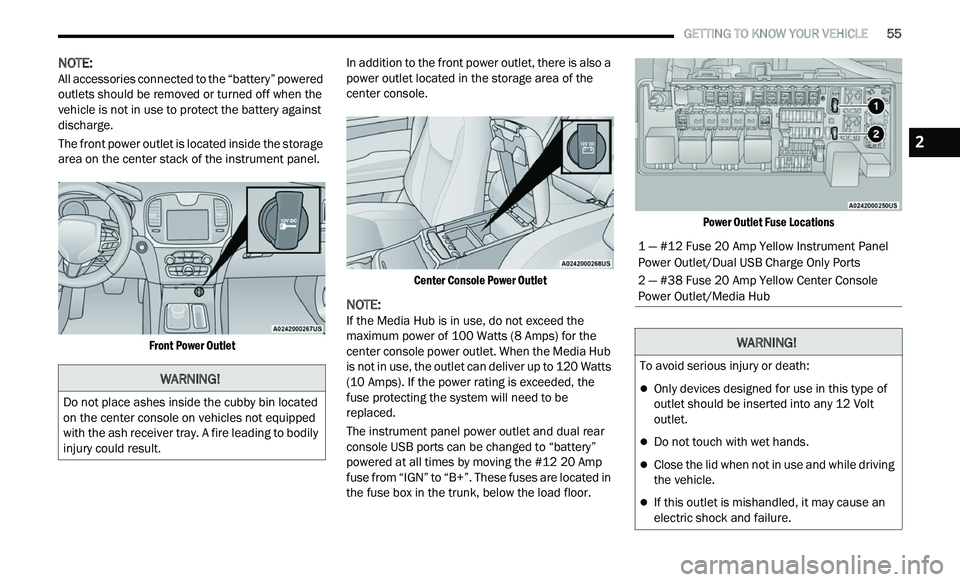
The front power outlet is located inside the storage
ar
ea on the center stack of the instrument panel.
Front Power Outlet
In addition to the front power outlet, there is also a
p
ow
er outlet located in the storage area of the
center console.
Center Console Power Outlet
NOTE:
If the Media Hub is in use, do not exceed the
m a
ximum power of 100 Watts (8 Amps) for the
center console power outlet. When the Media Hub
is not in use, the outlet can deliver up to 120 Watts
(10 Amps). If the power rating is exceeded, the
fuse protecting the system will need to be
replaced.
The instrument panel power outlet and dual rear
c on
sole USB ports can be changed to “battery”
powered at all times by moving the #12 20 Amp
fuse from “IGN” to “B+”. These fuses are located in
the fuse box in the trunk, below the load floor.
Power Outlet Fuse Locations
WARNING!
Do not place ashes inside the cubby bin located
on the center console on vehicles not equipped
with the ash receiver tray. A fire leading to bodily
injury could result.
1 — #12 Fuse 20 Amp Yellow Instrument Panel
Power Outlet/Dual USB Charge Only Ports
2 — #38 Fuse 20 Amp Yellow Center Console
Power Outlet/Media Hub
WARNING!
To avoid serious injury or death:
Only devices designed for use in this type of
outlet should be inserted into any 12 Volt
outlet.
Do not touch with wet hands.
Close the lid when not in use and while driving
the vehicle.
If this outlet is mishandled, it may cause an
electric shock and failure.
2
Page 89 of 268
STARTING AND OPERATING 87
BRAKE TRANSMISSION SHIFT
I
NTERLOCK (BTSI) SYSTEM
This vehicle is equipped with BTSI that holds the
transmission gear selector in PARK unless the
brakes are applied. To shift the transmission out of
PARK, the engine must be running and the brake
pedal must be pressed. The brake pedal must also
be pressed to shift from NEUTRAL into DRIVE or
REVERSE when the vehicle is stopped or moving at
low speeds.
8-SPEED AUTOMATIC TRANSMISSION
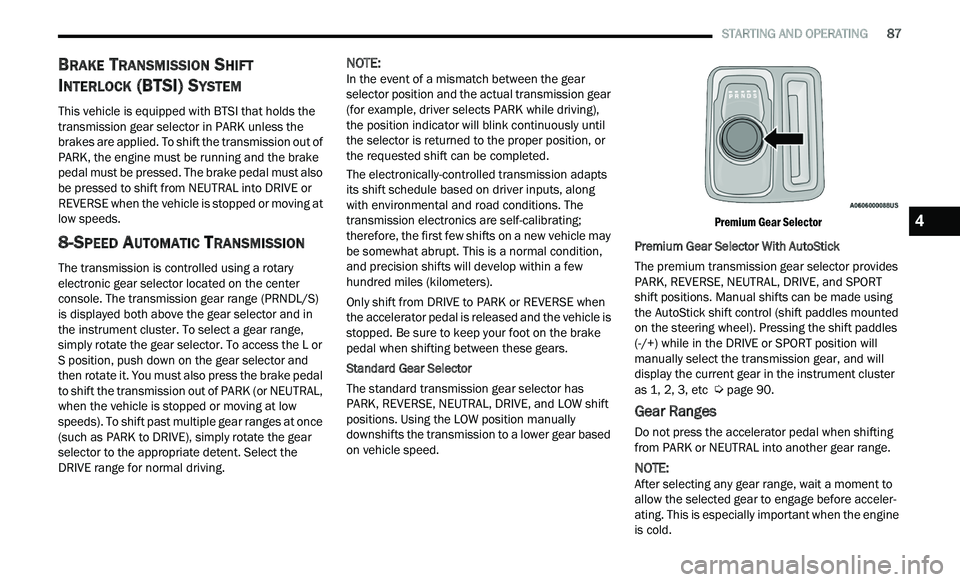
The transmission is controlled using a rotary
electronic gear selector located on the center
console. The transmission gear range (PRNDL/S)
is displayed both above the gear selector and in
the instrument cluster. To select a gear range,
simply rotate the gear selector. To access the L or
S position, push down on the gear selector and
then rotate it. You must also press the brake pedal
to shift the transmission out of PARK (or NEUTRAL,
when the vehicle is stopped or moving at low
speeds). To shift past multiple gear ranges at once
(such as PARK to DRIVE), simply rotate the gear
selector to the appropriate detent. Select the
DRIVE range for normal driving.
NOTE:
In the event of a mismatch between the gear
s e
lector position and the actual transmission gear
(for example, driver selects PARK while driving),
the position indicator will blink continuously until
the selector is returned to the proper position, or
the requested shift can be completed.
The electronically-controlled transmission adapts
it
s shift schedule based on driver inputs, along
with environmental and road conditions. The
transmission electronics are self-calibrating;
therefore, the first few shifts on a new vehicle may
be somewhat abrupt. This is a normal condition,
and precision shifts will develop within a few
hundred miles (kilometers).
Only shift from DRIVE to PARK or REVERSE when
t h
e accelerator pedal is released and the vehicle is
stopped. Be sure to keep your foot on the brake
pedal when shifting between these gears.
Standard Gear Selector
The standard transmission gear selector has
P A
RK, REVERSE, NEUTRAL, DRIVE, and LOW shift
positions. Using the LOW position manually
downshifts the transmission to a lower gear based
on vehicle speed.
Premium Gear Selector
Premium Gear Selector With AutoStick
The premium transmission gear selector provides
P A
RK, REVERSE, NEUTRAL, DRIVE, and SPORT
shift positions. Manual shifts can be made using
the AutoStick shift control (shift paddles mounted
on the steering wheel). Pressing the shift paddles
(-/+) while in the DRIVE or SPORT position will
manually select the transmission gear, and will
display the current gear in the instrument cluster
as 1, 2, 3, etc
Ú page 90.
Gear Ranges
Do not press the accelerator pedal when shifting
from PARK or NEUTRAL into another gear range.
NOTE:
After selecting any gear range, wait a moment to
a l
low the selected gear to engage before acceler -
ating. This is especially important when the engine
i s
cold.
4