2021 CHRYSLER 300 seats
[x] Cancel search: seatsPage 172 of 268
170 SAFETY
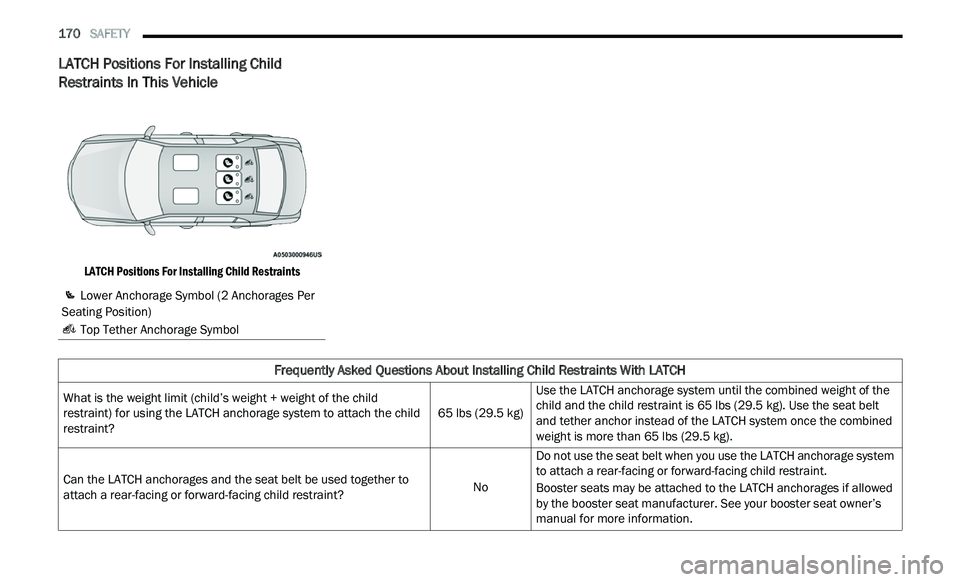
LATCH Positions For Installing Child
Restraints In This Vehicle
LATCH Positions For Installing Child Restraints
Lower Anchorage Symbol (2 Anchorages Per
Seating Position)
Top Tether Anchorage Symbol
Frequently Asked Questions About Installing Child Restraints With LATCH
What is the weight limit (child’s weight + weight of the child
restraint) for using the LATCH anchorage system to attach the child
restraint? 65 lbs (29.5 kg)Use the LATCH anchorage system until the combined weight of the
c
h
ild and the child restraint is 65 lbs (29.5 kg). Use the seat belt
and tether anchor instead of the LATCH system once the combined
weight is more than 65 lbs (29.5 kg).
Can the LATCH anchorages and the seat belt be used together to
a t
tach a rear-facing or forward-facing child restraint? NoDo not use the seat belt when you use the LATCH anchorage system
t
o
attach a rear-facing or forward-facing child restraint.
Booster seats may be attached to the LATCH anchorages if allowed
by
the booster seat manufacturer. See your booster seat owner’s
manual for more information.
Page 175 of 268
SAFETY 173
(Continued)
Installing Child Restraints Using The
Vehicle Seat Belt
Child restraint systems are designed to be secured
in vehicle seats by lap belts or the lap belt portion
of a lap/shoulder belt. The seat belts in the passenger seating positions
a
r
e equipped with a Switchable Automatic Locking
Retractor (ALR) that is designed to keep the lap
portion of the seat belt tight around the child
restraint so that it is not necessary to use a locking
clip. The ALR retractor can be “switched” into a
locked mode by pulling all of the webbing out of the
retractor and then letting the webbing retract back
into the retractor. If it is locked, the ALR will make
a clicking noise while the webbing is pulled back
into the retractor.
See the “Automatic Locking Mode” description
Ú page 157 for additional information on ALR.
Please see the table below and the following
s e
ctions for more information.
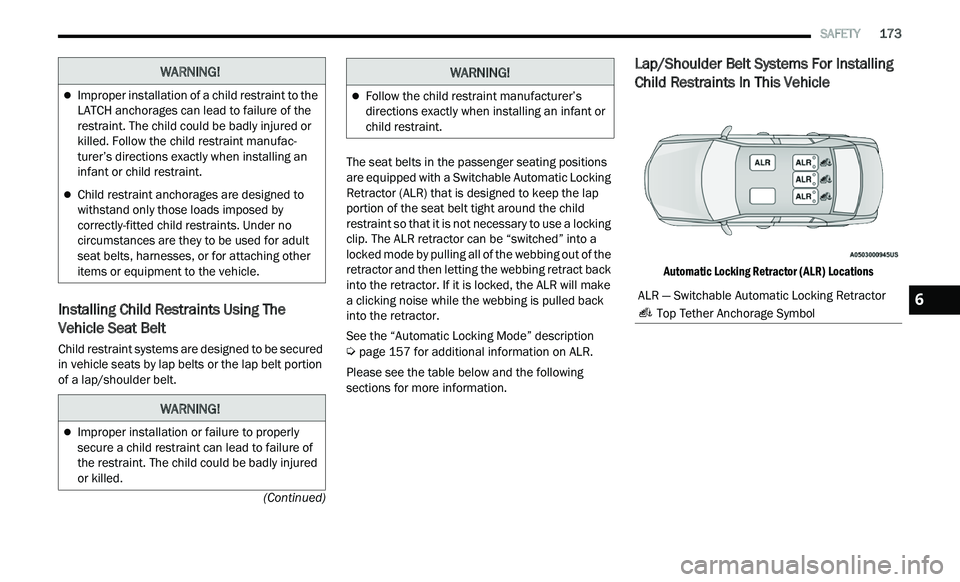
Lap/Shoulder Belt Systems For Installing
Child Restraints In This Vehicle
Automatic Locking Retractor (ALR) Locations
WARNING!
Improper installation of a child restraint to the
LATCH anchorages can lead to failure of the
restraint. The child could be badly injured or
killed. Follow the child restraint manufac -
turer’s directions exactly when installing an
in
fant or child restraint.
Child restraint anchorages are designed to
withstand only those loads imposed by
correctly-fitted child restraints. Under no
circumstances are they to be used for adult
seat belts, harnesses, or for attaching other
items or equipment to the vehicle.
WARNING!
Improper installation or failure to properly
secure a child restraint can lead to failure of
the restraint. The child could be badly injured
or killed.
Follow the child restraint manufacturer’s
directions exactly when installing an infant or
child restraint.
WARNING!
ALR — Switchable Automatic Locking Retractor
Top Tether Anchorage Symbol6
Page 176 of 268
174 SAFETY
Installing A Child Restraint With A
Switchable Automatic Locking Retractor
(ALR):
Child restraint systems are designed to be secured
in vehicle seats by lap belts or the lap belt portion
of a lap/shoulder belt.
1. P
lace the child seat in the center of the
s
eating position. If the second row seat can
be reclined, you may recline the seat and/or
raise the head restraint (if adjustable) to get a
better fit. If the rear seat can be moved
forward and rearward in the vehicle, you may
wish to move it to its rear-most position to
make room for the child seat. You may also
move the front seat forward to allow more
room for the child seat.
2. P ull enough of the seat belt webbing from the
r
etractor to pass it through the belt path of the
child restraint. Do not twist the belt webbing in
the belt path.
3. Slide the latch plate into the buckle until you h
ear a “click.” 4. P
ull on the webbing to make the lap portion
t
ight against the child seat.
5. To lock the seat belt, pull down on the shoulder p
art of the belt until you have pulled all the
seat belt webbing out of the retractor. Then,
allow the webbing to retract back into the
retractor. As the webbing retracts, you will hear
a clicking sound. This means the seat belt is
now in the Automatic Locking mode.
6. T ry to pull the webbing out of the retractor. If it
i
s locked, you should not be able to pull out any
webbing. If the retractor is not
locked, repeat
step 5.
Frequently Asked Questions About Installing Child Restraints With Seat Belts
What is the weight limit (child’s weight + weight of the child
restraint) for using the Tether Anchor with the seat belt to
attach a forward facing child restraint? Weight limit of the Child
Re
straint Always use the tether anchor when using the seat belt to
i
n
stall a forward facing child restraint, up to the recommended
weight limit of the child restraint.
Can the rear-facing child restraint touch the back of the front
p a
ssenger seat? YesContact between the front passenger seat and the child
r
e
straint is allowed, if the child restraint manufacturer also
allows contact.
Can the rear head restraints be removed? No
Can the buckle stalk be twisted to tighten the seat belt against
th
e belt path of the child restraint? NoDo not twist the buckle stalk in a seating position with an ALR
re
tractor.
WARNING!
Improper installation or failure to properly
secure a child restraint can lead to failure of
the restraint. The child could be badly injured
or killed.
Follow the child restraint manufacturer’s
directions exactly when installing an infant or
child restraint.
Page 178 of 268
176 SAFETY
4. Attach the tether strap hook of the child
restraint to the top tether anchorage as shown
in the diagram.
5. R emove slack in the tether strap according to
t
he child restraint manufacturer’s instructions.
Center Tether Attachment
1. If adjustable, lower the adjustable center head restraint to the full down position.
2. Route the tether strap over the seatback and h
ead restraint.
3. Attach the tether strap hook of the child r
estraint to the center tether anchorage
located in the panel between the rear
seatback and the rear window.
4. Remove slack in the tether strap according to t
he child restraint manufacturer’s instructions.
SAFETY TIPS
TRANSPORTING PASSENGERS
NEVER TRANSPORT PASSENGERS IN THE CARGO
AREA.
TRANSPORTING PETS
Air Bags deploying in the front seat could harm
your pet. An unrestrained pet will be thrown about
and possibly injured, or injure a passenger during
panic braking or in a collision. Pets should be restrained in the rear seat (if
e
q
uipped) in pet harnesses or pet carriers that are
secured by seat belts.
SAFETY CHECKS YOU SHOULD MAKE
I
NSIDE THE VEHICLE
Seat Belts
Inspect the seat belt system periodically, checking
for cuts, frays, and loose parts. Damaged parts
must be replaced immediately. Do not
disassemble or modify the system.
If your vehicle is involved in a collision, or if you
ha
ve questions regarding the seat belt or retractor
conditions, take your vehicle to an authorized FCA
dealer or authorized FCA Certified Collision Care
Program facility for inspection.
Air Bag Warning Light
The Air Bag Warning Light will turn on for four to
eight seconds as a bulb check when the ignition
s w
itch is first placed in the ON/RUN position. If the
light is either not on during starting, stays on, or
turns on while driving, have the system inspected at
an authorized dealer as soon as possible. After the
bulb check, this light will illuminate with a single
chime when a fault with the Air Bag System has
been detected. It will stay on until the fault is
removed. If the light comes on intermittently or
remains on while driving, have an authorized dealer
service the vehicle immediately
Ú
page 151.
WARNING!
An incorrectly anchored tether strap could
lead to increased head motion and possible
injury to the child. Use only the anchorage
position directly behind the child seat to
secure a child restraint top tether strap.
If your vehicle is equipped with a split rear
seat, make sure the tether strap does not slip
into the opening between the seatbacks as
you remove slack in the strap.
WARNING!
Do not leave children or animals inside parked
vehicles in hot weather. Interior heat build-up
may cause serious injury or death.
It is extremely dangerous to ride in a cargo
area, inside or outside of a vehicle. In a colli -
sion, people riding in these areas are more
l i
kely to be seriously injured or killed.
Do not allow people to ride in any area of your
vehicle that is not equipped with seats and
seat belts.
Be sure everyone in your vehicle is in a seat
and using a seat belt properly.
Page 221 of 268

SERVICING AND MAINTENANCE 219
F23 –10 Amp RedFuel Door * / Diagnostic Port
F24 –10 Amp RedIntegrated Center Stack
F25 –10 Amp RedTire Pressure Monitor System
F26 –15 Amp BlueTrans Mod (Charger Non- Police/300)
F27 –25 Amp ClearAmplifier *
F31 –25 Amp BreakerPower Seats *
F32 –15 Amp BlueHVAC Module/Cluster
F33 –15 Amp BlueIGN SW/Wireless Mod/Steer Clmn Lock Mod/Remote
S
t
art *
F34 –10 Amp RedSteering Column Module/Clock (300)
F35 –5 Amp TanBattery Sensor
F36 –15 Amp BlueActive Exhaust Valve *
F37 –20 Amp YellowRadio
F38 –20 Amp YellowMedia Hub / Console APO
F42 30 Amp Pink –Rear Defrost
F43 –20 Amp YellowRear Heated Seats * / Heated Steering Wheel *
F44 –10 Amp RedPark Assist / Blind Spot / Rear View Camera
F45 –15 Amp BlueCluster / Rearview Mirror / Lane Departure
F46 ––Spare
F47 –10 Amp RedAdaptive Front Lighting / Day Time Running Lamps *
Cavity Cartridge Fuse Mini-Fuse Description
* If Equipped
8
Page 222 of 268

220 SERVICING AND MAINTENANCE
F49 ––Spare
F50 ––Spare
F51 –20 Amp YellowFront Heated / Vented Seats *
F52 –10 Amp RedHeated/Cooled Cup Holders/Rear Heated Seat
Sw
itches *
F53 –10 Amp RedHVAC Module/In Vehicle Temperature Sensor
F54 ––Spare
F55 ––Spare
F56 ––Spare
F57 ––Spare
F58 –10 Amp RedAirbag Module
F59 –20 Amp YellowAdjustable Pedals – Police
F60 ––Spare
F61 ––Spare
F62 ––Spare
F63 ––Spare
F64 –25 Amp BreakerRear Windows (Charger/300)
F65 –10 Amp RedAirbag Module
F66 ––Spare
F67 –10 Amp RedRain and Light Sensor / Sunroof / Inside RearView
M
i
rror / Police Run Acc Relay
Cavity Cartridge Fuse Mini-Fuse Description
* If Equipped
Page 245 of 268
SERVICING AND MAINTENANCE 243
Special Care
If you drive on salted or dusty roads or if you
drive near the ocean, hose off the undercarriage
at least once a month.
It is important that the drain holes in the lower
edges of the doors, rocker panels, and trunk be
kept clear and open.
If you detect any stone chips or scratches in the
paint, touch them up immediately.
If your vehicle is damaged due to a collision or
similar cause that destroys the paint and protec -
tive coating, have your vehicle repaired as soon
a s
possible.
If you carry special cargo such as chemicals,
fertilizers, de-icer salt, etc., be sure that such
materials are well packaged and sealed.
If a lot of driving is done on gravel roads,
consider mud or stone shields behind each
wheel.
Use Mopar® Touch Up Paint on scratches as
soon as possible. An authorized dealer has
touch up paint to match the color of your
vehicle.
INTERIORS
SEATS AND FABRIC PARTS
Use Mopar® Total Clean to clean fabric upholstery
and carpeting.
Seat Belt Maintenance
Do not bleach, dye, or clean the belts with
chemical solvents or abrasive cleaners. This will
weaken the fabric.
If the belts need cleaning, use Mopar® Total
Cl
ean, a mild soap solution, or lukewarm water. Do
not remove the belts from the vehicle to wash
them. Dry with a soft cloth.
Sun damage can also weaken the fabric. Replace
th
e belts if they appear frayed or worn or if the
buckles do not work properly.
PLASTIC AND COATED PARTS
Use Mopar® Total Clean to clean vinyl upholstery.
WARNING!
Do not use volatile solvents for cleaning
purposes. Many are potentially flammable, and
if used in closed areas they may cause
respiratory harm.
WARNING!
A frayed or torn seat belt could rip apart in a col -
lision and leave you with no protection. Inspect
t h
e seat belt system periodically, checking for
cuts, frays, or loose parts. Damaged parts must
be replaced immediately. Do not disassemble or
modify the seat belt system. If your vehicle is
involved in a collision, or if you have questions
regarding seat belt or retractor conditions, take
your vehicle to an authorized FCA dealer or
authorized FCA Certified Collision Care Program
facility for inspection.
CAUTION!
Direct contact of air fresheners, insect repel -
lents, suntan lotions, or hand sanitizers to the
p l
astic, painted, or decorated surfaces of the
interior may cause permanent damage. Wipe
away immediately.
Damage caused by these type of products
may not be covered by your New Vehicle
Limited Warranty.
8
Page 246 of 268
244 SERVICING AND MAINTENANCE
Cleaning Plastic Instrument Cluster
Lenses
The lenses in front of the instruments in this
vehicle are molded in clear plastic. When cleaning
the lenses, care must be taken to avoid scratching
the plastic.
Clean with a wet soft cloth. A mild soap solution
ma
y be used, but do not use high alcohol content
or abrasive cleaners. If soap is used, wipe clean
with a clean damp cloth. Dry with a soft cloth.
LEATHER SURFACES
Mopar® Total Clean is specifically recommended
for leather upholstery.
Your leather upholstery can be best preserved by
re
gular cleaning with a damp soft cloth. Small
particles of dirt can act as an abrasive and damage
the leather upholstery and should be removed
promptly with a damp cloth. Stubborn soils can be
removed easily with a soft cloth and Mopar® Total
Clean. Care should be taken to avoid soaking your
leather upholstery with any liquid. Please do not
use polishes, oils, cleaning fluids, solvents,
detergents, or ammonia-based cleaners to clean
your leather upholstery.
NOTE:
If equipped with light colored leather, it tends to
s h
ow any foreign material, dirt, and fabric dye
transfer more so than darker colors. The leather is
designed for easy cleaning, and FCA recommends
Mopar® total care leather cleaner applied on a
cloth to clean the leather seats as needed.
GLASS SURFACES
All glass surfaces should be cleaned on a regular
basis with Mopar® Glass Cleaner, or any
commercial household-type glass cleaner. Never
use an abrasive type cleaner. Use caution when
cleaning the inside rear window equipped with
electric defrosters or windows equipped with radio
antennas. Do not use scrapers or other sharp
instruments that may scratch the elements.
When cleaning the rear view mirror, spray cleaner
on
the towel or cloth that you are using. Do not
spray cleaner directly on the mirror.
CAUTION!
Do not use Alcohol and Alcohol-based and/or
Ketone based cleaning products to clean leather
seats, as damage to the seat may result.