2021 CHRYSLER 300 weight
[x] Cancel search: weightPage 169 of 268
SAFETY 167
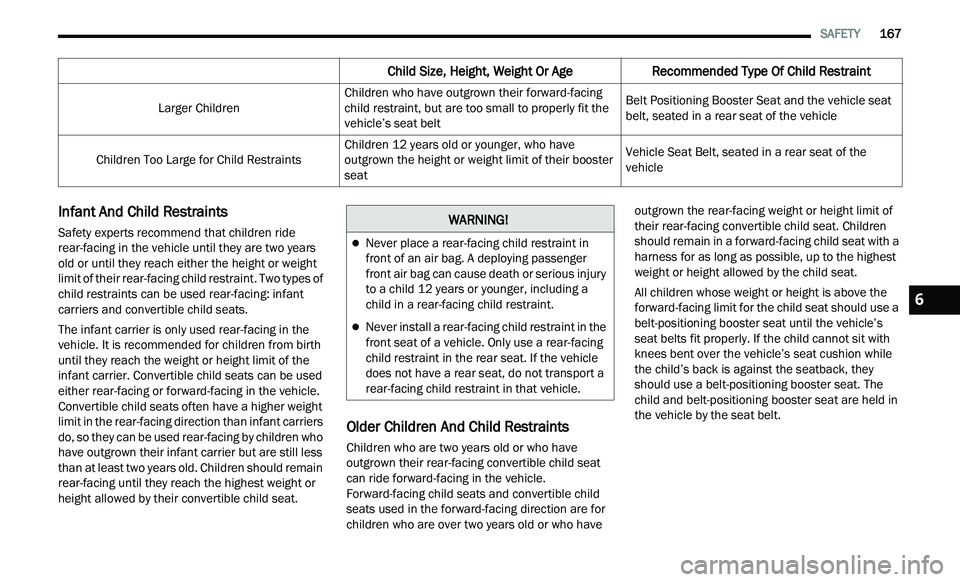
Infant And Child Restraints
Safety experts recommend that children ride
rear-facing in the vehicle until they are two years
old or until they reach either the height or weight
limit of their rear-facing child restraint. Two types of
child restraints can be used rear-facing: infant
carriers and convertible child seats.
The infant carrier is only used rear-facing in the
ve
hicle. It is recommended for children from birth
until they reach the weight or height limit of the
infant carrier. Convertible child seats can be used
either rear-facing or forward-facing in the vehicle.
Convertible child seats often have a higher weight
limit in the rear-facing direction than infant carriers
do, so they can be used rear-facing by children who
have outgrown their infant carrier but are still less
than at least two years old. Children should remain
rear-facing until they reach the highest weight or
height allowed by their convertible child seat.
Older Children And Child Restraints
Children who are two years old or who have
outgrown their rear-facing convertible child seat
can ride forward-facing in the vehicle.
Forward-facing child seats and convertible child
seats used in the forward-facing direction are for
children who are over two years old or who have outgrown the rear-facing weight or height limit of
their rear-facing convertible child seat. Children
should remain in a forward-facing child seat with a
harness for as long as possible, up to the highest
weight or height allowed by the child seat.
All children whose weight or height is above the
f
or
ward-facing limit for the child seat should use a
belt-positioning booster seat until the vehicle’s
seat belts fit properly. If the child cannot sit with
knees bent over the vehicle’s seat cushion while
the child’s back is against the seatback, they
should use a belt-positioning booster seat. The
child and belt-positioning booster seat are held in
the vehicle by the seat belt.
Larger Children
Children who have outgrown their forward-facing
c
h
ild restraint, but are too small to properly fit the
vehicle’s seat belt Belt Positioning Booster Seat and the vehicle seat
b
e
lt, seated in a rear seat of the vehicle
Children Too Large for Child Restraints Children 12 years old or younger, who have
ou
t
grown the height or weight limit of their booster
seat Vehicle Seat Belt, seated in a rear seat of the
v
e
hicle
Child Size, Height, Weight Or Age Recommended Type Of Child Restraint
WARNING!
Never place a rear-facing child restraint in
front of an air bag. A deploying passenger
front air bag can cause death or serious injury
to a child 12 years or younger, including a
child in a rear-facing child restraint.
Never install a rear-facing child restraint in the
front seat of a vehicle. Only use a rear-facing
child restraint in the rear seat. If the vehicle
does not have a rear seat, do not transport a
rear-facing child restraint in that vehicle.
6
Page 171 of 268
SAFETY 169
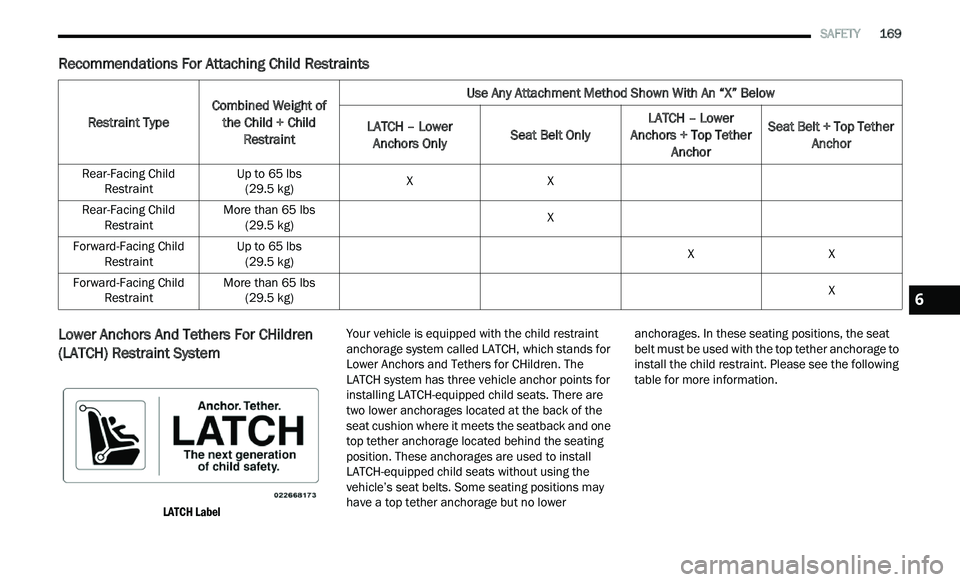
Recommendations For Attaching Child Restraints
Lower Anchors And Tethers For CHildren
(LA
TCH) Restraint System
LATCH Label
Your vehicle is equipped with the child restraint
a
n
chorage system called LATCH, which stands for
Lower Anchors and Tethers for CHildren. The
LATCH system has three vehicle anchor points for
installing LATCH-equipped child seats. There are
two lower anchorages located at the back of the
seat cushion where it meets the seatback and one
top tether anchorage located behind the seating
position. These anchorages are used to install
LATCH-equipped child seats without using the
vehicle’s seat belts. Some seating positions may
have a top tether anchorage but no lower anchorages. In these seating positions, the seat
belt must be used with the top tether anchorage to
install the child restraint. Please see the following
table for more information.
Restraint Type
Combined Weight of
th
e Child + Child Restraint Use Any Attachment Method Shown With An “X” Below
LATCH – Lower A n
chors Only Seat Belt Only LATCH – Lower
A n
chors + Top Tether Anchor Seat Belt + Top Tether
An
chor
Rear-Facing Child Restraint Up to 65 lbs
(2 9.5 kg) X
X
Rear-Facing Child Re
straint More than 65 lbs
(2 9.5 kg) X
Forward-Facing Child Re
straint Up to 65 lbs
(2 9.5 kg) X
X
Forward-Facing Child Re
straint More than 65 lbs
(2 9.5 kg) X
6
Page 172 of 268
170 SAFETY
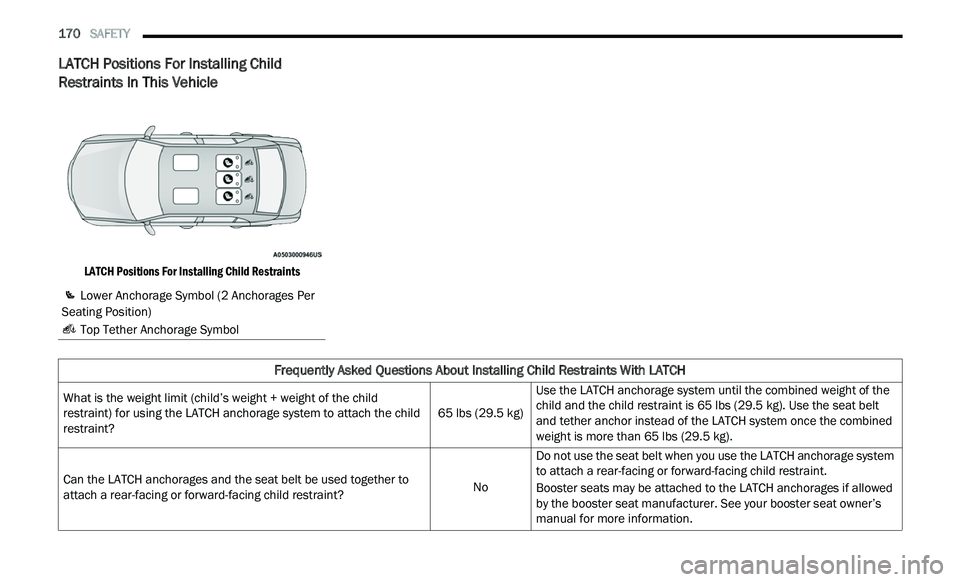
LATCH Positions For Installing Child
Restraints In This Vehicle
LATCH Positions For Installing Child Restraints
Lower Anchorage Symbol (2 Anchorages Per
Seating Position)
Top Tether Anchorage Symbol
Frequently Asked Questions About Installing Child Restraints With LATCH
What is the weight limit (child’s weight + weight of the child
restraint) for using the LATCH anchorage system to attach the child
restraint? 65 lbs (29.5 kg)Use the LATCH anchorage system until the combined weight of the
c
h
ild and the child restraint is 65 lbs (29.5 kg). Use the seat belt
and tether anchor instead of the LATCH system once the combined
weight is more than 65 lbs (29.5 kg).
Can the LATCH anchorages and the seat belt be used together to
a t
tach a rear-facing or forward-facing child restraint? NoDo not use the seat belt when you use the LATCH anchorage system
t
o
attach a rear-facing or forward-facing child restraint.
Booster seats may be attached to the LATCH anchorages if allowed
by
the booster seat manufacturer. See your booster seat owner’s
manual for more information.
Page 176 of 268
174 SAFETY
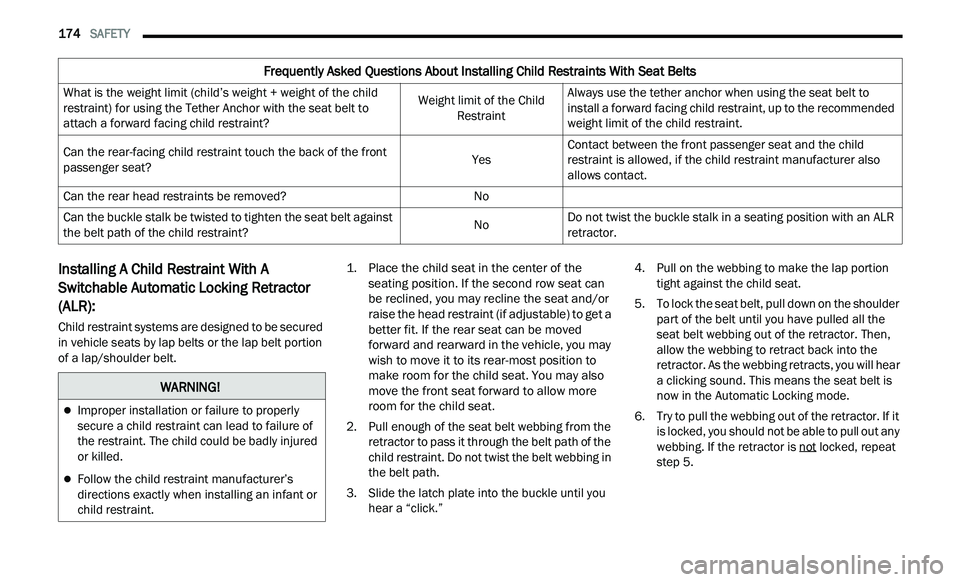
Installing A Child Restraint With A
Switchable Automatic Locking Retractor
(ALR):
Child restraint systems are designed to be secured
in vehicle seats by lap belts or the lap belt portion
of a lap/shoulder belt.
1. P
lace the child seat in the center of the
s
eating position. If the second row seat can
be reclined, you may recline the seat and/or
raise the head restraint (if adjustable) to get a
better fit. If the rear seat can be moved
forward and rearward in the vehicle, you may
wish to move it to its rear-most position to
make room for the child seat. You may also
move the front seat forward to allow more
room for the child seat.
2. P ull enough of the seat belt webbing from the
r
etractor to pass it through the belt path of the
child restraint. Do not twist the belt webbing in
the belt path.
3. Slide the latch plate into the buckle until you h
ear a “click.” 4. P
ull on the webbing to make the lap portion
t
ight against the child seat.
5. To lock the seat belt, pull down on the shoulder p
art of the belt until you have pulled all the
seat belt webbing out of the retractor. Then,
allow the webbing to retract back into the
retractor. As the webbing retracts, you will hear
a clicking sound. This means the seat belt is
now in the Automatic Locking mode.
6. T ry to pull the webbing out of the retractor. If it
i
s locked, you should not be able to pull out any
webbing. If the retractor is not
locked, repeat
step 5.
Frequently Asked Questions About Installing Child Restraints With Seat Belts
What is the weight limit (child’s weight + weight of the child
restraint) for using the Tether Anchor with the seat belt to
attach a forward facing child restraint? Weight limit of the Child
Re
straint Always use the tether anchor when using the seat belt to
i
n
stall a forward facing child restraint, up to the recommended
weight limit of the child restraint.
Can the rear-facing child restraint touch the back of the front
p a
ssenger seat? YesContact between the front passenger seat and the child
r
e
straint is allowed, if the child restraint manufacturer also
allows contact.
Can the rear head restraints be removed? No
Can the buckle stalk be twisted to tighten the seat belt against
th
e belt path of the child restraint? NoDo not twist the buckle stalk in a seating position with an ALR
re
tractor.
WARNING!
Improper installation or failure to properly
secure a child restraint can lead to failure of
the restraint. The child could be badly injured
or killed.
Follow the child restraint manufacturer’s
directions exactly when installing an infant or
child restraint.
Page 231 of 268
SERVICING AND MAINTENANCE 229
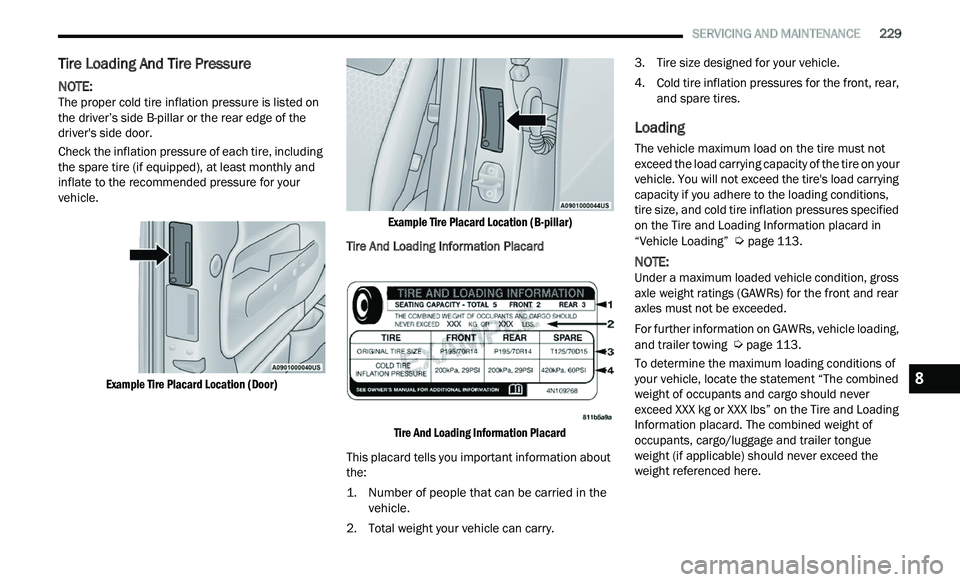
Tire Loading And Tire Pressure
NOTE:
The proper cold tire inflation pressure is listed on
t h
e driver’s side B-pillar or the rear edge of the
driver's side door.
Check the inflation pressure of each tire, including
t h
e spare tire (if equipped), at least monthly and
inflate to the recommended pressure for your
vehicle.
Example Tire Placard Location (Door) Example Tire Placard Location (B-pillar)
Tire And Loading Information Placard
Tire And Loading Information Placard
This placard tells you important information about
t h
e:
1. Number of people that can be carried in the ve
hicle.
2. Total weight your vehicle can carry. 3
. T
ire size designed for your vehicle.
4
. C old tire inflation pressures for the front, rear,
a
nd spare tires.
Loading
The vehicle maximum load on the tire must not
exceed the load carrying capacity of the tire on your
vehicle. You will not exceed the tire's load carrying
capacity if you adhere to the loading conditions,
tire size, and cold tire inflation pressures specified
on the Tire and Loading Information placard in
“Vehicle Loading”
Ú page 113.
NOTE:
Under a maximum loaded vehicle condition, gross
a x
le weight ratings (GAWRs) for the front and rear
axles must not be exceeded.
For further information on GAWRs, vehicle loading,
a n
d trailer towing Ú page 113.
To determine the maximum loading conditions of
y ou
r vehicle, locate the statement “The combined
weight of occupants and cargo should never
exceed XXX kg or XXX lbs” on the Tire and Loading
Information placard. The combined weight of
occupants, cargo/luggage and trailer tongue
weight (if applicable) should never exceed the
weight referenced here.8
Page 232 of 268
230 SERVICING AND MAINTENANCE
Steps For Determining Correct Load
Limit—
(1) Locate the statement “The combined
we
ight of occupants and cargo should
never exceed XXX kg or XXX lbs.” on your
vehicle's placard.
(2) Determine the combined weight of
th
e driver and passengers that will be
riding in your vehicle.
(3) Subtract the combined weight of the
dri
ver and passengers from XXX kg or
XXX lbs.
(4) The resulting figure equals the
av
ailable amount of cargo and luggage
load capacity. For example, if “XXX”
amount equals 1400 lbs. and there will
be five 150 lb passengers in your
vehicle, the amount of available cargo
and luggage load capacity is 650 lbs.
(1400-750 (5x150) = 650 lbs.) (5) Determine the combined weight of
l
u
ggage and cargo being loaded on the
vehicle. That weight may not safely
exceed the available cargo and luggage
load capacity calculated in Step 4.
(6) If your vehicle will be towing a trailer,
lo
ad from your trailer will be transferred
to your vehicle. Consult this manual to
determine how this reduces the
available cargo and luggage load
capacity of your vehicle.
Metric Example For Load Limit
For example, if “XXX” amount equals 635 kg and
t h
ere will be five 68 kg passengers in your vehicle,
the amount of available cargo and luggage load
capacity is 295 kg (635-340 (5x68) = 295 kg) as
shown in step 4.
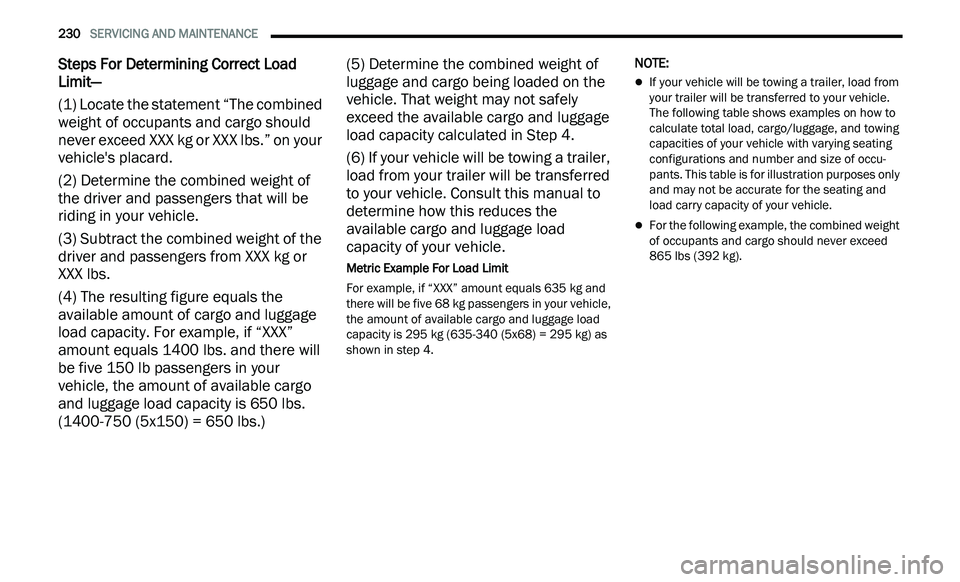
NOTE:
If your vehicle will be towing a trailer, load from
your trailer will be transferred to your vehicle.
The following table shows examples on how to
calculate total load, cargo/luggage, and towing
capacities of your vehicle with varying seating
configurations and number and size of occu -
pants. This table is for illustration purposes only
a n
d may not be accurate for the seating and
load carry capacity of your vehicle.
For the following example, the combined weight
of occupants and cargo should never exceed
865 lbs (392 kg).
Page 260 of 268

258
Fluid, Brake...................................................250Fog Lights........................................................42Fold-Flat Seats.................................................27Folding Rear Seats..........................................27Forward Collision Warning.............................146Four-Way Hazard Flasher...............................179Freeing A Stuck Vehicle.................................192Fuel...............................................................246Additives...................................................246Clean Air....................................................246Ethanol......................................................247Gasoline....................................................246Gauge..........................................................75Materials Added........................................246Methanol...................................................247Octane Rating.................................246, 249Requirements...........................................246Specifications............................................249Tank Capacity............................................248Fuses.............................................................214
G
Garage Door Opener (HomeLink)....................37Gasoline, Clean Air........................................246Gasoline, Reformulated.................................246Gauges
Fuel.............................................................75Gear Ranges....................................................87Glass Cleaning...............................................244
Gross Axle Weight Rating.....................113, 114Gross Vehicle Weight Rating................113, 114GVWR............................................................113
H
HazardDriving Through Flowing, Rising, Or
Shallow Standing Water
.......................120Hazard Warning Flashers..............................179Head Restraints........................................32, 33Head Rests...............................................32, 33Headlights....................................................222Automatic....................................................41Cleaning...................................................242High Beam/Low Beam Select Switch..........41Lights On Reminder.....................................42On With Wipers............................................42Passing........................................................41Switch..........................................................40Time Delay...................................................42Washers...................................................201Heated Mirrors.................................................36Heated Seats...................................................30Heater, Engine Block.......................................84High Beam/Low Beam Select (Dimmer)
Switch..............................................................41Hill Start Assist..............................................141Hitches Trailer Towing...........................................115
Holder, Coin.....................................................52HomeLink (Garage Door Opener).....................37Hood Prop........................................................59Hood Release...................................................59
I
Ignition.............................................................15Switch..........................................................15Inside Rearview Mirror...........................34, 179Instrument Cluster....................................64, 66Descriptions.................................................78Display..................................................66, 68Instrument Panel Lens Cleaning...................244Interior Appearance Care..............................243Interior Lights...................................................43
J
Jack Location................................................183Jack Operation..............................................184Jacking Instructions......................................184Jump Starting.......................................186, 187
K
Key FobArm The System
...........................................18Unlatch The Trunk.......................................13Key Fob Battery Service (Remote Keyless
Entry)...............................................................13
Page 264 of 268

262
Starting............................................................81Automatic Transmission..............................81Button.........................................................15Cold Weather..............................................83Engine Fails To Start...................................83Starting And Operating....................................81Starting Procedures.........................................81Steering...........................................................23Column Lock...............................................23Power..........................................................92Tilt Column...........................................23, 24Wheel, Heated.............................................24Wheel, Tilt............................................23, 24Storage..........................................................242Storage, Vehicle......................................50, 242Storing Your Vehicle......................................242Stuck, Freeing...............................................192Sun Roof..........................................................58Sunglasses Storage.........................................52Supplemental Restraint System – Air Bag.....159Synthetic Engine Oil.......................................203
T
Telescoping Steering Column...................23, 24Temperature Control, Automatic (ATC)............49Tilt Steering Column.................................23, 24Time Delay
Headlight.....................................................42Tire And Loading Information Placard...........229
Tire Markings................................................225Tire Safety Information.................................225Tires...................................177, 232, 236, 241Aging (Life Of Tires)..................................234Air Pressure..............................................232Chains......................................................239Changing.........................................182, 184Compact Spare.........................................236General Information........................232, 236High Speed...............................................233Inflation Pressure.....................................232Jacking.....................................................184Life Of Tires..............................................234Load Capacity...........................................229Pressure Monitoring System (TPMS)..76, 148Quality Grading.........................................241Radial.......................................................233Replacement............................................235Rotation....................................................240Safety..............................................225, 232Sizes.........................................................226Snow Tires................................................236Spare Tires.............................183, 236, 237Spinning...................................................234Trailer Towing...........................................117Tread Wear Indicators..............................234Wheel Nut Torque.....................................245To Open Hood..................................................59Tongue Weight/Trailer Weight......................116
Towing...........................................................114Behind A Motorhome................................119Disabled Vehicle.......................................193Guide........................................................116Recreational.............................................119Weight......................................................116Towing Behind A Motorhome........................119Traction.........................................................119Traction Control............................................142Trailer Towing................................................114Hitches.....................................................115Minimum Requirements...........................116Tips...........................................................118Trailer And Tongue Weight........................116Wiring.......................................................118Trailer Towing Guide.....................................116Trailer Weight................................................116Transfer CaseFluid.................................................213, 250Maintenance............................................213Transmission....................................................87Automatic..........................................87, 212Fluid..........................................................250Maintenance............................................212Shifting........................................................85Transporting Pets..........................................176Tread Wear Indicators...................................234Trunk Lid (Deck Lid).........................................60Trunk Release Remote Control........................60
Turn Signals..............................................43, 78