2021 CHRYSLER 300 open hood
[x] Cancel search: open hoodPage 5 of 268

3
EXTERIOR LIGHTS ................................................. 40
Headlight Switch.. .............................................40
Multifunction Lever . . ........................................40
Daytime Running Lights (DRLs). . .....................41
High/Low Beam Switch. . ..................................41
Automatic High Beam — If Equipped . . ...........41
Flash-To-Pass. . ..................................................41
Automatic Headlights . . ....................................41
Parking Lights . . ................................................41
Headlights On With Wipers . . ............................42
Adaptive Bi-Xenon High Intensity Discharge
Headlights — If Equipped . .
...............................42
Headlight Time Delay . . .....................................42
Lights-On Reminder . . .......................................42
Fog Lights — If Equipped . . ................................42
Turn Signals . . ....................................................43
Lane Change Assist — If Equipped . . ................43
INTERIOR LIGHTS . . ............................................... 43
Interior Courtesy Lights .. ..................................43
WINDSHIELD WIPERS AND WASHERS . . ............ 45
Windshield Wiper Operation .. ..........................45
Rain Sensing Wipers — If Equipped . . .............46
CLIMATE CONTROLS . . .......................................... 47
Automatic Climate Control Descriptions And
Functions . .........................................................47
A
utomatic Temperature Control (ATC) . . .........49
Climate Voice Commands. . ..............................50
Operating Tips . . ...............................................50 INTERIOR STORAGE AND EQUIPMENT .
.
............. 51
Storage..............................................................51
U SB/AUX Control . . ...........................................53
Lighted Cupholders — If Equipped . . ................53
Heated And Cooled Cupholders —
If Equipped . .
.....................................................53
Power Sunshade — If Equipped . . ....................54
Power Outlets . . .................................................54
WINDOWS . . ............................................................56
Power Window Controls .. .................................56
Automatic Window Features . . ........................56
Reset Auto-Up . . ................................................57
Window Lockout Switch . . .................................57
Wind Buffeting . . ...............................................57
PANORAMIC SUNROOF — IF EQUIPPED . . ...........58
Opening And Closing The Sunroof.. .................58
Pinch Protect Feature . . ....................................58
Venting Sunroof. . ..............................................59
Opening And Closing The Power Shade. . ........59
Sunroof Maintenance . . ....................................59
Ignition Off Operation. . .....................................59
HOOD . .....................................................................59
O pening The Hood.. ..........................................59
Closing The Hood . . ...........................................60
TRUNK . ...................................................................60
O pening The Trunk .. .........................................60
Closing The Trunk. . ...........................................60
Trunk Safety . . ...................................................61
Cargo Area Features . . .....................................61
LOAD LEVELING SYSTEM — IF EQUIPPED . . .......63
GETTING TO KNOW YOUR
INSTRUMENT PANEL
INSTRUMENT CLUSTER ........................................ 64
Instrument Cluster Descriptions .. .................. 66
INSTRUMENT CLUSTER DISPLAY . . ...................... 66
Location And Controls.. .................................... 66
Engine Oil Life Reset . . ..................................... 67
Instrument Cluster Display Selectable
Menu Items . .
.................................................... 68
Battery Saver On/Battery Saver Mode
Message — Electrical Load Reduction
Actions — If Equipped . .
.................................... 70
Programmable Features . . ................................ 71
WARNING LIGHTS AND MESSAGES . . ................. 71
Red Warning Lights .. ........................................72
Yellow Warning Lights . . .................................... 74
Yellow Indicator Lights . . ................................... 77
Green Indicator Lights . . ................................... 77
White Indicator Lights . . .................................... 78
Blue Indicator Lights . . ...................................... 78
ONBOARD DIAGNOSTIC SYSTEM — OBD II . . ...... 79
Onboard Diagnostic System
(OBD II) Cybersecurity . .
.................................... 79
EMISSIONS INSPECTION AND MAINTENANCE
PROGRAMS . .
.......................................................... 79
Page 20 of 268

18 GETTING TO KNOW YOUR VEHICLE
In warm weather, the driver vented seat feature
will turn on when Remote Start is activated, if
programmed in the Comfort menu screen. The
vehicle will adjust the climate control settings
depending on the outside ambient temperature.
Automatic Temperature Control (ATC) —
If Equipped
The climate controls will be automatically adjusted
t o
the optimal temperature and mode settings
depending on the outside ambient temperature.
This will occur until the ignition is placed in the ON/
RUN position where the climate controls will
resume their previous settings.
Manual Temperature Control (MTC) — If Equipped
In ambient temperatures at 40°F (4.5°C) or
below, the climate settings will default to
maximum heat, with fresh air entering the
cabin. If the front defrost timer expires, the
vehicle will enter Mix Mode.
In ambient temperatures from 40°F (4.5°C) to
78°F (26°C), the climate settings will be based
on the last settings selected by the driver.
In ambient temperatures at 78°F (26°C) or
above, the climate settings will default to MAX
A/C, Bi-Level Mode, with Recirculation on.
For more information on ATC, MTC, and climate
c on
trol settings, see Ú page 47.
NOTE:
These features will stay on through the duration of
R e
mote Start until the ignition is placed in the ON/
RUN position. The climate control settings will
change if manually adjusted by the driver while the
vehicle is in Remote Start mode, and exit auto -
matic override. This includes the OFF button on the
c l
imate controls, which will turn the system off.
REMOTE START CANCEL MESSAGE
The following messages will display in the
instrument cluster display if the vehicle fails to
remote start or exits Remote Start prematurely:
Remote Start Aborted — Door Open
Remote Start Aborted — Hood Open
Remote Start Aborted — Fuel Low
Remote Start Aborted — Trunk Open
Remote Start Disabled — Start Vehicle To Reset
Remote Start Aborted — Too Cold
Remote Start Aborted — Time Expired
The instrument cluster display message stays
a c
tive until the ignition is placed in the ON/RUN
position
VEHICLE SECURITY SYSTEM — IF EQUIPPED
The Vehicle Security system monitors the vehicle
doors, hood, trunk, and the Keyless Enter ‘n Go™
— Ignition for unauthorized operation. While the Vehicle Security system is armed, interior switches
for door locks and trunk release are disabled. If
something triggers the alarm, the Vehicle Security
system will provide the following audible and
visible signals:
The horn will pulse
The turn signals will flash
The Vehicle Security Light in the instrument
cluster will flash
TO ARM THE SYSTEM
Follow these steps to arm the Vehicle Security
system:
1. Make sure the vehicle’s ignition is placed in
t
he OFF position.
2. Perform one of the following methods to lock t
he vehicle:
Push lock on the interior power door lock
switch with the driver and/or passenger
door open.
Push the lock button on the exterior Passive
Entry door handle with a valid key fob avail -
able in the same exterior zone
Ú page 20.
Push the lock button on the key fob.
3. I f any doors are open, close them.
Page 61 of 268
GETTING TO KNOW YOUR VEHICLE 59
VENTING SUNROOF
Push and release the "Vent" button within one-half
second and the sunroof will open to the vent
position. This is called “Express Vent”, and it will
occur regardless of sunroof position. During
Express Vent operation, any movement of the
switch will stop the sunroof.
NOTE:
If the sunshade is in the closed position when the
v e
nt switch is pushed, the sunshade will automati -
cally cycle to the halfway open position prior to the
s u
nroof opening to the Vent position.
OPENING AND CLOSING THE POWER
S
HADE
Express Open/Close
Push the shade switch rearward and release it
w i
thin one-half second and the shade will
automatically open to the halfway position and
stop automatically. Push the switch again to fully
open the shade.
Push the switch forward and release it within
on e
-half second and the shade will close
automatically from any position.
During Express Open or Express Close operation,
a n
y other movement of the shade switch will stop
the shade. Manual Open/Close
To open the shade, push and hold the switch
r
e
arward. The shade will open and stop
automatically at the half-open position. Push and
hold the switch again and the shade will fully open.
To close the shade, push and hold the switch in the
for
ward position.
Any release of the switch will stop the movement
an
d the shade will remain in a partially closed
condition until the switch is pushed again.
SUNROOF MAINTENANCE
Use only a non-abrasive cleaner and a soft cloth to
clean the glass panel. Periodically check for and
clear out any debris that may have collected in the
tracks.
IGNITION OFF OPERATION
The power sunroof switch can remain active in
Accessory Delay for up to approximately
10 minutes after the vehicle’s ignition is placed to
th
e OFF position. Opening either front door will
cancel this feature.
This feature is programmable using the Uconnect
s y
stem Ú page 122.
HOOD
OPENING THE HOOD
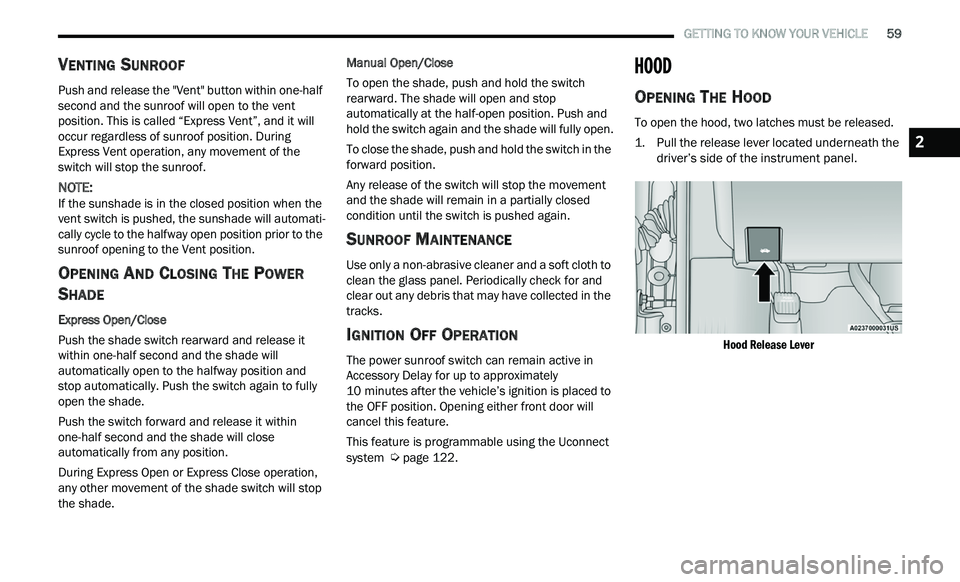
To open the hood, two latches must be released.
1. P ull the release lever located underneath the
d
river’s side of the instrument panel.
Hood Release Lever
2
Page 62 of 268
60 GETTING TO KNOW YOUR VEHICLE
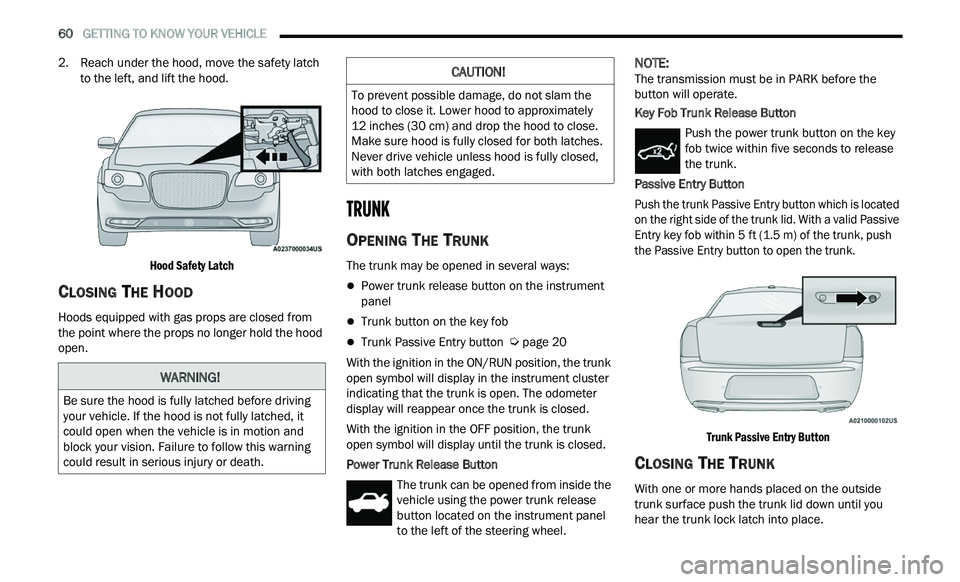
2. Reach under the hood, move the safety latch
to the left, and lift the hood.
Hood Safety Latch
CLOSING THE HOOD
Hoods equipped with gas props are closed from
the point where the props no longer hold the hood
open.
TRUNK
OPENING THE TRUNK
The trunk may be opened in several ways:
Power trunk release button on the instrument
panel
Trunk button on the key fob
Trunk Passive Entry button Ú page 20
With the ignition in the ON/RUN position, the trunk
op e
n symbol will display in the instrument cluster
indicating that the trunk is open. The odometer
display will reappear once the trunk is closed.
With the ignition in the OFF position, the trunk
ope
n symbol will display until the trunk is closed.
Power Trunk Release Button The trunk can be opened from inside the
vehicle using the power trunk release
bu
tton located on the instrument panel
to the left of the steering wheel.
NOTE:
The transmission must be in PARK before the
b u
tton will operate.
Key Fob Trunk Release Button
Push the power trunk button on the key
fob twice within five seconds to release
th
e trunk.
Passive Entry Button
Push the trunk Passive Entry button which is located
o n
the right side of the trunk lid. With a valid Passive
Entry key fob within 5 ft (1.5 m) of the trunk, push
th
e Passive Entry button to open the trunk.
Trunk Passive Entry Button
CLOSING THE TRUNK
With one or more hands placed on the outside
trunk surface push the trunk lid down until you
hear the trunk lock latch into place.
WARNING!
Be sure the hood is fully latched before driving
your vehicle. If the hood is not fully latched, it
could open when the vehicle is in motion and
block your vision. Failure to follow this warning
could result in serious injury or death.
CAUTION!
To prevent possible damage, do not slam the
hood to close it. Lower hood to approximately
12 inches (30 cm) and drop the hood to close.
Ma
ke sure hood is fully closed for both latches.
Never drive vehicle unless hood is fully closed,
with both latches engaged.
Page 76 of 268
74 GETTING TO KNOW YOUR INSTRUMENT PANEL
Trunk Open Warning Light
This indicator will illuminate when the
trunk is open and not fully closed.
NOTE:
If the vehicle is moving, there will also be a single
c h
ime.
Oil Pressure Warning Light
This warning light will illuminate to
indicate low engine oil pressure. If the
li
ght turns on while driving, stop the
vehicle, shut off the engine as soon as
possible, and contact an authorized dealer. A
chime will sound when this light turns on.
Do not operate the vehicle until the cause is
c or
rected. This light does not indicate how much oil
is in the engine. The engine oil level must be
checked under the hood.
Oil Temperature Warning Light
This warning light will illuminate to
indicate the engine oil temperature is
h i
gh. If the light turns on while driving,
stop the vehicle and shut off the engine
as soon as possible. Wait for oil temperature to
return to normal levels.
Transmission Temperature Warning Light
— If Equipped
This warning light will illuminate to warn
of a high transmission fluid temperature.
T h
is may occur with strenuous usage
such as trailer towing. If this light turns
on, stop the vehicle and run the engine at idle or
slightly faster, with the transmission in PARK or
NEUTRAL, until the light turns off. Once the light
turns off, you may continue to drive normally.
Vehicle Security Warning Light —
If Equipped
This light will flash at a fast rate for
approximately 15 seconds when the
V e
hicle Security system is arming, and
then will flash slowly until the vehicle is
disarmed.
YELLOW WARNING LIGHTS
Service Adaptive Cruise Control Warning
Light — If Equipped
This light will turn on when a ACC is not
operating and needs service Ú page 94.
Anti-Lock Brake System (ABS) Warning
Light
This warning light monitors the ABS. The
light will turn on when the ignition is
p
l
aced in the ON/RUN or ACC/ON/RUN
position and may stay on for as long as
four seconds.
If the ABS light remains on or turns on while
dr
iving, then the Anti-Lock portion of the brake
system is not functioning and service is required as
soon as possible. However, the conventional brake
system will continue to operate normally,
assuming the Brake Warning Light is not also on.
WARNING!
If you continue operating the vehicle when the
Transmission Temperature Warning Light is
illuminated you could cause the fluid to boil over,
come in contact with hot engine or exhaust
components and cause a fire.
CAUTION!
Continuous driving with the Transmission
Temperature Warning Light illuminated will
eventually cause severe transmission damage
or transmission failure.
Page 189 of 268
IN CASE OF EMERGENCY 187
PREPARATIONS FOR JUMP START
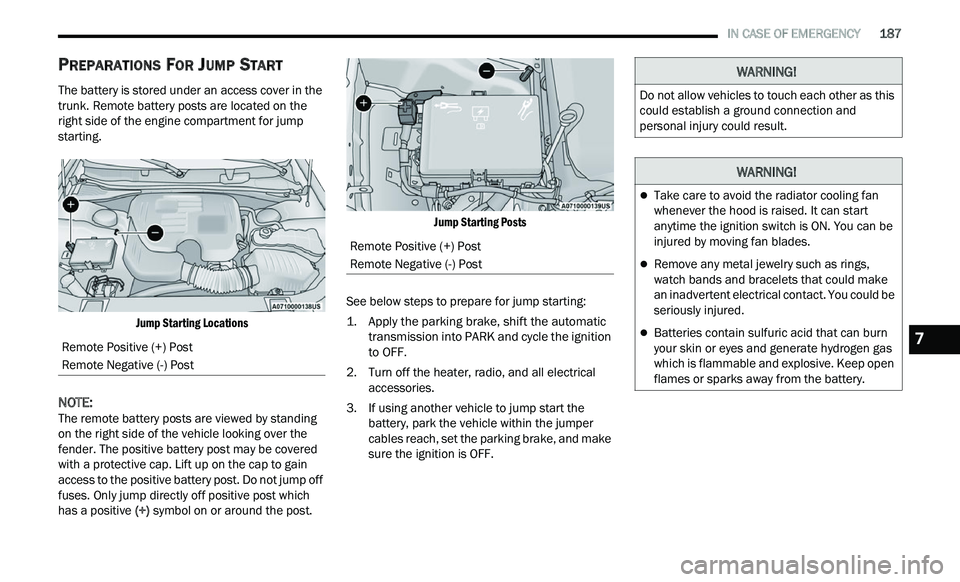
The battery is stored under an access cover in the
trunk. Remote battery posts are located on the
right side of the engine compartment for jump
starting.
Jump Starting Locations
NOTE:
The remote battery posts are viewed by standing
on
the right side of the vehicle looking over the
fender. The positive battery post may be covered
with a protective cap. Lift up on the cap to gain
access to the positive battery post. Do not jump off
fuses. Only jump directly off positive post which
has a positive (+) symbol on or around the post.
Jump Starting Posts
See below steps to prepare for jump starting:
1. Apply the parking brake, shift the automatic t
ransmission into PARK and cycle the ignition
to OFF.
2. T urn off the heater, radio, and all electrical
a
ccessories.
3. If using another vehicle to jump start the b
attery, park the vehicle within the jumper
cables reach, set the parking brake, and make
sure the ignition is OFF.
Remote Positive (+) Post
Remote Negative (-) Post
Remote Positive (+) Post
Remote Negative (-) Post
WARNING!
Do not allow vehicles to touch each other as this
could establish a ground connection and
personal injury could result.
WARNING!
Take care to avoid the radiator cooling fan
whenever the hood is raised. It can start
anytime the ignition switch is ON. You can be
injured by moving fan blades.
Remove any metal jewelry such as rings,
watch bands and bracelets that could make
an inadvertent electrical contact. You could be
seriously injured.
Batteries contain sulfuric acid that can burn
your skin or eyes and generate hydrogen gas
which is flammable and explosive. Keep open
flames or sparks away from the battery.7
Page 192 of 268
190 IN CASE OF EMERGENCY
IF YOUR ENGINE OVERHEATS
If the vehicle is overheating, it will need to be
serviced by an authorized dealer.
In any of the following situations, you can reduce
th
e potential for overheating by taking the
appropriate action.
On the highways — slow down.
In city traffic — while stopped, place the trans -
mission in NEUTRAL, but do not increase the
e n
gine idle speed while preventing vehicle
motion with the brakes.
NOTE:
There are steps that you can take to slow down an
i m
pending overheat condition:
If your Air Conditioner (A/C) is on, turn it off. The
A/C system adds heat to the engine cooling
system and turning the A/C off can help remove
this heat.
You can also turn the temperature control to
maximum heat, the mode control to floor and
the blower control to high. This allows the heater
core to act as a supplement to the radiator and
aids in removing heat from the engine cooling
system.
MANUAL PARK RELEASE
To move the vehicle in cases where the
transmission will not shift out of PARK (such as a
depleted battery), a Manual Park Release is
available.
WARNING!
You or others can be badly burned by hot engine
coolant (antifreeze) or steam from your radiator. If
you see or hear steam coming from under the
hood, do not open the hood until the radiator has
had time to cool. Never try to open a cooling
system pressure cap when the radiator or coolant
bottle is hot.
CAUTION!
Driving with a hot cooling system could damage
your vehicle. If the temperature gauge reads HOT
(H), pull over and stop the vehicle. Idle the vehicle
with the air conditioner turned off until the pointer
drops back into the normal range. If the pointer
remains on HOT (H), and you hear continuous
chimes, turn the engine off immediately and call
for service.
WARNING!
Always secure your vehicle by fully applying the
parking brake before activating the Manual Park
Release. In addition, you should be seated in the
driver's seat with your foot firmly on the brake
pedal when activating the Manual Park Release.
Activating the Manual Park Release will allow
your vehicle to roll away if it is not secured by the
parking brake, or by proper connection to a tow
vehicle. Activating the Manual Park Release on
an unsecured vehicle could lead to serious
injury or death for those in or around the vehicle.
Page 211 of 268
SERVICING AND MAINTENANCE 209
In unusual situations involving grossly
malfunctioning engine operation, a scorching odor
may suggest severe and abnormal catalyst
overheating. If this occurs, stop the vehicle, turn off
the engine and allow it to cool. Service, including a
tune-up to manufacturer's specifications, should
be obtained immediately.
To minimize the possibility of catalytic converter
da
mage:
Do not shut off the engine or interrupt the igni -
tion when the transmission is in gear and the
v e
hicle is in motion.
Do not try to start the engine by pushing or
towing the vehicle.
Do not idle the engine with any spark plug wires
disconnected or removed, such as when diag -
nostic testing, or for prolonged periods during
ve
ry rough idle or malfunctioning operating
conditions.
NOTE:
Your vehicle’s exhaust system may be equipped
w i
th an Electronic Exhaust Valve (EEV) system, if
the exhaust system is replaced with aftermarket
products a Malfunction Indicator Lamp (MIL) will
illuminate.
COOLING SYSTEM
Coolant Checks
Check engine coolant (antifreeze) protection every
12 months (before the onset of freezing weather,
w h
ere applicable). If the engine coolant is dirty, the
system should be drained, flushed, and refilled
with fresh Organic Additive Technology (OAT)
coolant (conforming to MS.90032) by an authorized dealer. Check the front of the radiator
for any accumulation of bugs, leaves, etc. If dirty,
clean by gently spraying water from a garden hose
vertically down the face of the condenser.
Check the coolant recovery bottle tubing for brittle
r
u
bber, cracking, tears, cuts, and tightness of the
connection at the bottle and radiator. Inspect the
entire system for leaks. DO NOT REMOVE THE
COOLANT PRESSURE CAP WHEN THE COOLING
SYSTEM IS HOT.
Cooling System — Drain, Flush And Refill
NOTE:
Some vehicles require special tools to add coolant
p r
operly. Failure to fill these systems properly
could lead to severe internal engine damage. If any
coolant is needed to be added to the system
please contact an authorized dealer.
If the engine coolant (antifreeze) is dirty or
c on
tains visible sediment, have an authorized
dealer clean and flush with Organic Additive
Technology (OAT) coolant (conforming to
MS.90032).
For the proper maintenance intervals
Ú page 195.
WARNING!
You or others can be badly burned by hot
engine coolant (antifreeze) or steam from your
radiator. If you see or hear steam coming from
under the hood, do not open the hood until the
radiator has had time to cool. Never open a
cooling system pressure cap when the radi
-
ator or coolant bottle is hot.
Keep hands, tools, clothing, and jewelry away
from the radiator cooling fan when the hood is
raised. The fan starts automatically and may
start at any time, whether the engine is
running or not.
When working near the radiator cooling fan,
disconnect the fan motor lead or turn the igni -
tion to the OFF mode. The fan is temperature
c on
trolled and can start at any time the igni -
tion is in the ON mode.
8