2021 CHRYSLER 300 trunk release
[x] Cancel search: trunk releasePage 14 of 268

12
GETTING TO KNOW YOUR VEHICLE
KEYS
KEY FOB
Your vehicle is equipped with a key fob which
supports Passive Entry, Remote Keyless Entry
(RKE), Keyless Enter ‘n Go™ (if equipped), Remote
Start (if equipped), and remote trunk release. The
key fob allows you to lock or unlock the doors and
trunk from distances up to approximately 66
ft
( 2
0 m). The key fob does not need to be pointed at
t h
e vehicle to activate the system. The key fob also
contains an emergency key, which is stored in the
rear of the key fob.
NOTE:
The key fob’s wireless signal may be blocked if
the key fob is located next to a mobile phone,
laptop, or other electronic device. This may
result in poor performance.
With ignition in the ON position and the vehicle
moving at 2 mph (4 km/h), all RKE commands
a r
e disabled.
Key Fob
In case the ignition switch does not change with
t
h
e push of a button, the key fob may have a low or
fully depleted battery. A low key fob battery can be
verified by referring to the instrument cluster,
which will display directions to follow
Ú page 254.
To Lock/Unlock The Doors And Trunk
Push and release the unlock button on the key fob
once to unlock the driver’s door, or twice within five
seconds to unlock all the doors and the trunk. To
lock all the doors and the trunk, push the lock
button once.
When the doors are unlocked, the turn signals will
fl
ash and the illuminated entry system will be
activated. When the doors are locked, the turn
signals will flash and the horn will chirp.
1 — Unlock
2 — Trunk Open
3 — Lock
4 — Remote Start
5 — PANIC Button
6 — Emergency Key
Page 15 of 268

GETTING TO KNOW YOUR VEHICLE 13
NOTE:
If the vehicle is unlocked by Passive Entry and
no door is opened within 60 seconds, the
vehicle will relock and the security system will
arm (if equipped).
If one or more doors are open, or the trunk is
open, the doors will lock. The doors will unlock
automatically if the key fob is left inside the
passenger compartment, otherwise the doors
will stay locked.
All doors can be programmed to unlock on the first
p u
sh of the unlock button through Uconnect
Settings
Ú page 122.
NOTE:
When you use the key fob to open any door, the
c ou
rtesy lights, overhead lights, and approach
lighting in the outside mirrors (if equipped) will turn
on
Ú page 43.
To Unlatch The Trunk
Push the trunk button on the key fob two times
within five seconds to unlatch the trunk.
Replacing The Battery In The Key Fob
The recommended replacement battery is one
CR2032 battery.
NOTE:
Customers are recommended to use a battery
obtained from Mopar®. Aftermarket coin battery dimensions may not meet the original
OEM coin battery dimensions.
Perchlorate Material — special handling may
apply. See
www.dtsc.ca.gov/hazardouswaste/
perchlorate for further information.
Do not touch the battery terminals that are on
the back housing or the printed circuit board.
1. Remove the emergency key (2) by sliding the e
mergency key release (1) on the back of the
key fob and pulling the emergency key out
with your other hand.
Emergency Key Removal
2. S
eparate the key fob halves using a #2 flat
b
lade screwdriver or a coin, and gently pry the
two halves of the key fob apart. Make sure not
to damage the seal during removal.
Separating Case With A Coin
Key Fob Battery Replacement
1 — Emergency Key Release Button
2 — Emergency Key
2
Page 19 of 268

GETTING TO KNOW YOUR VEHICLE 17
For security, power window operation is
disabled when the vehicle is in the Remote Start
mode.
Remote Start can only be used twice. The igni -
tion must be placed in the ON/RUN position
b e
fore the Remote Start sequence can be
repeated for a third cycle.
All of the following conditions must be met before
t h
e engine will remote start:
Gear selector in PARK
Doors closed
Hood closed
Trunk closed
Hazard switch off
Brake switch inactive (brake pedal not pressed)
Battery at an acceptable charge level
PANIC button not pushed
System not disabled from previous Remote
Start event
Vehicle Security Light is flashing
Ignition in OFF position
Fuel level meets minimum requirement
Vehicle Security system is not signaling an intru -
sion
Malfunction Indicator Light is not illuminated
TO EXIT REMOTE START MODE
To drive the vehicle after starting the Remote Start
system, either push and release the unlock button
on the key fob to unlock the doors, or unlock the
vehicle using Keyless Enter ‘n Go™ — Passive Entry
via the door handles, and disarm the Vehicle
Security system (if equipped). Then, prior to the
end of the 15 minute cycle, push and release the
S T
ART/STOP ignition button.
The Remote Start system will turn the engine off
wi
th another push and release of the Remote Start
button on the key fob, or if the engine is allowed to
run for the entire 15 minute cycle. Once the
i g
nition is placed in the ON/RUN position, the
climate controls will resume the previously set
operations (temperature, blower control, etc.).
NOTE:
To avoid unintentional shutdowns, the system
will disable for two seconds after receiving a
valid Remote Start request.
For vehicles equipped with the Keyless Enter ‘n
Go™ — Passive Entry feature, the message
“Remote Start Active — Push Start Button” will
display in the instrument cluster display until
you push the START/STOP ignition button.
REMOTE START FRONT DEFROST
A
CTIVATION — IF EQUIPPED
When Remote Start is active, and the outside
ambient temperature is 40°F (4.5°C) or below, the
system will automatically activate front defrost for
15 minutes or less. The time is dependent on the
a m
bient temperature. Once the timer expires, the
system will automatically adjust the settings
depending on ambient conditions. See “Remote
Start Comfort Systems — If Equipped” in the next
section for detailed operation.
REMOTE START COMFORT SYSTEMS —
I
F EQUIPPED
When Remote Start is activated, the front and rear
defrost will automatically turn on in cold weather.
The heated steering wheel and driver heated seat
feature will turn on if selected in the comfort menu
screen within Uconnect Settings
Ú page 122.
WARNING!
Do not start or run an engine in a closed
garage or confined area. Exhaust gas contains
Carbon Monoxide (CO) which is odorless and
colorless. Carbon Monoxide is poisonous and
can cause serious injury or death when
inhaled.
Keep key fobs away from children. Operation
of the Remote Start system, windows, door
locks or other controls could cause serious
injury or death.
2
Page 20 of 268

18 GETTING TO KNOW YOUR VEHICLE
In warm weather, the driver vented seat feature
will turn on when Remote Start is activated, if
programmed in the Comfort menu screen. The
vehicle will adjust the climate control settings
depending on the outside ambient temperature.
Automatic Temperature Control (ATC) —
If Equipped
The climate controls will be automatically adjusted
t o
the optimal temperature and mode settings
depending on the outside ambient temperature.
This will occur until the ignition is placed in the ON/
RUN position where the climate controls will
resume their previous settings.
Manual Temperature Control (MTC) — If Equipped
In ambient temperatures at 40°F (4.5°C) or
below, the climate settings will default to
maximum heat, with fresh air entering the
cabin. If the front defrost timer expires, the
vehicle will enter Mix Mode.
In ambient temperatures from 40°F (4.5°C) to
78°F (26°C), the climate settings will be based
on the last settings selected by the driver.
In ambient temperatures at 78°F (26°C) or
above, the climate settings will default to MAX
A/C, Bi-Level Mode, with Recirculation on.
For more information on ATC, MTC, and climate
c on
trol settings, see Ú page 47.
NOTE:
These features will stay on through the duration of
R e
mote Start until the ignition is placed in the ON/
RUN position. The climate control settings will
change if manually adjusted by the driver while the
vehicle is in Remote Start mode, and exit auto -
matic override. This includes the OFF button on the
c l
imate controls, which will turn the system off.
REMOTE START CANCEL MESSAGE
The following messages will display in the
instrument cluster display if the vehicle fails to
remote start or exits Remote Start prematurely:
Remote Start Aborted — Door Open
Remote Start Aborted — Hood Open
Remote Start Aborted — Fuel Low
Remote Start Aborted — Trunk Open
Remote Start Disabled — Start Vehicle To Reset
Remote Start Aborted — Too Cold
Remote Start Aborted — Time Expired
The instrument cluster display message stays
a c
tive until the ignition is placed in the ON/RUN
position
VEHICLE SECURITY SYSTEM — IF EQUIPPED
The Vehicle Security system monitors the vehicle
doors, hood, trunk, and the Keyless Enter ‘n Go™
— Ignition for unauthorized operation. While the Vehicle Security system is armed, interior switches
for door locks and trunk release are disabled. If
something triggers the alarm, the Vehicle Security
system will provide the following audible and
visible signals:
The horn will pulse
The turn signals will flash
The Vehicle Security Light in the instrument
cluster will flash
TO ARM THE SYSTEM
Follow these steps to arm the Vehicle Security
system:
1. Make sure the vehicle’s ignition is placed in
t
he OFF position.
2. Perform one of the following methods to lock t
he vehicle:
Push lock on the interior power door lock
switch with the driver and/or passenger
door open.
Push the lock button on the exterior Passive
Entry door handle with a valid key fob avail -
able in the same exterior zone
Ú page 20.
Push the lock button on the key fob.
3. I f any doors are open, close them.
Page 62 of 268

60 GETTING TO KNOW YOUR VEHICLE
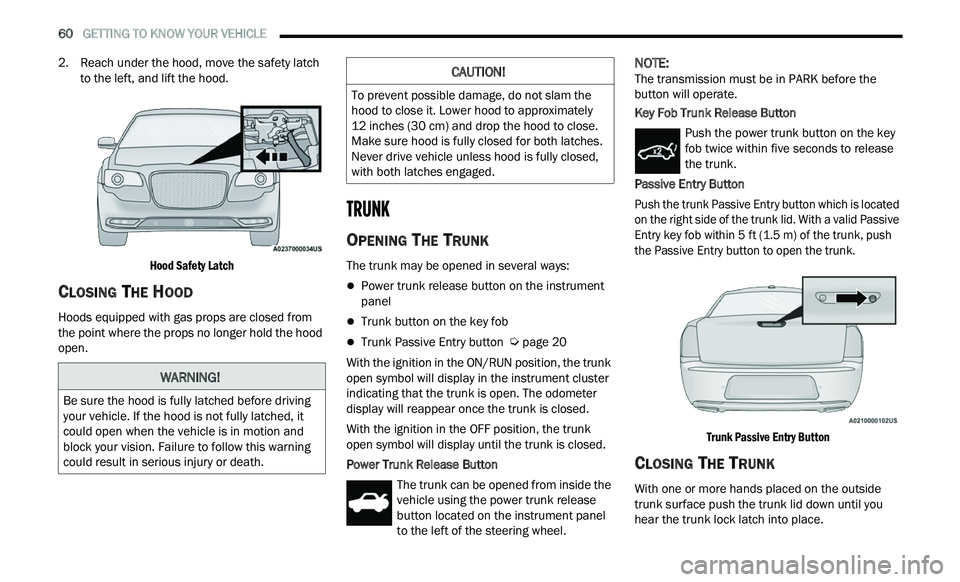
2. Reach under the hood, move the safety latch
to the left, and lift the hood.
Hood Safety Latch
CLOSING THE HOOD
Hoods equipped with gas props are closed from
the point where the props no longer hold the hood
open.
TRUNK
OPENING THE TRUNK
The trunk may be opened in several ways:
Power trunk release button on the instrument
panel
Trunk button on the key fob
Trunk Passive Entry button Ú page 20
With the ignition in the ON/RUN position, the trunk
op e
n symbol will display in the instrument cluster
indicating that the trunk is open. The odometer
display will reappear once the trunk is closed.
With the ignition in the OFF position, the trunk
ope
n symbol will display until the trunk is closed.
Power Trunk Release Button The trunk can be opened from inside the
vehicle using the power trunk release
bu
tton located on the instrument panel
to the left of the steering wheel.
NOTE:
The transmission must be in PARK before the
b u
tton will operate.
Key Fob Trunk Release Button
Push the power trunk button on the key
fob twice within five seconds to release
th
e trunk.
Passive Entry Button
Push the trunk Passive Entry button which is located
o n
the right side of the trunk lid. With a valid Passive
Entry key fob within 5 ft (1.5 m) of the trunk, push
th
e Passive Entry button to open the trunk.
Trunk Passive Entry Button
CLOSING THE TRUNK
With one or more hands placed on the outside
trunk surface push the trunk lid down until you
hear the trunk lock latch into place.
WARNING!
Be sure the hood is fully latched before driving
your vehicle. If the hood is not fully latched, it
could open when the vehicle is in motion and
block your vision. Failure to follow this warning
could result in serious injury or death.
CAUTION!
To prevent possible damage, do not slam the
hood to close it. Lower hood to approximately
12 inches (30 cm) and drop the hood to close.
Ma
ke sure hood is fully closed for both latches.
Never drive vehicle unless hood is fully closed,
with both latches engaged.
Page 63 of 268

GETTING TO KNOW YOUR VEHICLE 61
(Continued)
NOTE:
Before closing the trunk lid make sure your key fob
i s
n’t inside the trunk area. The trunk will latch then
automatically unlock if the key fob is detected, not
allowing the key fob to be locked in the trunk area.
TRUNK SAFETY
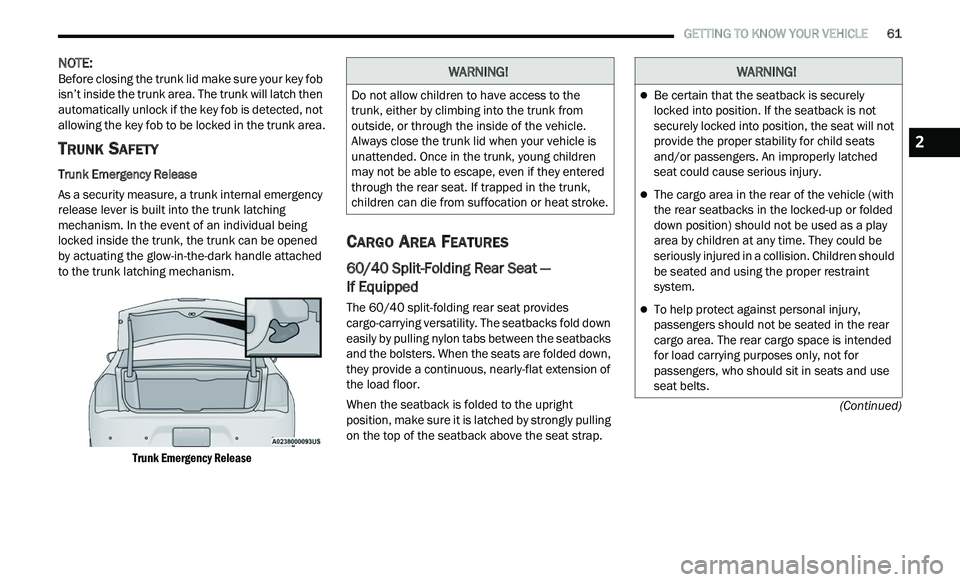
Trunk Emergency Release
As a security measure, a trunk internal emergency
r e
lease lever is built into the trunk latching
mechanism. In the event of an individual being
locked inside the trunk, the trunk can be opened
by actuating the glow-in-the-dark handle attached
to the trunk latching mechanism.
Trunk Emergency Release
CARGO AREA FEATURES
60/40 Split-Folding Rear Seat —
If Equipped
The 60/40 split-folding rear seat provides
cargo-carrying versatility. The seatbacks fold down
easily by pulling nylon tabs between the seatbacks
and the bolsters. When the seats are folded down,
they provide a continuous, nearly-flat extension of
the load floor.
When the seatback is folded to the upright
pos
ition, make sure it is latched by strongly pulling
on the top of the seatback above the seat strap.
WARNING!
Do not allow children to have access to the
trunk, either by climbing into the trunk from
outside, or through the inside of the vehicle.
Always close the trunk lid when your vehicle is
unattended. Once in the trunk, young children
may not be able to escape, even if they entered
through the rear seat. If trapped in the trunk,
children can die from suffocation or heat stroke.
WARNING!
Be certain that the seatback is securely
locked into position. If the seatback is not
securely locked into position, the seat will not
provide the proper stability for child seats
and/or passengers. An improperly latched
seat could cause serious injury.
The cargo area in the rear of the vehicle (with
the rear seatbacks in the locked-up or folded
down position) should not be used as a play
area by children at any time. They could be
seriously injured in a collision. Children should
be seated and using the proper restraint
system.
To help protect against personal injury,
passengers should not be seated in the rear
cargo area. The rear cargo space is intended
for load carrying purposes only, not for
passengers, who should sit in seats and use
seat belts.
2
Page 114 of 268

112 STARTING AND OPERATING
(Continued)
NOTE:
In certain cold conditions, ice may prevent the fuel
d oor
from opening. If this occurs, lightly push on
the fuel door to break the ice buildup and
re-release the fuel door using the inside release
button. Do not pry on the door.
3. T here is no fuel filler cap. Two flapper doors
i
nside the pipe seal the system.
4. Insert the fuel nozzle fully into the filler pipe – t
he nozzle opens and holds the flapper doors
while refueling.
5. F ill the vehicle with fuel – when the fuel nozzle
“
clicks” or shuts off the fuel tank is full.
6. Maintain nozzle in filler for five seconds to a
llow nozzle to drain.
7. Remove the fuel nozzle and close the fuel d
oor.
NOTE:
A funnel is provided (located in the trunk in the
s p
are tire area) to open the flapper doors to allow
for emergency refueling with a gas can.
EMERGENCY FUEL FILLER DOOR
R
ELEASE
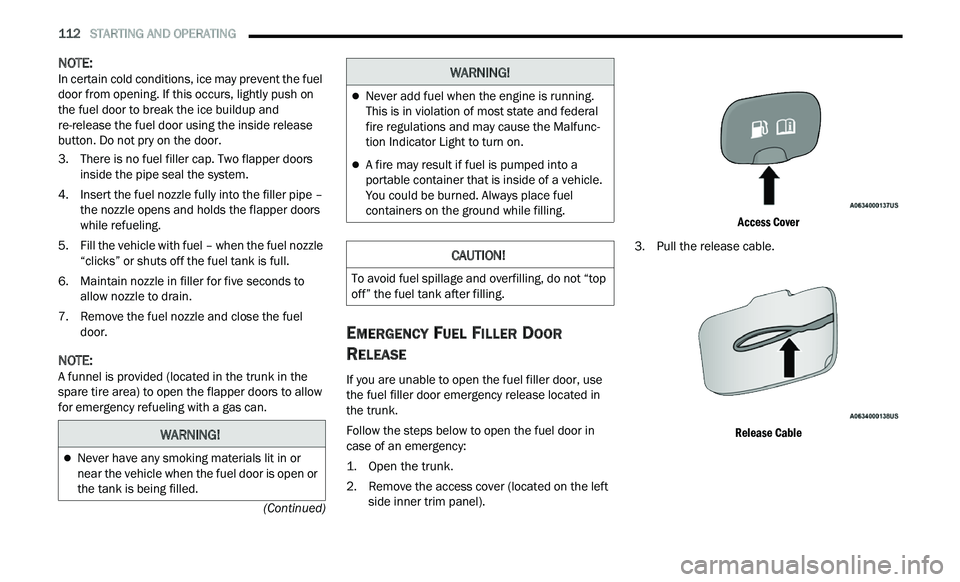
If you are unable to open the fuel filler door, use
the fuel filler door emergency release located in
the trunk.
Follow the steps below to open the fuel door in
c a
se of an emergency:
1. Open the trunk.
2
. R emove the access cover (located on the left
s
ide inner trim panel).
Access Cover
3. P ull the release cable.
R
elease Cable
WARNING!
Never have any smoking materials lit in or
near the vehicle when the fuel door is open or
the tank is being filled.
Never add fuel when the engine is running.
This is in violation of most state and federal
fire regulations and may cause the Malfunc -
tion Indicator Light to turn on.
A fire may result if fuel is pumped into a
portable container that is inside of a vehicle.
You could be burned. Always place fuel
containers on the ground while filling.
CAUTION!
To avoid fuel spillage and overfilling, do not “top
off” the fuel tank after filling.
WARNING!
Page 260 of 268

258
Fluid, Brake...................................................250Fog Lights........................................................42Fold-Flat Seats.................................................27Folding Rear Seats..........................................27Forward Collision Warning.............................146Four-Way Hazard Flasher...............................179Freeing A Stuck Vehicle.................................192Fuel...............................................................246Additives...................................................246Clean Air....................................................246Ethanol......................................................247Gasoline....................................................246Gauge..........................................................75Materials Added........................................246Methanol...................................................247Octane Rating.................................246, 249Requirements...........................................246Specifications............................................249Tank Capacity............................................248Fuses.............................................................214
G
Garage Door Opener (HomeLink)....................37Gasoline, Clean Air........................................246Gasoline, Reformulated.................................246Gauges
Fuel.............................................................75Gear Ranges....................................................87Glass Cleaning...............................................244
Gross Axle Weight Rating.....................113, 114Gross Vehicle Weight Rating................113, 114GVWR............................................................113
H
HazardDriving Through Flowing, Rising, Or
Shallow Standing Water
.......................120Hazard Warning Flashers..............................179Head Restraints........................................32, 33Head Rests...............................................32, 33Headlights....................................................222Automatic....................................................41Cleaning...................................................242High Beam/Low Beam Select Switch..........41Lights On Reminder.....................................42On With Wipers............................................42Passing........................................................41Switch..........................................................40Time Delay...................................................42Washers...................................................201Heated Mirrors.................................................36Heated Seats...................................................30Heater, Engine Block.......................................84High Beam/Low Beam Select (Dimmer)
Switch..............................................................41Hill Start Assist..............................................141Hitches Trailer Towing...........................................115
Holder, Coin.....................................................52HomeLink (Garage Door Opener).....................37Hood Prop........................................................59Hood Release...................................................59
I
Ignition.............................................................15Switch..........................................................15Inside Rearview Mirror...........................34, 179Instrument Cluster....................................64, 66Descriptions.................................................78Display..................................................66, 68Instrument Panel Lens Cleaning...................244Interior Appearance Care..............................243Interior Lights...................................................43
J
Jack Location................................................183Jack Operation..............................................184Jacking Instructions......................................184Jump Starting.......................................186, 187
K
Key FobArm The System
...........................................18Unlatch The Trunk.......................................13Key Fob Battery Service (Remote Keyless
Entry)...............................................................13