2021 CHEVROLET SILVERADO 2500HD transmission
[x] Cancel search: transmissionPage 238 of 433
Chevrolet Silverado 2500 HD/3500 HD Owner Manual (GMNA-Localizing-U.
S./Canada/Mexico-14632154) - 2021 - CRC - 11/20/20
Driving and Operating 237
If equipped, the transfer case controls are
used to shift into and out of four-wheel
drive.
To shift the transfer case, press the desired
button. The graphic in the instrument
cluster will flash while a shift is in progress.
The graphic displayed will change to indicate
the setting requested.
When the shift is complete the graphic will
stop flashing. The DIC message turns off
once the shift is complete. If the transfer
case cannot complete a shift request, it will
go back to its last chosen setting.
The settings are:
N (Neutral) :Use only when the vehicle
needs to be towed. See Recreational Vehicle
Towing 0370 or
Towing the Vehicle 0369.
2
m(Two-Wheel Drive High) : Use for driving
on most streets and highways. The front
axle is not engaged. This setting provides
the best fuel economy.
AUTO (Automatic Four-Wheel Drive) : Use
when road surface conditions are variable.
When driving in AUTO, the front axle is
engaged, and the vehicle's power is sent to
the front and rear wheels automatically based on driving conditions. This setting
provides slightly lower fuel economy
than 2
m.
4
m(Four-Wheel Drive High) : Use this
setting when extra traction is needed, such
as when driving on snowy or icy roads,
when off-roading, or when plowing snow.
4
n(Four-Wheel Drive Low) : This setting
engages the front axle and delivers extra
torque. Choose 4
nwhen driving off-road in
deep sand, deep mud, or deep snow, and
while climbing or descending steep hills.
While driving in 4
n, keep vehicle speed
below 72 km/h (45 mph).
Shifting into 4
nwill turn Traction Control
and StabiliTrak/ESC off. See Traction Control/
Electronic Stability Control 0242.
Shifts between 2
m, 4m, and AUTO
Any of these shifts can be made at normal
driving speed.
The actual 4x4 shift request is only made
after the button is released. The 4x4 graphic
will remain flashing until the shift request
has completed. A DIC message displays to
indicate that the 4x4 transfer case has been
requested to shift to the new desired state. Once the 4x4 shift has completed, the DIC
message disappears, the 4x4 graphic stops
flashing, and the current setting is indicated.
When a shift to 2
mis completed successfully
while in P (Park), the parking brake will
engage. To resume driving, shift the
transmission to the desired gear and
manually release the parking brake or press
the accelerator pedal to begin driving. See
Electric Parking Brake 0240.
If equipped, use 4
n, AUTO, or 4mto provide
additional traction when parking on a steep
grade with poor traction such as ice, snow,
mud, or gravel.
Shifting Into 4
n
1. The ignition must be on and the vehicle must be stopped or moving less than
5 km/h (3 mph) with the transmission in
N (Neutral). It is best for the vehicle to
be moving 1.6 to 3.2 km/h (1 to 2 mph).
2. Press 4
n. The actual 4x4 shift request is
only made after the button is released.
The 4x4 graphic will remain flashing
until the shift request has completed.
A DIC message displays to indicate that
the 4x4 transfer case has been requested
to shift to the new desired state.
Page 239 of 433
Chevrolet Silverado 2500 HD/3500 HD Owner Manual (GMNA-Localizing-U.
S./Canada/Mexico-14632154) - 2021 - CRC - 11/20/20
238 Driving and Operating
Once the 4x4 shift has completed, the
DIC message disappears, the 4x4 graphic
stops flashing and the current setting is
indicated.
If vehicle speed is higher when shift request
occurs, a DIC message displays. Reduce
vehicle speed.
If the transmission is not in N (Neutral)
when shift request occurs, a DIC message
displays. The vehicle will allow 20 seconds
for the shift to occur. After this time, a
graphic in the instrument cluster will
indicate that the transfer case is in 4
n.
Caution
Shifting the transmission into gear before
the requested mode indicator light has
stopped flashing could damage the
transfer case.
If the transmission is not shifted into
N (Neutral) or the vehicle has not slowed to
5 km/h (3 mph) within 20 seconds, the
transfer case will remain in its original state.
This will be indicated in the instrument
cluster. With the vehicle moving less than
5 km/h (3 mph) and the transmission in
N (Neutral), attempt the shift again.
Shifting Out of 4
n
1. The vehicle must be stopped or moving
less than 5 km/h (3 mph) with the
transmission in N (Neutral) and the
ignition on. It is best for the vehicle to
be moving 1.6 to 3.2 km/h (1 to 2 mph).
2. Press 4
m, AUTO, or 2m. The actual 4x4
shift request is only made after the
button is released. The 4x4 graphic will
remain flashing until the shift request
has completed. A DIC message displays
to indicate the state of the request.
Once the 4x4 shift has completed, the
DIC message disappears, the 4x4 graphic
stops flashing, and the current setting is
indicated.
If vehicle speed is higher when shift
request occurs, a DIC message displays.
Reduce vehicle speed.
If the transmission is not in N (Neutral)
when shift request occurs, DIC messages will
display. The vehicle will allow 20 seconds for
this shift to occur. After this time, a graphic
in the instrument cluster will indicate that
the transfer case is in 4
n.
Caution
Shifting the transmission into gear before
the requested mode indicator light has
stopped flashing could damage the
transfer case.
If the transmission is not shifted into
N (Neutral) or the vehicle has not slowed to
5 km/h (3 mph) within 20 seconds, the
transfer case will remain in its original state.
This will be indicated in the instrument
cluster.
With the vehicle moving less than 5 km/h
(3 mph), and the transmission in N (Neutral),
attempt the shift again.
Shifting Into N (Neutral)
To shift into N (Neutral): 1. Start the vehicle.
2. Shift the transmission to N (Neutral).
3. Shift the transfer case to 2
m.
4. Apply the parking brake and/or brake pedal.
5. Press 2
mfive times in 10 seconds until
the N (Neutral) graphic starts flashing in
the instrument cluster. When the shift is
complete, the graphic stops flashing.
Page 240 of 433
Chevrolet Silverado 2500 HD/3500 HD Owner Manual (GMNA-Localizing-U.
S./Canada/Mexico-14632154) - 2021 - CRC - 11/20/20
Driving and Operating 239
If the parking brake and/or brake pedal
is not applied within 20 seconds, the
transfer case will remain in the original
state.
6. If the transmission is not shifted into N (Neutral) or the vehicle has not slowed
to 5 km/h (3 mph) within 20 seconds,
the transfer case will remain in its
original state. This will be indicated in
the instrument cluster.
Shifting Out of N (Neutral)
To shift out of N (Neutral): 1. Turn the ignition on with the engine off. See Ignition Positions (Keyless Access)
0 226 or
Ignition Positions (Key Access) 0224.
2. Set the parking brake. See Electric
Parking Brake 0240.
3. Shift the transmission to N (Neutral).
4. Shift the transfer case to 2
m. Transfer
case shifts out of N (Neutral) can only be
made into 2
m. When the shift to 2mis
complete, the graphic in the instrument
cluster will stop flashing. If the transfer
case cannot complete a shift, the graphic
will return to the previously selected
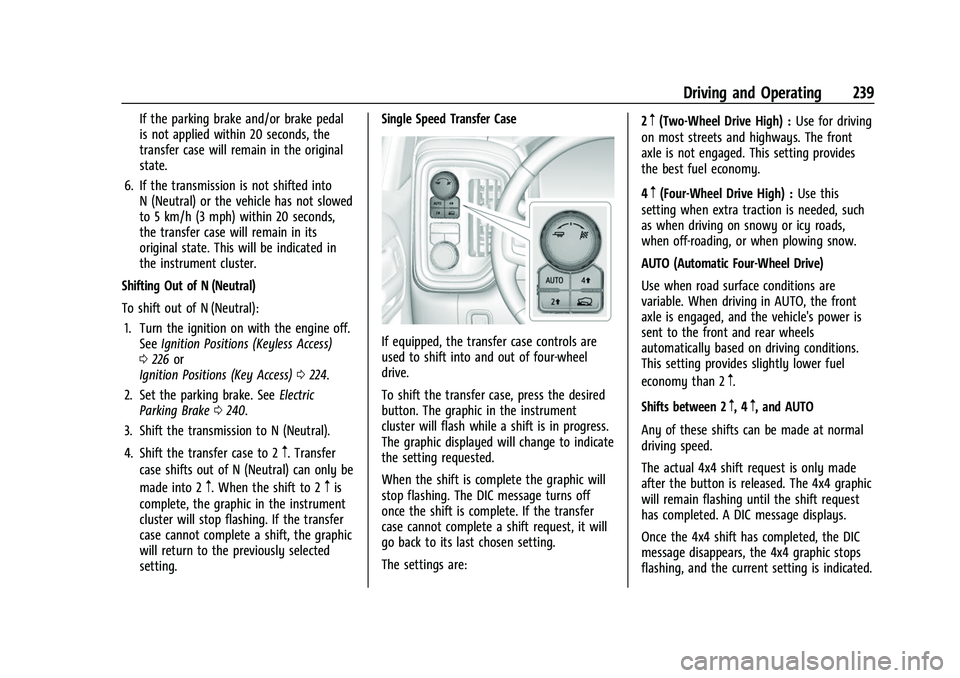
setting. Single Speed Transfer Case
If equipped, the transfer case controls are
used to shift into and out of four-wheel
drive.
To shift the transfer case, press the desired
button. The graphic in the instrument
cluster will flash while a shift is in progress.
The graphic displayed will change to indicate
the setting requested.
When the shift is complete the graphic will
stop flashing. The DIC message turns off
once the shift is complete. If the transfer
case cannot complete a shift request, it will
go back to its last chosen setting.
The settings are:
2
m(Two-Wheel Drive High) :
Use for driving
on most streets and highways. The front
axle is not engaged. This setting provides
the best fuel economy.
4
m(Four-Wheel Drive High) : Use this
setting when extra traction is needed, such
as when driving on snowy or icy roads,
when off-roading, or when plowing snow.
AUTO (Automatic Four-Wheel Drive)
Use when road surface conditions are
variable. When driving in AUTO, the front
axle is engaged, and the vehicle's power is
sent to the front and rear wheels
automatically based on driving conditions.
This setting provides slightly lower fuel
economy than 2
m.
Shifts between 2
m, 4m, and AUTO
Any of these shifts can be made at normal
driving speed.
The actual 4x4 shift request is only made
after the button is released. The 4x4 graphic
will remain flashing until the shift request
has completed. A DIC message displays.
Once the 4x4 shift has completed, the DIC
message disappears, the 4x4 graphic stops
flashing, and the current setting is indicated.
Page 246 of 433
Chevrolet Silverado 2500 HD/3500 HD Owner Manual (GMNA-Localizing-U.
S./Canada/Mexico-14632154) - 2021 - CRC - 11/20/20
Driving and Operating 245
Modes:
Normal Mode :Use for normal city and
highway driving to provide a smooth ride.
This setting provides balance between
comfort and handling. This is the standard/
default mode. There is no persistent
indicator in the instrument cluster for
this mode.
6Snow/Ice Mode : Snow/Ice Mode
improves vehicle acceleration on snow and
ice covered roads. When active, Snow/Ice
Mode will adjust acceleration to optimize
traction on slippery surfaces. This can
compromise the acceleration on dry asphalt.
This feature is not intended for use when
the vehicle is stuck in sand, mud, ice, snow,
or gravel. If the vehicle becomes stuck, see If
the Vehicle Is Stuck 0216.
7Off-Road Mode : Use this mode for
off-road recreational driving. Off-Road Mode
should be used to improve driving at
moderate speeds, on grass, gravel, dirt,
unpaved roads, or snow-covered roads. The
accelerator pedal is tuned for off-road use.
This mode modifies pedal mapping,
All-Wheel Drive (AWD), ride height, Antilock Brake System (ABS), StabiliTrak/Electronic
Stability Control (ESC), and Traction Control
System (TCS) performance.
For more information on off-road driving see
Off-Road Driving
0211.
_Tow/Haul Mode : Use this mode
when hauling heavy loads to provide
increased performance and vehicle control.
Tow/Haul Mode adjusts the transmission
shift pattern, AWD, and ESC performance.
If the vehicle is turned off with Tow/Haul
Mode active and then restarted within four
hours or less, Tow/Haul will remain active.
Otherwise, the vehicle will start in
Normal Mode.
If the vehicle has a diesel engine, exhaust
braking is automatically activated when
Tow/Haul Mode is selected. It maintains
vehicle speed by automatically
implementing a shift pattern that uses the
engine and the transmission to slow the
vehicle. The system will command
downshifts and use the turbocharger on the
engine to reduce vehicle speed when the
brake is applied. The normal tow/haul shift
pattern will return once the vehicle is on a
low grade or when the accelerator pedal is
pressed. While in the Electronic Range Select (ERS)
Mode (see
“manual mode”), grade breaking
is deactivated, allowing the driver to select a
range and limiting the highest gear
available.
For more information on trailer weight
specifications, see Towing Equipment 0276.
Limited-Slip Differential
If equipped, the limited-slip differential can
give more traction on snow, mud, ice, sand,
or gravel. It works like a standard axle most
of the time, but when traction is low, this
feature allows the drive wheel with the
most traction to move the vehicle. For
vehicles with the limited-slip differential,
driven under severe conditions, the rear axle
fluid should be changed. See Maintenance
Schedule 0384.
Locking Rear Axle
Vehicles with a locking rear axle can give
more traction on snow, mud, ice, sand,
or gravel. It works like a standard axle most
of the time, but when traction is low, this
feature will allow the rear wheel with the
most traction to move the vehicle.
Page 248 of 433
Chevrolet Silverado 2500 HD/3500 HD Owner Manual (GMNA-Localizing-U.
S./Canada/Mexico-14632154) - 2021 - CRC - 11/20/20
Driving and Operating 247
Once the vehicle reaches about 40 km/h
(25 mph) or more, press RES+ up briefly. The
vehicle returns to the previously set speed.
Increasing Speed While Using Cruise Control
Do one of the following:
.Press and hold +RES up until the desired
speed is reached, then release it.
.To increase vehicle speed in small
increments, press +RES up briefly. For
each press, the vehicle goes about 1 km/h
(1 mph) faster.
The speedometer reading can be displayed
in either English or metric units. See
Instrument Cluster 0102. The increment
value used depends on the units displayed.
Reducing Speed While Using Cruise Control
Do one of the following:
.Press and hold SET– down until the
desired lower speed is reached, then
release it.
.To slow down in small increments, press
SET– down briefly. For each press, the
vehicle goes about 1 km/h (1 mph) slower.
The speedometer reading can be displayed
in either English or metric units. See
Instrument Cluster 0102. The increment
value used depends on the units displayed. Passing Another Vehicle While Using Cruise
Control
Use the accelerator pedal to increase the
vehicle speed. When you take your foot off
the pedal, the vehicle will slow down to the
previously set cruise speed. While pressing
the accelerator pedal or shortly following
the release to override cruise control, briefly
pressing SET–
will result in cruise control set
to the current vehicle speed.
Using Cruise Control on Hills
How well the cruise control works on hills
depends on the vehicle speed, the load, and
the steepness of the hills. When going up
steep hills, pressing the accelerator pedal
may be necessary to maintain vehicle speed.
While going downhill, cruise braking helps
maintain driver selected speed.
Cruise Grade Braking is enabled when the
vehicle is started and cruise control is active.
It is not enabled in Range Selection Mode.
It assists in maintaining driver selected
speed when driving on downhill grades by
using the engine and transmission to slow
the vehicle. For other forms of descent control, see
Hill
Descent Control (HDC) 0244, Automatic
Transmission 0232, and Tow/Haul Mode
0 235.
Ending Cruise Control
There are four ways to end cruise control:
.Step lightly on the brake pedal.
.Press*.
.Shift the transmission to N (Neutral).
.To turn off cruise control, press5.
Erasing Speed Memory
The cruise control set speed is erased from
memory if
5is pressed or the ignition is
turned off.
Driver Assistance Systems
This vehicle may have features that work
together to help avoid crashes or reduce
crash damage while driving, backing, and
parking. Read this entire section before
using these systems.
Page 270 of 433
Chevrolet Silverado 2500 HD/3500 HD Owner Manual (GMNA-Localizing-U.
S./Canada/Mexico-14632154) - 2021 - CRC - 11/20/20
Driving and Operating 269
.State laws may require the use of
extended side view mirrors. Even if not
required, you should install extended side
view mirrors if your visibility is limited or
restricted while towing.
.Do not tow a trailer during the first
800 km (500 mi) of vehicle use to prevent
damage to the engine, axle, or other
parts.
.It is recommended to perform the first oil
change before heavy towing.
.During the first 800 km (500 mi) of trailer
towing, do not drive over 80 km/h
(50 mph) and do not make starts at full
throttle.
.Vehicles can tow in D (Drive). Tow/Haul
Mode is recommended for heavier trailers.
SeeTow/Haul Mode 0235. If the
transmission downshifts too often, a
lower gear may be selected using Manual
Mode. See Manual Mode 0235.
If equipped, the following driver assistance
features should be turned off when towing
a trailer:
.Adaptive Cruise Control (ACC)
.Super Cruise Control
.Lane Keep Assist (LKA)
.Park Assist
.Automatic Parking Assist (APA)
.Reverse Automatic Braking (RAB)
If equipped, the following driver assistance
features should be turned to alert or off
when towing a trailer:
.Automatic Emergency Braking (AEB)
.Intelligent Brake Assist (IBA)
.Front Pedestrian Braking (FPB)
If equipped with Lane Change Alert (LCA),
the LCA detection zones that extend back
from the side of the vehicle do not move
further back when a trailer is towed. Use
caution while changing lanes when towing a
trailer.
If equipped with Rear Cross Traffic Alert
(RCTA), use caution while backing up when
towing a trailer, as the RCTA detection zones
that extend out from the back of the vehicle
do not move further back when a trailer is
towed.
{Warning
To prevent serious injury or death from
carbon monoxide (CO), when towing a
trailer: (Continued)
Warning (Continued)
.Do not drive with the liftgate, trunk/
hatch, or rear-most window open.
.Fully open the air outlets on or under
the instrument panel.
.Adjust the climate control system to a
setting that brings in only outside air.
See“Climate Control Systems” in the
Index.
For more information about carbon
monoxide, see Engine Exhaust 0232.
Towing a trailer requires experience. The
combination of the vehicle and trailer is
longer and not as responsive as the vehicle
itself. Get used to the handling and braking
of the combination by driving on a level
road surface before driving on public roads.
The trailer structure, the tires, and the
brakes must all be rated to carry the
intended cargo. Inadequate trailer
equipment can cause the combination to
operate in an unexpected or unsafe manner.
Before driving, inspect all trailer hitch parts
and attachments, safety chains, electrical
connectors, lamps, tires, and mirrors. See
Towing Equipment 0276. If the trailer has
electric brakes, start the combination
Page 271 of 433
Chevrolet Silverado 2500 HD/3500 HD Owner Manual (GMNA-Localizing-U.
S./Canada/Mexico-14632154) - 2021 - CRC - 11/20/20
270 Driving and Operating
moving and then manually apply the trailer
brake controller to check that the trailer
brakes work. During the trip, occasionally
check that the cargo and trailer are secure
and that the lamps and any trailer brakes
are working.
Towing with a Stability Control System
When towing, the stability control system
might be heard. The system reacts to
vehicle movement caused by the trailer,
which mainly occurs during cornering. This is
normal when towing heavier trailers.
Following Distance
Stay at least twice as far behind the vehicle
ahead as you would when driving without a
trailer. This can help to avoid heavy braking
and sudden turns.
Passing
More passing distance is needed when
towing a trailer. The combination of the
vehicle and trailer will not accelerate as
quickly and is much longer than the vehicle
alone. It is necessary to go much farther
beyond the passed vehicle before returning
to the lane. Pass on level roadways. Avoid
passing on hills if possible.
Backing Up
Hold the bottom of the steering wheel with
one hand. To move the trailer to the left,
move that hand to the left. To move the
trailer to the right, move that hand to the
right. Always back up slowly and, if possible,
have someone guide you.
Making TurnsCaution
Turn more slowly and make wider arcs
when towing a trailer to prevent damage
to your vehicle. Making very sharp turns
could cause the trailer to contact the
vehicle.
Make wider turns than normal when towing,
so the trailer will not go over soft shoulders,
over curbs, or strike road signs, trees,
or other objects. Always signal turns well in
advance. Do not steer or brake suddenly.
Driving on Grades
Reduce speed and shift to a lower gear
before starting down a long or steep
downhill grade. If the transmission is not
shifted down, the brakes may overheat and
result in reduced braking efficiency. The vehicle can tow in D (Drive). Shift the
transmission to a lower gear if the
transmission shifts too often under heavy
loads and/or hilly conditions.
When towing at higher altitudes, engine
coolant will boil at a lower temperature
than at lower altitudes. If the engine is
turned off immediately after towing at high
altitude on steep uphill grades, the vehicle
could show signs similar to engine
overheating. To avoid this, let the engine
run, preferably on level ground, with the
transmission in P (Park) for a few minutes
before turning the engine off. If the
overheat warning comes on, see
Engine
Overheating 0312.
Viewing Systems
If equipped, the viewing systems on the
vehicle can improve visibility while hitching,
backing, and driving with a trailer. See
Driver Assistance Systems 0247.
Parking on Hills
{Warning
To prevent serious injury or death,
always park your vehicle and trailer on a
level surface when possible.
Page 283 of 433
Chevrolet Silverado 2500 HD/3500 HD Owner Manual (GMNA-Localizing-U.
S./Canada/Mexico-14632154) - 2021 - CRC - 11/20/20
282 Driving and Operating
Tow/Haul Mode is most useful when towing
a heavy trailer or carrying a large or
heavy load:
.Through rolling terrain.
.In stop-and-go traffic.
.In busy parking lots.
Operating the vehicle in Tow/Haul Mode
when lightly loaded or not towing will not
cause damage; however, it is not
recommended and may result in unpleasant
engine and transmission driving
characteristics, heavy or light steering
efforts, and reduced fuel economy.
Integrated Trailer Brake Control System
The vehicle may have an Integrated Trailer
Brake Control (ITBC) system for use with
electric trailer brakes or most electric over
hydraulic trailer brake systems. These
instructions apply to both types of electric
trailer brakes.
This symbol is on the Trailer Brake Control
Panel on vehicles with an ITBC system. The
power output to the trailer brakes is
proportional to the amount of vehicle
braking. This available power output to the
trailer brakes can be adjusted to a wide
range of trailering situations.
The ITBC system is integrated with the
vehicle’s brake, antilock brake, and
StabiliTrak/Electronic Stability Control (ESC)
systems. In trailering conditions that cause
the vehicle’s antilock brake or StabiliTrak/
ESC systems to activate, power sent to the
trailer's brakes will be automatically
adjusted to minimize trailer wheel lock-up.
This does not imply that the trailer has
StabiliTrak/ESC.
If the vehicle’s brake, antilock brake,
or StabiliTrak/ESC systems are not
functioning properly, the ITBC system may
not function fully or at all. Make sure all of
these systems are fully operational to allow
the ITBC system to function properly.
The ITBC system is powered through the
vehicle's electrical system. Turning the
ignition off will also turn off the ITBC
system. The ITBC system is fully functional
only when the ignition is in on.{Warning
Connecting a trailer that has an air brake
system may result in reduced or
complete loss of trailer braking, including
increased stopping distance or trailer
instability which could result in serious
injury, death, or property damage. Only
use the ITBC system with electric or
electric over hydraulic trailer brake
systems.
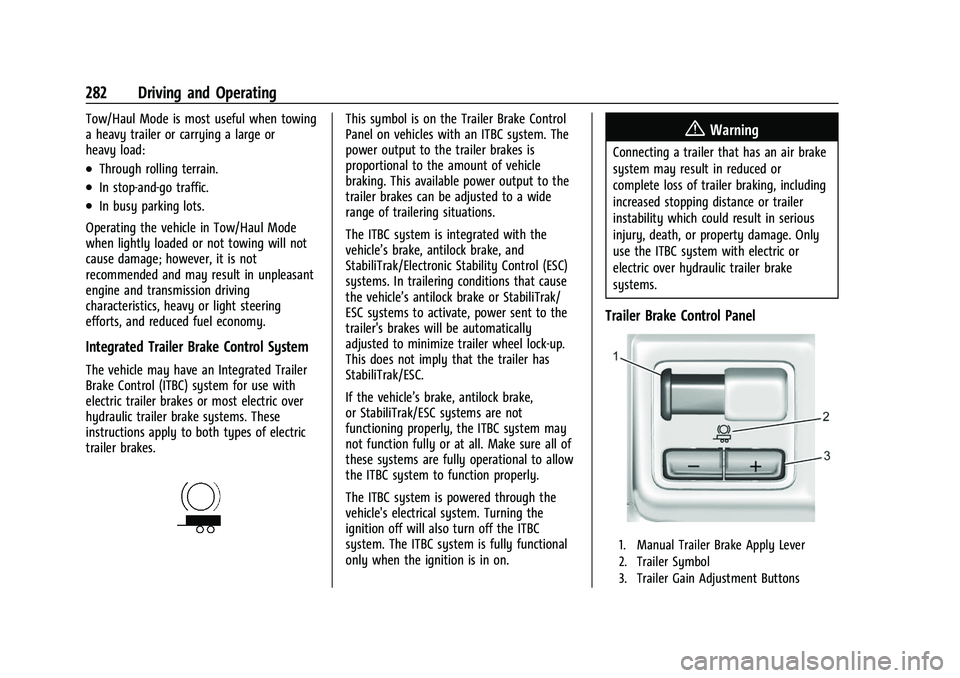
Trailer Brake Control Panel
1. Manual Trailer Brake Apply Lever
2. Trailer Symbol
3. Trailer Gain Adjustment Buttons