2021 CHEVROLET SILVERADO 2500HD transmission
[x] Cancel search: transmissionPage 189 of 433
Chevrolet Silverado 2500 HD/3500 HD Owner Manual (GMNA-Localizing-U.
S./Canada/Mexico-14632154) - 2021 - CRC - 11/20/20
188 Infotainment System
2. Create a Personal Identification Number(PIN) by choosing a four-digit PIN.
Re-enter the PIN to confirm. To change
the PIN, touch Change PIN.
The PIN is required to:
.Register or unregister keys.
.Change Teen Driver settings.
.Change or clear the Teen Driver PIN.
.Access or delete Report Card data.
Register keys to activate Teen Driver and
assign restrictions to the key:
Any vehicle key can be registered, up to a
maximum of eight keys. Label the key to
tell it apart from the other keys.
For a pushbutton start system: 1. Start the engine.
2. For automatic transmissions, the vehicle must be in P (Park). For manual
transmissions, the vehicle must be
stopped with the parking brake set.
3. From the Settings menu, touch Vehicle and then Teen Driver.
4. Enter the PIN.
5. Place the Remote Keyless Entry (RKE) transmitter key you wish to register in
the transmitter pocket. The key does not need to be the one that started the
vehicle. See
Remote Keyless Entry (RKE)
System Operation (Key Access) 010 or
Remote Keyless Entry (RKE) System
Operation (Keyless Access) 013 for
transmitter pocket location.
6. From the Teen Driver menu, touch Setup Keys..If the transmitter key has not
previously been registered, the option
to add the key displays. Touch Setup
and a confirmation message displays.
Teen Driver restrictions will be
applied whenever this key is used to
operate the vehicle.
.If the transmitter key has already
been registered, the option to
remove the key displays. If Remove is
touched, the transmitter key is no
longer registered. A confirmation
message displays, and Teen Driver
restrictions will not be applied if this
transmitter key is used to operate
the vehicle.
In vehicles with a pushbutton start system,
if a Teen Driver and a non-Teen Driver key
are both present at start up, the vehicle will recognize the non-Teen Driver key to start
the vehicle. The Teen Driver settings will not
be active.
For a keyed ignition system:
1. Start the engine.
2. For automatic transmissions, the vehicle must be in P (Park). For manual
transmissions, the vehicle must be
stopped with the parking brake set.
3. From the Settings menu, touch Vehicle and then Teen Driver.
4. Enter the PIN.
5. Touch Setup Keys. The system displays instructions for registering or
unregistering a key. A confirmation
message displays.
Manage Settings
Audio Volume Limit : Allows the audio
volume limit to be turned on or off. Touch
Set Audio Volume Limit to choose the
maximum allowable audio volume level.
Set Audio Volume Limit : Allows a
maximum radio volume to be set. Use the
arrows to choose the maximum allowable
level for the audio volume.
Page 207 of 433
Chevrolet Silverado 2500 HD/3500 HD Owner Manual (GMNA-Localizing-U.
S./Canada/Mexico-14632154) - 2021 - CRC - 11/20/20
206 Driving and Operating
Driving and Operating
Driving Information
Driving for Better Fuel Economy . . . . . . 207
Distracted Driving . . . . . . . . . . . . . . . . . . . . . 207
Defensive Driving . . . . . . . . . . . . . . . . . . . . . 208
Impaired Driving . . . . . . . . . . . . . . . . . . . . . . 208
Control of a Vehicle . . . . . . . . . . . . . . . . . . . 208
Braking . . . . . . . . . . . . . . . . . . . . . . . . . . . . . . . 208
Steering . . . . . . . . . . . . . . . . . . . . . . . . . . . . . . . 209
Off-Road Recovery . . . . . . . . . . . . . . . . . . . . . 210
Loss of Control . . . . . . . . . . . . . . . . . . . . . . . . 210
Off-Road Driving . . . . . . . . . . . . . . . . . . . . . . . 211
Driving on Wet Roads . . . . . . . . . . . . . . . . . 214
Hill and Mountain Roads . . . . . . . . . . . . . . 215
Winter Driving . . . . . . . . . . . . . . . . . . . . . . . . . 215
If the Vehicle Is Stuck . . . . . . . . . . . . . . . . . 216
Vehicle Load Limits . . . . . . . . . . . . . . . . . . . . 217
Truck-Camper Loading Information . . . . . 222
Starting and Operating
New Vehicle Break-In . . . . . . . . . . . . . . . . . . 223
Ignition Positions (Key Access) . . . . . . . . 224
Ignition Positions (Keyless Access) . . . . . 226
Starting the Engine . . . . . . . . . . . . . . . . . . . . 227
Engine Heater . . . . . . . . . . . . . . . . . . . . . . . . . 228
Retained Accessory Power (RAP) . . . . . . . 229
Shifting Into Park . . . . . . . . . . . . . . . . . . . . . 230
Shifting out of Park . . . . . . . . . . . . . . . . . . . . 231
Parking over Things That Burn . . . . . . . . . 231Extended Parking . . . . . . . . . . . . . . . . . . . . . . 231
Engine Exhaust
Engine Exhaust . . . . . . . . . . . . . . . . . . . . . . . . 232
Running the Vehicle While Parked . . . . . 232
Automatic Transmission
Automatic Transmission . . . . . . . . . . . . . . . 232
Manual Mode . . . . . . . . . . . . . . . . . . . . . . . . . 235
Tow/Haul Mode . . . . . . . . . . . . . . . . . . . . . . . 235
Drive Systems
Four-Wheel Drive . . . . . . . . . . . . . . . . . . . . . . 236
Brakes
Antilock Brake System (ABS) . . . . . . . . . . 240
Electric Parking Brake . . . . . . . . . . . . . . . . . 240
Brake Assist . . . . . . . . . . . . . . . . . . . . . . . . . . . 241
Hill Start Assist (HSA) . . . . . . . . . . . . . . . . . 242
Ride Control Systems
Traction Control/Electronic Stability
Control . . . . . . . . . . . . . . . . . . . . . . . . . . . . . . 242
Hill Descent Control (HDC) . . . . . . . . . . . . 244
Driver Mode Control . . . . . . . . . . . . . . . . . . 244
Limited-Slip Differential . . . . . . . . . . . . . . . . 245
Locking Rear Axle . . . . . . . . . . . . . . . . . . . . . 245
Cruise Control
Cruise Control . . . . . . . . . . . . . . . . . . . . . . . . . 246
Driver Assistance Systems
Driver Assistance Systems . . . . . . . . . . . . . 247
Assistance Systems for Parking or Backing . . . . . . . . . . . . . . . . . . . . . . . . . . . . . . 249
Assistance Systems for Driving . . . . . . . . 257
Forward Collision Alert (FCA) System . . . . . . . . . . . . . . . . . . . . . . . . . . . . . . 257
Automatic Emergency Braking (AEB) . . . . . . . . . . . . . . . . . . . . . . . . 259
Side Blind Zone Alert (SBZA) . . . . . . . . . . 260
Lane Change Alert (LCA) . . . . . . . . . . . . . . . 261
Lane Departure Warning (LDW) . . . . . . . 262
Fuel
Top Tier Fuel . . . . . . . . . . . . . . . . . . . . . . . . . . 263
Recommended Fuel . . . . . . . . . . . . . . . . . . . . 263
Prohibited Fuels . . . . . . . . . . . . . . . . . . . . . . . 264
Fuels in Foreign Countries . . . . . . . . . . . . . 264
Fuel Additives . . . . . . . . . . . . . . . . . . . . . . . . . 264
E85 or FlexFuel . . . . . . . . . . . . . . . . . . . . . . . . 264
Filling the Tank (Pickup Model) . . . . . . . . 265
Filling the Tank (Chassis Cab and Box Delete Models) . . . . . . . . . . . . . . . . . . . . . . 266
Filling a Portable Fuel Container . . . . . . . 267
Trailer Towing
General Towing Information . . . . . . . . . . 268
Driving Characteristics and Towing Tips . . . . . . . . . . . . . . . . . . . . . . . . . 268
Trailer Towing . . . . . . . . . . . . . . . . . . . . . . . . . 272
Towing Equipment . . . . . . . . . . . . . . . . . . . . 276
Page 213 of 433
Chevrolet Silverado 2500 HD/3500 HD Owner Manual (GMNA-Localizing-U.
S./Canada/Mexico-14632154) - 2021 - CRC - 11/20/20
212 Driving and Operating
Driving on Hills
Driving safely on hills requires good
judgment and an understanding of what the
vehicle can and cannot do.
{Warning
Many hills are simply too steep for any
vehicle. Driving up hills can cause the
vehicle to stall. Driving down hills can
cause loss of control. Driving across hills
can cause a rollover. You could be injured
or killed. Do not drive on steep hills.
Before driving on a hill, assess the
steepness, traction, and obstructions. If the
terrain ahead cannot be seen, get out of the
vehicle and walk the hill before driving
further.
When driving on hills:
.Use a low gear and keep a firm grip on
the steering wheel.
.Maintain a slow speed.
.When possible, drive straight up or down
the hill.
.Slow down when approaching the top of
the hill.
.Use headlamps even during the day to
make the vehicle more visible.
{Warning
Driving to the top of a hill at high speed
can cause a crash. There could be a
drop-off, embankment, cliff, or even
another vehicle. You could be seriously
injured or killed. As you near the top of a
hill, slow down and stay alert.
.Never go downhill forward or backward
with either the transmission or transfer
case in N (Neutral). The brakes could
overheat and you could lose control.
{Warning
If the vehicle has the two-speed
automatic transfer case, shifting the
transfer case to N (Neutral) can cause
your vehicle to roll even if the
transmission is in P (Park). This is because
the N (Neutral) position on the transfer
case overrides the transmission. You or
someone else could be injured. If leaving
the vehicle, set the parking brake and
shift the transmission to P (Park). Shift
the transfer case to any position but
N (Neutral).
.When driving down a hill, keep the
vehicle headed straight down. Use a low
gear because the engine will work with
the brakes to slow the vehicle and help
keep the vehicle under control.
{Warning
Heavy braking when going down a hill
can cause your brakes to overheat and
fade. This could cause loss of control and
you or others could be injured or killed.
Apply the brakes lightly when descending
a hill and use a low gear to keep vehicle
speed under control.
If a brake fade condition is detected, a DIC
warning message is displayed. Adjust brake
pedal use and shift to a lower transmission
gear to reduce braking.
If the brakes continue to fade to a severe
condition, additional DIC messages are
displayed. The brake system warning light
will illuminate, and the vehicle speed may
be limited. See Brake System Warning Light
0 113.
If the vehicle stalls on a hill: 1. Apply the brakes to stop the vehicle, and then apply the parking brake.
Page 216 of 433

Chevrolet Silverado 2500 HD/3500 HD Owner Manual (GMNA-Localizing-U.
S./Canada/Mexico-14632154) - 2021 - CRC - 11/20/20
Driving and Operating 215
road is wet enough and you are going fast
enough. When the vehicle is hydroplaning, it
has little or no contact with the road.
There is no hard and fast rule about
hydroplaning. The best advice is to slow
down when the road is wet.
Other Rainy Weather Tips
Besides slowing down, other wet weather
driving tips include:
.Allow extra following distance.
.Pass with caution.
.Keep windshield wiping equipment in
good shape.
.Keep the windshield washer fluid reservoir
filled.
.Have good tires with proper tread depth.
SeeTires 0336.
.Turn off cruise control.
Hill and Mountain Roads
Driving on steep hills or through mountains
is different than driving on flat or rolling
terrain. Tips include:
.Keep the vehicle serviced and in good
shape.
.Check all fluid levels and brakes, tires,
cooling system, and transmission.
.Shift to a lower gear when going down
steep or long hills.
{Warning
Using the brakes to slow the vehicle on a
long downhill slope can cause brake
overheating, can reduce brake
performance, and could result in a loss of
braking. Shift the transmission to a lower
gear to let the engine assist the brakes
on a steep downhill slope.
{Warning
Coasting downhill in N (Neutral) or with
the ignition off is dangerous. This can
cause overheating of the brakes and loss
of steering assist. Always have the engine
running and the vehicle in gear.
.Drive at speeds that keep the vehicle in
its own lane. Do not swing wide or cross
the center line.
.Be alert on top of hills; something could
be in your lane (e.g., stalled car, crash).
.Pay attention to special road signs (e.g.,
falling rocks area, winding roads, long
grades, passing or no-passing zones) and
take appropriate action.
Winter Driving
Driving on Snow or Ice
Snow or ice between the tires and the road
creates less traction or grip, so drive
carefully. Wet ice can occur at about 0 °C
(32 °F) when freezing rain begins to fall.
Avoid driving on wet ice or in freezing rain
until roads can be treated.
For Slippery Road Driving:
.Accelerate gently. Accelerating too quickly
causes the wheels to spin and makes the
surface under the tires slick.
.Turn on Traction Control. See Traction
Control/Electronic Stability Control 0242.
.The Antilock Brake System (ABS) improves
vehicle stability during hard stops, but
the brakes should be applied sooner than
when on dry pavement. See Antilock
Brake System (ABS) 0240.
.Allow greater following distance and
watch for slippery spots. Icy patches can
occur on otherwise clear roads in shaded
areas. The surface of a curve or an
overpass can remain icy when the
surrounding roads are clear. Avoid sudden
steering maneuvers and braking while
on ice.
Page 218 of 433
Chevrolet Silverado 2500 HD/3500 HD Owner Manual (GMNA-Localizing-U.
S./Canada/Mexico-14632154) - 2021 - CRC - 11/20/20
Driving and Operating 217
Turn the steering wheel left and right to
clear the area around the front wheels. Then
make sure the wheels are pointed straight
ahead. For four-wheel-drive vehicles, shift
into Four-Wheel Drive High. Turn the TCS
off. Shift back and forth between R (Reverse)
and a forward gear, spinning the wheels as
little as possible. To prevent transmission
wear, wait until the wheels stop spinning
before shifting gears. Slowly spinning the
wheels in the forward and reverse directions
causes a rocking motion that could free the
vehicle. If that does not get the vehicle out
after a few tries, it might need to be towed
out. SeeTowing the Vehicle 0369. Recovery
hooks can be used, if the vehicle has them.
Recovery Hooks
{Warning
Never pull on recovery hooks from the
side. The hooks could break and you and
others could be injured. When using
recovery hooks, always pull the vehicle
from the front.
Caution
Never use recovery hooks to tow the
vehicle. The vehicle could be damaged,
and the repairs would not be covered by
the vehicle warranty.
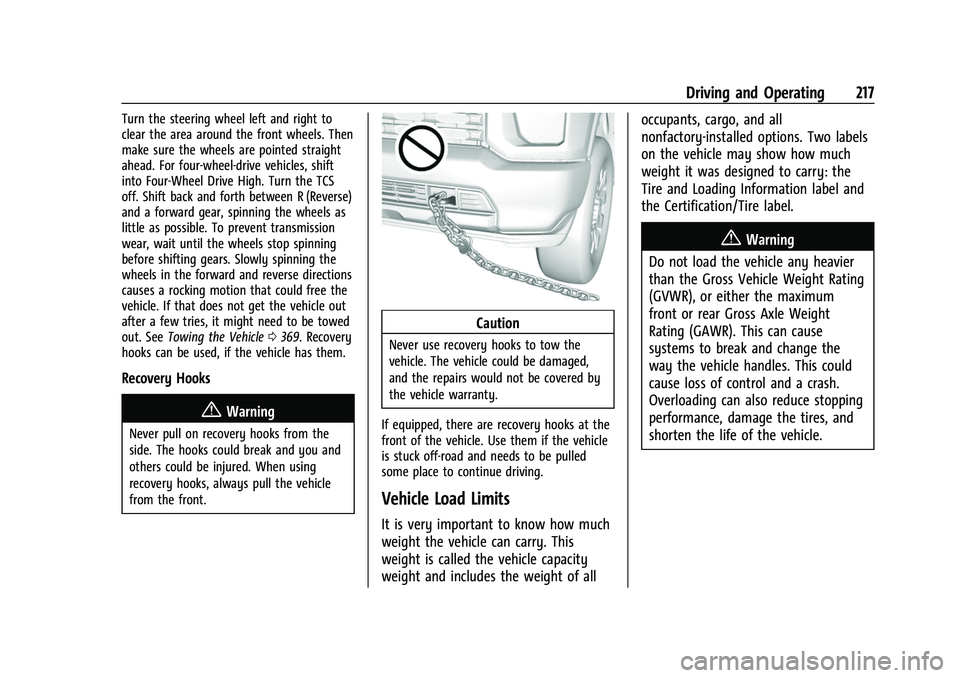
If equipped, there are recovery hooks at the
front of the vehicle. Use them if the vehicle
is stuck off-road and needs to be pulled
some place to continue driving.
Vehicle Load Limits
It is very important to know how much
weight the vehicle can carry. This
weight is called the vehicle capacity
weight and includes the weight of all occupants, cargo, and all
nonfactory-installed options. Two labels
on the vehicle may show how much
weight it was designed to carry: the
Tire and Loading Information label and
the Certification/Tire label.
{Warning
Do not load the vehicle any heavier
than the Gross Vehicle Weight Rating
(GVWR), or either the maximum
front or rear Gross Axle Weight
Rating (GAWR). This can cause
systems to break and change the
way the vehicle handles. This could
cause loss of control and a crash.
Overloading can also reduce stopping
performance, damage the tires, and
shorten the life of the vehicle.
Page 225 of 433
Chevrolet Silverado 2500 HD/3500 HD Owner Manual (GMNA-Localizing-U.
S./Canada/Mexico-14632154) - 2021 - CRC - 11/20/20
224 Driving and Operating
Caution (Continued)
.Avoid making hard stops for the first
322 km (200 mi) or so. During this
time the new brake linings are not yet
broken in. Hard stops with new linings
can mean premature wear and earlier
replacement. Follow this breaking-in
guideline every time you get new
brake linings.
.Do not tow a trailer during break-in.
SeeTrailer Towing 0272 for the trailer
towing capabilities of the vehicle and
more information.
Following break-in, engine speed and load
can be gradually increased.
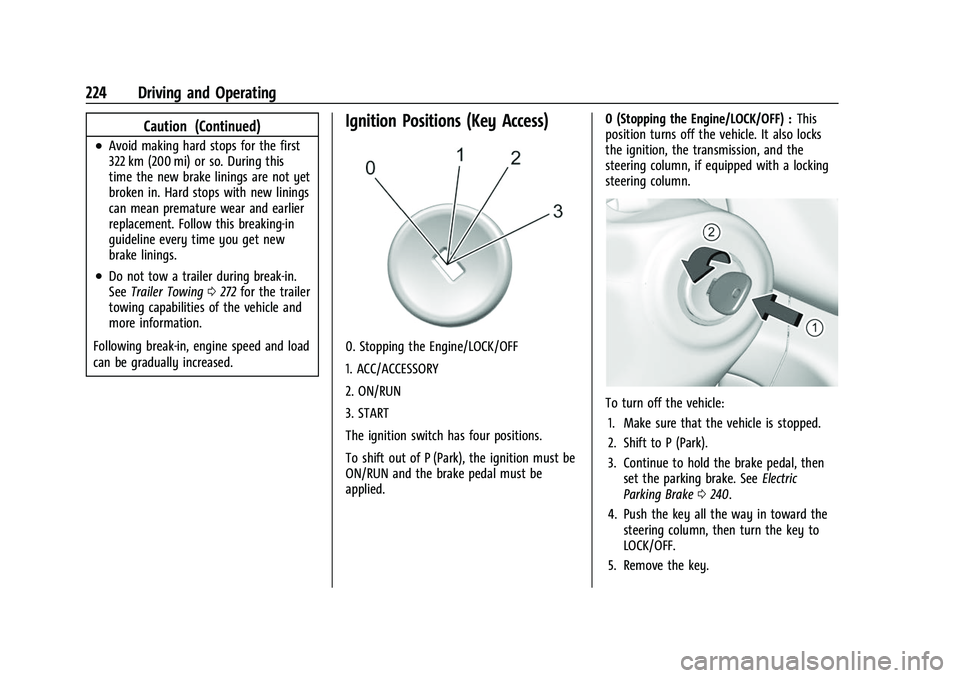
Ignition Positions (Key Access)
0. Stopping the Engine/LOCK/OFF
1. ACC/ACCESSORY
2. ON/RUN
3. START
The ignition switch has four positions.
To shift out of P (Park), the ignition must be
ON/RUN and the brake pedal must be
applied. 0 (Stopping the Engine/LOCK/OFF) :
This
position turns off the vehicle. It also locks
the ignition, the transmission, and the
steering column, if equipped with a locking
steering column.
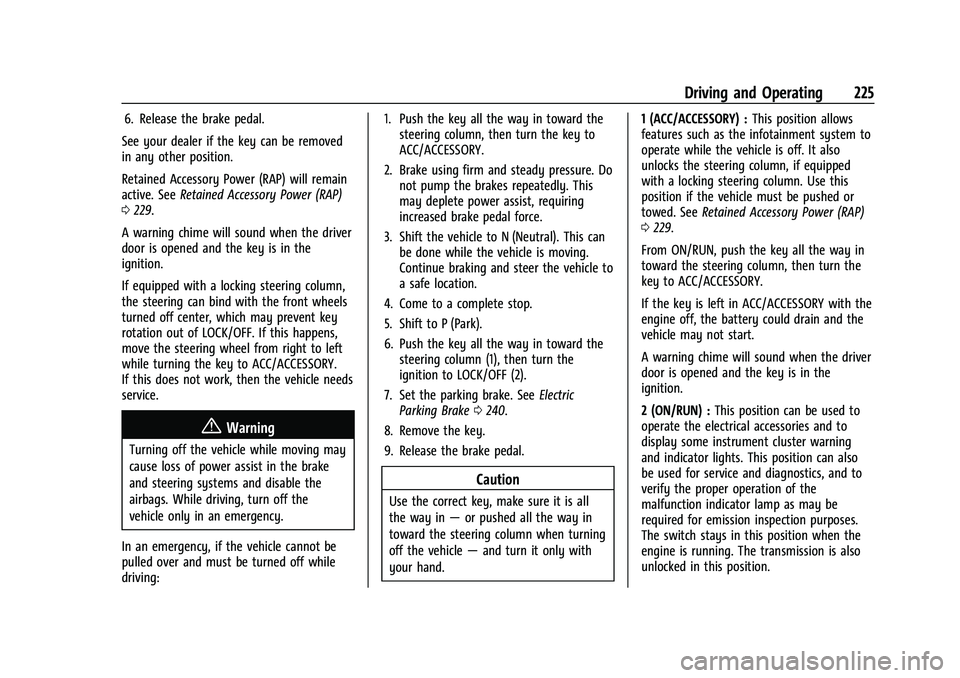
To turn off the vehicle:
1. Make sure that the vehicle is stopped.
2. Shift to P (Park).
3. Continue to hold the brake pedal, then set the parking brake. See Electric
Parking Brake 0240.
4. Push the key all the way in toward the steering column, then turn the key to
LOCK/OFF.
5. Remove the key.
Page 226 of 433
Chevrolet Silverado 2500 HD/3500 HD Owner Manual (GMNA-Localizing-U.
S./Canada/Mexico-14632154) - 2021 - CRC - 11/20/20
Driving and Operating 225
6. Release the brake pedal.
See your dealer if the key can be removed
in any other position.
Retained Accessory Power (RAP) will remain
active. See Retained Accessory Power (RAP)
0 229.
A warning chime will sound when the driver
door is opened and the key is in the
ignition.
If equipped with a locking steering column,
the steering can bind with the front wheels
turned off center, which may prevent key
rotation out of LOCK/OFF. If this happens,
move the steering wheel from right to left
while turning the key to ACC/ACCESSORY.
If this does not work, then the vehicle needs
service.
{Warning
Turning off the vehicle while moving may
cause loss of power assist in the brake
and steering systems and disable the
airbags. While driving, turn off the
vehicle only in an emergency.
In an emergency, if the vehicle cannot be
pulled over and must be turned off while
driving: 1. Push the key all the way in toward the
steering column, then turn the key to
ACC/ACCESSORY.
2. Brake using firm and steady pressure. Do not pump the brakes repeatedly. This
may deplete power assist, requiring
increased brake pedal force.
3. Shift the vehicle to N (Neutral). This can be done while the vehicle is moving.
Continue braking and steer the vehicle to
a safe location.
4. Come to a complete stop.
5. Shift to P (Park).
6. Push the key all the way in toward the steering column (1), then turn the
ignition to LOCK/OFF (2).
7. Set the parking brake. See Electric
Parking Brake 0240.
8. Remove the key.
9. Release the brake pedal.
Caution
Use the correct key, make sure it is all
the way in —or pushed all the way in
toward the steering column when turning
off the vehicle —and turn it only with
your hand. 1 (ACC/ACCESSORY) :
This position allows
features such as the infotainment system to
operate while the vehicle is off. It also
unlocks the steering column, if equipped
with a locking steering column. Use this
position if the vehicle must be pushed or
towed. See Retained Accessory Power (RAP)
0 229.
From ON/RUN, push the key all the way in
toward the steering column, then turn the
key to ACC/ACCESSORY.
If the key is left in ACC/ACCESSORY with the
engine off, the battery could drain and the
vehicle may not start.
A warning chime will sound when the driver
door is opened and the key is in the
ignition.
2 (ON/RUN) : This position can be used to
operate the electrical accessories and to
display some instrument cluster warning
and indicator lights. This position can also
be used for service and diagnostics, and to
verify the proper operation of the
malfunction indicator lamp as may be
required for emission inspection purposes.
The switch stays in this position when the
engine is running. The transmission is also
unlocked in this position.
Page 228 of 433
Chevrolet Silverado 2500 HD/3500 HD Owner Manual (GMNA-Localizing-U.
S./Canada/Mexico-14632154) - 2021 - CRC - 11/20/20
Driving and Operating 227
2. Brake using a firm and steady pressure.Do not pump the brakes repeatedly. This
may deplete power assist, requiring
increased brake pedal force.
3. Shift the vehicle to N (Neutral). This can be done while the vehicle is moving.
After shifting to N (Neutral), firmly apply
the brakes and steer the vehicle to a
safe location.
4. Come to a complete stop, shift to P (Park), and make sure engine is off.
The shift lever must be in P (Park) to
turn the ignition off.
5. Set the parking brake. See Electric
Parking Brake 0240.
{Warning
Turning off the vehicle while moving may
cause loss of power assist in the brake
and steering systems and disable the
airbags. While driving, only shut the
vehicle off in an emergency.
ACC/ACCESSORY (Amber Indicator Light) :
This mode allows some electrical accessories
to be used when the engine is off. With the ignition off, pressing the ENGINE
START/STOP button one time without the
brake pedal applied will place the ignition
system in ACC/ACCESSORY.
The ignition will switch from ACC/
ACCESSORY to off after five minutes to
prevent battery rundown.
ON/RUN/START (Green Indicator Light) :
This
mode is for driving and starting. With the
ignition off, and the brake pedal applied,
pressing ENGINE START/STOP button once
will turn the ignition on. Once engine
cranking begins, release the button. Engine
cranking will continue until the engine
starts. See Starting the Engine 0227.
Service Mode
This power mode is available for service and
diagnostics, and to verify the proper
operation of the malfunction indicator lamp
as may be required for emission inspection
purposes. With the vehicle off, and the
brake pedal not applied, pressing and
holding the ENGINE START/STOP button for
more than five seconds will place the vehicle
in Service Mode. The instruments and audio
systems will operate as they do when the
ignition is on, but the vehicle will not be able to be driven. The engine will not start
in Service Mode. Press the ENGINE START/
STOP button again to turn the ignition off.
Starting the Engine
If the vehicle has a diesel engine, see the
Duramax diesel supplement.
Caution
If you add electrical parts or accessories,
you could change the way the engine
operates. Any resulting damage would
not be covered by the vehicle warranty.
See
Add-On Electrical Equipment 0297.
Move the shift lever to P (Park) or
N (Neutral). To restart the engine when the
vehicle is already moving, use
N (Neutral) only.
Caution
Do not try to shift to P (Park) if the
vehicle is moving. If you do, you could
damage the transmission. Shift to P (Park)
only when the vehicle is stopped.