2021 CHEVROLET MALIBU ECO
[x] Cancel search: ECOPage 245 of 351
Chevrolet Malibu Owner Manual (GMNA-Localizing-U.S./Canada-
14584249) - 2021 - CRC - 11/9/20
244 Vehicle Care
The brake master cylinder reservoir is filled
with GM approved DOT 4 brake fluid as
indicated on the reservoir cap. SeeEngine
Compartment Overview 0231 for the
location of the reservoir.
Checking Brake Fluid
With the vehicle in P (Park) on a level
surface, the brake fluid level should be
between the minimum and maximum marks
on the brake fluid reservoir.
There are only two reasons why the brake
fluid level in the reservoir may go down:
.Normal brake lining wear. When new
linings are installed, the fluid level goes
back up.
.A fluid leak in the brake hydraulic system.
Have the brake hydraulic system fixed.
With a leak, the brakes will not
work well.
Always clean the brake fluid reservoir cap
and the area around the cap before
removing it.
Do not top off the brake fluid. Adding fluid
does not correct a leak. If fluid is added
when the linings are worn, there will be too
much fluid when new brake linings are installed. Add or remove fluid, as necessary,
only when work is done on the brake
hydraulic system.
{Warning
If too much brake fluid is added, it can
spill on the engine and burn, if the
engine is hot enough. You or others could
be burned, and the vehicle could be
damaged. Add brake fluid only when
work is done on the brake hydraulic
system.
When the brake fluid falls to a low level,
the brake warning light comes on. See Brake
System Warning Light 088.
Brake fluid absorbs water over time which
degrades the effectiveness of the brake fluid.
Replace brake fluid at the specified intervals
to prevent increased stopping distance. See
Maintenance Schedule 0304.
What to Add
Use only GM approved DOT 4 brake fluid
from a clean, sealed container. See
Recommended Fluids and Lubricants 0312.
{Warning
The wrong or contaminated brake fluid
could result in damage to the brake
system. This could result in the loss of
braking leading to a possible injury.
Always use the proper GM approved
brake fluid.
Caution
If brake fluid is spilled on the vehicle's
painted surfaces, the paint finish can be
damaged. Immediately wash off any
painted surface.
Battery - North America
The original equipment battery is
maintenance free. Do not remove the cap
and do not add fluid.
The vehicle has a standard 12-volt battery
under the hood. See Engine Compartment
Overview 0231.
Refer to the replacement number shown on
the original battery label when a new 12-volt
battery is needed.
Page 246 of 351
Chevrolet Malibu Owner Manual (GMNA-Localizing-U.S./Canada-
14584249) - 2021 - CRC - 11/9/20
Vehicle Care 245
Stop/Start System
If equipped with the 1.5L L4 engine, the
vehicle has a Stop/Start system to shut off
the engine to help conserve fuel. SeeStop/
Start System 0184.
Vehicles with a 1.5L engine have an
Absorbed Glass Mat (AGM) 12-volt battery.
Installation of a standard 12-volt battery will
result in reduced 12-volt battery life.
When using a 12-volt battery charger on the
12-volt AGM battery, some chargers have an
AGM battery setting on the charger.
If available, use the AGM setting on the
charger, to limit charge voltage to 14.8 volts.
{Warning
WARNING: Battery posts, terminals, and
related accessories contain lead and lead
compounds, chemicals known to the
State of California to cause cancer and
birth defects or other reproductive harm.
Batteries also contain other chemicals
known to the State of California to cause
cancer. WASH HANDS AFTER HANDLING.
For more information go to
www.P65Warnings.ca.gov/
passenger-vehicle. See
California Proposition 65 Warning 0228
and the back cover.
Vehicle Storage
{Warning
Batteries have acid that can burn you and
gas that can explode. You can be badly
hurt if you are not careful. See Jump
Starting - North America 0290 for tips
on working around a battery without
getting hurt.
Infrequent Usage: Remove the 12-volt
battery black, negative (−) cable from the
battery to keep the battery from
running down.
Extended Storage: Remove the 12-volt
battery black, negative (−) cable from the
battery or use a battery trickle charger.
Remember to reconnect the battery when
ready to drive the vehicle.
Negative Battery Cable Disconnection
{Warning
Before disconnecting the negative battery
cable, turn off all features, turn the
ignition off, and remove the key,
if equipped, from the vehicle. If this is
not done, you or others could be injured,
and the vehicle could be damaged.
Caution
If the battery is disconnected with the
ignition on or the vehicle in Retained
Accessory Power (RAP), the OnStar
back-up battery will be permanently
discharged and will need to be replaced.
1. Make sure the lamps, features, and accessories are turned off.
2. Turn the ignition off and remove the key, if equipped.
Page 247 of 351
Chevrolet Malibu Owner Manual (GMNA-Localizing-U.S./Canada-
14584249) - 2021 - CRC - 11/9/20
246 Vehicle Care
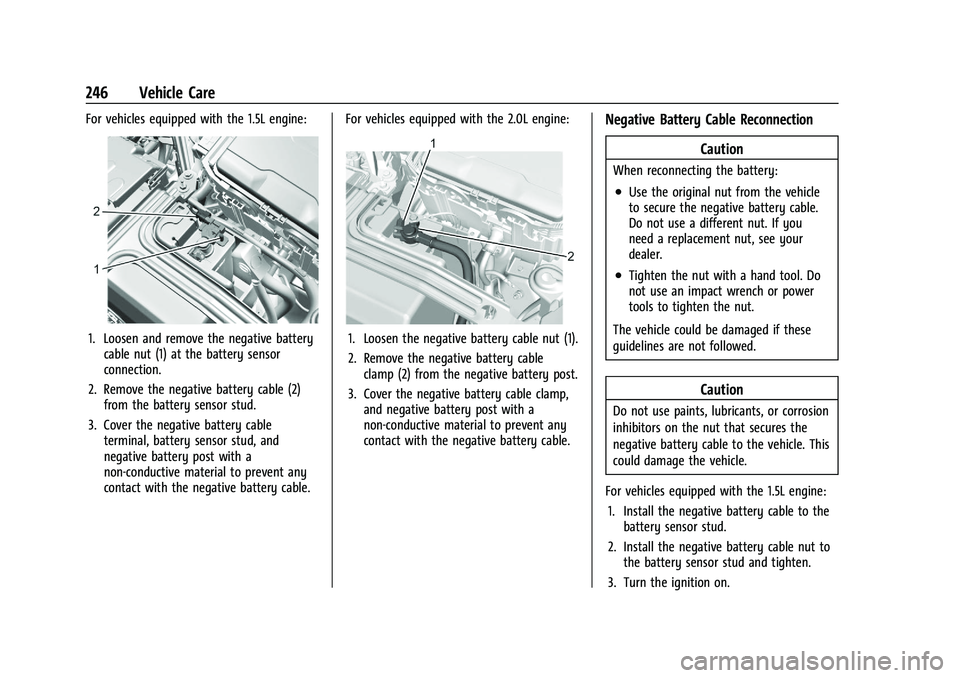
For vehicles equipped with the 1.5L engine:
1. Loosen and remove the negative batterycable nut (1) at the battery sensor
connection.
2. Remove the negative battery cable (2) from the battery sensor stud.
3. Cover the negative battery cable terminal, battery sensor stud, and
negative battery post with a
non-conductive material to prevent any
contact with the negative battery cable. For vehicles equipped with the 2.0L engine:1. Loosen the negative battery cable nut (1).
2. Remove the negative battery cable
clamp (2) from the negative battery post.
3. Cover the negative battery cable clamp, and negative battery post with a
non-conductive material to prevent any
contact with the negative battery cable.
Negative Battery Cable Reconnection
Caution
When reconnecting the battery:
.Use the original nut from the vehicle
to secure the negative battery cable.
Do not use a different nut. If you
need a replacement nut, see your
dealer.
.Tighten the nut with a hand tool. Do
not use an impact wrench or power
tools to tighten the nut.
The vehicle could be damaged if these
guidelines are not followed.
Caution
Do not use paints, lubricants, or corrosion
inhibitors on the nut that secures the
negative battery cable to the vehicle. This
could damage the vehicle.
For vehicles equipped with the 1.5L engine: 1. Install the negative battery cable to the battery sensor stud.
2. Install the negative battery cable nut to the battery sensor stud and tighten.
3. Turn the ignition on.
Page 249 of 351
Chevrolet Malibu Owner Manual (GMNA-Localizing-U.S./Canada-
14584249) - 2021 - CRC - 11/9/20
248 Vehicle Care
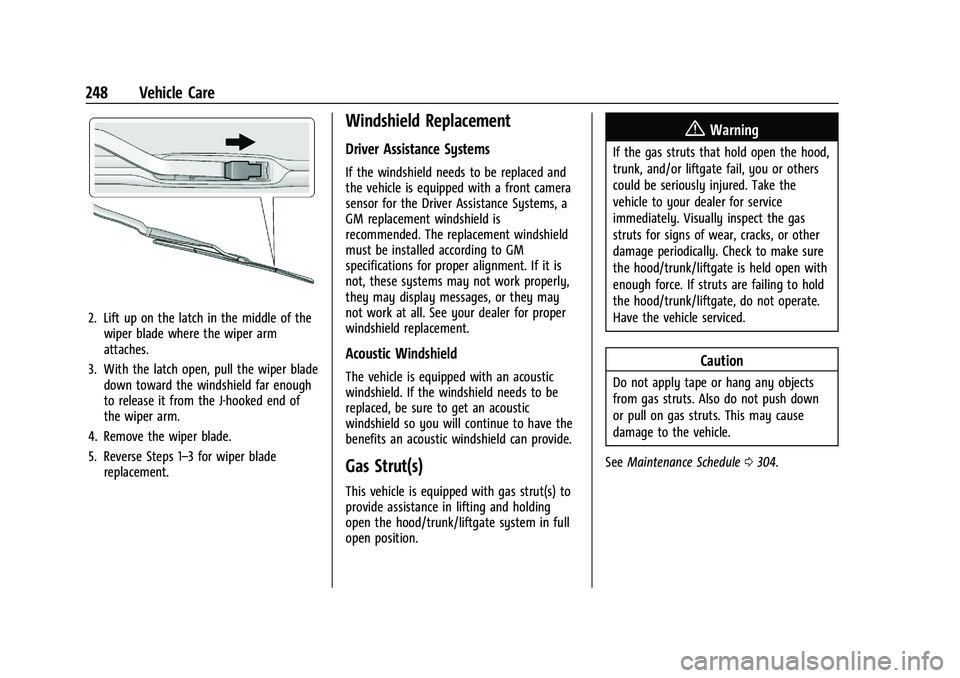
2. Lift up on the latch in the middle of thewiper blade where the wiper arm
attaches.
3. With the latch open, pull the wiper blade down toward the windshield far enough
to release it from the J-hooked end of
the wiper arm.
4. Remove the wiper blade.
5. Reverse Steps 1–3 for wiper blade replacement.
Windshield Replacement
Driver Assistance Systems
If the windshield needs to be replaced and
the vehicle is equipped with a front camera
sensor for the Driver Assistance Systems, a
GM replacement windshield is
recommended. The replacement windshield
must be installed according to GM
specifications for proper alignment. If it is
not, these systems may not work properly,
they may display messages, or they may
not work at all. See your dealer for proper
windshield replacement.
Acoustic Windshield
The vehicle is equipped with an acoustic
windshield. If the windshield needs to be
replaced, be sure to get an acoustic
windshield so you will continue to have the
benefits an acoustic windshield can provide.
Gas Strut(s)
This vehicle is equipped with gas strut(s) to
provide assistance in lifting and holding
open the hood/trunk/liftgate system in full
open position.
{Warning
If the gas struts that hold open the hood,
trunk, and/or liftgate fail, you or others
could be seriously injured. Take the
vehicle to your dealer for service
immediately. Visually inspect the gas
struts for signs of wear, cracks, or other
damage periodically. Check to make sure
the hood/trunk/liftgate is held open with
enough force. If struts are failing to hold
the hood/trunk/liftgate, do not operate.
Have the vehicle serviced.
Caution
Do not apply tape or hang any objects
from gas struts. Also do not push down
or pull on gas struts. This may cause
damage to the vehicle.
See Maintenance Schedule 0304.
Page 261 of 351
Chevrolet Malibu Owner Manual (GMNA-Localizing-U.S./Canada-
14584249) - 2021 - CRC - 11/9/20
260 Vehicle Care
Warning (Continued)
.Overloading the tires can cause
overheating as a result of too
much flexing. There could be a
blowout and a serious crash. See
Vehicle Load Limits0179.
.Underinflated tires pose the same
danger as overloaded tires. The
resulting crash could cause serious
injury. Check all tires frequently to
maintain the recommended
pressure. Tire pressure should be
checked when the tires are cold.
.Overinflated tires are more likely
to be cut, punctured, or broken by
a sudden impact —such as when
hitting a pothole. Keep tires at the
recommended pressure.
.Worn or old tires can cause a
crash. If the tread is badly worn,
replace them.
.Replace any tires that have been
damaged by impacts with
potholes, curbs, etc.
(Continued)
Warning (Continued)
.Improperly repaired tires can cause
a crash. Only the dealer or an
authorized tire service center
should repair, replace, dismount,
and mount the tires.
.Do not spin the tires in excess of
56 km/h (35 mph) on slippery
surfaces such as snow, mud, ice,
etc. Excessive spinning may cause
the tires to explode.
See Tire Pressure for High-Speed
Operation 0267 for inflation pressure
adjustment for high-speed driving.
All-Season Tires
This vehicle may come with all-season tires.
These tires are designed to provide good
overall performance on most road surfaces
and weather conditions. Original equipment
tires designed to GM's specific tire
performance criteria have a TPC specification
code molded onto the sidewall. Original
equipment all-season tires can be identified
by the last two characters of this TPC code,
which will be “MS.” Consider installing winter tires on the
vehicle if frequent driving on snow or
ice-covered roads is expected. All-season tires
provide adequate performance for most
winter driving conditions, but they may not
offer the same level of traction or
performance as winter tires on snow or
ice-covered roads. See
Winter Tires0260.
Winter Tires
This vehicle was not originally equipped
with winter tires. Winter tires are designed
for increased traction on snow and
ice-covered roads. Consider installing winter
tires on the vehicle if frequent driving on ice
or snow covered roads is expected. See your
dealer for details regarding winter tire
availability and proper tire selection. Also,
see Buying New Tires 0274.
With winter tires, there may be decreased
dry road traction, increased road noise, and
shorter tread life. After changing to winter
tires, be alert for changes in vehicle
handling and braking.
If using winter tires:
.Use tires of the same brand and tread
type on all four wheel positions.
Page 266 of 351
Chevrolet Malibu Owner Manual (GMNA-Localizing-U.S./Canada-
14584249) - 2021 - CRC - 11/9/20
Vehicle Care 265
Outward Facing Sidewall:The side of
an asymmetrical tire that has a
particular side that faces outward when
mounted on a vehicle. The side of the
tire that contains a whitewall, bears
white lettering, or bears manufacturer,
brand, and/or model name molding
that is higher or deeper than the same
moldings on the other sidewall of
the tire.
Passenger (P-Metric) Tire
:A tire used
on passenger cars and some light duty
trucks and multipurpose vehicles.
Recommended Inflation Pressure
:
Vehicle manufacturer's recommended
tire inflation pressure as shown on the
tire placard. See Tire Pressure0266 and
Vehicle Load Limits 0179.
Radial Ply Tire
:A pneumatic tire in
which the ply cords that extend to the
beads are laid at 90 degrees to the
centerline of the tread. Rim
:A metal support for a tire and
upon which the tire beads are seated.
Sidewall
:The portion of a tire between
the tread and the bead.
Speed Rating
:An alphanumeric code
assigned to a tire indicating the
maximum speed at which a tire can
operate.
Traction
:The friction between the tire
and the road surface. The amount of
grip provided.
Tread
:The portion of a tire that comes
into contact with the road.
Treadwear Indicators
:Narrow bands,
sometimes called wear bars, that show
across the tread of a tire when only
1.6 mm (1/16 in) of tread remains. See
When It Is Time for New Tires 0273. UTQGS (Uniform Tire Quality Grading
Standards)
:A tire information system
that provides consumers with ratings
for a tire's traction, temperature, and
treadwear. Ratings are determined by
tire manufacturers using government
testing procedures. The ratings are
molded into the sidewall of the tire.
See Uniform Tire Quality Grading 0275.
Vehicle Capacity Weight
:The number
of designated seating positions
multiplied by 68 kg (150 lb) plus the
rated cargo load. See Vehicle Load
Limits 0179.
Vehicle Maximum Load on the Tire
:
Load on an individual tire due to curb
weight, accessory weight, occupant
weight, and cargo weight.
Page 267 of 351
Chevrolet Malibu Owner Manual (GMNA-Localizing-U.S./Canada-
14584249) - 2021 - CRC - 11/9/20
266 Vehicle Care
Vehicle Placard:A label permanently
attached to a vehicle showing the
vehicle capacity weight and the original
equipment tire size and recommended
inflation pressure. See “Tire and Loading
Information Label” underVehicle Load
Limits 0179.
Tire Pressure
Tires need the correct amount of air
pressure to operate effectively.
{Warning
Neither tire underinflation nor
overinflation is good. Underinflated
tires, or tires that do not have
enough air, can result in:
.Tire overloading and overheating,
which could lead to a blowout.
.Premature or irregular wear.
.Poor handling.
.Reduced fuel economy.
(Continued)
Warning (Continued)
Overinflated tires, or tires that have
too much air, can result in:
.Unusual wear.
.Poor handling.
.Rough ride.
.Needless damage from road
hazards.
The Tire and Loading Information label
on the vehicle indicates the original
equipment tires and the correct cold
tire inflation pressures. The
recommended pressure is the minimum
air pressure needed to support the
vehicle's maximum load carrying
capacity. See Vehicle Load Limits 0179. How the vehicle is loaded affects
vehicle handling and ride comfort.
Never load the vehicle with more
weight than it was designed to carry.
When to Check
Check the pressure of the tires once a
month or more. Do not forget the
compact spare, if the vehicle has one.
The compact spare cold tire pressure
should be at 420 kPa (60 psi). See
Compact Spare Tire
0289.
How to Check
Use a good quality pocket-type gauge
to check tire pressure. Proper tire
inflation cannot be determined by
looking at the tire. Check the tire
inflation pressure when the tires are
cold, meaning the vehicle has not been
driven for at least three hours or no
more than 1.6 km (1 mi).
Page 268 of 351
Chevrolet Malibu Owner Manual (GMNA-Localizing-U.S./Canada-
14584249) - 2021 - CRC - 11/9/20
Vehicle Care 267
Remove the valve cap from the tire
valve stem. Press the tire gauge firmly
onto the valve to get a pressure
measurement. If the cold tire inflation
pressure matches the recommended
pressure on the Tire and Loading
Information label, no further adjustment
is necessary. If the inflation pressure is
low, add air until the recommended
pressure is reached. If the inflation
pressure is high, press on the metal
stem in the center of the tire valve to
release air.
Recheck the tire pressure with the tire
gauge.
Put the valve caps back on the valve
stems to keep out dirt and moisture.
Use only valve caps designed for the
vehicle by GM. TPMS sensors could be
damaged and would not be covered by
the vehicle warranty.Tire Pressure for High-Speed
Operation
{Warning
Driving at high speeds, 160 km/h
(100 mph) or higher, puts additional
strain on tires. Sustained high-speed
driving causes excessive heat buildup and
can cause sudden tire failure. This could
cause a crash, and you or others could be
killed. Some high-speed rated tires require
inflation pressure adjustment for
high-speed operation. When speed limits
and road conditions allow the vehicle to
be driven at high speeds, make sure the
tires are rated for high-speed operation,
are in excellent condition, and are set to
the correct cold tire inflation pressure for
the vehicle load.Vehicles with tire sizes listed in the High
Speed Operation Inflation Pressures table
require inflation pressure adjustment when
driving the vehicle at speeds of 160 km/h
(100 mph) or higher. Set the cold tire
inflation pressure to the corresponding value
in the table for the tire size on the vehicle.