2021 BUICK ENVISION instrument cluster
[x] Cancel search: instrument clusterPage 3 of 20

3
Read your Owner’s Manual to learn about the information being relayed by the lights, gauges and indicators on the instrument cluster.
See Introduction in your Owner’s Manual.
Infotainment System Controls
Instrument Panel Vent Control
Infotainment System Touchscreen
Hazard Warning Flashers Button
Auto Stop Disable/Hill Descent ControlF/Lane Keep Assist/Traction Control-StabiliTrak/Auto Parking AssistF/Park AssistF Buttons
Electronic Precision Shift Controls
Wireless Phone Charging PadF
Climate Controls/ Heated & Ventilated Seat ButtonsF
USB Ports/ Accessory Power Outlet
F Optional equipment
Vehicle Ahead
Pedestrian Ahead
Antilock Brake System
Low Tire Pressure
Door Ajar
Charging System
Driver Seat Belt Reminder
2 Passenger Seat Belt Reminder
Page 6 of 20

6
ELECTRONIC PRECISION SHIFT
DRIVER MODE SELECTOR
ELECTRIC PARKING BRAKE
To apply the parking brake, pull the Parking Brake switch on the center console.
To release the parking brake, turn on the ignition, press the brake pedal, and then press the switch.
See Driving and Operating in your Owner’s Manual.
The automatic transmission is electronically controlled using the shift switches on the center console. The selected gear position illuminates in red on the shift switch and is shown on the instrument cluster.
Park — Press the P switch to shift to Park.
Reverse — Pull the R switch to shift to Reverse.
Neutral — Press and hold the N switch until the indicator is red to shift to Neutral.
Note: The transmission will not stay in Neutral for an extended period. It will automatically shift into Park.
Drive — Pull the D switch to shift to Drive.
Manual Mode — With the transmission in Drive, press the M (Manual) switch to shift manu-ally. Pull the left steering wheel paddle to downshift and the right steering wheel paddle to upshift. Pull the D switch to return to Drive.
See Driving and Operating in your Owner’s Manual.
The Driver Mode Selector system can automatically adjust various vehicle control systems based on driving preferences, weather and road conditions.
Press the MODE button on the center console to display the Mode menu on the instrument cluster and activate the next available mode.
Modes
Tour — Use for normal driving.
Snow/Ice (Front-Wheel-Drive models) — Use for enhanced acceleration on snowy roads.
All-Wheel Drive (All-Wheel-Drive models) — Use for enhanced responsiveness.
Sport — Use for enhanced handling and accelera-tion on dry pavement.
Off-Road (All-Wheel-Drive models) — Use for enhanced driving on unpaved roads.
See Driving and Operating in your Owner’s Manual.
Page 9 of 20

9
The Head-Up Display (HUD) projects some operating information on the windshield. The HUD controls are located on the left side of the instrument panel.
HUD HUD
Lift up or press down to adjust the position of the image. It cannot be adjusted side-to-side.
INFO
Press to select from four displays: Speed View; Audio/Phone View; Navigation View; and Performance View.
Brightness
Lift up to brighten or press down to dim the display. Hold down to turn off the display.
See Instruments and Controls in your Owner’s Manual.
F Optional equipment
DRIVER INFORMATION CENTER (DIC)
HEAD-UP DISPLAYF
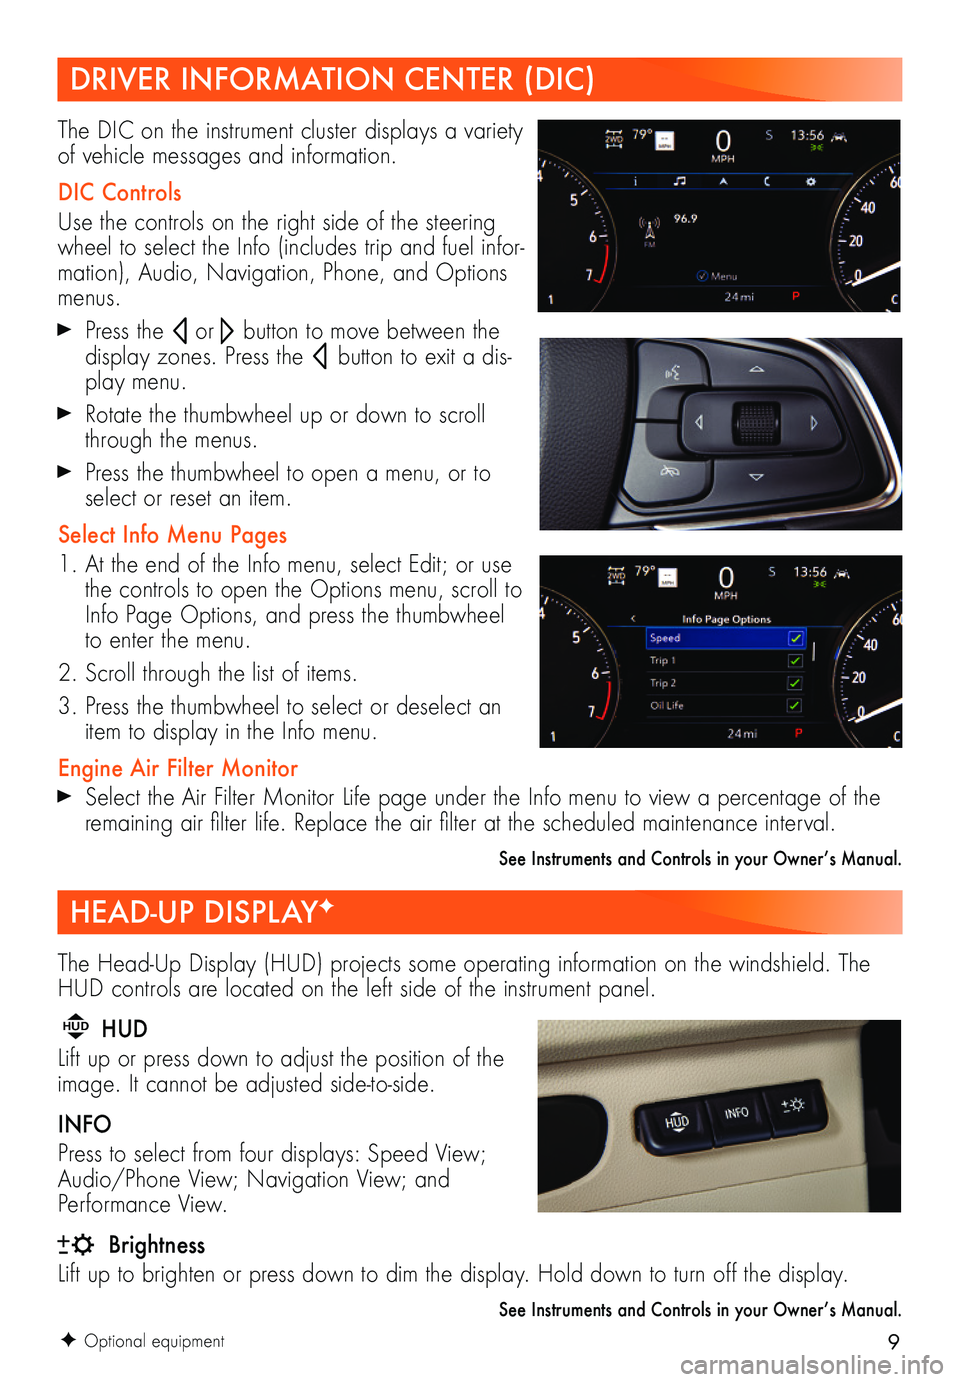
The DIC on the instrument cluster displays a variety of vehicle messages and information.
DIC Controls
Use the controls on the right side of the steering wheel to select the Info (includes trip and fuel infor-mation), Audio, Navigation, Phone, and Options menus.
Press the or button to move between the
display zones. Press the button to exit a dis-play menu.
Rotate the thumbwheel up or down to scroll through the menus.
Press the thumbwheel to open a menu, or to select or reset an item.
Select Info Menu Pages
1. At the end of the Info menu, select Edit; or use the controls to open the Options menu, scroll to Info Page Options, and press the thumbwheel to enter the menu.
2. Scroll through the list of items.
3. Press the thumbwheel to select or deselect an item to display in the Info menu.
Engine Air Filter Monitor Select the Air Filter Monitor Life page under the Info menu to view a percentage of the remaining air filter life. Replace the air filter at the scheduled maintenance interval.
See Instruments and Controls in your Owner’s Manual.
Page 14 of 20

14
LIGHTING
F Optional equipment
Exterior Lamp Controls
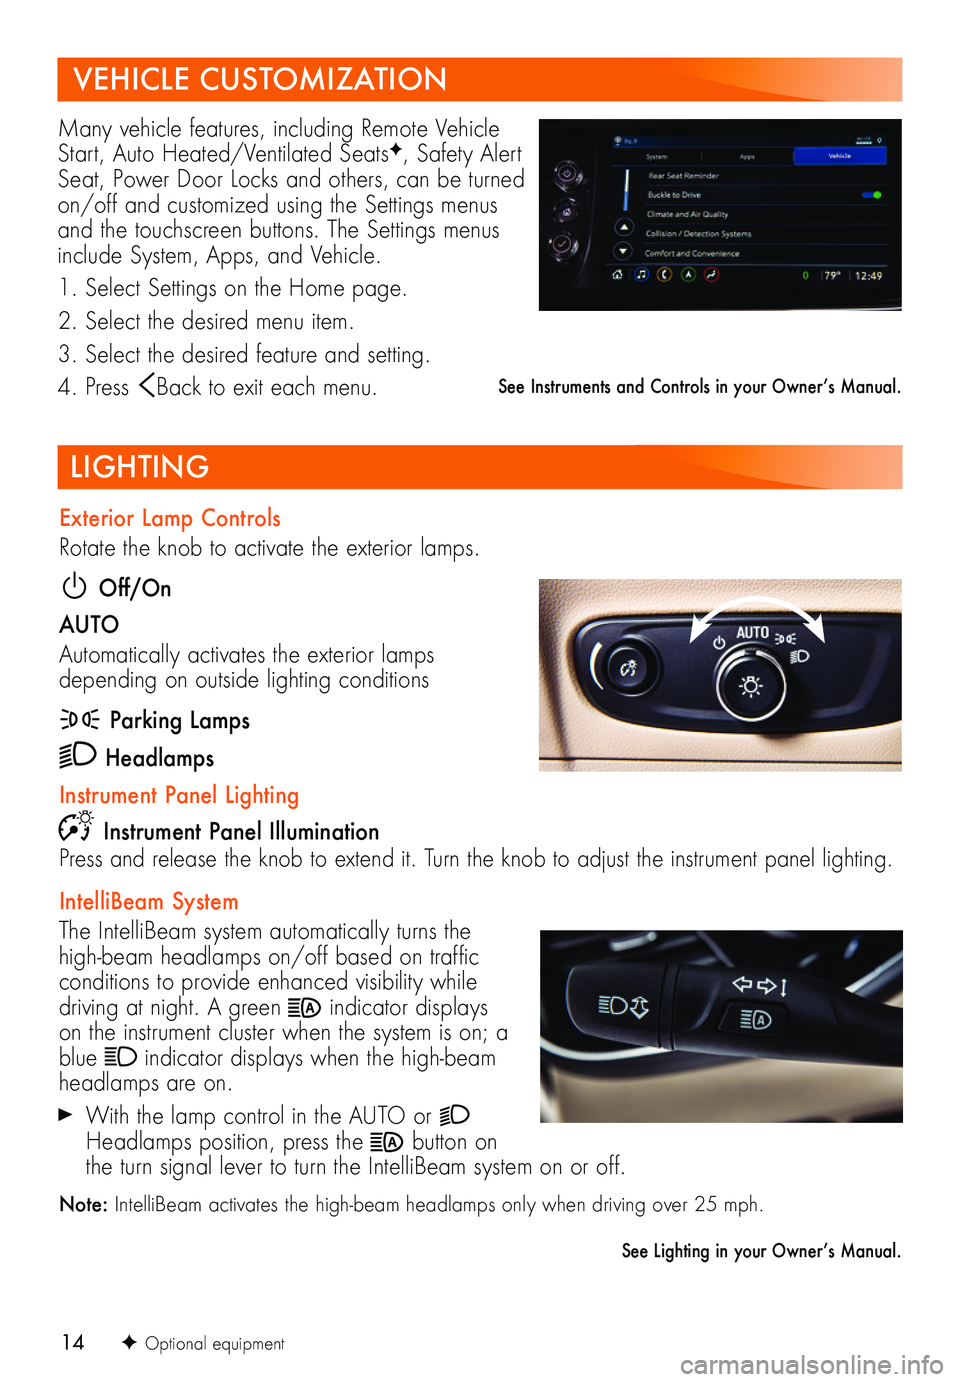
Rotate the knob to activate the exterior lamps.
Off/On
AUTO
Automatically activates the exterior lamps depending on outside lighting conditions
Parking Lamps
Headlamps
Instrument Panel Lighting
Instrument Panel IlluminationPress and release the knob to extend it. Turn the knob to adjust the instrument panel lighting.
IntelliBeam System
The IntelliBeam system automatically turns the high-beam headlamps on/off based on traffic conditions to provide enhanced visibility while driving at night. A green indicator displays on the instrument cluster when the system is on; a blue indicator displays when the high-beam headlamps are on.
With the lamp control in the AUTO or Headlamps position, press the button on the turn signal lever to turn the IntelliBeam system on or off.
Note: IntelliBeam activates the high-beam headlamps only when driving over 25 mph.
See Lighting in your Owner’s Manual.
Many vehicle features, including Remote Vehicle Start, Auto Heated/Ventilated SeatsF, Safety Alert Seat, Power Door Locks and others, can be turned on/off and customized using the Settings menus and the touchscreen buttons. The Settings menus include System, Apps, and Vehicle.
1. Select Settings on the Home page.
2. Select the desired menu item.
3. Select the desired feature and setting.
4. Press Back to exit each menu.
VEHICLE CUSTOMIZATION
See Instruments and Controls in your Owner’s Manual.
Page 19 of 20

19F Optional equipment
DRIVER ASSISTANCE SYSTEMS
UNIVERSAL REMOTE SYSTEMF
TIRE PRESSURE MONITORING WITH TIRE FILL ALERT
Enhanced Automatic Parking AssistF — The system can search for a parallel or perpendic-ular parking space and then steer and brake the vehicle into that space while shifting gears as needed. It can also help you unpark the vehicle after parallel parking. While using the system, you need to remain in your vehicle and be prepared to override and take control.
To activate the system, press the Auto Parking Assist button on the center console. A parking assist display will be shown. Follow all instructions as directed.
See Driving and Operating in your Owner’s Manual.
The Universal Remote System on the overhead console enables your vehicle to control 3 different devices, ranging from garage doors and gates to home lighting. Go to homelink.com for detailed videos and instructions on how to program the Universal Remote System. For additional assistance, call 1-800-355-3515.
See Instruments and Controls in your Owner’s Manual.
The Low Tire Pressure warning light on the instrument cluster illuminates when one or more of the vehicle’s tires is significantly underinflated. Fill the tires to the proper tire pres-sures listed on the Tire and Loading Information label, located below the driver’s door latch. Current tire pressures can be viewed on the Driver Information Center.
The Tire Fill Alert provides visual and audible alerts to help when inflating a tire to the rec-ommended tire pressure. With the vehicle on, the horn sounds and the turn signals change from flashing to solid when the recommended pressure is reached.
See Vehicle Care in your Owner’s Manual.
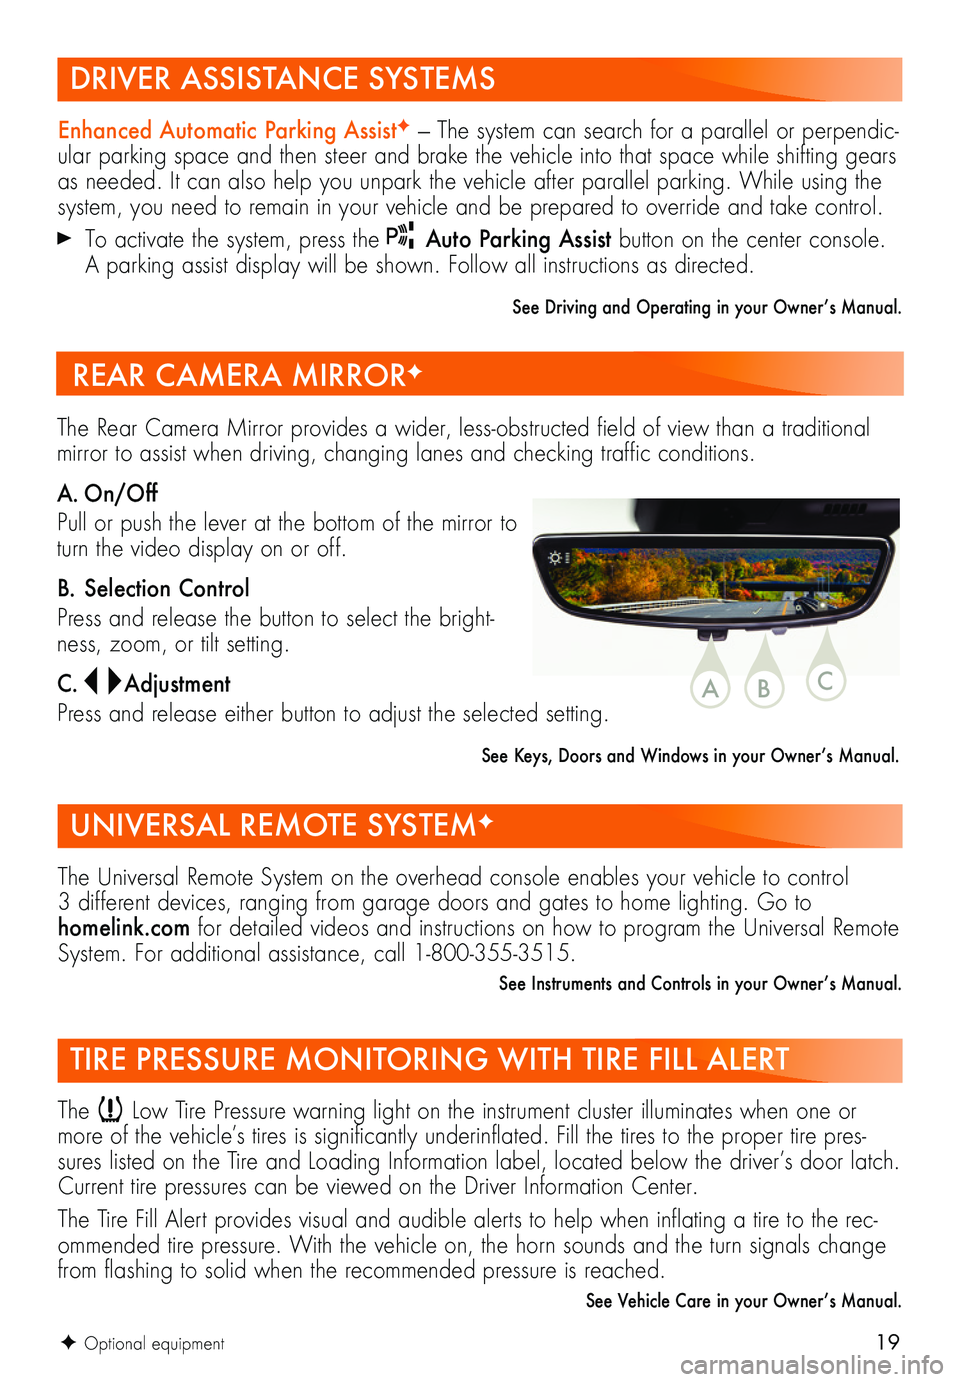
The Rear Camera Mirror provides a wider, less-obstructed field of view than a traditional mirror to assist when driving, changing lanes and checking traffic conditions.
A. On/Off
Pull or push the lever at the bottom of the mirror to turn the video display on or off.
B. Selection Control
Press and release the button to select the bright-ness, zoom, or tilt setting.
C. Adjustment
Press and release either button to adjust the selected setting.
See Keys, Doors and Windows in your Owner’s Manual.
REAR CAMERA MIRRORF
CBA