2021 ALFA ROMEO STELVIO transmission oil
[x] Cancel search: transmission oilPage 14 of 280

12
JUMP STARTING .................................... 201
Remote Battery Connection Posts......202
Jump Starting Procedure.....................203
Bump Starting ..................................204
ENGINE OVERHEATING ......................... 204 MANUAL PARK RELEASE ...................... 205TOWING A DISABLED VEHICLE ............. 205
Four-Wheel Drive (AWD) Models .........206
TOW EYES .............................................. 206
ENHANCED ACCIDENT RESPONSE
SYSTEM (EARS) ..................................... 207EVENT DATA RECORDER (EDR) ............ 207
SERVICING AND MAINTENANCE
SCHEDULED SERVICING ....................... 208
Periodic Checks ...................................208
Heavy Usage Of The Vehicle ...............208
Maintenance Plan (2.0L Engine) ........209
Maintenance Plan (2.9L Engine) ........212
ENGINE COMPARTMENT....................... 214
Checking Levels — 2.0L Engine .......... 214
Checking Levels — 2.9L Engine .......... 215
Engine Oil ............................................. 215
Engine Coolant Fluid............................216
Washer Fluid For Windshield/
Headlights ............................................ 217 Brake Fluid ...........................................217
Automatic Transmission Activation
System Oil ............................................ 217 Useful Advice For Extending The Life Of
Your Battery..........................................217 Battery ..................................................217
Pressure Washing ................................ 218
BATTERY RECHARGING ......................... 218
Important Notes .................................. 218
VEHICLE MAINTENANCE ........................ 219
Engine Oil ............................................. 219
Engine Oil Filter ................................... 220
Engine Air Cleaner Filter ..................... 220
Air Conditioning System
Maintenance........................................ 220 Lubricating Moving Parts Of The
Bodywork ............................................. 220 Windshield Wiper................................. 221
Exhaust System ................................... 222
Cooling System .................................... 223
Braking System.................................... 224
Automatic Transmission ..................... 225
Replacing The Battery ......................... 225
Fuses .................................................... 225
Bulb Replacement ............................... 229
TIRES ...................................................... 233
Tire Safety Information .................... 233
Tires — General Information .............. 239
Spare Tires — If Equipped .................. 244
Wheel And Wheel Trim Care ............ 245
Tire Types ............................................. 246
Tire Chains and Traction Devices ....... 247
Tire Rotation Recommendations........ 247
DEPARTMENT OF TRANSPORTATION
UNIFORM TIRE QUALITY GRADES ......... 248
Treadwear ............................................ 248
Traction Grades ................................... 248
Temperature Grades ........................... 248
STORING THE VEHICLE ......................... 249 BODYWORK ........................................... 249
Protection Against Atmospheric
Agents .................................................. 249 Corrosion Warranty ............................. 250
Preserving The Bodywork .................. 250
INTERIORS ............................................. 251
Seats And Fabric Parts ....................... 251
Leather Seats ...................................... 251
Plastic And Coated Parts .................... 251
Alcantara Parts — If Equipped ............ 251
Genuine Leather Parts........................ 251
Carbon Fiber Parts .............................. 252
TECHNICAL SPECIFICATIONS
VEHICLE IDENTIFICATION
NUMBER (VIN) ....................................... 253
Vehicle Identification Number............ 253
Vehicle Identification Number
(VIN) Plate ............................................ 253
ENGINE .................................................. 254
POWER SUPPLY ..................................... 255 TRANSMISSION ..................................... 255BRAKES.................................................. 255
SUSPENSION ......................................... 256
STEERING .............................................. 256
DIMENSIONS ......................................... 257
Luggage Compartment Volume ......... 259
WEIGHTS ................................................ 259
21_GU_OM_EN_USC_t.book Page 12
Page 17 of 280
15
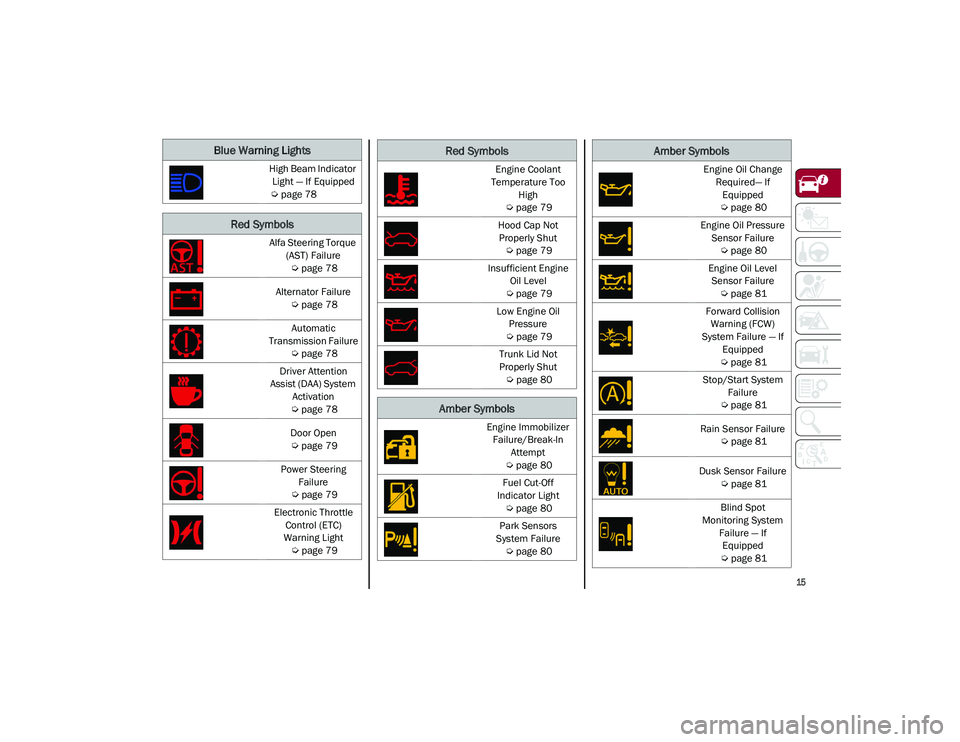
Blue Warning Lights
High Beam Indicator Light — If Equipped
Ú
page 78
Red Symbols
Alfa Steering Torque
(AST) Failure
Ú
page 78
Alternator Failure
Ú
page 78
Automatic
Transmission Failure
Ú
page 78
Driver Attention
Assist (DAA) System Activation
Ú
page 78
Door Open
Ú
page 79
Power Steering Failure
Ú
page 79
Electronic Throttle Control (ETC)
Warning Light
Ú
page 79
Engine Coolant
Temperature Too High
Ú
page 79
Hood Cap Not Properly Shut
Ú
page 79
Insufficient Engine Oil Level
Ú
page 79
Low Engine Oil Pressure
Ú
page 79
Trunk Lid Not
Properly Shut
Ú
page 80
Amber Symbols
Engine Immobilizer
Failure/Break-In Attempt
Ú
page 80
Fuel Cut-Off
Indicator Light
Ú
page 80
Park Sensors
System Failure
Ú
page 80
Red Symbols
Engine Oil Change
Required— If Equipped
Ú
page 80
Engine Oil Pressure Sensor Failure
Ú
page 80
Engine Oil Level Sensor Failure
Ú
page 81
Forward Collision Warning (FCW)
System Failure — If Equipped
Ú
page 81
Stop/Start System Failure
Ú
page 81
Rain Sensor Failure
Ú
page 81
Dusk Sensor Failure
Ú
page 81
Blind Spot
Monitoring System Failure — If Equipped
Ú
page 81
Amber Symbols
21_GU_OM_EN_USC_t.book Page 15
Page 80 of 280
GETTING TO KNOW YOUR INSTRUMENT PANEL
78
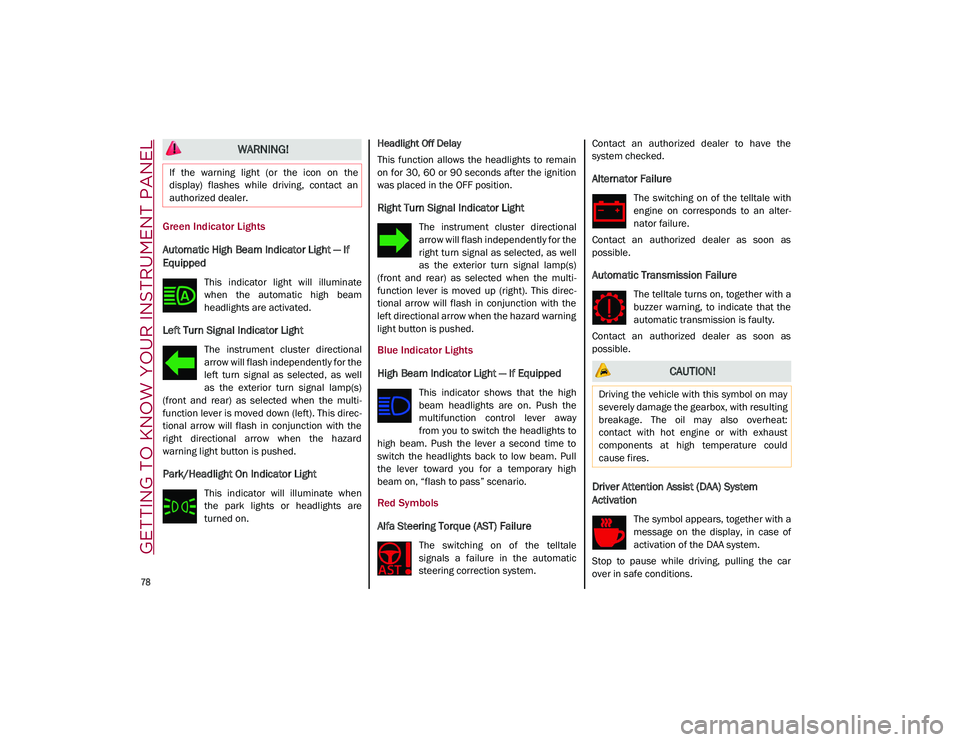
Green Indicator Lights
Automatic High Beam Indicator Light — If
Equipped
This indicator light will illuminate
when the automatic high beam
headlights are activated.
Left Turn Signal Indicator Light
The instrument cluster directional
arrow will flash independently for the
left turn signal as selected, as well
as the exterior turn signal lamp(s)
(front and rear) as selected when the multi -
function lever is moved down (left). This direc -
tional arrow will flash in conjunction with the
right directional arrow when the hazard
warning light button is pushed.
Park/Headlight On Indicator Light
This indicator will illuminate when
the park lights or headlights are
turned on. Headlight Off Delay
This function allows the headlights to remain
on for 30, 60 or 90 seconds after the ignition
was placed in the OFF position.
Right Turn Signal Indicator Light
The instrument cluster directional
arrow will flash independently for the
right turn signal as selected, as well
as the exterior turn signal lamp(s)
(front and rear) as selected when the multi -
function lever is moved up (right). This direc -
tional arrow will flash in conjunction with the
left directional arrow when the hazard warning
light button is pushed.
Blue Indicator Lights
High Beam Indicator Light — If Equipped
This indicator shows that the high
beam headlights are on. Push the
multifunction control lever away
from you to switch the headlights to
high beam. Push the lever a second time to
switch the headlights back to low beam. Pull
the lever toward you for a temporary high
beam on, “flash to pass” scenario.
Red Symbols
Alfa Steering Torque (AST) Failure
The switching on of the telltale
signals a failure in the automatic
steering correction system. Contact an authorized dealer to have the
system checked.
Alternator Failure
The switching on of the telltale with
engine on corresponds to an alter
-
nator failure.
Contact an authorized dealer as soon as
possible.
Automatic Transmission Failure
The telltale turns on, together with a
buzzer warning, to indicate that the
automatic transmission is faulty.
Contact an authorized dealer as soon as
possible.
Driver Attention Assist (DAA) System
Activation
The symbol appears, together with a
message on the display, in case of
activation of the DAA system.
Stop to pause while driving, pulling the car
over in safe conditions.
WARNING!
If the warning light (or the icon on the
display) flashes while driving, contact an
authorized dealer.
CAUTION!
Driving the vehicle with this symbol on may
severely damage the gearbox, with resulting
breakage. The oil may also overheat:
contact with hot engine or with exhaust
components at high temperature could
cause fires.
21_GU_OM_EN_USC_t.book Page 78
Page 90 of 280
STARTING AND OPERATING
88
After Starting — Warming Up The Engine
Proceed as follows:
Travel slowly, letting the engine run at a
reduced RPM, without accelerating
suddenly.
It is recommended to wait until the digital
engine coolant temperature indicator starts
to rise for maximum performance.
Stopping The Engine
To stop the engine, proceed as follows:
1. Park the vehicle in a position that is notdangerous for oncoming traffic.
2. Engage the PARK (P) mode.
3. With engine idling, push the ENGINE START/STOP button on the steering wheel
to STOP the engine.
NOTE:
Do not leave the ignition in ACC mode when
the engine is off.
To shut off the engine with vehicle speed
greater than 5 mph (8 km/h), you must push
and hold the ignition or push the ENGINE
START/STOP button three times consecutively
within a few seconds. The engine will shut
down, and the ignition will be placed in the
ACC mode With the keyless ignition system, it is possible
to exit the vehicle taking the key fob with you,
without the engine switching off. The vehicle
will inform about the absence of the key on
board, when the doors are closed.
After the engine has stopped (cycling from the
ACC to the OFF position) the accessories are
still powered for about three minutes, or until
a door is opened.
When the ignition is in the OFF mode, the
window switches remain active for three
minutes. Opening a front door will cancel this
function.
After severe driving, idle the engine to allow
the temperature inside the engine compart
-
ment to cool before shutting off the engine.
Turbocharger Cool Down
It is recommended before switching the
vehicle off, to keep the engine idling for a few
minutes so that the turbocharger can be suit -
ably lubricated. This procedure is particularly
recommended after severe driving.
After a full load operation, keep the engine
idling for three to five minutes before
switching it off.
This time allows the lubricating oil and the
engine coolant to eliminate the excessive heat
from combustion chamber, bearings, inner
components and turbocharger.
WARNING!
Never pour fuel or other flammable liquid
into the throttle body air inlet opening in
an attempt to start the vehicle. This could
result in flash fire causing serious
personal injury.
Do not attempt to push or tow your vehicle
to get it started. Vehicles equipped with an
automatic transmission cannot be started
this way. Unburned fuel could enter the
catalytic converter and once the engine
has started, ignite and damage the
converter and vehicle.
If the vehicle has a discharged battery,
booster cables may be used to obtain a
start from a booster battery or the battery
in another vehicle. This type of start can
be dangerous if done improperly
Ú
page 201.
CAUTION!
To prevent damage to the starter, do not
continuously crank the engine for more than
25 seconds at a time. Wait 60 seconds
before trying again.
21_GU_OM_EN_USC_t.book Page 88
Page 100 of 280
STARTING AND OPERATING
98
ALFA DNA SELECTOR
Alfa DNA System
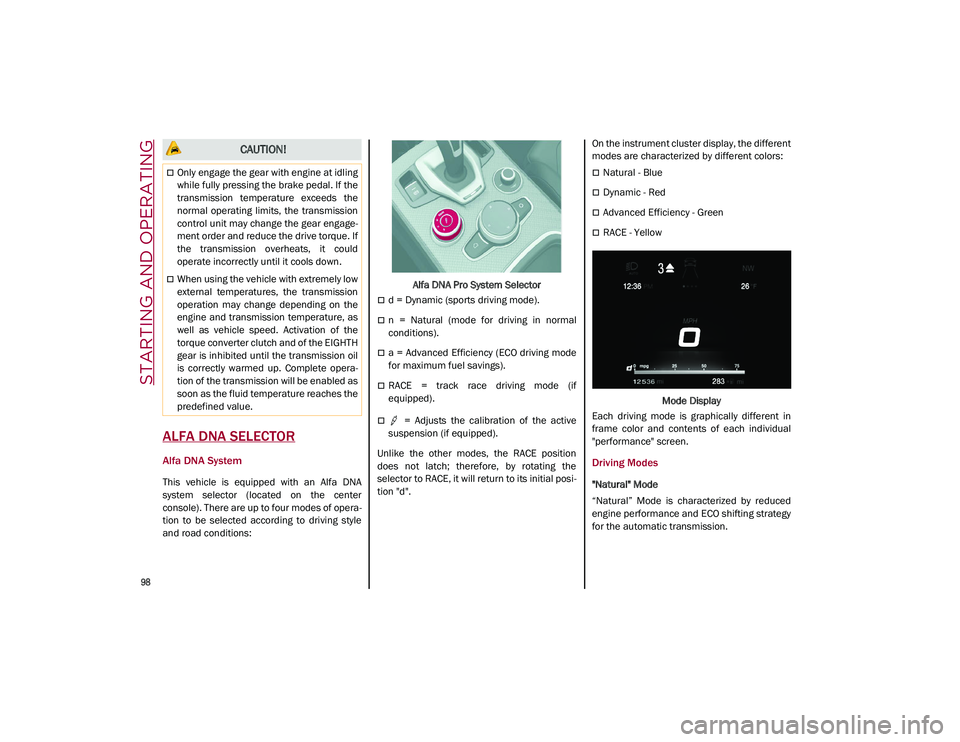
This vehicle is equipped with an Alfa DNA
system selector (located on the center
console). There are up to four modes of opera-
tion to be selected according to driving style
and road conditions: Alfa DNA Pro System Selector
d = Dynamic (sports driving mode).
n = Natural (mode for driving in normal
conditions).
a = Advanced Efficiency (ECO driving mode
for maximum fuel savings).
RACE = track race driving mode (if
equipped).
= Adjusts the calibration of the active
suspension (if equipped).
Unlike the other modes, the RACE position
does not latch; therefore, by rotating the
selector to RACE, it will return to its initial posi -
tion "d". On the instrument cluster display, the different
modes are characterized by different colors:
Natural - Blue
Dynamic - Red
Advanced Efficiency - Green
RACE - Yellow
Mode Display
Each driving mode is graphically different in
frame color and contents of each individual
"performance" screen.
Driving Modes
"Natural" Mode
“Natural” Mode is characterized by reduced
engine performance and ECO shifting strategy
for the automatic transmission.
CAUTION!
Only engage the gear with engine at idling
while fully pressing the brake pedal. If the
transmission temperature exceeds the
normal operating limits, the transmission
control unit may change the gear engage -
ment order and reduce the drive torque. If
the transmission overheats, it could
operate incorrectly until it cools down.
When using the vehicle with extremely low
external temperatures, the transmission
operation may change depending on the
engine and transmission temperature, as
well as vehicle speed. Activation of the
torque converter clutch and of the EIGHTH
gear is inhibited until the transmission oil
is correctly warmed up. Complete opera -
tion of the transmission will be enabled as
soon as the fluid temperature reaches the
predefined value.
21_GU_OM_EN_USC_t.book Page 98
Page 219 of 280
217
Washer Fluid For Windshield/Headlights
The windshield and headlight (if equipped)
washer fluid reservoir is equipped with a tele-
scopic filler neck.
If the level is too low, remove reservoir cap and
lift the filler neck. Then, add the fluid
described
Ú
page 263. After filling the reser -
voir, lower the filler neck and install the reser -
voir cap until you hear it click.
NOTE:
The headlight washers are activated every 10
activations of the windshield washer.
note:
The headlight washing system will not work if
the liquid level is low (situation indicated by
the symbol on the instrument cluster display
Ú
page 69). The windshield washer will keep
working.
On vehicles equipped with headlight washers,
there is a reference notch on the dipstick:
ONLY the windshield/rear window washer
operates with the level below this reference.
Brake Fluid
Check that the fluid is at the maximum level. If
the fluid level in the tank is low, contact an
authorized dealer to have the system checked.
Automatic Transmission Activation System
Oil
The transmission control oil level should only
be checked at an authorized dealer.
Useful Advice For Extending The Life Of
Your Battery
To avoid draining your battery and make it last
longer, observe the following instructions:
When you park the vehicle, ensure that the
doors and liftgate are closed properly to
prevent any lights from remaining on inside
the passenger's compartment.
Do not keep accessories (e.g. radio, hazard
warning lights, etc.) switched on for a long
time when the engine is not running.
Before performing any operation on the
electrical system, disconnect the negative
battery cable.
If you wish to install electrical accessories
after purchasing the vehicle that require
permanent electrical supply (e.g. alarm, etc.),
or accessories which influence the electrical
supply requirements, contact an authorized
dealer, who’s qualified staff will evaluate the
overall electrical consumption.
NOTE:
After the battery is disconnected, the steering
must be initialized. The warning light on the
instrument cluster display switches on to indi
-
cate this. To carry out this procedure, simply
turn the steering wheel all the way from one
end to the other, and then turn it back to the
central position.Battery
The battery does not require the electrolyte to
be topped up with distilled water. A periodic
check carried out at an authorized dealer,
however, is necessary to check efficiency.
Follow the battery manufacturer's instructions
for maintenance.
CAUTION!
If the charge level remains under 50% for a
long time, the battery may be damaged by
sulfation, reducing its capacity and
efficiency during the vehicle start. The
battery is also more prone to the risk of
freezing (at temperatures as high as 14°F
(-10°C).
21_GU_OM_EN_USC_t.book Page 217
Page 227 of 280
225
Automatic Transmission
Use only a transmission oil with the character-
istics indicated
Ú
page 263.
Special Additives
Do not use any type of additive with the auto -
matic transmission oil. The automatic trans -
mission oil is a product designed specially for this vehicle and its performance may be
compromised through the use of further addi
-
tives.
Frequency of Oil Changes
In normal vehicle operating conditions, it is not
necessary to change the transmission oil.
Replacing The Battery
If necessary, replace the battery with another
battery with the same specifications. It is
advised to contact an authorized dealer for
replacement.
Follow the battery manufacturer's instructions
for maintenance.
Fuses
General Information
The fuses protect electrical systems against
excessive current.
When a device does not work, you must check
the electrical circuit inside of the fuse for a
break/melt.
Also, please be aware that using power outlets
for extended periods of time with the engine
off may result in vehicle battery discharge.
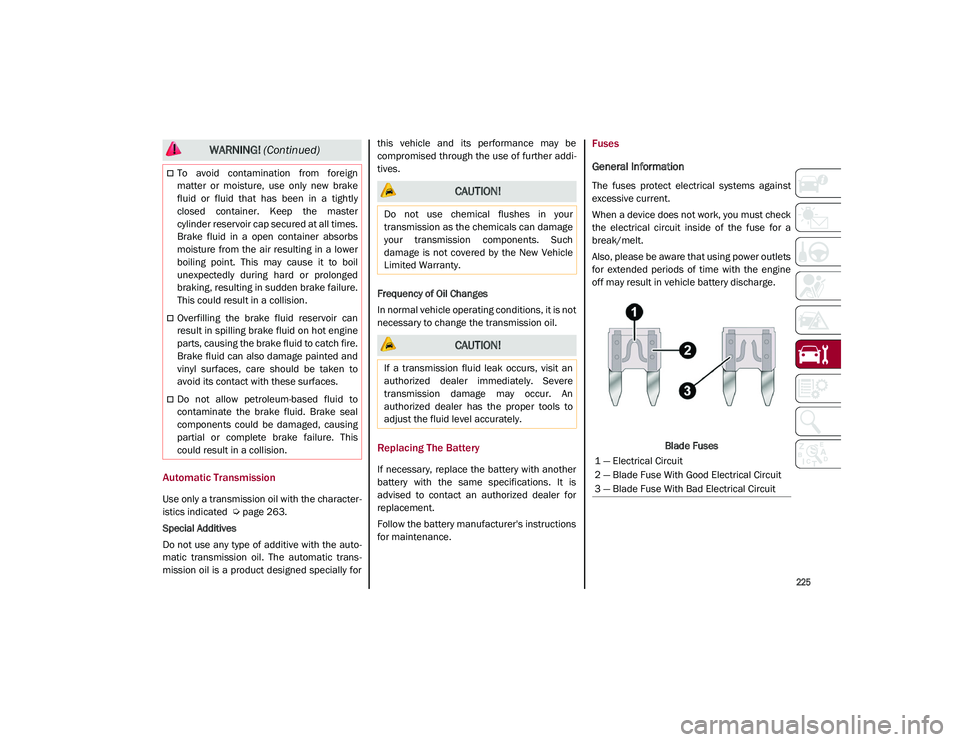
Blade Fuses
To avoid contamination from foreign
matter or moisture, use only new brake
fluid or fluid that has been in a tightly
closed container. Keep the master
cylinder reservoir cap secured at all times.
Brake fluid in a open container absorbs
moisture from the air resulting in a lower
boiling point. This may cause it to boil
unexpectedly during hard or prolonged
braking, resulting in sudden brake failure.
This could result in a collision.
Overfilling the brake fluid reservoir can
result in spilling brake fluid on hot engine
parts, causing the brake fluid to catch fire.
Brake fluid can also damage painted and
vinyl surfaces, care should be taken to
avoid its contact with these surfaces.
Do not allow petroleum-based fluid to
contaminate the brake fluid. Brake seal
components could be damaged, causing
partial or complete brake failure. This
could result in a collision.
WARNING! (Continued)
CAUTION!
Do not use chemical flushes in your
transmission as the chemicals can damage
your transmission components. Such
damage is not covered by the New Vehicle
Limited Warranty.
CAUTION!
If a transmission fluid leak occurs, visit an
authorized dealer immediately. Severe
transmission damage may occur. An
authorized dealer has the proper tools to
adjust the fluid level accurately.
1 — Electrical Circuit
2 — Blade Fuse With Good Electrical Circuit
3 — Blade Fuse With Bad Electrical Circuit
21_GU_OM_EN_USC_t.book Page 225
Page 264 of 280

TECHNICAL SPECIFICATIONS
262
FLUID CAPACITIES
2.0L Engine
USMetric
Fuel tank 16.9 Gallons64 Liters
Fuel tank reserve 2.5 Gallons9.6 Liters
Engine cooling system 2.3 Gallons8.8 Liters
Intercooler cooling system 1.4 Gallons5.25 Liters
Engine oil sump and filter 5.5 Quarts5.2 Liters
Hydraulic brake circuit 0.9 Quarts0.9 Liters
Windshield washer fluid reservoir 1.1 Gallons4.1 Liters
Automatic transmission 9.8 Quarts9.3 Liters
RDU 230-LSD differential 0.9 Quarts0.9 Liters
RDU 210-eLSD differential (if equipped) 1.4 Quarts1.3 Liters
RDU 210/215-LSD differential 1.1 Quarts1.1 Liters
AWD System FAD transfer case 0.5 Quarts0.5 Liters
AWD System Transfer Case 0.7 Quarts0.7 Liters
2.9L Engine
USMetric
Fuel tank 16.9 Gallons64 Liters
Fuel tank reserve 2.5 Gallons9.6 Liters
Engine cooling system 2.95 Gallons11.2 Liters
Intercooler cooling system 1.5 Gallons5.75 Liters
Engine oil sump and filter 7.2 Quarts7 Liters
Hydraulic brake circuit 0.9 Quarts0.9 Liters
21_GU_OM_EN_USC_t.book Page 262