Page 41 of 96
Operation and important riding points
5-3
5
NOTICE
ECA11043
For maximum engine life, never ac-
celerate hard when the engine is
cold!
EAU45312
TIP
This model is equipped with a lean an-
gle sensor to stop the engine in case of
a turnover. In this case, turn the main
switch off and then on. Failing to do so
will prevent the engine from starting
even though the engine will crank
when pushing the start switch.
UB6GE0E0.book Page 3 Wednesday, August 28, 2019 11:11 AM
Page 42 of 96

Operation and important riding points
5-4
5
EAU16674
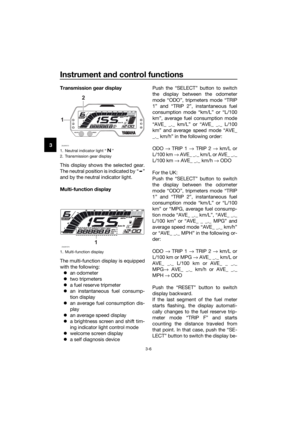
Shifting
Shifting gears lets you control the
amount of engine power available for
starting off, accelerating, climbing hills,
etc.
The gear positions are shown in the il-
lustration.
TIP
To shift the transmission into the neu-
tral position ( ), press the shift pedal
down repeatedly until it reaches the
end of its travel, and then slightly raise
it.
NOTICE
ECA10261
Even with the transmission in
the neutral position, do not
coast for long periods of time
with the engine off, and do not
tow the motorcycle for long dis-
tances. The transmission is
properly lubricated only when
the engine is running. Inade-
quate lubrication may damage
the transmission.
Always use the clutch while
changing gears to avoid dam-
aging the engine, transmission,and drive train, which are not
designed to withstand the
shock of forced shifting.
EAU85370To start out and accelerate
1. Pull the clutch lever to disengage
the clutch.
2. Shift the transmission into first
gear. The neutral indicator light
should go out.
3. Open the throttle gradually, and at
the same time, release the clutch
lever slowly.
4. After starting out, close the throt-
tle, and at the same time, quickly
pull the clutch lever in.
5. Shift the transmission into second
gear. (Make sure not to shift the
transmission into the neutral posi-
tion.)
6. Open the throttle part way and
gradually release the clutch lever.
7. Follow the same procedure when
shifting to the next higher gear.
EAU85380To decelerate
1. Release the throttle and apply
both the front and the rear brakes
smoothly to slow the motorcycle.
2. As the vehicle decelerates, shift to
a lower gear.
3. When the engine is about to stall
or runs roughly, pull the clutch le-
ver in, use the brakes to slow the
motorcycle, and continue to
downshift as necessary.
4. Once the motorcycle has
stopped, the transmission can be
shifted into the neutral position.
1. Neutral position
2. Shift pedal
1 2 3 4 5
6
1
2 N
UB6GE0E0.book Page 4 Wednesday, August 28, 2019 11:11 AM
Page 43 of 96

Operation and important riding points
5-5
5 The neutral indicator light should
come on and then the clutch lever
can be released.
WARNING
EWA17380
Improper braking can cause
loss of control or traction. Al-
ways use both brakes and apply
them smoothly.
Make sure that the motorcycle
and the engine have sufficiently
slowed before shifting to a low-
er gear. Engaging a lower gear
when the vehicle or engine
speed is too high could make
the rear wheel lose traction or
the engine to over-rev. This
could cause loss of control, an
accident and injury. It could also
cause engine or drive train dam-
age.
EAU16811
Tips for reducing fuel con-
sumption
Fuel consumption depends largely on
your riding style. Consider the follow-
ing tips to reduce fuel consumption:
Shift up swiftly, and avoid high en-
gine speeds during acceleration.
Do not rev the engine while shift-
ing down, and avoid high engine
speeds with no load on the en-
gine.
Turn the engine off instead of let-
ting it idle for an extended length
of time (e.g., in traffic jams, at traf-
fic lights or at railroad crossings).
UB6GE0E0.book Page 5 Wednesday, August 28, 2019 11:11 AM
Page 44 of 96
Operation and important riding points
5-6
5
EAU17214
Parking
When parking, stop the engine, and
then remove the key from the main
switch.
WARNING
EWA10312
Since the engine and exhaust
system can become very hot,
park in a place where pedestri-
ans or children are not likely to
touch them and be burned.
Do not park on a slope or on soft
ground, otherwise the vehicle
may overturn, increasing the
risk of a fuel leak and fire.
Do not park near grass or other
flammable materials which
might catch fire.
UB6GE0E0.book Page 6 Wednesday, August 28, 2019 11:11 AM
Page 45 of 96

Periodic maintenance and adjustment
6-1
6
EAU17246
Periodic inspection, adjustment, and
lubrication will keep your vehicle in the
safest and most efficient condition
possible. Safety is an obligation of the
vehicle owner/operator. The most im-
portant points of vehicle inspection,
adjustment, and lubrication are ex-
plained on the following pages.
The intervals given in the periodic
maintenance charts should be simply
considered as a general guide under
normal riding conditions. However, de-
pending on the weather, terrain, geo-
graphical location, and individual use,
the maintenance intervals may need to
be shortened.
WARNING
EWA10322
Failure to properly maintain the vehi-
cle or performing maintenance ac-
tivities incorrectly may increase
your risk of injury or death during
service or while using the vehicle. If
you are not familiar with vehicle ser-
vice, have a Yamaha dealer perform
service.
WARNING
EWA15123
Turn off the engine when performing
maintenance unless otherwise
specified.
A running engine has moving
parts that can catch on body
parts or clothing and electrical
parts that can cause shocks or
fires.
Running the engine while ser-
vicing can lead to eye injury,
burns, fire, or carbon monoxide
poisoning – possibly leading todeath. See page 1-3 for more in-
formation about carbon monox-
ide.
WARNING
EWA15461
Brake discs, calipers, drums, and
linings can become very hot during
use. To avoid possible burns, let
brake components cool before
touching them.
UB6GE0E0.book Page 1 Wednesday, August 28, 2019 11:11 AM
Page 46 of 96

Periodic maintenance and adjustment
6-2
6
EAU17303
Emission controls not only function to
ensure cleaner air, but are also vital to
proper engine operation and maximum
performance. In the following periodic
maintenance charts, the services relat-
ed to emissions control are grouped
separately. These services require
specialized data, knowledge, and
equipment. Maintenance, replace-
ment, or repair of the emission control
devices and systems may be per-
formed by any repair establishment or
individual that is certified (if applicable).
Yamaha dealers are trained and
equipped to perform these particular
services.
EAU85230
Tool kit
The tool kit is in the location shown.
The information included in this manual
and the tools provided in the tool kit are
intended to assist you in the perfor-
mance of preventive maintenance and
minor repairs. However, a torque
wrench and other tools are necessary
to perform certain maintenance work
correctly.
TIP
If you do not have the tools or experi-
ence required for a particular job, have
your Yamaha dealer perform it for you.
1. Tool kit
1
UB6GE0E0.book Page 2 Wednesday, August 28, 2019 11:11 AM
Page 47 of 96
Periodic maintenance and adjustment
6-3
6
EAU71021
TIP
The annual checks must be performed every year, except if a distance-
based maintenance is performed instead.
From 30000 km (17500 mi), repeat the maintenance intervals starting from
6000 km (3500 mi).
Items marked with an asterisk should be performed by a Yamaha dealer as
they require special tools, data and technical skills.
EAU71060
Periodic maintenance chart for the emission control system
NO. ITEM
1*Fuel line• Check fuel hoses for cracks or
damage.
• Replace if necessary.√√√√√
2*Spark plug• Check condition.
• Adjust gap and clean.√√
• Replace.√√
3*Valve clearance• Check and adjust.√√√√
4*Fuel injection• Check and adjust engine idle
speed.√√√√√√
5*Exhaust system• Check for leakage.
• Tighten if necessary.
• Replace gasket if necessary.√√√√√X 1000 km CHECK OR
MAINTENANCE JOB
X 1000 mi
ODOMETER
READING
ANNUAL CHECK
16121824
0.63.5710.514
UB6GE0E0.book Page 3 Wednesday, August 28, 2019 11:11 AM
Page 48 of 96

Periodic maintenance and adjustment
6-4
6
EAU71361
General maintenance and lubrication chart
NO. ITEM
1*Diagnostic system
check• Perform dynamic inspection us-
ing Yamaha diagnostic tool.
• Check the error codes.√√√√√√
2*Air filter element• Replace.√√
3Air filter case
check hose• Clean.√√√√√
4Clutch• Check operation.
•Adjust.√√√√√
5*Front brake• Check operation, fluid level, and
for fluid leakage.
• Replace brake pads if neces-
sary.√√√√√√
6*Rear brake• Check operation, fluid level, and
for fluid leakage.
• Replace brake pads if neces-
sary.√√√√√√
7*Brake hoses• Check for cracks or damage.√√√√√
• Replace. Every 4 years
8*Brake fluid• Change. Every 2 years
9*Wheels• Check runout and for damage.
• Replace if necessary.√√√√
10*Tires• Check tread depth and for dam-
age.
• Replace if necessary.
• Check air pressure.
• Correct if necessary.√√√√√
11*Wheel bearings• Check bearing for looseness or
damage.√√√√
12*Swingarm pivot
bearings• Check operation and for exces-
sive play.√√√√
• Lubricate with lithium-soap-
based grease.Every 24000 km (14000 mi)X 1000 km CHECK OR
MAINTENANCE JOB
X 1000 miODOMETER
READINGANNUAL CHECK
1 6 12 18 24
0.6 3.5 7 10.5 14
UB6GE0E0.book Page 4 Wednesday, August 28, 2019 11:11 AM


, rep")