2020 VOLKSWAGEN TRANSPORTER door lock
[x] Cancel search: door lockPage 109 of 486

Turn the light switch to the required position 86:
When the Ignition Is switched off
0 The fog lights, dipped beam headlights and side lights are switched off.
,. The orientation lighting can be switched on.
) , The side lights are switched on.
Dipped beam headlights are switched off.
"'D While the vehicle key is in lhe ignition lock, the side lights will stay on.
Fog lights
The indicator lamps or 0$ in the light switch or Instrument cluster indicate that the fog lights are switched on.
• To switch the fog light on, pull the light switch out of the position "" or tD to the first stop.
• To switch the rear fog light 0$ on, pull the light switch out of position ,.,, or gD as far as it will go.
• To switch the fog lights off, press the light switch or move it to position 0.
Signal tones if lights are not switched off
If the key is removed from the ignition lock and the driver door is opened, a signal tone will sound in any of the following situations. This will remind you to switch off the lights as necessary.
Lights and vision -functions
1""1'11 First read and observe the introductory L-lo:.U Information and safety warnings & on page 106.
Parking light
When the parking lights (left and right turn signals) are switched on, the headlight on the correspond-ing side of the vehicle lights up along with the tail light and parts of the tail light cluster. The parking light only lights up when the Ignition is switched off and if the turn signal and main beam lever was in the central position before being operated.
Side lights
If the light switch is in position ;.o; both headlights with side lights light up, along with parts of the rear light cluster, the number plate lighting, the instru-ment cluster lighting and the buttons in the centre console and the dash panel.
If the charge level of the battery is too low, the side lights will switch off automatically &. This pre-vents the vehicle battery from being discharged
When the Ignition Is switched on
Lights switched off or daytime headlights are switched on.
The automatic headlight control and, if applica-ble, the daytime headlights are switched on.
The side lights are switched on.
The dipped beam headlights are switched on.
• If the parking light is switched on 107.
• If the light switch is in position '"'·
• If the light switch is in position iD or 0$ 112.
A WARNING
The side lights or daytime running lights are not bright enough to Illuminate the road ahead and to ensure that other road users are able to see you.
• Always switch the dipped beam head-lights on if it is dark, raining or visibility Is
completely and thus allows for still starting the en-gine 366, Automatic switch-off for electri-cal consumers.
Daytime running lights
There are separate lights in the headlights for the daytime running lights.
Only the separate lights light up when the daytime running lights are switched on &.
The daytime running lights are switched on when the ignition is switched on if the light switch is in position 0 or AUTO.
If the light switch is in position AUTO, a rain sensor will switch the dipped beam and the lighting in the instruments and switches on and off automatically.
The daytime running lights cannot be switched on or off manually. ,._
Lights and vision 1109
Page 112 of 486

If you have to drive a right-hand drive vehicle in a left-hand drive country, or vice versa, the asymmet-ric dipped beam halogen headlights may dazzle oncoming traffic. Therefore, the headlights must be masked over if you are driving abroad.
Therefore you must apply stickers to certain parts of the headlighllenses if you are driving abroad. A qualified workshop can provide you with further in-formation. Volkswagen Commercial Vehicles rec-ommends using a Volkswagen Commercial Vehi-cles dealership for this purpose.
m The use of the stickers on the headlights is L!J only permissible if the period of use is limited. Please contact a qualified workshop for a perma-nent alteration. Volkswagen Commercial Vehicles recommends using a Volkswagen Commercial Ve-hicles dealership for this purpose.
,.....-.(')1 First read and observe the introductory l....-.lo:.l.l Information and safety warnings & on page 106.
The Coming Home function is switched on manual-ly. However, the "Leaving Home" function is con-trolled automatically by a rain sensor.
"Coming Home"
Switching on
Switching off
"Leaving Home"
Switching on
Switching off
!Action
-Switch off the ignition. -Activate the headlight flasher for approximately one second 107. The Coming Home lighting is switched on when the driver door is opened. The switch-off delay starts when the last vehicle door or the tailgate has been closed.
-Automatically after the set switch-off delay has elapsed. -Automatically if a door or the tailgate is opened approximately 30 seconds after switch on. -Turn light switch to position 0. -Switch on the ignition.
Action
-Unlock vehicle when light switch is in position AUTO and rain sensor has detected that it is dark.
-Automatically after the switch-off delay. -Lock the vehicle. -Turn light switch to position 0. -Switch on the ignition.
m When the Coming Home function is switched L!J on, no signal tone will be given as a reminder that a light is still switched on when the driver door is opened.
Page 114 of 486
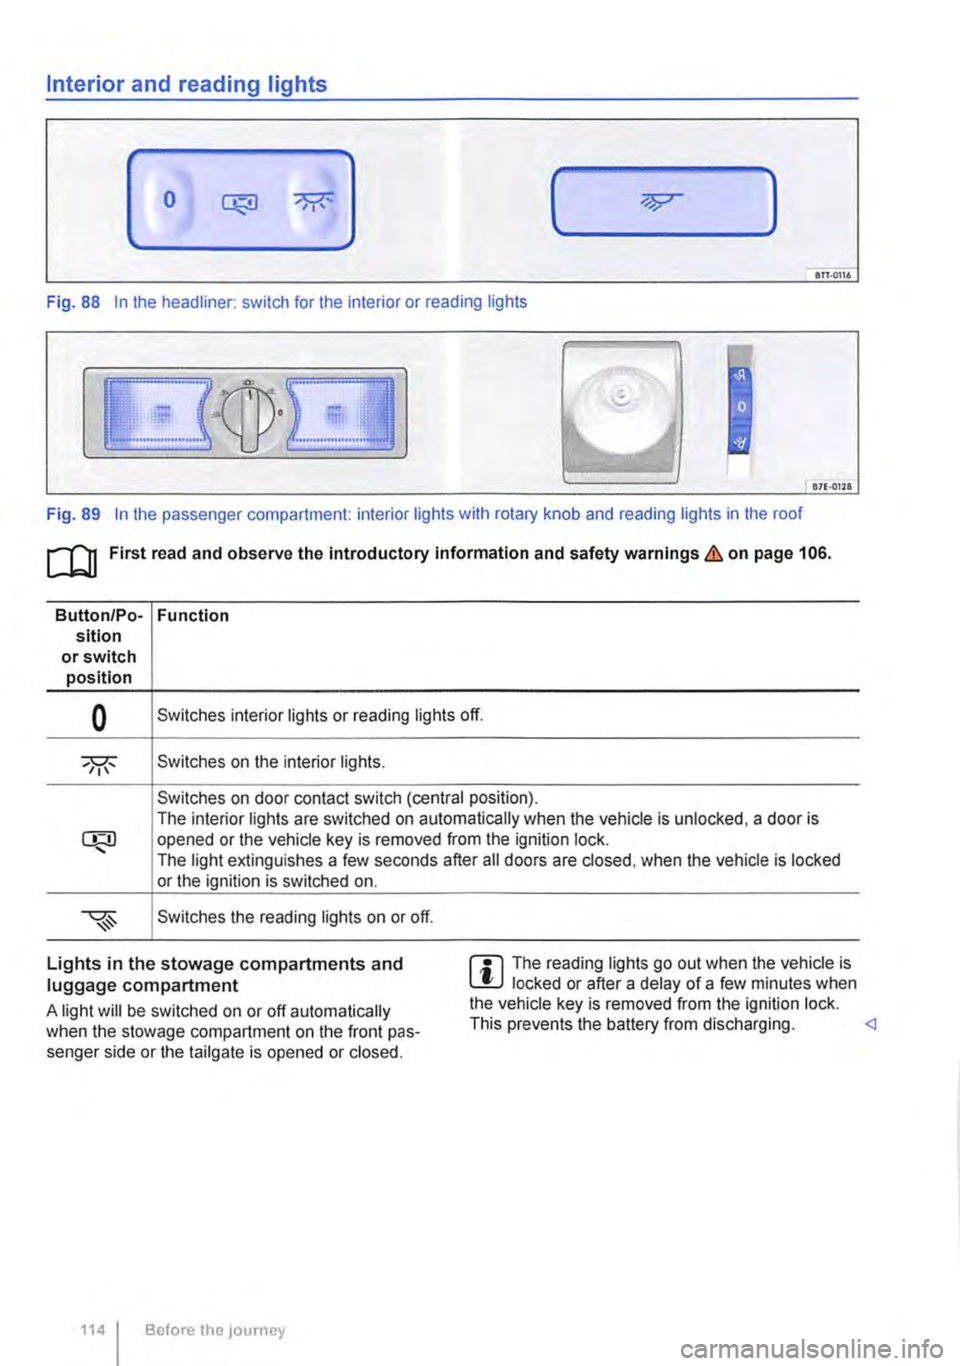
Interior and reading lights
0 ( )
ITT·0116
Fig. 88 In the headliner: switch for the interior or reading lights
871·01ll
Fig. 89 In the passenger compartment: interior lights with rotary knob and reading lights in the roof
[Q] First read and observe the Introductory information and safety warnings&. on page 106.
Button/Po-Function sition or switch position
0 Switches interior lights or reading lights off.
Switches on the interior lights.
Switches on door contact switch (central position). The interior lights are switched on automatically when the vehicle is unlocked, a door is opened or the vehicle key is removed from the ignition lock. The light extinguishes a few seconds after all doors are closed, when the vehicle is locked or the ignition is switched on.
Switches the reading lights on or off.
Lights in the stowage compartments and luggage compartment
A light will be switched on or off automatically when the stowage compartment on the front pas-senger side or the tailgate is opened or closed.
1141 Before the journey
m The reading lights go out when the vehicle is W locked or after a delay of a few minutes when the vehicle key is removed from the ignition lock. This prevents the battery from discharging.
Page 129 of 486
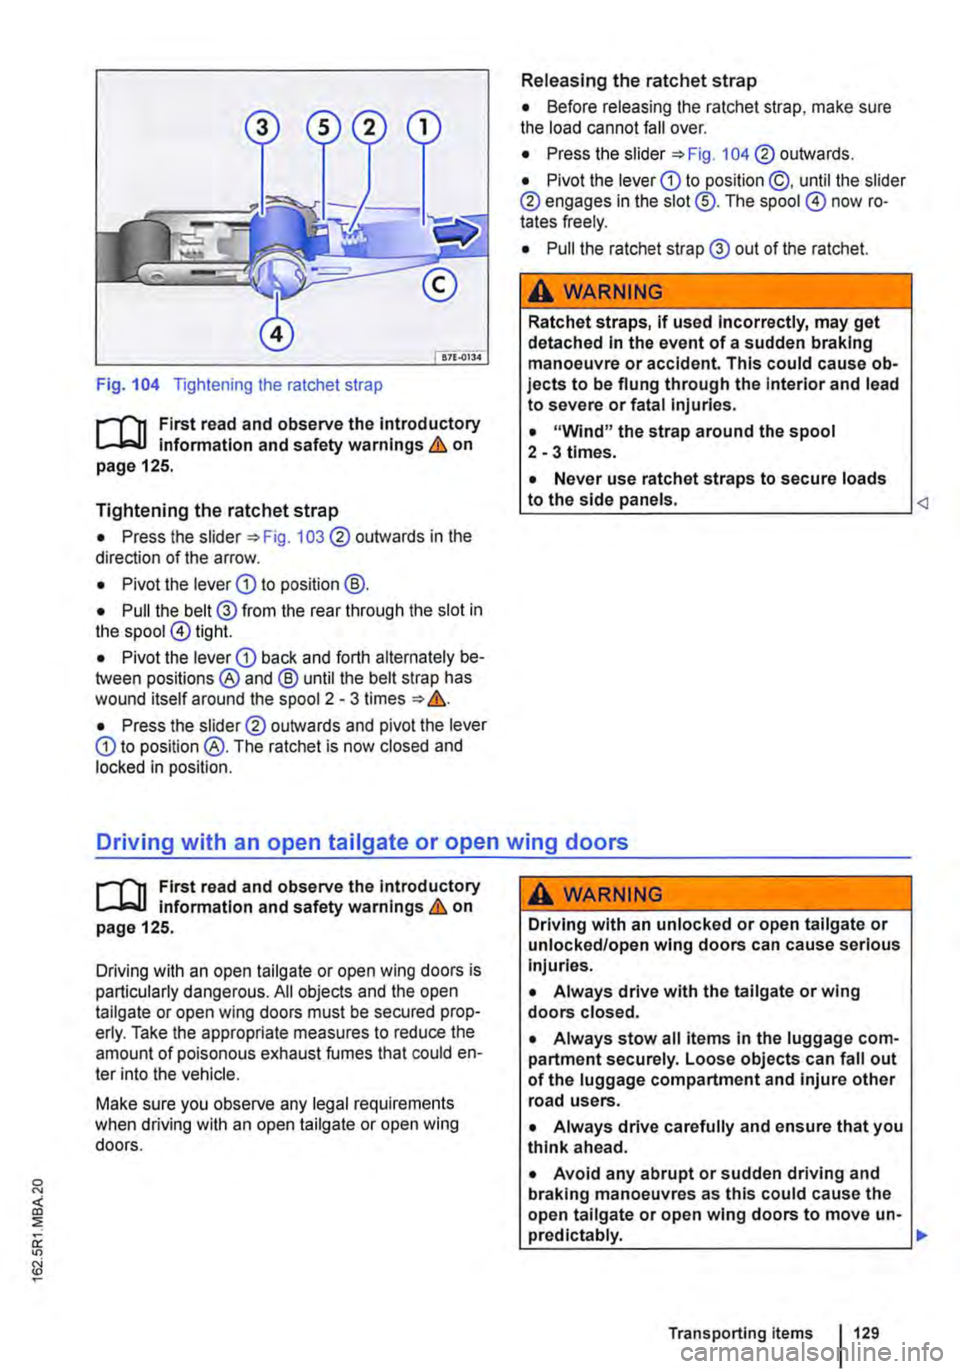
Fig. 104 Tightening the ratchet strap
r--f'n First read and observe the Introductory l.-..lr:=-ll information and safety warnings & on page 125.
Tightening the ratchet strap
• Press the slider =:>Fig. 103 ® outwards in the direction of the arrow.
• Pivot the lever CD to position@.
• Pull the belt@ from the rear through the slot in the spool@ tight.
• Pivot the lever CD back and forth alternately be-tween positions ® and @ until the belt strap has wound itself around the spool 2 -3 times ::. &.
• Press the slid er® outwards and pivot the lever CD to position @. The ratchet is now closed and locked in position.
Releasing the ratchet strap
• Before releasing the ratchet strap, make sure the load cannot fall over.
• Press the slider =:>Fig. 104 ® outwards.
• Pivot the lever CD to position @, until the slider ® engages in the slot@. The spool @) now ro-tates freely.
• Pull the ratchet strap @ out of the ratchet.
A WARNING
Ratchet straps, if used Incorrectly, may get detached in the event of a sudden braking manoeuvre or accident. This could cause ob-jects to be flung through the Interior and lead to severe or fatal injuries.
• "Wind" the strap around the spool 2-3 times.
• Never use ratchet straps to secure loads to the side panels.
r--f'n First read and observe the Introductory l.-..lr:=-ll Information and safety warnings & on page 125.
Driving with an open tailgate or open wing doors is particularly dangerous. All objects and the open tailgate or open wing doors must be secured prop-erly. Take the appropriate measures to reduce the amount of poisonous exhaust fumes that could en-ter into the vehicle.
Make sure you observe any legal requirements when driving with an open tailgate or open wing doors.
A WARNING
Driving with an unlocked or open tailgate or unlocked/open wing doors can cause serious injuries.
• Always drive with the tailgate or wing doors closed.
• Always stow all items in the luggage com-partment securely. Loose objects can fall out of the luggage compartment and injure other road users.
• Always drive carefully and ensure that you think ahead.
• Avoid any abrupt or sudden driving and braking manoeuvres as this could cause the open tailgate or open wing doors to move un-pred lctably. .,.
Transporting items 129
Page 131 of 486
Additional information and warnings:
• Airbag system =:.page 87
• Lights =:.page 106
• Transporting =:.page 125
• Towing a trailer=> page 139
• Luggage net, California =>page 192
• Wheels and tyres =>page 367
A WARNING
When the vehicle is not in use or is not being supervised, always lock the doors and tail-gate to reduce the risk of severe or fatal inju-ries.
• Never leave children unattended, especial-ly when the tailgate is open. Children could make their way into the luggage compart-ment, close the tailgate and be unable to get out. This can cause severe or fatal injuries.
• Never let children play in or around the ve-hicle.
• Do not travel with people in the luggage compartment.
A WARNING
Objects that are not secured, or are secured Incorrectly, can cause serious injuries in the event of a sudden driving or braking manoeu-vre or accident. This applies particularly if objects are struck by the alrbag when activa-ted and then flung through the vehicle interi-or. To reduce the risk of accidents, please ob-serve the following guidelines:
• Always stow all objects In the vehicle se· curely. Always stow luggage and heavy ob-jects in the luggage compartment.
• Always use suitable straps to prevent lug-gage from being thrown through the vehicle Interior and entering the deployment zones of
A WARNING (Continued)
the curtain alrbag, the combined curtain and side airbag or the front airbag In the event of a sudden driving or braking manoeuvre.
• Always keep stowage compartments closed while the vehicle is In motion.
• Do not stow any hard, heavy or sharp ob· jects loose in any of the vehicle's open stow-age areas, on the luggage compartment cov-er or on the dash panel.
• Remove any hard, heavy or sharp objects from items of clothing and bags Inside the vehicle and stow them securely.
A WARNING
Transporting heavy objects changes the vehi-cle's handling and increases the braking dis-tance. Heavy loads that are not properly stowed or secured in the vehicle can lead to a loss of vehicle control and can cause serious injury.
• Transporting heavy objects changes the vehicle's handling and the centre of gravity.
• The payload should be distributed as evenly as possible in the vehicle.
• Always secure heavy objects In the lug-gage compartment as far in front of the rear axle as possible.
CD
Hard objects on the shelf can chafe against the wires of the heating element in the rear window and cause damage.
m Always ensure that the venlilalion openings L!J between the rear window and the stowage area are uncovered to allow stale air to escape from the vehicle.
Page 188 of 486

menus provided by way of the instrument cluster nor the factory-installed radio or navigation system can be used to make rear-seat telephony settings.
lfv'hen pairing a mobile telephone with the rear-seat telephony system using the hands-free profile (HFP) and when the mobile telephone is not in the charging base, observe the information on use of a mobile telephone in the vehicle without connection to the external aerial =>page 399.
Follow the operating manual for your mobile tele· phone and the instructions provided by the acces-sory manufacturer.
You may experience poor reception or may be cut off in areas where the signal is weak.
Most electronic devices are shielded against high-frequency signals. In rare cases, however, it Is pos-sible that electronic devices will not be shielded against high-frequency signals emitted by the rear-seat telephony system. This can cause Interfer-ence.
Bluetooth
Bluetooth technology is used to connect a mobile telephone to the hands-free system fitted In a vehi· cle. Pairing needs to be carried out once only in or-der to use the rear-seat telephony system with a Bluetooth mobile telephone.
Use compatible Bluetooth devices only. Information on compatible Bluetooth products Is available from your Volkswagen Commercial Vehicles dealer or on the Internet.
Some Bluetooth mobile telephones are detected and connected automatically when the ignition is switched on. For this to happen, the mobile tele-phone and the Bluetooth function in the telephone must be switched on, and all active Bluetooth con-nections to other units must be disconnected.
The Bluetooth connection is free of charge.
Bluetooth® is a registered trademark of Blue-tooth® SIG, Inc.
Declaration of conformity
BURY Sp. z o.o. herewith declares that this system complies with the basic requirements and the rele· van! stipulations of directive 1999/5/EG. This sys-tem has been classified as belonging to Device Class 1. A manufacturer's declaration of conformity for this system can be requested from the following e-mail address: [email protected]. Please formulate all enquiries either In English or German.
((
166 I Before the journey
Additional information and warnings:
• Digital voice enhancement =>page 173
• Accessories, modifications, repairs and renewal of parts =>page 394
• Radio or navigation system =>Booklet Radio, provision for mobile telephone, infotainment sys-tem, navigation system
A wARNING
Accidents and Injuries can occur If the driver Is distracted. Using the telephone or the rear· seat telephony system can distract you from what Is happening on the road.
• Select volume settings that allow signals from outside the vehicle (such as emergency services sirens) to be easily heard at all times. Comply with legal regulations.
• Your call may be cut off or you may be un-able to make calls If you are In an area with no mobile telephone network coverage, an area where the network Is very weak or, In some cases, In a tunnel, garage or under-pass. This also means that no emergency calls can be made.
• In some countries, lt Is only possible to make an emergency call from the rear-seat telephony system if it is connected to a mo-bile telephone containing a SIM card that is "unlocked" and has sufficient credit.
A WARNING
Any mobile telephone that is not secured or Is incorrectly secured in the vehicle could be flung though the interior during a sudden driving or braking manoeuvre, or In the event of an accident. This could cause Injuries.
• You should never position or attach a mo-bile telephone on a door, on the windscreen or above or near to the areas marked "AIR-BAG" on the steering wheel, the dash panel and the seat backrests, or between these areas and the vehicle occupants. The mobile telephone could cause serious Injury In an accident, especially when the alrbags Inflate.
A WARNING
Always switch off the mobile telephone when filling the tank and in areas with a risk of ex-plosion. Electromagnetic radiation can gener-ate sparks which can In turn start a fire.
• The mobile telephone can automatically log Itself Into the mobile telephone network again If the Bluetooth connection to the rear-seat telephony system has been Interrupted. I>
Page 193 of 486
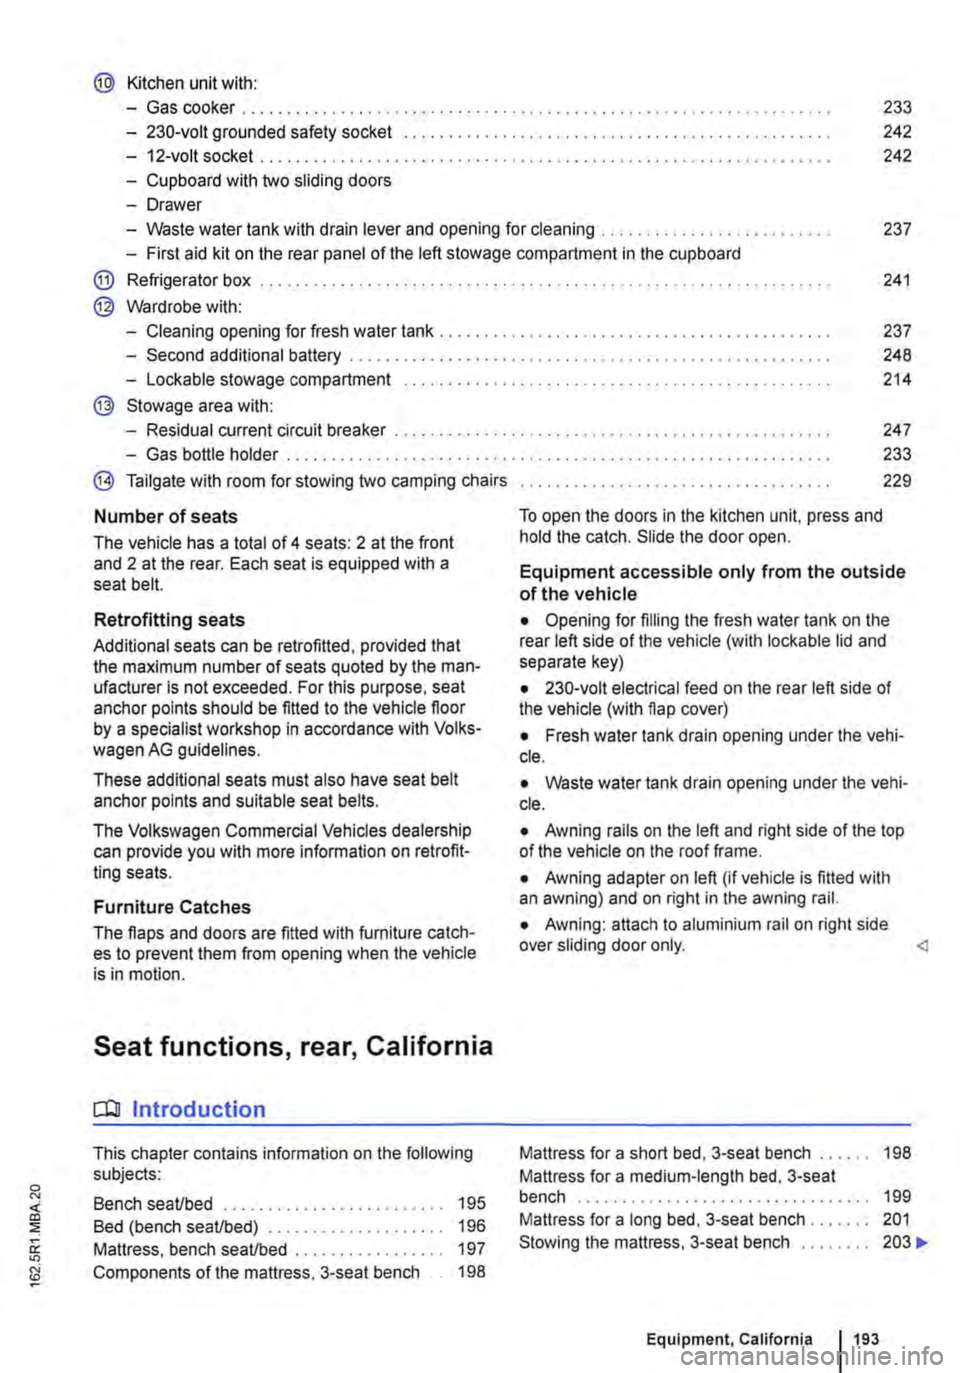
@ Kitchen unit with:
-Gas cooker ................................... . 233
242
242
-230-volt grounded safety socket ................. .
-12-volt socket .............................•..................................
-Cupboard with two sliding doors
-Drawer
-Waste water tank with drain lever and opening for cleaning ...... . 237
-First aid kit on the rear panel of the left stowage compartment in the cupboard
@ Refrigerator box ...
@ Wardrobe with:
241
-Cleaning opening for fresh water tank . . . . . . . . . . . . . . . . . . . . . . . . . . . . . . . . . . . . . . . 237
-Second additional battery . . . . . ........ , . . . . . . . . . . . . . . . . . . . . . . . . . . 248
-Lockable stowage compartment . . . . . . . . . . . . . . . . . . . . . . . . . . . . . . . . . . . . . . . . . . . . . . . . 214
@ Stowage area with:
-Residual current circuit breaker ............... , ...... . 247
233
229
-Gas bottle holder .................. .
® Tailgate with room for stowing two camping chairs
Number of seats
The vehicle has a total of 4 seats: 2 at the front and 2 at the rear. Each seat is equipped with a seat belt.
Retrofitting seats
Additional seats can be retrofitted, provided that the maximum number of seats quoted by the man-ufacturer is not exceeded. For this purpose, seat anchor points should be fitted to the vehicle floor by a specialist workshop in accordance with Volks-wagen AG guidelines.
These additional seats must also have seat belt anchor points and suitable seat belts.
The Volkswagen Commercial Vehicles dealership can provide you with more information on retrofit-ting seats.
Furniture Catches
The flaps and doors are fitted with furniture catch-es to prevent them from opening when the vehicle is in motion.
Seat functions, rear, California
ClJ Introduction
This chapter contains information on the following subjects:
Bench seat/bed . . . . . . . . . . . . . . . . . . . . • • . . . 195
Bed (bench seat/bed) . . . . . . . . . . . 196 Mattress, bench seat/bed . . . . . . . . . . . . . . . . . 197
Components of the mattress, 3-seat bench . . 198
To open the doors in the kitchen unit, press and hold the catch. Slide the door open.
Equipment accessible only from the outside of the vehicle
• Opening for filling the fresh water tank on the rear left side of the vehicle (with lockable lid and separate key)
• 230-volt electrical feed on the rear left side of the vehicle (with flap cover)
• Fresh water tank drain opening under the vehi-cle.
• Waste water tank drain opening under the vehi-cle.
• Awning rails on the left and right side of the top of the vehicle on the roof frame.
• Awning adapter on left (if vehicle is fitted with an awning) and on right in the awning rail.
• Awning: attach to aluminium rail on right side over sliding door only.
Mattress for a medium-length bed, 3-seat bench . . . . . . . . . . . . . . . . . . . . . . . . . . . . 199 Mattress for a long bed, 3-seat bench . . . . . . . 201 Stowing the mattress, 3-seat bench . . . . . . . . 203 .,..
Equipment, California 1193
Page 195 of 486
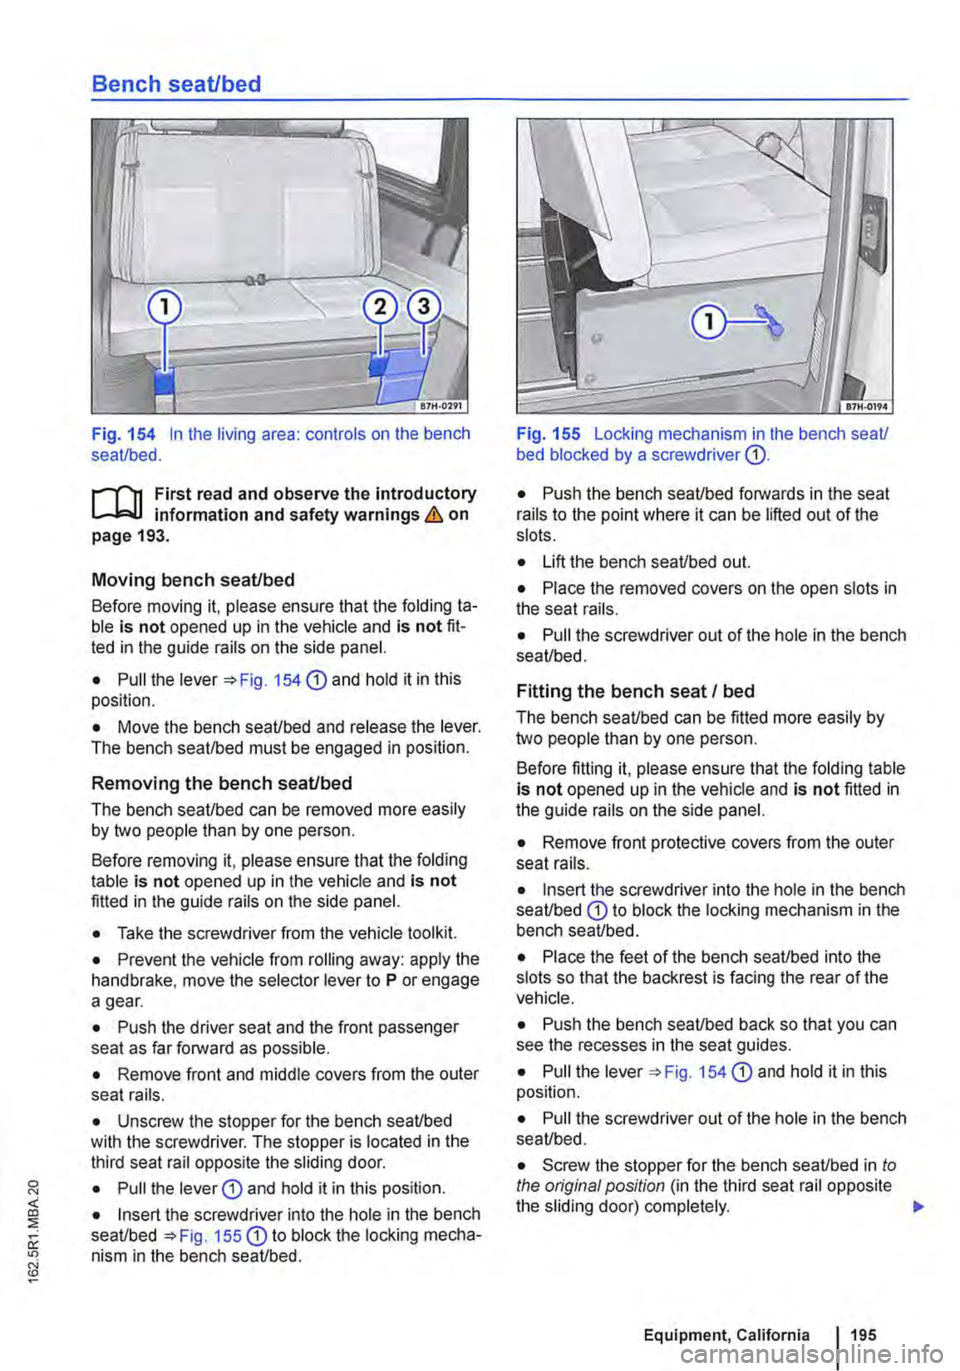
Bench seat/bed
Fig. 154 In the living area: controls on the bench seat/bed.
ill1 First read and observe the introductory l-J::,jJ information and safety warnings & on page 193.
Moving bench seat/bed
Before moving it, please ensure that the folding ta-ble is not opened up in the vehicle and is not fit-ted in the guide rails on the side panel.
• Pull the lever '*Fig. 154 CD and hold it in this position.
• Move the bench seat/bed and release the lever. The bench seat/bed must be engaged in position.
Removing the bench seat/bed
The bench seat/bed can be removed more easily by two people than by one person.
Before removing it, please ensure that the folding table is not opened up in the vehicle and is not fitted in the guide rails on the side panel.
• Take the screwdriver from the vehicle tool kit.
• Prevent the vehicle from rolling away: apply the handbrake, move the selector lever to P or engage a gear.
• Push the driver seat and the front passenger seat as far forward as possible.
• Remove front and middle covers from the outer seat rails.
• Unscrew the stopper for the bench seat/bed with the screwdriver. The stopper is located in the third seat rail opposite the sliding door.
• Pull the lever G) and hold it in this position.
• Insert the screwdriver into the hole in the bench seat/bed =>Fig. 155 G) to block the locking mecha-nism in the bench seat/bed.
Fig. 155 Locking mechanism in lhe bench seat/ bed blocked by a screwdriver G).
• Push the bench seat/bed forwards in the seat rails to the point where it can be lifted out of the slots.
• Lift the bench seat/bed out.
• Place the removed covers on the open slots in the seat rails.
• Pull the screwdriver out of the hole in the bench seat/bed.
Fitting the bench seat I bed
The bench seat/bed can be fitted more easily by two people than by one person.
Before fitting it, please ensure that the folding table is not opened up in the vehicle and is not fitted in the guide rails on the side panel.
• Remove front protective covers from the outer seat rails.
• Insert the screwdriver into the hole in the bench seat/bed G) to block the locking mechanism in the bench seat/bed.
• Place the feet of the bench seat/bed into the slots so that the backrest is facing the rear of the vehicle.
• Push the bench seat/bed back so that you can see the recesses in the seat guides.
• Pull the lever =>Fig. 154 G) and hold it in this position.
• Pull the screwdriver out of the hole in the bench seat/bed.
• Screw the stopper for the bench seat/bed in to the original position (in the third seat rail opposite the sliding door) completely. .,.
Equipment, California 195