2020 VOLKSWAGEN TRANSPORTER door lock
[x] Cancel search: door lockPage 56 of 486

A WARNING
Always take care when using the mechanical or electric windows otherwise you could cause serious accidents or injuries.
• Windows should only be opened or closed when you are sure that nobody is In their op-erating area.
• Never leave children or people requiring assistance alone in the vehicle when the ve-hicle is locked. Electric windows can no lon-ger be opened in an emergency.
A WARNING (Continued)
• Always take all vehicle keys with you ev-ery time you leave the vehicle. The electric windows can still be operated using the but-tons several minutes after the ignition has been switched off, provided the driver door and the front passenger door are not opened.
CD
During sudden rain showers, water can enter the vehicle interior via open windows and cause damage to the vehicle.
'----------------: BSG-0031
Fig. 37 In the driver door: butlons for the electric windows
r-111 First read and observe the Introductory L-J,::.JJ information and safety warnings & on page 55.
Opening and closing the windows
Function Action
Opening Press the@ button.
Closing Pull the@ button.
Stopping the Press or pull the button for the a p-one-touch propriate window again. function
Electric windows -functions
r-111 First read and observe the introductory L-J,::.JJ information and safety warnings & on page 55.
One-touch opening and closing
One-touch opening and closing makes it possible to fully open and close the windows. The individual buttons do not have to be held down to do this.
For one-touch closing: pull the butlon for the ap-propriate window up briefly into the second posi-tion.
56 Before the journey
The windows can still be operated using lhe but-tons several minutes after the ignition has been switched off, provided that the driver door and front passenger door are not opened. If the vehicle key is removed from the ignition lock and lhe driver door Is opened, all electric windows can be opened or closed by operating and holding lhe correspond-ing window button in the driver door. After a few seconds, convenience opening/closing is started 57.
Stopping the one-touch function: press or pull the button for the appropriate window again.
Restoring one-touch opening and closing
One-touch opening and closing is deactivated if the vehicle battery has been disconnected or dis-charged while the windows were not fully closed. The function will have to be reset.
Page 57 of 486
• Close all windows and doors.
• Pull up the button for the window and hold it in this position for at least one second.
• Let go of the button then pull it up again and hold it in this position. One-touch opening and closing is now ready for operation.
The one-touch function can be restored for individ-ual windows or for several windows at the same time.
Convenience opening and closing
There are three different ways of opening and clos-ing all electric windows simultaneously when the ignition is switched off:
• Press and hold the locking or unlocking button in the remote control key.
• To interrupt this function, let go of the locking or unlocking button.
• OR: hold the vehicle key in the driver door lock cylinder in either the locking or the unlocking posi-tion until all windows are either opened or closed.
• To interrupt this function, turn the vehicle key in the opposite direction.
• OR: after switching the ignition off and opening the driver and front passenger doors, push or pull the@ button in the required direction for at least two seconds.
During convenience closing, first the windows and then the sliding/tilting roof will be closed.
A WARNING
Careless or unsupervised use of the electric windows can cause serious Injuries.
• The electric windows should only be opened or closed when you are sure that no-body is in their operating area.
• Never leave children or people requiring assistance alone In the vehicle when the ve-hicle is locked. The windows can no longer be opened In an emergency.
• Always take all vehicle keys with you ev-ery time you leave the vehicle. The windows can still be operated using the buttons sever-al minutes after the Ignition has been switch-ed off, provided that the driver door and front passenger door are not opened.
m One-touch opening and closing and the roii-L!J back function will not work if there is a fault in the electric windows. Go to a qualified workshop.
l"""l'l1 First read and observe the Introductory l-J,a,IJ Information and safety warnings & on page 55.
The roll-back function for the electric windows can reduce the risk of Injuries when the windows are closing :) &. If the one-touch closing function for a window does not work because it is stiff or is being obstructed, the window will automatically open again.
• Check to see why the window has not closed.
• Try to close the window again.
• If the window is again prevented from closing within approximately 10 seconds of the first at-tempt because it is stiff or obstructed, the automat-ic closing function is switched off for approximately 10 seconds.
• If the window is still obstructed, the window stops at this point. To close the window without the roll-back function, press the button again within 1 0 seconds :) &.
Closing the window without the roll-back function
• Try to close the window again within approxi-mately 10 seconds by holding the button. The roll-back function will be deactivated for a small section of the path of the closing window.
• If the closing procedure takes longer than ap-proximately 10 seconds, the roll-back function will be reactivated. The window will then stop again if it is stiff or meets another obstacle.
• Please go to a qualified workshop if the window still cannot be closed.
A WARNING
Closing the electric windows without the roll-back function could lead to severe Injuries.
• Always take care when closing electric windows. 11>
Opening and closing
Page 59 of 486
A WARNING (Continued)
• Never leave children or people requiring assistance alone in the car, particularly if they have access to the vehicle key. Unsuper-vised use of the vehicle key can lock the ve-hicle, start the engine, switch on the ignition and operate the sliding/tilting roof.
• The sliding/tilting roof can be operated for a short period after the ignition has been switched off, provided that the driver door and front passenger door are not opened.
CD
• In order to avoid damage in winter, remove ice and snow from the roof of the vehicle be-fore opening or tilting the sliding/tilting roof.
m Leaves and other loose items must be re-L.!:J moved from the guide rails of the sliding/tilt-ing roof at regular inteNals, either by hand or using a vacuum cleaner.
m If there is a fault in the sliding/tilting roof, the L.!:J roil-back function will not work properly. Go to a qualified workshop.
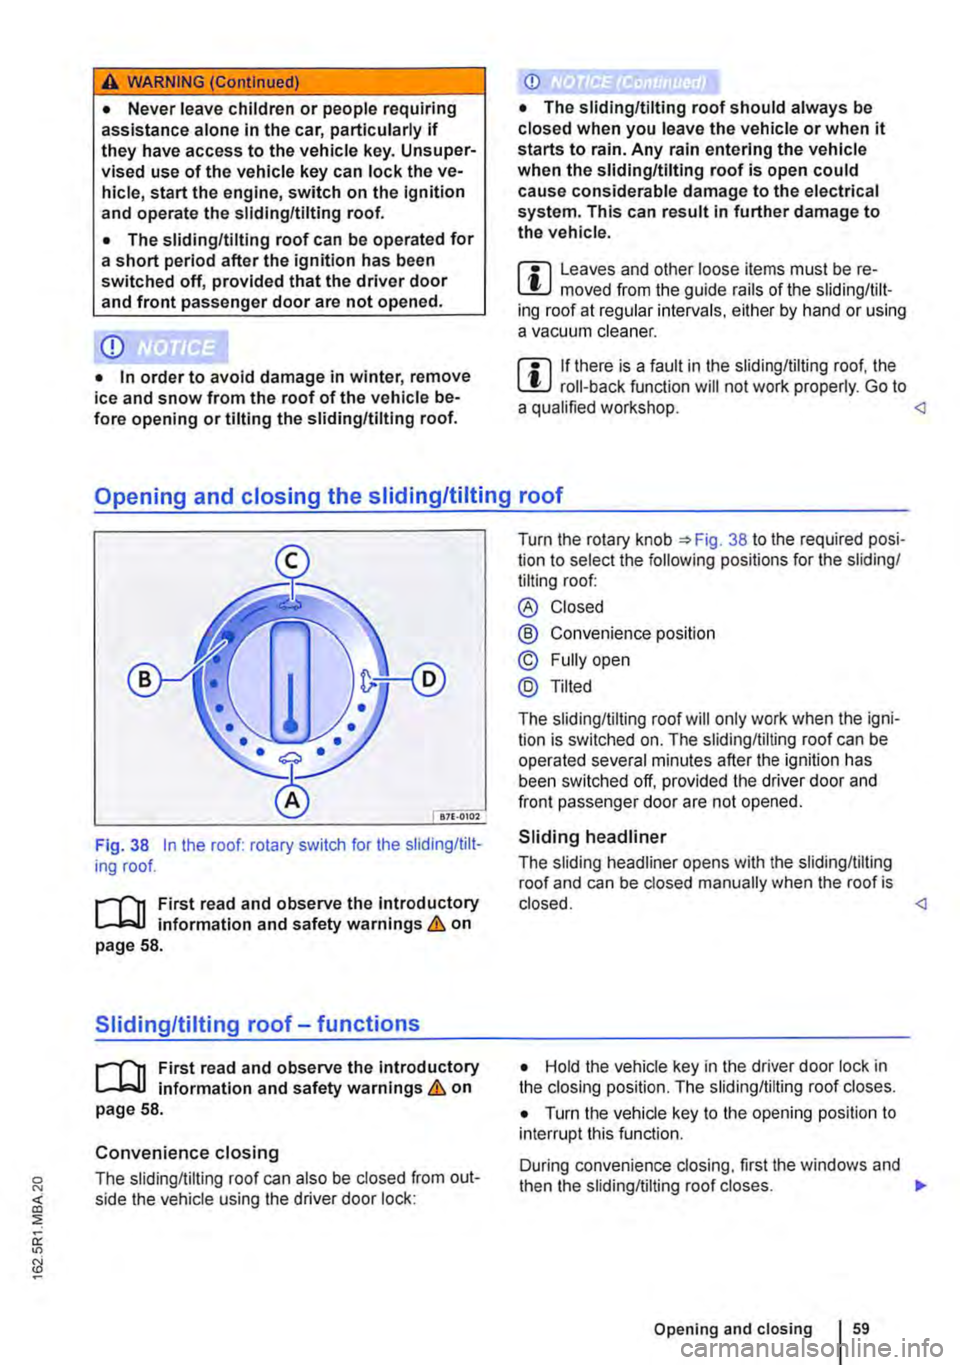
Fig. 38 In the roof: rotary switch for the sliding/tilt-ing roof.
r-T'n First read and observe the Introductory L-J,::.jJ information and safety warnings & on page 58.
Sliding/tilting roof-functions
r-T'n First read and obseNe the Introductory L-J,::.jJ information and safety warnings & on page 58.
Convenience closing
The sliding/tilting roof can also be closed from out-side the vehicle using the driver door lock:
Turn the rotary knob 38 to the required posi-tion to select the following positions for the sliding/ tilting roof:
® Closed
@ Convenience position
© Fully open
@Tilted
The sliding/tilting roof will only work when the igni-tion is switched on. The sliding/tilting roof can be operated several minutes after the ignition has been switched off, provided the driver door and front passenger door are not opened.
Sliding headliner
The sliding headliner opens with the sliding/tilting roof and can be closed manually when the roof is closed.
• Turn the vehicle key to the opening position to interrupt this function.
During convenience dosing, first the windows and then the sliding/tilting roof closes. .,..
Opening and closing 159
Page 60 of 486
m The sliding/tilting roof rotary switch remains W in the last position selected If the roof is closed from outside the vehicle using convenience closing. lt will have to be re-positioned the next time you drive. <1
Roll-back function for the sliding/tilting roof
r-111 First read and observe the introductory l..-J.::-1.1 Information and safety warnings & on page 58.
The roll-back function can reduce the risk of injury when closing the sliding/tilting roof => &. If the slid-ing/tilting roof is unable to close because it is stuck or obstructed, it will open again automatically.
• Check to see why the sliding/tilting roof has not closed.
• Try to close the sliding/tilting roof again.
• If the sliding/tilting roof is still obstructed, the sliding/tilting roof stops at this point. The sliding/tilt-ing roof then closes without the roll-back function.
Closing without the roll-back function
• Push the rotary knob at the front in position =>Fig. 38 ®until the sliding/tilting roof Is fully closed.
• The sliding/tilting roof then closes without the roll-back function.
• Please go to a qualified workshop if the sliding/ tilting roof still cannot be closed.
Before the journey
A WARNING
Closing the sliding/tilting roof without the roll-back function can lead to severe injuries.
• Always close the sliding/tilting roof care-fully.
• Ensure that nobody obstructs the operat-Ing area of the sliding/tilting roof, especially if the roll-back function Is not active.
• The roll-back function does not prevent fingers or other body parts from being press-ed against the roof frame and sustaining in-jury.
m The roll-back function is also activated if the W windows and sliding/tilting roof are closed us-ing the driver door lock for convenience clos-Ing =>page 57. <1
Page 71 of 486

Calling up the driver seat settings
• Within 10 minutes after the vehicle has been unlocked, briefly press the respective memory but-ton while the driver door is opened and the ignition is switched off.
• OR: with the driver door closed or ignition switched on, press and hold the corresponding memory button until the stored position has been attained.
Activating memory function of the vehicle key
• Unlock the driver door.
• Press the desired memory button 50 and keep it pressed until the end of the activation proc-ess.
• If required, keep the memory button pressed until the saved seat position is reached.
• Keeping the memory button pressed, simulta-neously press the unlocking button@ in the vehi-cle key within 10 seconds. A gong will sound to confirm that the settings have been activated.
Rotating front seats
r--('n First read and observe the introductory information and safety warnings & on page 69.
Turning the front seats
• Additional point to note for driver seat: en-gage selector lever position P or a gear to ensure the vehicle cannot roll.
• Additional point to note for driver seat: re-lease the handbrake and adjust the steering wheel so that it is as far up and as far forward as possi-ble.
• Open driver door or front passenger door.
• Adjust the backrest to an upright position.
• Place the outer armrest in the horizontal posi-tion.
• Move the driver seat to the mid point of the fore-and-aft adjustment.
• Pull the small lever on the front of the seat base and, at the same time, turn the seat inwards.
• You may need to readjust the seat and armrest for turning.
Deactivating memory function of the vehicle key
• Press Fig. 50 button and then keep it pressed till the end of the deactivation process.
• Keeping the memory button pressed, simulta-neously press the unlocking button @ in the vehi-cle key within 10 seconds. A gong will sound to confirm that the settings have been deactivated.
Assigning driver seat settings to a vehicle key
• Activate memory function of the vehicle key.
• Unlock the vehicle using the same vehicle key.
• Adjust the driver seat.
• Lock the vehicle using the @button in the re-mote control key in order to save the settings.
After the settings have been stored, the driver seat always returns to the stored position automatically, as soon as the@ button in the vehicle key 39 is used to unlock the vehicle and the driver door is opened. <1
A WARNING
Incorrect handling of the rotating front seats can cause accidents and serious Injuries.
• Only ever adjust the front seats when the vehicle is stationary otherwise you could as-sume an incorrect sitting position.
• Rotating front seats must always be in the direction of travel and securely engaged in this position when the vehicle is in motion.
CD
If the seat is occupied when it is turned, it could be damaged.
• Turn the front seats only when they are not occupied.
Page 76 of 486

• Remove all protective covers from the seat rails =-page 133.
• Lift the 3-seat bench at the points shown =>Fig. 54 (arrows).
• Place the feet of the 3-seat bench into the slots so that the backrest is facing the rear of the vehi-cle.
• Adjust the backrest to an upright position.
• Make sure that the lever or the loop has re-turned to its original position. The red marking should no longer be visible.
• Pull the backrest to ensure that it is securely engaged.
• Insert the single seats and the central table into the seat rails and push them back.
• Lock the single seats and the central table se-curely in the seat rails.
• Place the removed covers on the open slots in the seat rails.
Drawers in the 3-seat bench
r' ,f} I
---
VII f/l/ \\\
Fig. 55 In the 3-seat bench: drawers.
1""111 First read and observe the Introductory L-lo:oJJ information and safety warnings & on page 72.
There are three drawers =-Fig. 55 in the 3-seat bench (Multivan), which can be accessed from the front and from the rear.
All drawers can be removed fully. Drawers can be stacked and stored in a stowage compartment.
Opening and closing the drawer from the front
• To open, press and hold the handle in the han-dle recess and pull up the cover in the same way you would for a "garage door". You can now ac-cess the drawer.
• To close, push the drawer in and press the cov-er down.
76 Before the journey
• Fit the luggage compartment cover.
• Fit the centre head restraint.
A wARNING
The 3-seat bench weighs approximately 90 kg and could cause serious Injuries due to its weight.
• Before removing and fitting it, please con-sider whether you can actually lift it.
CD
If you move or remove the 3-seat bench with the luggage compartment cover, the luggage compartment cover and Its holders could be damaged
m Additional force may have to be applied to W move the 3-seat bench if it has not been moved for a long lime.
• To open, hold the handle in the handle recess and pull the cover back. You can now access the drawer.
• To close, place the cover on the top with the re-taining lugs in the recess and press it down until it engages.
A WARNING
If the drawer Is left open it can hinder the cor-rect operation of the pedals. This can result In accidents and severe Injuries.
• Always keep the drawer closed while the vehicle is in motion. Otherwise the drawer or other items could fall Into the driver footwell and obstruct the pedals.
Page 88 of 486
are not a substitute for seat belts. Seat belts must always be worn, even when the front seats are equipped with front airbags.
Additional information and warnings:
• Driving tips 33
• Central locking system 39
• Correct sitting position 61
• Seat belts 79
• Child seats (accessories) 96
• Cleaning and caring for the interior 388
• Accessories, modifications, repairs and renewal of parts 394
• Consumer information 404
A WARNING
Never rely solely on the airbag system for your protection.
• Even if an alrbag is triggered, it only offers auxiliary protection.
• The airbag system offers the best level of protection, and reduces the risk of injury, when seat belts are properly worn 79, Seat belts.
• Before every trip, each vehicle occupant must adopt the correct sitting position, cor-rectly fasten the seat belt belonging to their seat and keep it fastened properly throughout the trip. This applies to ail vehicle occupants and also in urban traffic.
A WARNING
The risk of injury increases if there are any objects between the vehicle occupants and the deployment area of the airbag when it is triggered. This will alter the deployment zone of the airbag, or the objects will be flung against the body.
• Never hold any objects in your hand or on your lap while the vehicle is in motion.
• Never transport any objects on the front passenger seal The objects could enter the deployment zone of the airbag during sudden braking or driving manoeuvres and then be flung dangerously through the vehicle interi-or if the airbag is activated.
• Vehicle occupants sitting on the front seats and rear outer seats must never carry any people, pets or objects in the deployment zone between themselves and the airbags. Make sure that children and passengers also keep to this rule.
BB I Before the journey
A WARNING
External devices in the vehicle that are not properly secured can be flung though the in-terior and cause injuries, if there is a sudden driving or braking manoeuvre, or in the event of an accident.
• You should never position or attach an ex-ternal device on a door, on the windscreen or above or near to the areas marked "AIRBAG" on the steering wheel, the dash panel and the seat backrests, or between these areas and the vehicle occupants. External devices can cause serious Injury in an accident, especial-ly when the airbags deploy.
A WARNING
The alrbag system can only be triggered once. The system will have to be replaced if the airbags have been triggered.
• Alrbags that have deployed and any affec-ted system parts must be immediately re-placed with new parts that are approved by Volkswagen Commercial Vehicles for the re-spective vehicle.
• Repairs and modifications to your vehicle should only be carried out by a qualified workshop. Qualified workshops have the nec-essary tools, diagnostic equipment, repair in-formation and qualified personnel.
• Never use recycled alrbag components or components that have been taken from end-of-life vehicles in your vehicle.
• Never alter any components of the airbag system.
A WARNING
Fine dust particles or steam may be released when the alrbags trigger. This Is normal and does not mean that there is a fire in the vehi-cle.
• The fine dust can cause irritation to the skin and eye membranes and cause breath-ing difficulties, particularly for people suffer-ing from asthma or people who have {had) other respiratory problems. To help reduce breathing difficulties, get out of the vehicle or open the windows or doors for more fresh air.
• If you come into contact with the dust, you should wash your hands and face with a mild soap and water before eating.
• Do not let the dust get into your eyes or into open wounds.
Page 93 of 486
A DANGE;R (Continued) --
• No other people, animals or objects may be carried between the occupants of the front seats and the alrbag deployment zone. Make sure that children and passengers also keep to this rule.
• Do not attach any objects, e.g. mobile nav-igation devices, to the windscreen above the front alrbag on the front passenger side.
• Do not cover or stick anything on the steering wheel hub or the soft plastic surface of the alrbag unit In the dash panel on the front passenger side, and do not modify them In any way.
A WARNING
The front alrbags are deployed In front of the steering wheel "*Fig. 71 and dash panel '*Fig. 72.
• When driving, always hold the steering wheel with both hands on the outside of the ring at the 9 o'clock and 3 o'clock positions.
• Adjust the driver seat so that there is at least 25 cm between your breastbone and the hub of the steering wheel. Contact a qualified workshop if your physical build makes this Impracticable.
• Adjust the front passenger seat so that the distance between the passenger and the
__ ____
Switching the front passenger front airbag on and off manually using the
key-operated switch
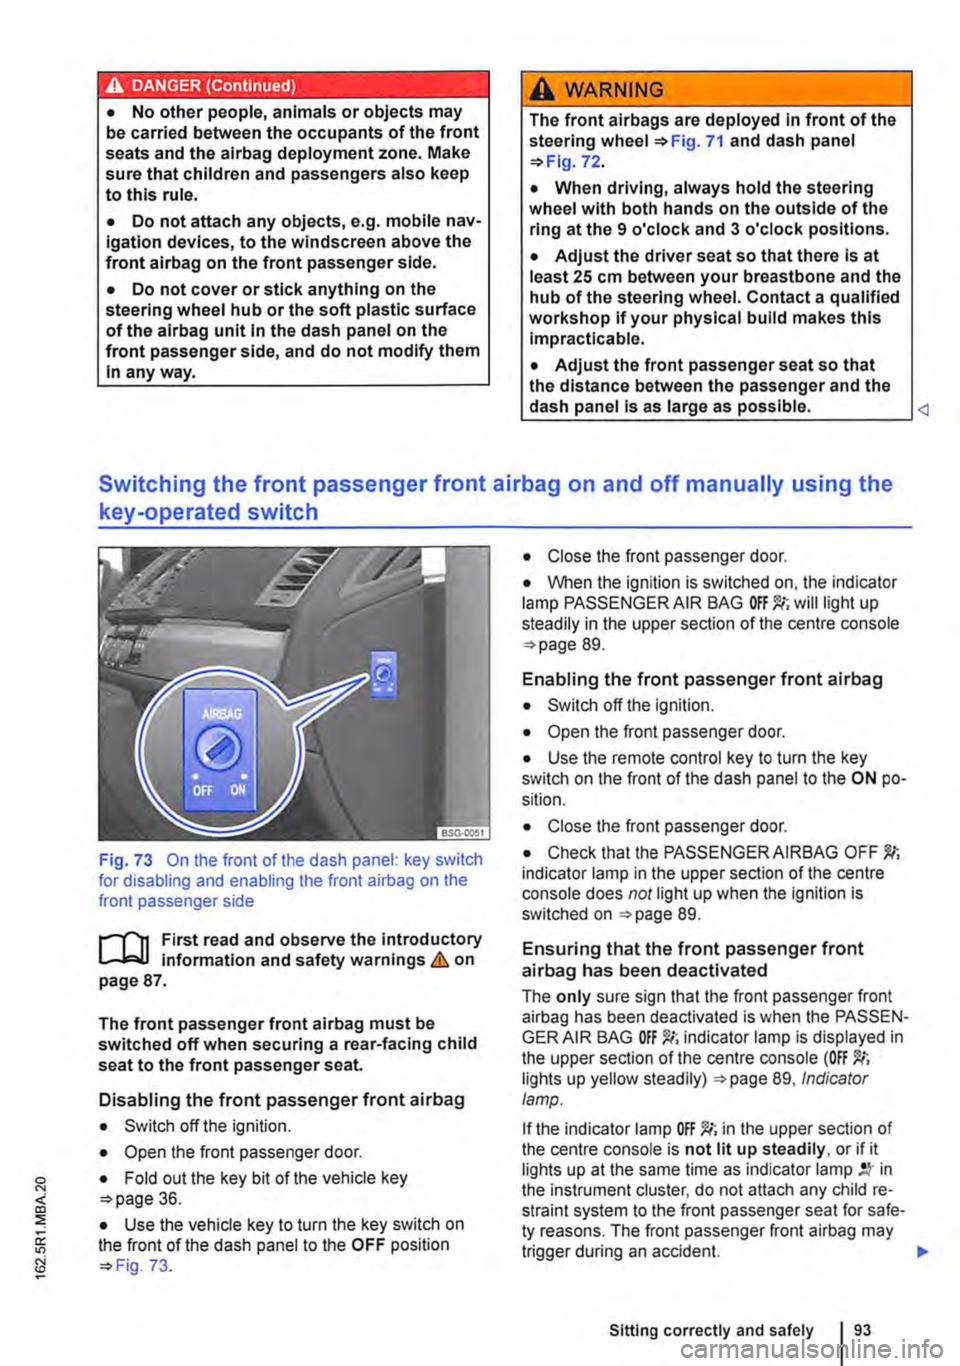
Fig. 73 On the front of the dash panel: key switch for disabling and enabling the front airbag on the front passenger side
l""'rn First read and observe the introductory L-J,::.U information and safety warnings&. on page 87.
The front passenger front airbag must be switched off when securing a rear-facing child seat to the front passenger seat.
Disabling the front passenger front airbag
• Switch off the ignition.
• Open the front passenger door.
• Fold out the key bit of the vehicle key o>page 36.
• Use the vehicle key to turn the key switch on the front of the dash panel to the OFF position o> Fig. 73.
• Close the front passenger door.
• When the ignition is switched on, the indicator lamp PASSENGER AIR BAG will light up steadily in the upper section of the centre console o> page 89.
Enabling the front passenger front airbag
• Switch off the ignition.
• Open the front passenger door.
• Use the remote control key to turn the key switch on the front of the dash panel to the ON po-sition.
• Close the front passenger door.
• Check that the PASSENGER AIRBAG OFF indicator lamp in the upper section of the centre console does not light up when the Ignition is switched on =>page 89.
Ensuring that the front passenger front airbag has been deactivated
The only sure sign that the front passenger front airbag has been deactivated is when the PASSEN-GER AIR BAG indicator lamp is displayed in the upper section of the centre console (OFF lights up yellow steadily) =>page 89, Indicator lamp.
If the indicator lamp OFF )!(; in the upper section of the centre console is not lit up steadily, or if it lights up at the same time as indicator lamp in the instrument cluster, do not attach any child re-straint system to the front passenger seat for safe-ty reasons. The front passenger front airbag may trigger during an accident.
Sitting correctly and safely