2020 TOYOTA PROACE CITY VERSO lock
[x] Cancel search: lockPage 103 of 272
103
Driving
6
Special cases
Immobilisation of the vehicle with the
engine running
To immobilise the vehicle with the engine running, briefly pull the control lever.Application of the parking brake is confirmed by illumination of the braking indicator lamp and the P indicator lamp in the control lever, accompanied by the display of the message "Parking brake applied".
Parking the vehicle with the brake
released
WARNI NG
In very cold conditions (ice), applying the parking brake is not recommended.To immobilise the vehicle, engage a gear or place the chocks against one of the wheels.
NOTIC E
With an automatic gearbox, mode P is automatically selected when the ignition is switched off. The wheels are blocked.For more information on Free-wheeling, refer
to the corresponding section.
NOTIC E
With an automatic gearbox, while mode N is selected, opening the driver’s door triggers an audible signal. It stops when the driver's door closes again.
Deactivating automatic
operation
In some situations, for example when it is extremely cold or when towing (e.g. caravan, breakdown), it may be necessary to deactivate automatic operation of the system.► Start the engine.► Apply the parking brake with the control lever, if it is released.► Take your foot fully off the brake pedal.► Push and hold the control lever in the release direction for at least 10 seconds and no more than 15 seconds.► Release the control lever.
► Press and hold the brake pedal.► Pull the control lever in the application direction for 2 seconds.Deactivation of the automatic functions is confirmed by illumination of this indicator lamp in the instrument panel.► Release the control lever and the brake pedal.
From now on, the parking brake can only be applied and released manually using the control lever.Repeat this procedure to reactivate automatic operation (confirmed by the indicator lamp in the instrument panel going off).
Emergency braking
In the event of a fault with the brake pedal or in an exceptional situation (e.g. driver taken ill, driver under instruction), a continuous pull on the electric parking brake control lever will brake the vehicle. Braking takes place while the control lever is being pulled; it is interrupted when the control lever is released.The ABS and DSC systems ensure stability of the vehicle during emergency braking.If the emergency braking malfunctions, the message "Parking brake control faulty" will be displayed in the instrument panel.
If the ABS and DSC systems malfunction,
signalled by the illumination of one or both warning lamps in the instrument panel, then stability of the vehicle is no longer guaranteed.In this event, stability must be assured by the driver by repeating alternate "pull-release" actions on the control lever until the vehicle is immobilised.
Page 108 of 272
108
► You can revert to automatic operation at any time by pressing button M again.The indicator lamp for the button goes off.
NOTIC E
In manual mode, there is no need to release the accelerator pedal while changing gear.
NOTIC E
It is only possible to change from one gear to another if the vehicle speed and engine speed permit.
NOTIC E
If the engine speed is too low or too high, the selected gear flashes for a few seconds, then the gear actually engaged is shown.When the vehicle is stationary or moving very slowly, the gearbox automatically selects gear M1.
NOTIC E
To preserve the brakes while descending a steep incline, use engine braking to reduce
your speed (change down or select a lower gear).Keeping the brake pedal pressed continuously for long periods can overheat the brakes, with the risk of damaging the braking system or making it inoperative.Only use the brakes when necessary, to slow or stop the vehicle.
NOTIC E
Depending on the road configuration (e.g. mountainous road), manual operation may be preferable.Automatic operation may not always be suitable, and does not enable engine braking.
Invalid value during manual
operation
This symbol is displayed if a gear is not engaged correctly (gear selector between two positions).► Place the selector "correctly" at a position.
Stopping the vehicle
Before switching off the engine, select position P then apply the parking brake to immobilise the vehicle.
NOTIC E
A point of resistance may be noticed when moving to position P.If the selector is not in position P when the driver's door is opened or approximately 45 seconds after the ignition is switched off, an audible signal sounds and a message appears.► Return the gear selector to position P; the audible signal stops and the message disappears.
WARNI NG
On a steep slope with a loaded vehicle, press the brake pedal, select position P, apply the parking brake then release the brake pedal.
WARNI NG
In all circumstances, ensure that the selector is in position P before leaving your vehicle.
Operating fault
When the ignition is on, a message appears in the instrument panel screen to indicate a
gearbox fault.In this case, the gearbox switches to back-up mode and is locked in 3rd gear. You may feel a substantial knock when changing from P to R
Page 117 of 272
11 7
Driving
6
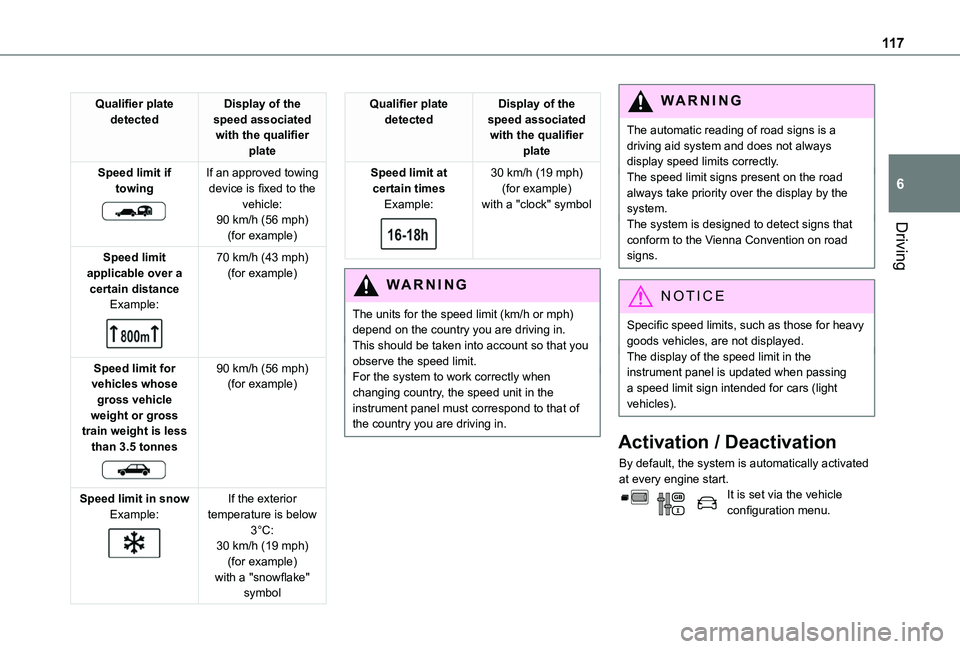
Qualifier plate detectedDisplay of the speed associated with the qualifier plate
Speed limit if towing
If an approved towing device is fixed to the vehicle:90 km/h (56 mph) (for example)
Speed limit applicable over a certain distanceExample:
70 km/h (43 mph) (for example)
Speed limit for vehicles whose gross vehicle weight or gross train weight is less than 3.5 tonnes
90 km/h (56 mph) (for example)
Speed limit in snowExample:
If the exterior temperature is below 3°C:
30 km/h (19 mph) (for example)with a "snowflake" symbol
Qualifier plate detectedDisplay of the speed associated with the qualifier plate
Speed limit at certain timesExample:
30 km/h (19 mph) (for example)with a "clock" symbol
WARNI NG
The units for the speed limit (km/h or mph) depend on the country you are driving in.This should be taken into account so that you observe the speed limit.For the system to work correctly when changing country, the speed unit in the instrument panel must correspond to that of the country you are driving in.
WARNI NG
The automatic reading of road signs is a driving aid system and does not always display speed limits correctly.The speed limit signs present on the road always take priority over the display by the system. The system is designed to detect signs that conform to the Vienna Convention on road signs.
NOTIC E
Specific speed limits, such as those for heavy goods vehicles, are not displayed.The display of the speed limit in the instrument panel is updated when passing a speed limit sign intended for cars (light vehicles).
Activation / Deactivation
By default, the system is automatically activated at every engine start.It is set via the vehicle configuration menu.
Page 146 of 272
146
Compatibility of fuels
Petrol fuels conforming to the EN228 standard containing up to 5% and 10% ethanol respectively.
Diesel fuels conforming to the EN590, EN16734 and EN16709 standards and containing up to 7%, 10%, 20% and 30% fatty acid methyl ester respectively. The use of B20 or B30 fuels, even occasionally, imposes special maintenance conditions referred to as "Arduous conditions".
Paraffinic Diesel fuel conforming to the EN15940 standard.
WARNI NG
The use of any other type of (bio) fuel (vegetable or animal oils, pure or diluted, domestic fuel, etc.) is strictly prohibited (risk of damage to the engine and fuel system).
NOTIC E
The only fuel additives authorised for use are those that meet the B715001 (petrol) or B715000 (Diesel) standards.
Diesel at low temperature
At temperatures below 0 °C (+32 °F), the formation of paraffins in summer-type Diesel fuels could prevent the engine from operating correctly. In these temperature conditions, use winter-type Diesel fuel and keep the fuel tank more than 50 % full.At temperatures below -15 °C (+5 °F) to avoid problems starting, it is best to park the vehicle under shelter (heated garage).
Travelling abroad
Certain fuels could damage your vehicle’s engine.In certain countries, the use of a particular fuel may be required (specific octane rating, specific trade name, etc.) to ensure correct operation of the engine.For all additional information, consult a dealer.
Refuelling
Fuel tank capacity: approximately 61 litres (petrol) or 50 litres (Diesel).Reserve level: approximately 6 litres.
Low fuel level
/2
1 1When the low fuel level is reached, this warning lamp comes on on the instrument panel, accompanied by an onscreen message and an audible signal. When it first
comes on, about 6 litres of fuel remain in the tank.Until sufficient fuel is added, this warning lamp appears every time the ignition is switched on, accompanied by an onscreen message and an audible signal. When driving, this message and audible signal are repeated with increasing frequency as the fuel level drops towards 0.You must refuel as soon as possible to avoid running out of fuel.For more information on Running out of fuel (Diesel), refer to the corresponding section.
W
ARNI NG
Stop & StartNever refuel with the engine in STOP mode; you must switch off the ignition.
Refuelling
At least 10 litres of fuel must be added, in order to be registered by the fuel gauge.
Opening the filler cap may create a noise caused by an inrush of air. This is entirely normal and results from the sealing of the fuel system.To refuel in complete safety:► Always switch off the engine.► Unlock the vehicle using the Keyless Entry and Starting.► Open the fuel filler flap.
Page 147 of 272
147
Practical information
7
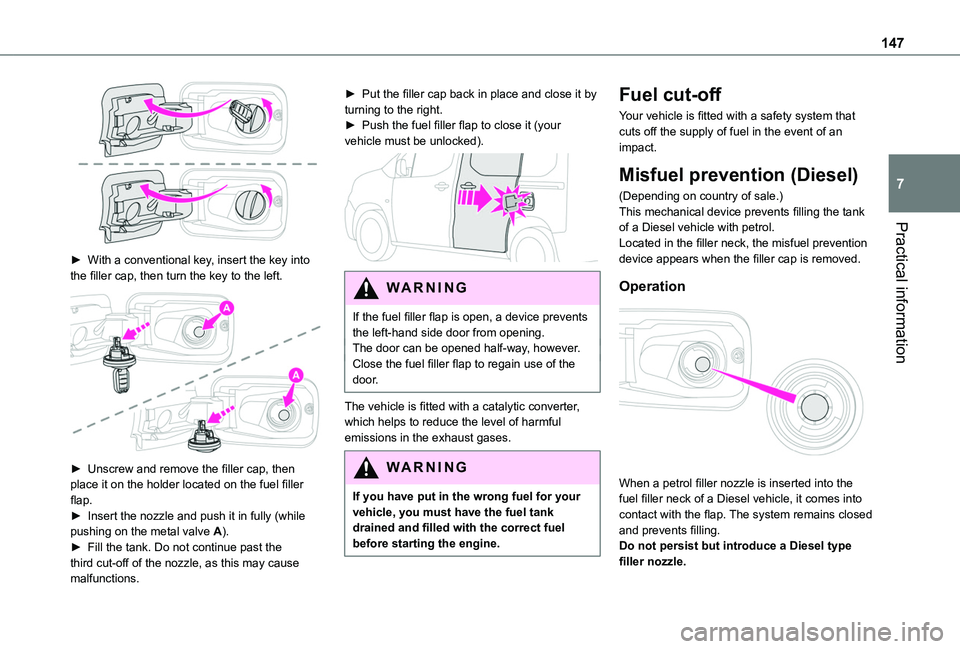
► With a conventional key, insert the key into the filler cap, then turn the key to the left.
► Unscrew and remove the filler cap, then place it on the holder located on the fuel filler flap.► Insert the nozzle and push it in fully (while pushing on the metal valve A).► Fill the tank. Do not continue past the third cut-off of the nozzle, as this may cause malfunctions.
► Put the filler cap back in place and close it by turning to the right.► Push the fuel filler flap to close it (your vehicle must be unlocked).
WARNI NG
If the fuel filler flap is open, a device prevents the left-hand side door from opening.The door can be opened half-way, however.Close the fuel filler flap to regain use of the door.
The vehicle is fitted with a catalytic converter, which helps to reduce the level of harmful emissions in the exhaust gases.
WARNI NG
If you have put in the wrong fuel for your vehicle, you must have the fuel tank drained and filled with the correct fuel before starting the engine.
Fuel cut-off
Your vehicle is fitted with a safety system that cuts off the supply of fuel in the event of an impact.
Misfuel prevention (Diesel)
(Depending on country of sale.)This mechanical device prevents filling the tank of a Diesel vehicle with petrol.Located in the filler neck, the misfuel prevention device appears when the filler cap is removed.
Operation
When a petrol filler nozzle is inserted into the fuel filler neck of a Diesel vehicle, it comes into contact with the flap. The system remains closed and prevents filling.Do not persist but introduce a Diesel type filler nozzle.
Page 151 of 272
151
Practical information
7
Towing device with quickly
detachable towball
No tools are required to install or remove this genuine towing device.
NOTIC E
Trailers with LED lamps are not compatible with the wiring harness of this device.
Fitting
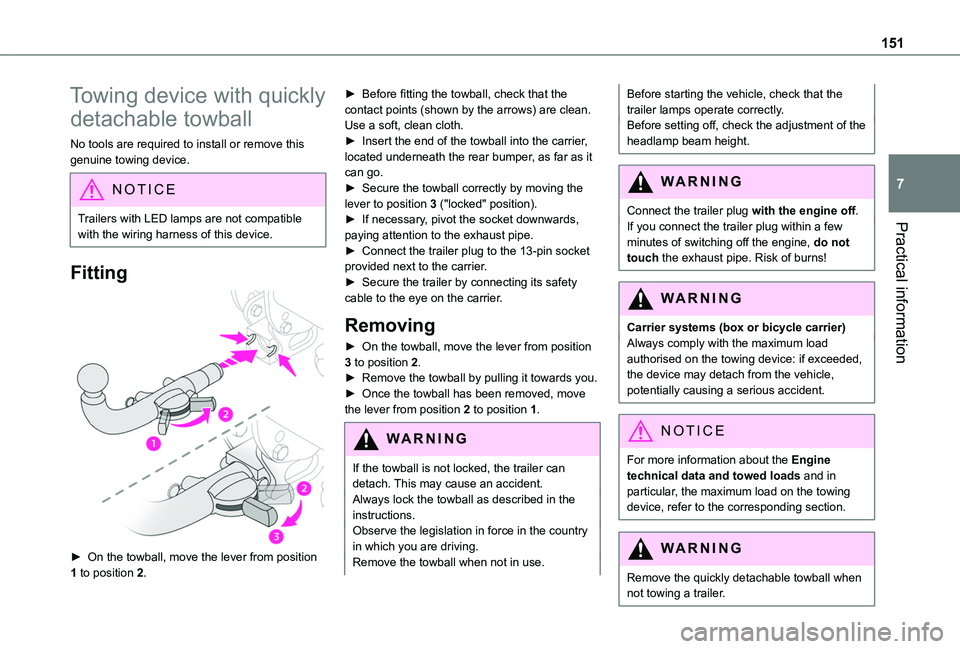
► On the towball, move the lever from position 1 to position 2.
► Before fitting the towball, check that the contact points (shown by the arrows) are clean. Use a soft, clean cloth.► Insert the end of the towball into the carrier, located underneath the rear bumper, as far as it can go.► Secure the towball correctly by moving the lever to position 3 ("locked" position).► If necessary, pivot the socket downwards, paying attention to the exhaust pipe.► Connect the trailer plug to the 13-pin socket provided next to the carrier.► Secure the trailer by connecting its safety cable to the eye on the carrier.
Removing
► On the towball, move the lever from position 3 to position 2.► Remove the towball by pulling it towards you.► Once the towball has been removed, move the lever from position 2 to position 1.
WARNI NG
If the towball is not locked, the trailer can detach. This may cause an accident.Always lock the towball as described in the instructions.Observe the legislation in force in the country in which you are driving.Remove the towball when not in use.
Before starting the vehicle, check that the trailer lamps operate correctly.Before setting off, check the adjustment of the headlamp beam height.
WARNI NG
Connect the trailer plug with the engine off.If you connect the trailer plug within a few minutes of switching off the engine, do not
touch the exhaust pipe. Risk of burns!
WARNI NG
Carrier systems (box or bicycle carrier)Always comply with the maximum load authorised on the towing device: if exceeded, the device may detach from the vehicle, potentially causing a serious accident.
NOTIC E
For more information about the Engine technical data and towed loads and in particular, the maximum load on the towing device, refer to the corresponding section.
WARNI NG
Remove the quickly detachable towball when not towing a trailer.
Page 153 of 272
153
Practical information
7
WARNI NG
In the event of loading a 7-seat model (not exceeding 40 cm (1 ft 3") in height) on the roof, do not exceed the following loads:– Three transverse bars bolted to the roof: 100 kg (220 lb).– An aluminium rack: 70 kg (154 lb).– A steel rack: 65 kg (143 lb).
W ARNI NG
As a safety measure and to avoid damaging the roof, it is essential to use the roof bars and racks approved for your vehicle.Observe the instructions on fitting and use contained in the guide supplied with the roof bars and racks.
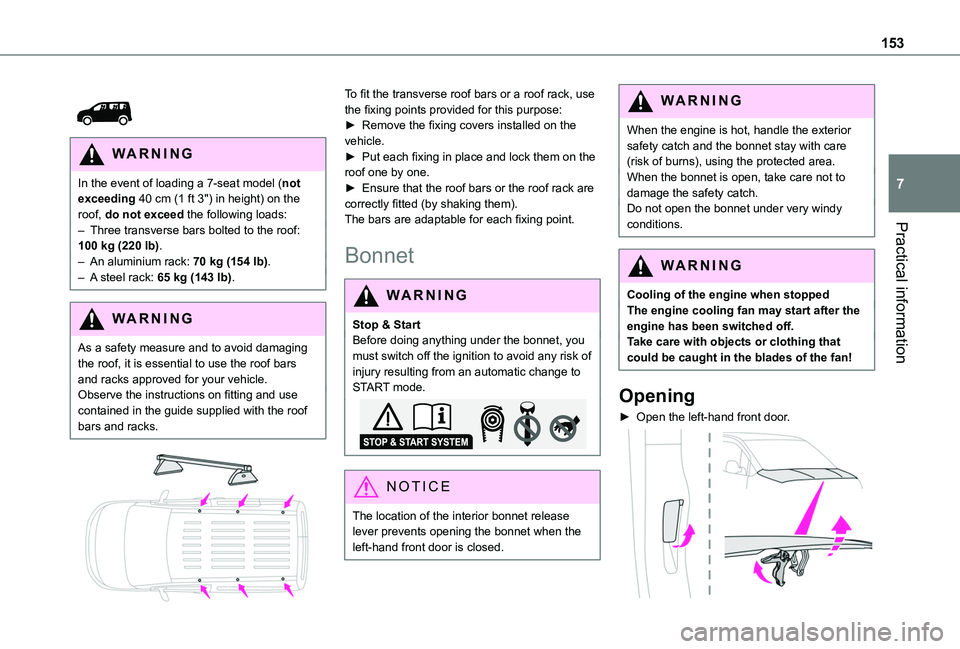
To fit the transverse roof bars or a roof rack, use the fixing points provided for this purpose:► Remove the fixing covers installed on the vehicle.► Put each fixing in place and lock them on the roof one by one.► Ensure that the roof bars or the roof rack are correctly fitted (by shaking them).The bars are adaptable for each fixing point.
Bonnet
WARNI NG
Stop & StartBefore doing anything under the bonnet, you must switch off the ignition to avoid any risk of injury resulting from an automatic change to START mode.
NOTIC E
The location of the interior bonnet release lever prevents opening the bonnet when the left-hand front door is closed.
WARNI NG
When the engine is hot, handle the exterior safety catch and the bonnet stay with care (risk of burns), using the protected area.When the bonnet is open, take care not to damage the safety catch.Do not open the bonnet under very windy conditions.
WARNI NG
Cooling of the engine when stoppedThe engine cooling fan may start after the engine has been switched off.Take care with objects or clothing that could be caught in the blades of the fan!
Opening
► Open the left-hand front door.
Page 154 of 272
154
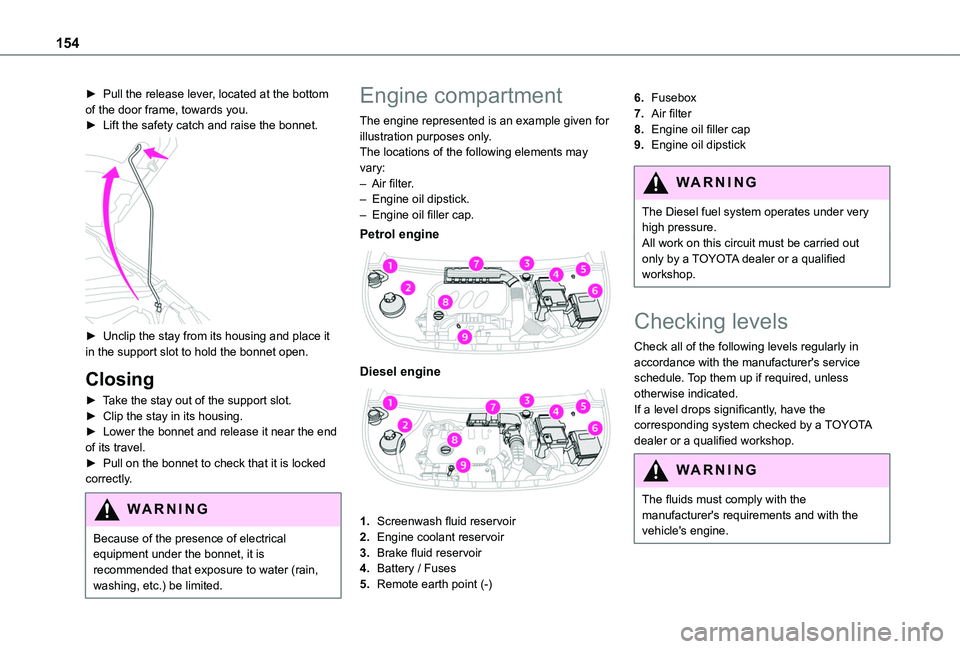
► Pull the release lever, located at the bottom of the door frame, towards you.► Lift the safety catch and raise the bonnet.
► Unclip the stay from its housing and place it in the support slot to hold the bonnet open.
Closing
► Take the stay out of the support slot.► Clip the stay in its housing.► Lower the bonnet and release it near the end of its travel.► Pull on the bonnet to check that it is locked correctly.
WARNI NG
Because of the presence of electrical
equipment under the bonnet, it is recommended that exposure to water (rain, washing, etc.) be limited.
Engine compartment
The engine represented is an example given for illustration purposes only.The locations of the following elements may vary:– Air filter.– Engine oil dipstick.– Engine oil filler cap.
Petrol engine
Diesel engine
1.Screenwash fluid reservoir
2.Engine coolant reservoir
3.Brake fluid reservoir
4.Battery / Fuses
5.Remote earth point (-)
6.Fusebox
7.Air filter
8.Engine oil filler cap
9.Engine oil dipstick
WARNI NG
The Diesel fuel system operates under very high pressure.All work on this circuit must be carried out only by a TOYOTA dealer or a qualified workshop.
Checking levels
Check all of the following levels regularly in accordance with the manufacturer's service schedule. Top them up if required, unless otherwise indicated.If a level drops significantly, have the corresponding system checked by a TOYOTA dealer or a qualified workshop.
WARNI NG
The fluids must comply with the manufacturer's requirements and with the vehicle's engine.