2020 TOYOTA PROACE CITY VERSO lock
[x] Cancel search: lockPage 42 of 272
42
Electric unfolding
The electric unfolding of the mirrors is via the remote control or the key when unlocking the vehicle. Unless folding was selected with control A, pull the control back again to the central position.
NOTIC E
The folding / unfolding on locking / unlocking
can be deactivated. Contact a TOYOTA dealer or a qualified workshop.If necessary, it is possible to fold the mirrors manually.
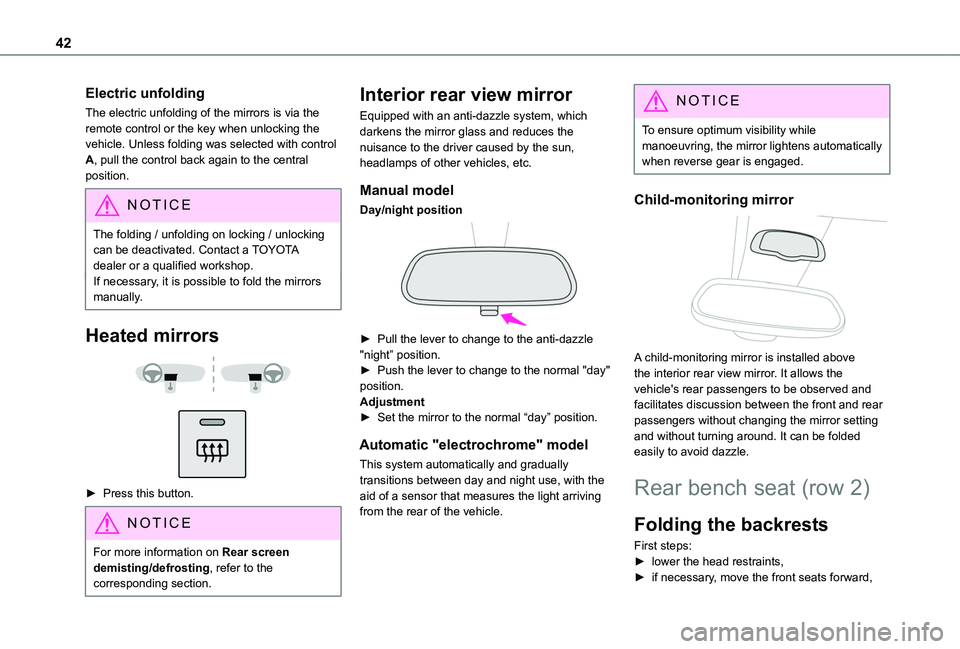
Heated mirrors
► Press this button.
NOTIC E
For more information on Rear screen demisting/defrosting, refer to the corresponding section.
Interior rear view mirror
Equipped with an anti-dazzle system, which darkens the mirror glass and reduces the nuisance to the driver caused by the sun, headlamps of other vehicles, etc.
Manual model
Day/night position
► Pull the lever to change to the anti-dazzle "night” position.► Push the lever to change to the normal "day" position.Adjustment► Set the mirror to the normal “day” position.
Automatic "electrochrome" model
This system automatically and gradually transitions between day and night use, with the aid of a sensor that measures the light arriving from the rear of the vehicle.
NOTIC E
To ensure optimum visibility while manoeuvring, the mirror lightens automatically when reverse gear is engaged.
Child-monitoring mirror
A child-monitoring mirror is installed above the interior rear view mirror. It allows the vehicle's rear passengers to be observed and facilitates discussion between the front and rear passengers without changing the mirror setting and without turning around. It can be folded easily to avoid dazzle.
Rear bench seat (row 2)
Folding the backrests
First steps:► lower the head restraints,► if necessary, move the front seats forward,
Page 44 of 272
44
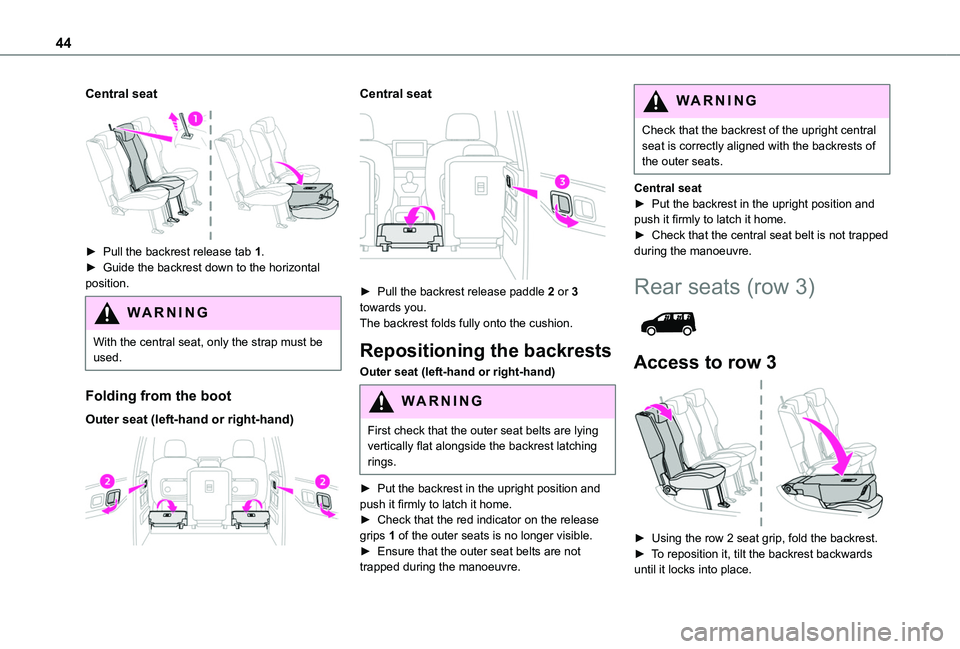
Central seat
► Pull the backrest release tab 1.► Guide the backrest down to the horizontal position.
WARNI NG
With the central seat, only the strap must be used.
Folding from the boot
Outer seat (left-hand or right-hand)
Central seat
► Pull the backrest release paddle 2 or 3 towards you.The backrest folds fully onto the cushion.
Repositioning the backrests
Outer seat (left-hand or right-hand)
WARNI NG
First check that the outer seat belts are lying vertically flat alongside the backrest latching rings.
► Put the backrest in the upright position and push it firmly to latch it home.► Check that the red indicator on the release grips 1 of the outer seats is no longer visible.
► Ensure that the outer seat belts are not trapped during the manoeuvre.
WARNI NG
Check that the backrest of the upright central seat is correctly aligned with the backrests of the outer seats.
Central seat► Put the backrest in the upright position and push it firmly to latch it home.► Check that the central seat belt is not trapped during the manoeuvre.
Rear seats (row 3)
Access to row 3
► Using the row 2 seat grip, fold the backrest.
► To reposition it, tilt the backrest backwards until it locks into place.
Page 45 of 272
45
Ease of use and comfort
3
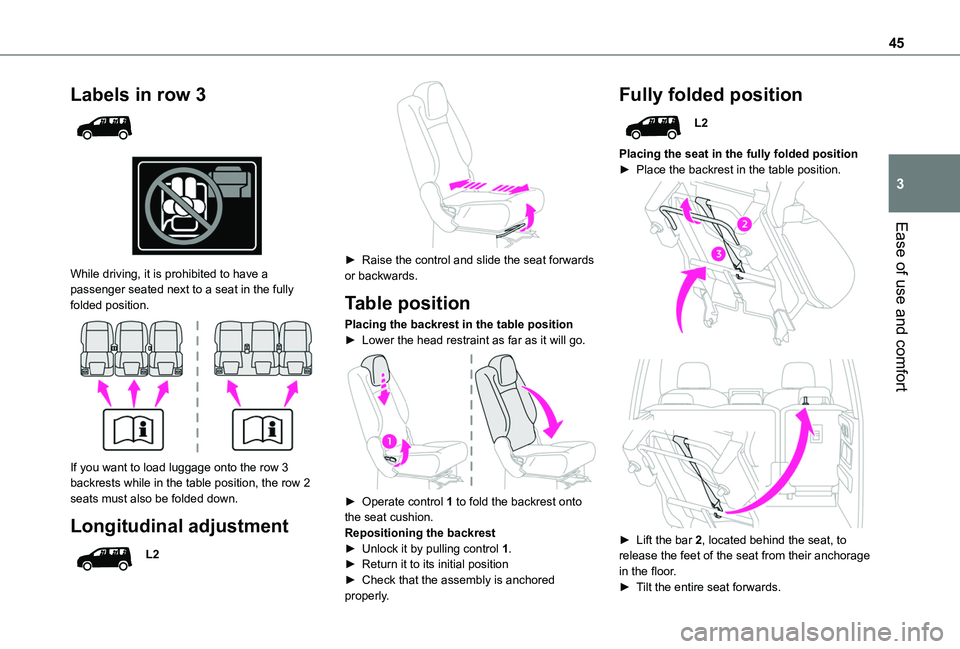
Labels in row 3
While driving, it is prohibited to have a passenger seated next to a seat in the fully folded position.
If you want to load luggage onto the row 3 backrests while in the table position, the row 2 seats must also be folded down.
Longitudinal adjustment
L2
► Raise the control and slide the seat forwards or backwards.
Table position
Placing the backrest in the table position► Lower the head restraint as far as it will go.
► Operate control 1 to fold the backrest onto the seat cushion.Repositioning the backrest► Unlock it by pulling control 1.► Return it to its initial position► Check that the assembly is anchored properly.
Fully folded position
L2
Placing the seat in the fully folded position► Place the backrest in the table position.
► Lift the bar 2, located behind the seat, to release the feet of the seat from their anchorage in the floor.► Tilt the entire seat forwards.
Page 53 of 272
53
Ease of use and comfort
3
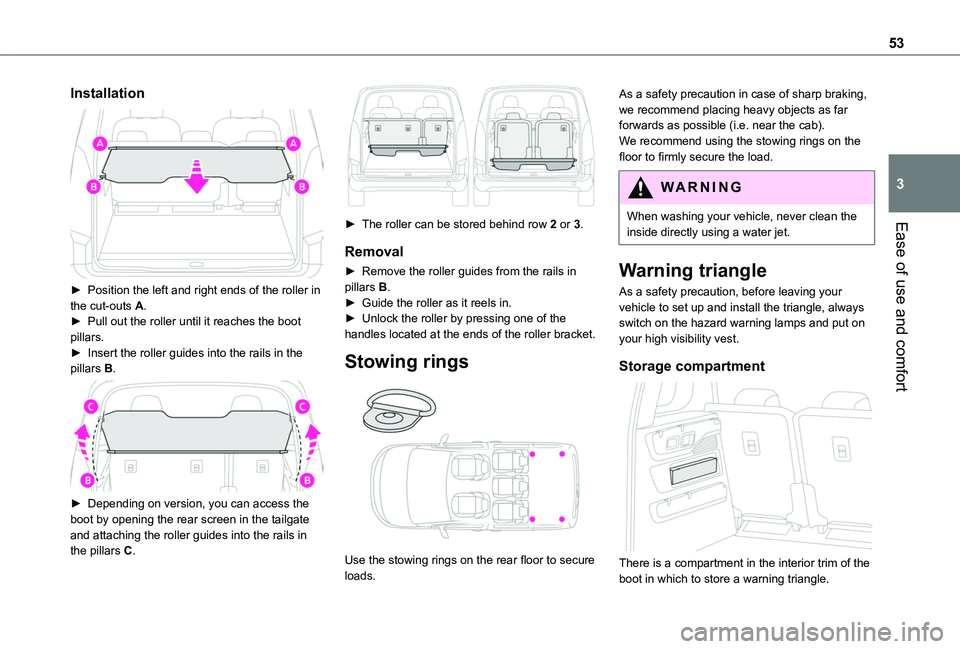
Installation
► Position the left and right ends of the roller in the cut-outs A.► Pull out the roller until it reaches the boot pillars.► Insert the roller guides into the rails in the pillars B.
► Depending on version, you can access the boot by opening the rear screen in the tailgate and attaching the roller guides into the rails in the pillars C.
► The roller can be stored behind row 2 or 3.
Removal
► Remove the roller guides from the rails in pillars B.► Guide the roller as it reels in.► Unlock the roller by pressing one of the handles located at the ends of the roller bracket.
Stowing rings
Use the stowing rings on the rear floor to secure loads.
As a safety precaution in case of sharp braking, we recommend placing heavy objects as far forwards as possible (i.e. near the cab).We recommend using the stowing rings on the floor to firmly secure the load.
WARNI NG
When washing your vehicle, never clean the inside directly using a water jet.
Warning triangle
As a safety precaution, before leaving your vehicle to set up and install the triangle, always switch on the hazard warning lamps and put on your high visibility vest.
Storage compartment
There is a compartment in the interior trim of the boot in which to store a warning triangle.
Page 60 of 272
60
Programming
With Bluetooth® audio system
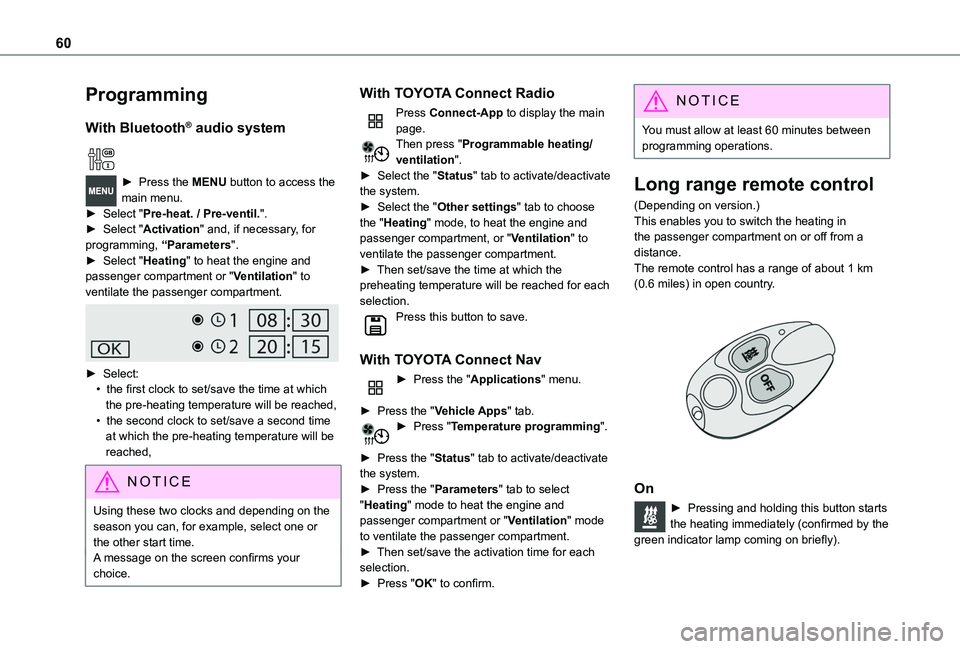
► Press the MENU button to access the main menu. ► Select "Pre-heat. / Pre-ventil.".► Select "Activation" and, if necessary, for programming, “Parameters".► Select "Heating" to heat the engine and passenger compartment or "Ventilation" to ventilate the passenger compartment.
► Select:• the first clock to set/save the time at which the pre-heating temperature will be reached,• the second clock to set/save a second time at which the pre-heating temperature will be reached,
N OTIC E
Using these two clocks and depending on the season you can, for example, select one or the other start time.A message on the screen confirms your choice.
With TOYOTA Connect Radio
Press Connect-App to display the main page.Then press "Programmable heating/ventilation".► Select the "Status" tab to activate/deactivate the system.► Select the "Other settings" tab to choose the "Heating" mode, to heat the engine and passenger compartment, or "Ventilation" to ventilate the passenger compartment.► Then set/save the time at which the preheating temperature will be reached for each selection.Press this button to save.
With TOYOTA Connect Nav
► Press the "Applications" menu.
► Press the "Vehicle Apps" tab.► Press "Temperature programming".
► Press the "Status" tab to activate/deactivate the system.► Press the "Parameters" tab to select "Heating" mode to heat the engine and passenger compartment or "Ventilation" mode to ventilate the passenger compartment.► Then set/save the activation time for each selection.► Press "OK" to confirm.
NOTIC E
You must allow at least 60 minutes between programming operations.
Long range remote control
(Depending on version.)This enables you to switch the heating in the passenger compartment on or off from a distance.The remote control has a range of about 1 km (0.6 miles) in open country.
On
► Pressing and holding this button starts the heating immediately (confirmed by the green indicator lamp coming on briefly).
Page 62 of 272
62
Courtesy lamp
Automatic switching on/off
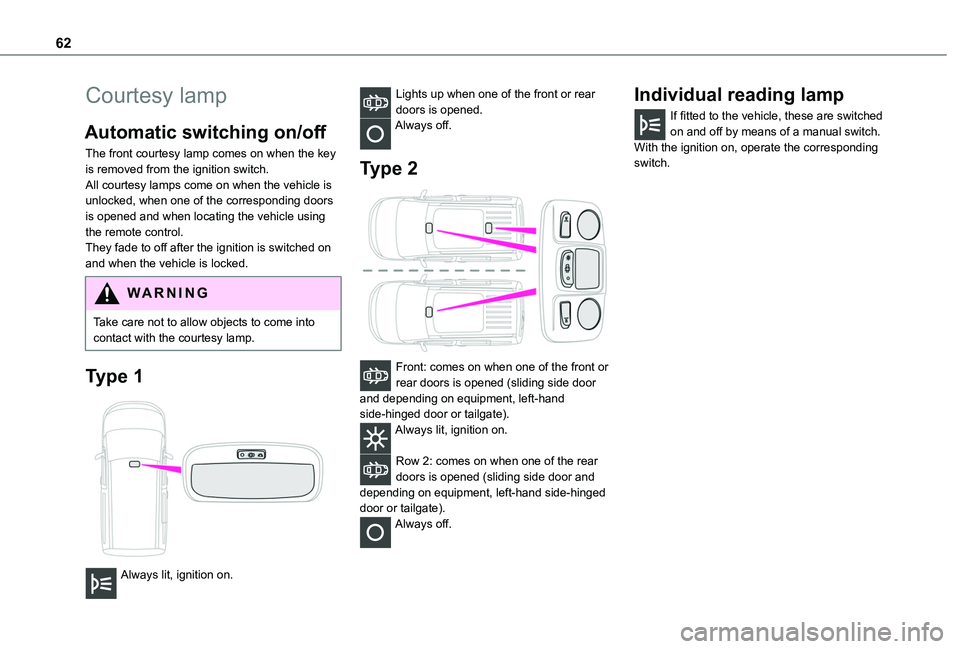
The front courtesy lamp comes on when the key is removed from the ignition switch.All courtesy lamps come on when the vehicle is unlocked, when one of the corresponding doors is opened and when locating the vehicle using the remote control. They fade to off after the ignition is switched on and when the vehicle is locked.
WARNI NG
Take care not to allow objects to come into contact with the courtesy lamp.
Type 1
Always lit, ignition on.
Lights up when one of the front or rear doors is opened.Always off.
Type 2
Front: comes on when one of the front or rear doors is opened (sliding side door and depending on equipment, left-hand side-hinged door or tailgate).Always lit, ignition on.
Row 2: comes on when one of the rear doors is opened (sliding side door and depending on equipment, left-hand side-hinged door or tailgate).Always off.
Individual reading lamp
If fitted to the vehicle, these are switched on and off by means of a manual switch.With the ignition on, operate the corresponding switch.
Page 66 of 272
66
Automatic exterior welcome
lighting
With the "Automatic headlamp illumination" function activated, when the light is poor, the sidelamps and dipped beam headlamps come on automatically when the vehicle is unlocked.Activation, deactivation and the duration of the exterior welcome lighting are set in the vehicle configuration menu.
Automatic headlamp
dipping
This system automatically changes between dipped and main beam headlamps according to the brightness and driving conditions, using a camera located at the top of the windscreen.
WARNI NG
This system is a driving aid.The driver remains responsible for the vehicle's lighting, its correct use for the prevailing conditions of light, visibility and traffic, and for observation of driving and vehicle regulations.
NOTIC E
The system will be operational as soon as you exceed 25 km/h (16 mph).If the speed drops below 15 km/h (9 mph), the system no longer operates.
Activation/Deactivation
Activation and deactivation are done via the vehicle
configuration menu.When deactivated, the lighting system changes to "automatic illumination of headlamps" mode.The state of the system stays in the memory when switching off the ignition.
Operation
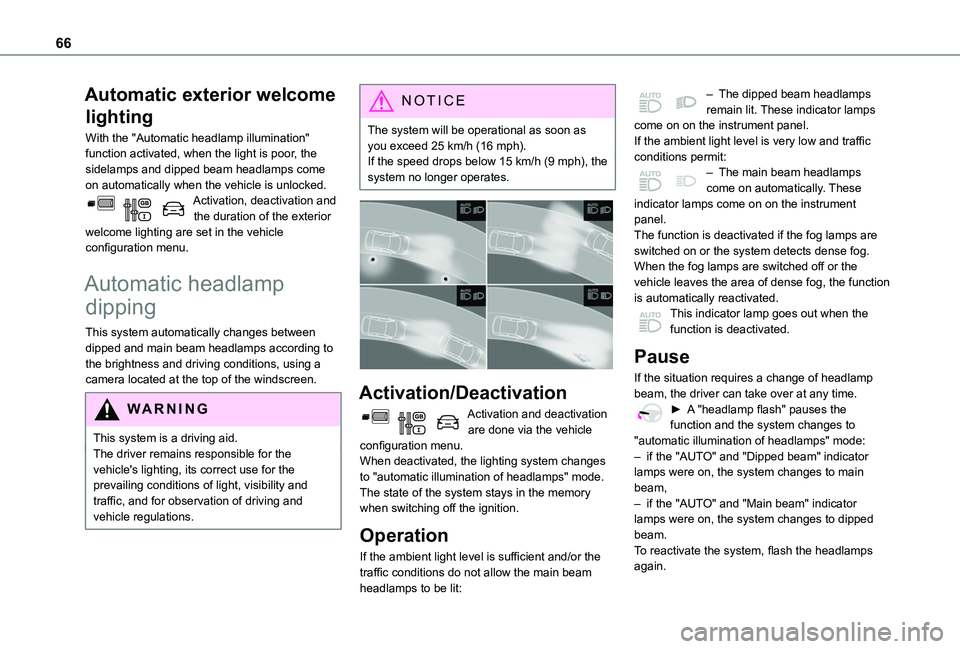
If the ambient light level is sufficient and/or the traffic conditions do not allow the main beam headlamps to be lit:
– The dipped beam headlamps remain lit. These indicator lamps come on on the instrument panel.If the ambient light level is very low and traffic conditions permit:– The main beam headlamps come on automatically. These indicator lamps come on on the instrument panel.The function is deactivated if the fog lamps are switched on or the system detects dense fog.When the fog lamps are switched off or the vehicle leaves the area of dense fog, the function is automatically reactivated.This indicator lamp goes out when the function is deactivated.
Pause
If the situation requires a change of headlamp beam, the driver can take over at any time.► A "headlamp flash" pauses the function and the system changes to "automatic illumination of headlamps" mode:
– if the "AUTO" and "Dipped beam" indicator lamps were on, the system changes to main beam,– if the "AUTO" and "Main beam" indicator lamps were on, the system changes to dipped beam.To reactivate the system, flash the headlamps again.
Page 74 of 272
74
(GDPR). Third parties to which data has been communicated shall be notified of any rectification, erasure or restriction carried out in accordance with the aforementioned Directive, unless doing so would be impossible or require a disproportionate effort. You also have the right to lodge a complaint with the relevant data protection authority.
Hazard warning lamps
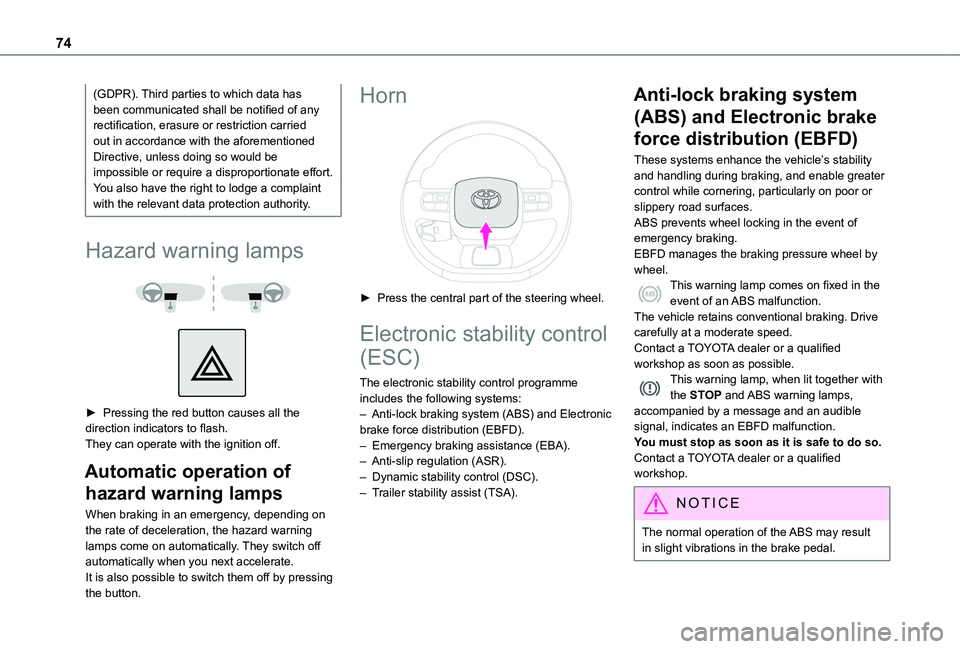
► Pressing the red button causes all the direction indicators to flash.They can operate with the ignition off.
Automatic operation of
hazard warning lamps
When braking in an emergency, depending on the rate of deceleration, the hazard warning lamps come on automatically. They switch off automatically when you next accelerate.It is also possible to switch them off by pressing the button.
Horn
► Press the central part of the steering wheel.
Electronic stability control
(ESC)
The electronic stability control programme includes the following systems:– Anti-lock braking system (ABS) and Electronic brake force distribution (EBFD).
– Emergency braking assistance (EBA).– Anti-slip regulation (ASR).– Dynamic stability control (DSC).– Trailer stability assist (TSA).
Anti-lock braking system
(ABS) and Electronic brake
force distribution (EBFD)
These systems enhance the vehicle’s stability and handling during braking, and enable greater control while cornering, particularly on poor or slippery road surfaces.ABS prevents wheel locking in the event of emergency braking.EBFD manages the braking pressure wheel by wheel.This warning lamp comes on fixed in the event of an ABS malfunction.The vehicle retains conventional braking. Drive carefully at a moderate speed.Contact a TOYOTA dealer or a qualified workshop as soon as possible.This warning lamp, when lit together with the STOP and ABS warning lamps, accompanied by a message and an audible signal, indicates an EBFD malfunction.You must stop as soon as it is safe to do so.
Contact a TOYOTA dealer or a qualified workshop.
NOTIC E
The normal operation of the ABS may result in slight vibrations in the brake pedal.