Page 49 of 288

49
2. CONNECTIVITY SETTINGS
BASIC FUNCTION
2
MIRAI_Navi_USA_OM62074U_20MY
■CONNECTING A Bluetooth® DE-
VICE IN A DIFFERENT WAY
From the phone top screen
P.156
From the Bluetooth
® audio control
screen
P.104
From the phone settings screen
P.173
■AUTO CONNECTION MODE
When the power switch is turned to
ACCESSORY or ON mode, the system
searches for a nearby registered device.
The system will connect with the regis-
tered device that was last connected, if it
is nearby. When automatic connection pri-
ority is set to on and there is more than
one registered Bluetooth
® phone avail-
able, the system will automatically con-
nect to the Bluetooth
® phone with the
highest priority. ( P. 5 3 )
■CONNECTING MANUALLY
1Press the “MENU” button.
2Select “Setup” .
3Select “Bluetooth” .
4Follow the steps in “CONNECTING A
Bluetooth
® DEVICE” from “STEP 2”.
(P.48)
■RECONNECTING THE Bluetooth®
PHONE
To turn auto connection mode on, set
“Bluetooth Power”
to on. (P.52)
Leave the Bluetooth
® device in a loca-
tion where the connection can be es-
tablished.
When the auto connection has failed or
“Bluetooth Power” is turned off, it is
necessary to connect the Bluetooth
®
device manually.
If a Bluetooth
® phone is disconnected
due to poor reception from the
Bluetooth
® network when the power
switch is in ACCESSORY or ON mode,
the system automatically reconnects
the Bluetooth
® phone.
Page 50 of 288

50
2. CONNECTIVITY SETTINGS
MIRAI_Navi_USA_OM62074U_20MY
1Display the Bluetooth® settings
screen. ( P.47)
2Select “Add New Device” .
When another Bluetooth
® device is con-
nected
To disconnect the Bluetooth® device,
select “Yes”.
When 5 Bluetooth® devices have al-
ready been registered
A registered device needs to be replaced.
Select “Yes”, and select the device to be
replaced.
3Follow the steps in “REGISTERING A
Bluetooth
® PHONE FOR THE FIRST
TIME” from “STEP 5”. ( P.42)
1Display the Bluetooth® settings
screen. ( P.47)
2Select “Remove Device” .
3Select the desired device.
4Select “Yes” when the confirmation
screen appears.
5Check that a confirmation screen is
displayed when the operation is com-
plete.
REGISTERING A Bluetooth®
DEVICE
Up to 5 Bluetooth® devices can be reg-
istered.
Bluetooth
® compatible phones (HFP)
and audio players (AVP) can be regis-
tered simultaneously.
This operation cannot be performed
while driving.
DELETING A Bluetooth®
DEVICE
INFORMATION
● When deleting a Bluetooth® phone, the
contact data will be deleted at the same
time.
Page 51 of 288

51
2. CONNECTIVITY SETTINGS
BASIC FUNCTION
2
MIRAI_Navi_USA_OM62074U_20MY
1Display the Bluetooth® settings
screen. ( P.47)
2Select “Registered Device” .
3Select the desired device to be edited.
4Select “Device Info” .
5Confirm and change the Bluetooth®
device information.
EDITING THE Bluetooth®
DEVICE INFORMATION
The Bluetooth® device’s information
can be displayed on the screen. The
displayed information can be edited.
No.Information
The name of the Bluetooth® device.
Can be changed to a desired name.
( P.52)
Select to set the Bluetooth® audio
player connection method. ( P.52)
Device address is unique to the de-
vice and cannot be changed.
Phone number of the Bluetooth®
phone.
Compatibility profile of the
Bluetooth® device.
Select to reset all setup items.
INFORMATION
● If 2 Bluetooth® devices have been regis-
tered with the same device name, the
devices can be distinguished by refer-
ring to the device addresses.
● Depending on the type of phone, some
information may not be displayed.
Page 52 of 288

52
2. CONNECTIVITY SETTINGS
MIRAI_Navi_USA_OM62074U_20MY
1Select “Device Name” .
2Enter the name and select “OK”.
1Select “Connect Audio Player
From” .
2Select the desired connection method.
“Vehicle” : Select to connect the audio
player from the vehicle’s audio/visual sys-
tem.
“Device” : Select to connect the vehicle’s
audio/visual system from the audio player.
Depending on the audio player, the “Vehi-
cle” or “Device” connection method may
be best. As such, refer to the manual that
comes with the audio player.
1Display the Bluetooth® settings
screen. ( P.47)
2Select “Detailed Settings” .
3Select the desired item to be set.
CHANGING A DEVICE NAME
INFORMATION
●Even if the device name is changed, the
name registered in your Bluetooth®
device does not change.
SETTING AUDIO PLAYER
CONNECTION METHOD
SETTING Bluetooth® SYSTEM
The Bluetooth® settings can be con-
firmed and changed.
No.InformationPage
Select to set Bluetooth®
connection on/off.53
Select to change the auto-
matic connection priority of
the registered Bluetooth
®
devices.
53
Select to edit the system in-
formation.54
Select to reset all setup
items.
Page 53 of 288

53
2. CONNECTIVITY SETTINGS
BASIC FUNCTION
2
MIRAI_Navi_USA_OM62074U_20MY
1Select “Bluetooth Power” .
When “Bluetooth Power” is on:
The Bluetooth
® device is automatically
connected when the power switch is
turned to ACCESSO RY or ON mode.
When “Bluetooth Power” is off :
The Bluetooth
® device is disconnected,
and the system will no t connect to it next
time.
1Select “Preferred Device Settings” .
2Select the desired item to be set.
CHANGING “Bluetooth Power”
INFORMATION
●While driving, the auto connection state
can be changed from off to on, but can-
not be changed from on to off.
SETTING AUTOMATIC
CONNECTION PRIORITY
The automatic connection priority of
the registered Bluetooth
® devices can
be changed.
No.FunctionPage
Select to set automatic
connection priority on/off.
Select to change the auto-
matic connection priority of
the registered Bluetooth
®
phones.
54
Select to change the auto-
matic connection priority of
the registered Bluetooth
®
audio players.
54
Select to reset all setup
items.
Page 54 of 288
54
2. CONNECTIVITY SETTINGS
MIRAI_Navi_USA_OM62074U_20MY
■CHANGING Bluetooth® DEVICE
AUTOMATIC CONNECTION PRIOR-
ITY
1Select “Preferred Phones” or “Pre-
ferred Audio Players” .
2Select the desired Bluetooth® device
and select “Move Up” or “Move
Down” to change the pr eferred order.
1Select “System Information” .
2Select the desired item to be set.
INFORMATION
●A newly registered Bluetooth® device
will automatically be given the highest
automatic connection priority.
EDITING THE SYSTEM
INFORMATION
Page 55 of 288
55
2. CONNECTIVITY SETTINGS
BASIC FUNCTION
2
MIRAI_Navi_USA_OM62074U_20MY
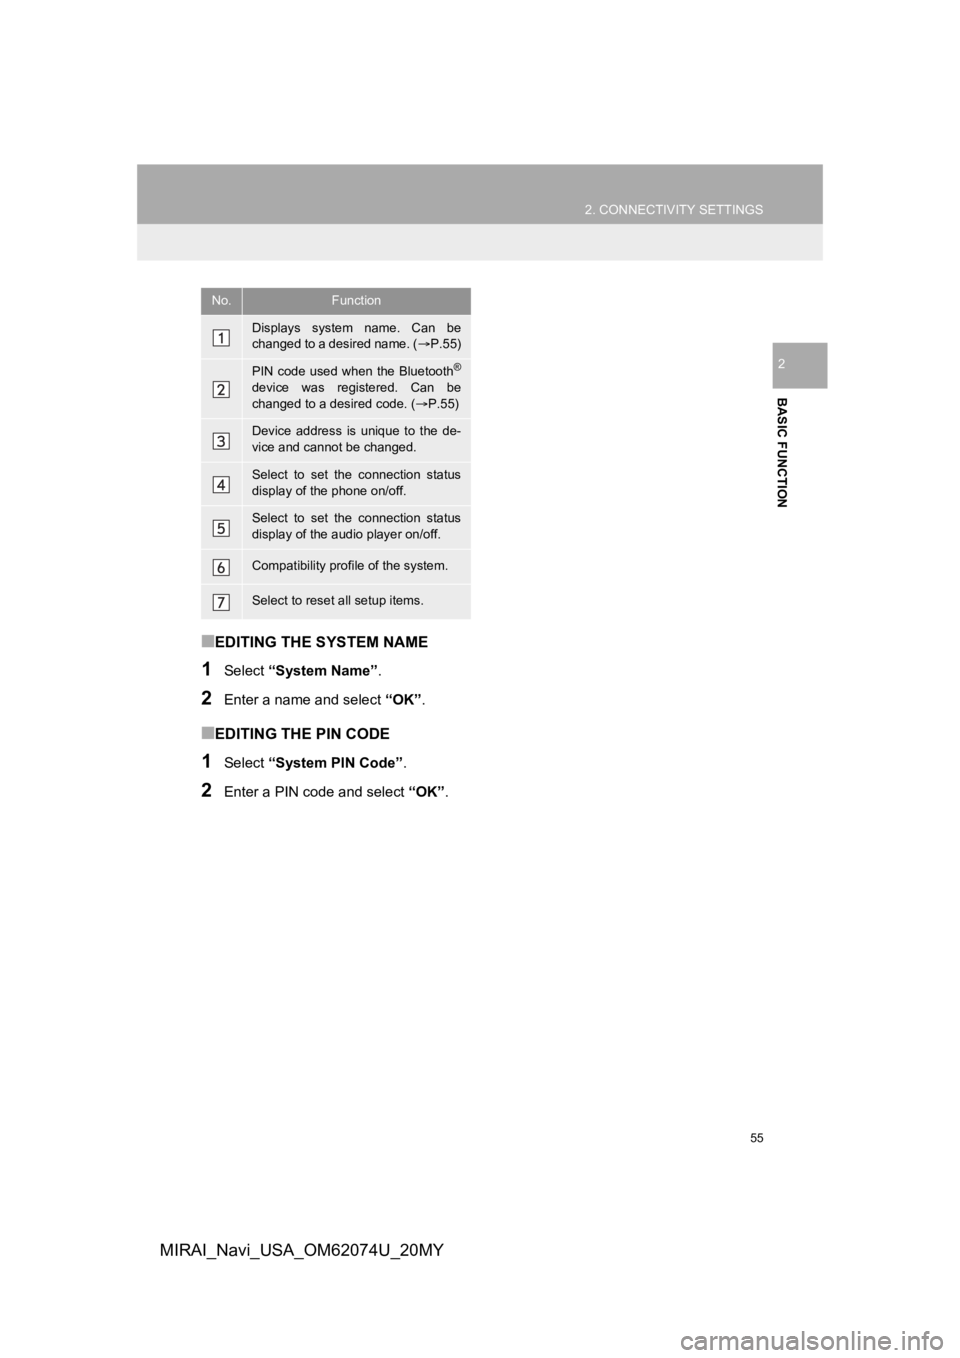
■EDITING THE SYSTEM NAME
1Select “System Name” .
2Enter a name and select “OK”.
■EDITING THE PIN CODE
1Select “System PIN Code” .
2Enter a PIN code and select “OK”.
No.Function
Displays system name. Can be
changed to a desired name. ( P.55)
PIN code used when the Bluetooth®
device was registered. Can be
changed to a desired code. ( P.55)
Device address is unique to the de-
vice and cannot be changed.
Select to set the connection status
display of the phone on/off.
Select to set the connection status
display of the audio player on/off.
Compatibility profile of the system.
Select to reset all setup items.
Page 56 of 288

56
2. CONNECTIVITY SETTINGS
MIRAI_Navi_USA_OM62074U_20MY
3. Wi-Fi® HOTSPOT*
1Enable the Wi-Fi® Hotspot function.
(P.56)
2Disable the “Hide Access Point” func-
tion. ( P.56)
3Search for the vehicle access point us-
ing the device you wish to connect.
For details about operating the device,
refer to the documentation which came
with it.
4Operate the device to connect it to the
vehicle access point.
To check the vehicle access point pass-
word, check “Password”. ( P.58)
1Enable the Wi-Fi® Hotspot function.
( P.56)
2Enable the “Hide Access Point” func-
tion. ( P.56)
3Enter the access point name (SSID)
into the device you wish to connect and
connect it.
To check the vehicle access point pass-
word, check “Password”. ( P. 5 8 )
The security settings on the device must
be the same as that displayed for “Secu-
rity”. ( P. 5 8 )
For details about operating the device,
refer to the documentation which came
with it.
1Press the “MENU” button.
2Select “Setup”.
3Select “Wi-Fi”.
By connecting a device to the vehicle
via Wi-Fi
®, it can access the internet
through the DCM.
To use this function, a Wi-Fi Hotspot
service subscription from AT&T is re-
quired. Connect your device to the in-
vehicle access point (see instructions
below), or contact the Customer Expe-
rience Center at 1-800-331-4331 for
assistance.
CONNECTING A DEVICE TO
THE IN-VEHICLE ACCESS
POINT
SEARCHING FOR AND
CONNECTING A DEVICE TO
THE VEHICLE ACCESS POINT
INFORMATION
● Hints for connecting to the vehicle via
Wi-Fi® can be displayed. ( P.56)
CONNECTING A DEVICE TO
THE IN-VEHICLE ACCESS
POINT USING THE ACCESS
POINT NAME (SSID)
CHANGING THE Wi-Fi®
SETTINGS
*: This function is not made avai lable in some countries or areas.