Page 177 of 288
177
2. SETUP
PHONE
7
MIRAI_Navi_USA_OM62074U_20MY
1Select “Automatic Transfer”.
2Select the desired item to be set.
INFORMATION
●Depending on the type of phone, certain
functions may not be available.
● Contact data is managed independently
for every registered phone. When one
phone is connected, another phone’s
registered data cannot be read.
SETTING AUTOMATIC
CONTACT/HISTORY
TRANSFER
The automatic contact/history function
is available for PBAP compatible
Bluetooth
® phones only.
No.Function
Select to set automatic contact/his-
tory transfer on/off.
When set to on, the phone’s contact
data and history are automatically
transferred.
Select to update contacts from the
connected phone. ( P.178)
Select to set the transferred contact
image display on/off.
Select to reset all setup items.
Page 178 of 288

178
2. SETUP
MIRAI_Navi_USA_OM62074U_20MY
■UPDATING CONTACTS FROM
PHONE
1Select “Update Now” .
Contacts are transferred automatically.
2Check that a confirmation screen is
displayed when the operation is com-
plete.
This operation may be unnecessary
depending on the type of cellular phone.
If another Bluetooth
® device is connected
when transferring contact data, depending
on the phone, the connected Bluetooth
®
device may need to be disconnected.
Depending on the type of Bluetooth
®
phone being connected, it may be neces-
sary to perform additional steps on the
phone.
■UPDATING THE CONTACTS IN A
DIFFERENT WAY (FROM THE CALL
HISTORY SCREEN)*
1Display the phone top screen.
(P.154)
2Select “History” and select a contact
not yet registered in the contact list.
3Select “Update Contact” .
4Select the desired contact.
5Select a phone type for the phone
number.
*: For PBAP compatible Bluetooth® phones,
this function is available when “Automatic
Transfer” is set to off. ( P.177)
■FROM PHONE (OPP COMPATIBLE
Bluetooth
® PHONES ONLY)
1Select “Transfer Contacts from De-
vice” .
2Select “From Phone (Bluetooth)”.
When the contact is not registered
3Transfer the contact data to the system
using a Bluetooth
® phone.
This operation may be unnecessary
depending on the type of cellular phone.
To cancel this function, select “Cancel”.
4Check that a confirmation screen is
displayed when the operation is com-
plete.
When the contact is registered
3Select “Replace Contacts” or “Add
Contact” .
“Replace Contacts” : Select to transfer
the contact from the connected cellular
phone and replace the current one.
“Add Contact”: Select to transfer the de-
sired contact data fr om the connected cel-
lular phone to add t o the current one.
TRANSFERRING CONTACTS
FROM DEVICE
Page 179 of 288

179
2. SETUP
PHONE
7
MIRAI_Navi_USA_OM62074U_20MY
4Transfer the contact data to the system
using a Bluetooth
® phone.
This operation may be unnecessary
depending on the type of cellular phone.
To cancel this function, select “Cancel”.
5Check that a confirmation screen is
displayed when the operation is com-
plete.
■FROM USB DEVICE
1Connect a USB device. ( P.76)
2Select “Transfer Contacts from De-
vice” .
3Select “From USB” .
4Select “USB 1” or “USB 2” when the
multiple USB devices are connected.
If a USB device is connected, skip this
procedure.
When the contact is not registered
5Select a desired file from vCard file list.
6Check that a confirmation screen is
displayed when the operation is com-
plete.
When the contact is registered
5Select “Replace Contacts” or “Add
Contact” .
“Replace Contacts”: Select to transfer
the contact from the connected USB de-
vice or Bluetooth
® phone and replace the
current one.
“Add Contact” : Select to transfer the de-
sired contact data from the connected
USB device or Bluetooth
® phone to add to
the current one.
6Select a desired file from vCard file list.
7Check that a confirmation screen is
displayed when the operation is com-
plete.
Backed-up contact data (“vCard” for-
matted) can be transferred from USB
device or Bluetooth
® phone connected
via USB to this system.
INFORMATION
● Depending type of phone used and
number of files, it may take time to dis-
play vCard file lists and download con-
tacts.
● Downloading may not complete cor-
rectly in the following cases:
• If the power switch is turned off during
downloading.
• If the USB device or Bluetooth
® phone
is removed before downloading is
complete.
Page 180 of 288

180
2. SETUP
MIRAI_Navi_USA_OM62074U_20MY
1Select “New Contact” .
2Enter the name and select “OK”.
3Enter the phone number and select
“OK”.
4Select the phone type for the phone
number.
5To add another number to this contact,
select “Yes”.
■REGISTERING A NEW CONTACT IN
A DIFFERENT WAY (FROM THE
CALL HISTORY SCREEN)
1Display the phone top screen.
(P.154)
2Select “History” and select a contact
not yet registered in the contact list.
3Select “Add to Contacts” .
4Follow the steps in “REGISTERING A
NEW CONTACT TO THE CONTACT
LIST” from “STEP 2”. ( P.180)
1Select “Edit Contact”.
2Select the desired contact.
3Select corresponding to the de-
sired name or number.
For editing the name
4Follow the steps in “REGISTERING A
NEW CONTACT TO THE CONTACT
LIST” from “STEP 2”. (P.180)
For editing the number
4Follow the steps in “REGISTERING A
NEW CONTACT TO THE CONTACT
LIST” from “STEP 3”. (P.180)
1Select “Delete Contacts” .
2Select the desired contact and select
“Delete”.
3Select “Yes” when the confirmation
screen appears.
REGISTERING A NEW
CONTACT TO THE CONTACT
LIST
New contact data can be registered.
Up to 4 numbers per person can be
registered. For PBAP compatible
Bluetooth
® phones, this function is
available when “Automatic Transfer” is
set to off. (P.176)
EDITING THE CONTACT DATA
For PBAP compatible Bluetooth
®
phones, this function is available when
“Automatic Transfer” is set to off.
( P.176)
DELETING THE CONTACT
DATA
For PBAP compatible Bluetooth
®
phones, this function is available when
“Automatic Transfer” is set to off.
( P.176)
Page 181 of 288

181
2. SETUP
PHONE
7
MIRAI_Navi_USA_OM62074U_20MY
■REGISTERING THE CONTACTS IN
THE FAVORITES LIST
1Select “Add Favorite” .
2Select the desired contact to add to the
favorites list.
Dimmed contacts are already stored as a
favorite.
When 15 contacts have already been reg-
istered to the favorites list, a registered
contact needs to be replaced.
Select “Yes” when the confirmation
screen appears and select the contact to
be replaced.
3Check that a confirmation screen is
displayed when the operation is com-
plete.
■REGISTERING CONTACTS IN THE
FAVORITES LIST IN A DIFFERENT
WAY (FROM THE CONTACT DE-
TAILS SCREEN)
1Display the phone top screen.
(P.154)
2Select “Contacts” and select the de-
sired contact.
3Select “Add Favorite” .
4Check that a confirmation screen is
displayed when the operation is com-
plete.
■DELETING THE CONTACTS IN THE
FAVORITES LIST
1Select “Remove Favorite” .
2Select the desired contacts and select
“Remove”.
3Select “Yes” when the confirmation
screen appears.
4Check that a confirmation screen is
displayed when the operation is com-
plete.
INFORMATION
● Multiple data can be selected and
deleted at the same time.
SETTING FAVORITES LIST
Up to 15 contacts (maximum of 4 num-
bers per contact) can be registered in
the favorites list.
Page 182 of 288

182
2. SETUP
MIRAI_Navi_USA_OM62074U_20MY
■DELETING CONTACTS IN THE FA-
VORITES LIST IN A DIFFERENT
WAY (FROM THE CONTACT DE-
TAILS SCREEN)
1Display the phone top screen.
(P.154)
2Select “Favorites” or “Contacts” and
select the desired contact to delete.
3Select “Remove Favorite” .
4Select “Yes” when the confirmation
screen appears.
5Check that a confirmation screen is
displayed when the operation is com-
plete.
1Select “Manage Voice Tags” .
2Select the desired item to be set.
■REGISTERING A VOICE TAG
1Select “New”.
2Select the desired contact to register a
voice tag for.
3Select “ REC” and record a voice tag.
When recording a voice tag, do so in a
quiet area.
“ Play” : Select to play the voice tag.
4Select “OK” when voice tag registra-
tion is complete.
SETTING VOICE TAGS
Calls can be made by saying the voice
tag of a registered contact in the con-
tact list. (→P.124)
No.FunctionPage
Select to register a new
voice tag.182
Select to edit a voice tag.183
Select to delete a voice tag.183
Up to 50 voice tags can be registered.
Page 183 of 288

183
2. SETUP
PHONE
7
MIRAI_Navi_USA_OM62074U_20MY
■EDITING A VOICE TAG
1Select “Edit”.
2Select the desired contact to edit.
3Follow the steps in “REGISTERING A
VOICE TAG” from “STEP 3”. ( P.182)
■DELETING THE VOICE TAG
1Select “Delete” .
2Select the desired contact and select
“Delete”.
3Select “Yes” when the confirmation
screen appears.
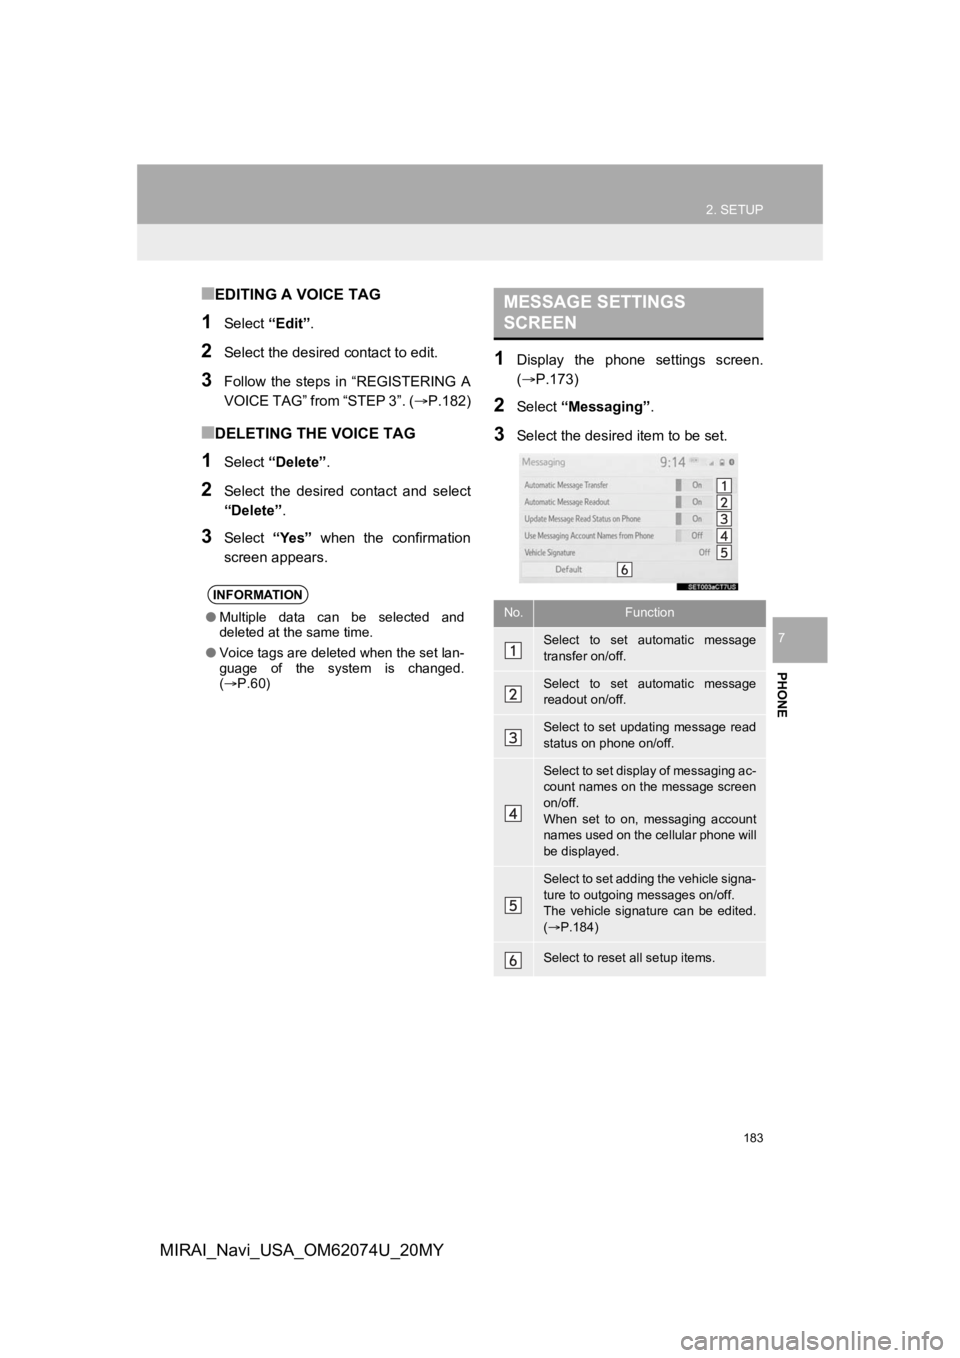
1Display the phone settings screen.
(P.173)
2Select “Messaging” .
3Select the desired item to be set.
INFORMATION
●Multiple data can be selected and
deleted at the same time.
● Voice tags are deleted when the set lan-
guage of the system is changed.
( P.60)
MESSAGE SETTINGS
SCREEN
No.Function
Select to set automatic message
transfer on/off.
Select to set automatic message
readout on/off.
Select to set updating message read
status on phone on/off.
Select to set display of messaging ac-
count names on the message screen
on/off.
When set to on, messaging account
names used on the cellular phone will
be displayed.
Select to set adding the vehicle signa-
ture to outgoing messages on/off.
The vehicle signature can be edited.
( P.184)
Select to reset all setup items.
Page 184 of 288
184
2. SETUP
MIRAI_Navi_USA_OM62074U_20MY
1Select “Vehicle Signature” .
2Select “Edit Vehicle Signature” .
3Enter desired signature and select
“OK”.
4Select “OK” on the preview screen.
“Edit Again” : Select to edit the signature
again.
INFORMATION
● Depending on the phone, these func-
tions may not be available.
EDITING VEHICLE SIGNATURE