2020 TOYOTA CAMRY HYBRID USB port
[x] Cancel search: USB portPage 62 of 350

62
2. CONNECTIVITY SETTINGS
4. Apple CarPlay/Android Auto*1
1Enable Siri on the device to be con-
nected.
2Connect the device to the USB port.
(P.86)
3Select “Always Enable” or “Enable
Once” .
If “Do Not Enable” is selected, an Apple
CarPlay connection will not be estab-
lished. In this case, the device can be
operated as a normal Apple device, such
as an iPod.
Apple CarPlay will remain off until “Apple
CarPlay” of “Projection Settings” on the
general settings screen is turned on.
( P.68)
Depending on the device connected, it
may take approximately 3 to 6 seconds
before the system ret urns to previous
screen.
The screen may change to “STEP 6”
depending on the system.
4Press the “MENU” button.
5Select “Apple CarPlay” .
6Check that home screen of Apple Car-
Play is displayed.
Apple CarPlay/Android Auto allows
some applications, such as Map,
Phone, and Music, to be used on the
system.
When an Apple CarPlay/Android Auto
connection is established, Apple Car-
Play/Android Auto compatible applica-
tions will be displayed on the system
display.
Compatible devices
Apple iPhone (iOS Ver. 9.3 or later)
that supports Apple CarPlay.
For details, refer to
https://www.apple.com/ios/carplay/
.*2
Android devices with Android OS ver
5.0 or higher which support Android
Auto and have the Android Auto appli-
cation installed.
For details, refer to
https://www.android.com/auto/
.*2
ESTABLISHING AN Apple
CarPlay CONNECTION
*1: This function is not made available in some countries or area s.
*2: Some devices may not operate with this system.
No.Function
Select to display the home screen of
Apple CarPlay.
Select and hold to activate Siri.
Select to start the application.
User can use any iPhone application
supported by Apple CarPlay.
Select to display the system screen.
Page 63 of 350

63
2. CONNECTIVITY SETTINGS
BASIC FUNCTION
21Check that the Android Auto applica-
tion is installed to the device to be con-
nected.
2Connect the device to the USB port.
(P.86)
3Select “On” to enable the function.
“Off” : Select to not enable Android Auto.
Android Auto will remain off until
“Android Auto” of “Projection Set-
tings” on the general settings screen is
turned on. ( P. 6 8 )
Depending on the device connected, it
may take approximately 3 to 6 seconds
before the system returns to previous
screen.
The screen may change to “STEP 6”
depending on the system.
4Press the “MENU” button.
5Select “Android Auto” .
6Check that Android Auto screen is dis-
played.
ESTABLISHING AN Android
Auto CONNECTIONWA R N I N G
● Do not connect smartphone or operate
the controls while driving.
NOTICE
●Do not leave your smartphone in the
vehicle. In particular, high temperatures
inside the vehicle may damage the
smartphone.
● Do not push down on or apply unneces-
sary pressure to the smartphone while it
is connected as this may damage the
smartphone or its terminal.
● Do not insert foreign objects into the port
as this may damage the smartphone or
its terminal.
Page 64 of 350

64
2. CONNECTIVITY SETTINGS
INFORMATION
●When an Apple CarPlay/Android Auto
connection is established, the function of
some system buttons will change.
● When an Apple CarPlay/Android Auto
connection is established, some system
functions, such as the following, will be
replaced by similar Apple CarPlay/
Android Auto functions or will become
unavailable:
• iPod (Audio Playback)
• USB audio/USB video
• Bluetooth
® audio
• Bluetooth® phone (Apple CarPlay
only)
• Toyota apps
● When an Apple CarPlay/Android Auto
connection is established, voice com-
mand system (Siri/Google Assistant)
and map application voice guidance vol-
ume can be changed by selecting
“Voice Volume” on the voice settings
screen. It cannot be changed by
“PWR·VOL” knob on Audio control
panel. ( P. 7 4 )
● Apple CarPlay/Android Auto is an appli-
cation developed by Apple Inc/Google
LLC. Its functions and services may be
terminated or changed without notice
depending on the connected device’s
operation system, hardware and soft-
ware, or due to changes in Apple Car-
Play/Android Auto specifications.
● For a list of the apps supported by Apple
CarPlay or Android Auto, refer to their
respective website.
● While using these functions, vehicle and
user information, such as location and
vehicle speed, will be shared with the
respective application publisher and the
cellular service provider.
● By downloading and using each applica-
tion, you agree to their terms of use.
● Data for these functions is transmitted
using the internet and may incur
charges.
For information about data transmission
fees, contact your cellular service pro-
vider.
INFORMATION
●Depending on the application, certain
functions, such as music playback, may
be restricted.
● As the applications for each function are
provided by a third-party, they may be
subject to change or discontinuation
without notice.
For details, refer to the website of the
function.
● If the vehicle’s navigation system is
being used for route guidance and a
route is set using the Apple CarPlay/
Android Auto Maps app, route guidance
will be performed through Apple Car-
Play/Android Auto.
If the Apple CarPlay/Android Auto Maps
app is being used for route guidance
and a route is set using the vehicle’s
navigation system, route guidance will
be performed by the vehicle’s navigation
system.
● If the USB cable is disconnected, opera-
tion of Apple CarPlay/Android Auto will
end.
At this time, sound output will stop and
change to the system screen.
● Audio:
Use of the Apple CarPlay logo means
that a vehicle user interface meets
Apple performance standards. Apple is
not responsible for the operation of this
vehicle or its compliance with safety and
regulatory standards. Please note that
the use of this product with iPhone or
iPod may affect wireless performance.
Page 66 of 350

66
2. CONNECTIVITY SETTINGS
TROUBLESHOOTING
If you are experiencing difficulties with Apple CarPlay/Android Auto, check the fol-
lowing table.
SymptomSolution
An Apple CarPlay/Android Auto
connection cannot be estab-
lished.
Check if the device supports Apple CarPlay/Android Auto.
Check if Apple CarPlay/Android Auto is enabled on the con-
nected device.
Check if that the Android Auto application is installed to the
device to be connected.
For details, refer to
Apple CarPlay: https://www.apple.com/ios/carplay/
.
Android Auto: https://www.android.com/auto/.
For available countries or areas for Apple CarPlay, refer to
https://www.apple.com/ios/featureavailability/
#apple-carplay.
Check if “Apple CarPlay” /“Android Auto” of “Projection
Settings” on the general settings screen is set to on.
( P.68)
Check if the USB cable being used is securely connected to
the device and USB port.
Check that the device is connected directly to the USB port
of the system and not connected to a USB hub.
For Apple CarPlay: Check if the Lightning cable being used
is certified by Apple. Check if Siri is enabled.
After checking all of the above, t ry to establish an Apple Car-
Play/Android Auto connection. ( P.62, 63)
When an Apple CarPlay/Android
Auto connection is established
and a video is being played, the
video is not displayed, but audio
is output through the system.
As the system is not designed to play video through Apple
CarPlay/Android Auto, this is not a malfunction.
Although an Apple CarPlay/An-
droid Auto connection is estab-
lished, audio is not output
through the system.
The system may be muted or the volume may be low. In-
crease the system volume.
The Apple CarPlay/Android Auto
screen has artifacts and/or audio
from Apple CarPlay/Android
Auto has noise.
Check if the USB cable being used to connect the device to
the system is damaged.
To check if the USB cable is damaged internally, connect
the device to another system, such as a PC, and check if the
device is recognized by the connected system. (The device
should begin charging when connected.)
After checking all of the above, t ry to establish an Apple Car-
Play/Android Auto connection. ( P.62, 63)
Page 80 of 350

80
1. QUICK REFERENCE ..................... 82
2. SOME BASICS............................... 84
TURNING THE SYSTEM ON AND OFF ..................................................... 84
SELECTING AN AUDIO SOURCE ........ 84
DISC SLOT ............................................ 85
USB PORT............................................. 86
SOUND SETTINGS ............................... 86
AUDIO SCREEN ADJUSTMENT .......... 88
VOICE COMMAND SYSTEM ................ 89
1. AM/FM/SiriusXM®
Satellit
e Radio ............................ 90
OVERVIEW ............................................ 90
PRESETTING A STATION .................... 93
CACHING A RADIO PROGRAM ........... 93
SELECTING A STATION FROM
THE LIST ............................................. 95
RADIO OPTIONS ................................... 96
RADIO BROADCAST DATA SYSTEM .............................................. 96
USING HD Radio™ TECHNOLOGY...... 97
AVAILABLE HD Radio™ TECHNOLOGY.................................... 97
HD Radio™ TROUBLESHOOTING GUIDE ................................................. 98
HOW TO SUBSCRIBE TO SiriusXM Radio Services..................................... 99
DISPLAYING THE RADIO ID............... 100
REFER TO THE TABLE BELOW TO IDENTIFY THE PROBLEM AND
TAKE THE SUGGESTED
CORRECTIVE ACTION..................... 101
1BASIC OPERATION2RADIO OPERATION
3
AUDIO/VISUAL SYSTEM
Page 86 of 350

86
1. BASIC OPERATION
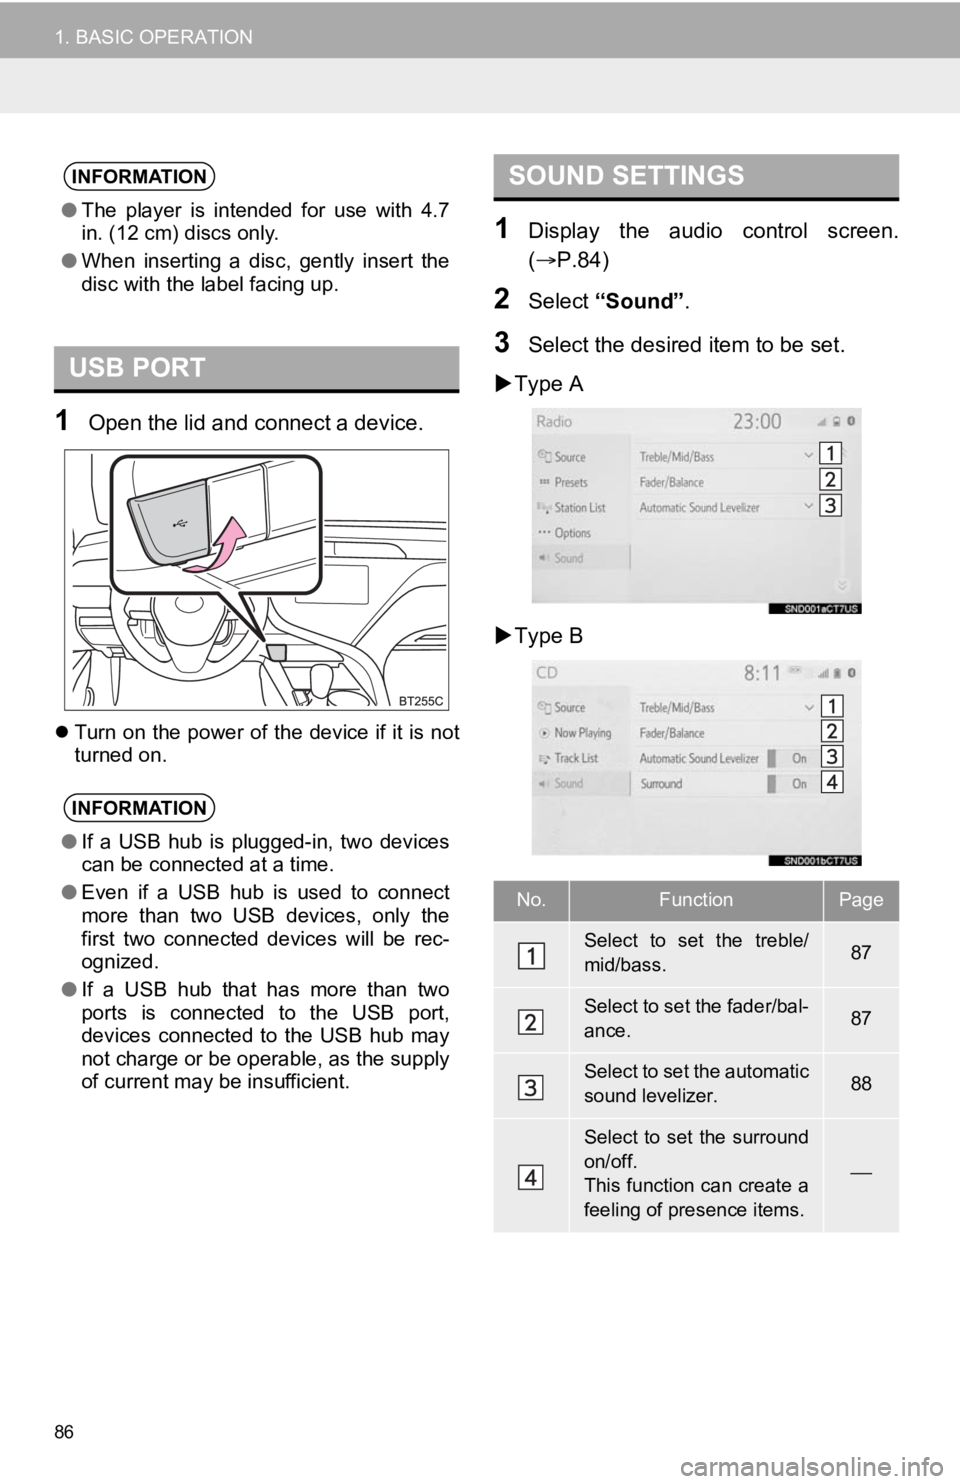
1Open the lid and connect a device.
Turn on the power of the device if it is not
turned on.
1Display the audio control screen.
( P.84)
2Select “Sound” .
3Select the desired item to be set.
Type A
Type B
INFORMATION
● The player is intended for use with 4.7
in. (12 cm) discs only.
● When inserting a disc, gently insert the
disc with the label facing up.
USB PORT
INFORMATION
●If a USB hub is plugged-in, two devices
can be connected at a time.
● Even if a USB hub is used to connect
more than two USB devices, only the
first two connected devices will be rec-
ognized.
● If a USB hub that has more than two
ports is connected to the USB port,
devices connected to the USB hub may
not charge or be operable, as the supply
of current may be insufficient.
SOUND SETTINGS
No.FunctionPage
Select to set the treble/
mid/bass.87
Select to set the fader/bal-
ance.87
Select to set the automatic
sound levelizer.88
Select to set the surround
on/off.
This function can create a
feeling of presence items.
Page 108 of 350

108
3. MEDIA OPERATION
Select to change the artist.
Select to display a full screen image.
Select to change the folder.
Turn to change the file/track.
Turn to move up/down the list. Also, the knob can be used to en ter selections on the
list screens by pressing it.
Press to change the file/track.
Press and hold to fast forward/rewind.
WA R N I N G
● Do not operate the player’s controls or connect the USB memory while driving.
NOTICE
●Do not leave your portable player in the vehicle. In particular, high temperatures inside
the vehicle may damage the portable player.
● Do not push down on or apply unnecessary pressure to the portab le player while it is con-
nected as this may damage the portable player or its terminal.
● Do not insert foreign objects into the port as this may damage the portable player or its
terminal.
INFORMATION
● While the vehicle is being driven, this function can only outpu t sound.
● If tag information exists, the file names will be changed to tr ack names.
No.Function
Page 130 of 350

130
6. TIPS FOR OPERATING THE AUDIO/VISUAL SYSTEM
This device supports high-resolution
sound sources.
The definition of high-resolution is based
on the standards of groups such as the
CTA (Consumer Technology Association).
Supported formats and playable media are
as follows.
■SUPPORTED FORMATS
WAV, FLAC, ALAC, OGG Vorbis
■PLAYABLE MEDIA
USB memory
■COMPATIBLE USB DEVICES
■COMPATIBLE COMPRESSED
FILES
*: USB video only
HIGH-RESOLUTION SOUND
SOURCE
FILE INFORMATION
USB communication
formatsUSB 2.0 HS (480
Mbps)
File formatsFAT 16/32
Correspondence classMass storage
class
ItemUSBDISC
Compatible
file format
MP3/WMA/
AAC
MP3/
WMA/AACWAV(LPCM)/FLAC/ALAC/ OGG Vorbis
MP4/AVI/ WMV
Compatible
file format
(video)*MP4/AVI/WMV
Folders in
the deviceMaximum 3000Maximum 192
Files in the
deviceMaximum
9999Maximum 255
Files per
folderMaximum 255