Page 9 of 32
8 - NAVIGATION SYSTEM OWNER’S MANUAL
1.1 NAVIGATION MENU SCREEN
1.1.1 OPENING THE NAVIGATION MENU
Press the “Connection” button on the menu, then choose “NAVI” among the options
in the list. If it is the first use, the NAVI software will ask to select the language. The
Navigation System Disclaimer will be displayed in the selected language: read and
accept it to continue.
Quick Guide
MAP - Background
Navigation Menu
Page 10 of 32
NAVIGATION SYSTEM OWNER’S MANUAL - 9
1.1.2 NAVIGATION MENU FUNCTIONS
2
3
1
5
6 4
NFunction
1MAP
Direct access to the map page
2DRIVE ME HOME
Create a route to a user point saved as HOME
3USER SETTINGS
Preferences about the system: language, units, etc.
4TRIP OVERVIEW
A synoptic view of your trip
5MAP SETTINGS
Preferences about the routing and the map appearance
6DRIVE TO
Search and set a destination Navigation Menu
Page 11 of 32
10 - NAVIGATION SYSTEM OWNER’S MANUAL
1.2 MAP LAYOUT OVERVIEW
1.2.1 ACCESSING THE MAP PAGE
Access the map pressing the “Map” button in the Navigation Menu and tap a point
on the map to activate the screen.
1
23
4
6
5
N
Function
1NAVIGATION MENU
Direct access to the Navigation Menu
2COMPASS AND SCALE
Orientation and scale of the map. Press it to change the map orientation,
cycling between three modes: 2D north up, 2D head up, 3D.
3ZOOM IN
Press to zoom in
4ZOOM OUT
Press to zoom out
5GPS STATUS ICON
Indicator about the GPS signal quality
6BOTTOM BAR
It displays info about your current positionMAP - No route
Page 12 of 32
NAVIGATION SYSTEM OWNER’S MANUAL - 11
1.2.2 HOW TO EXPLORE THE MAP
The touch screen technology allows you exploring the map by acting on the display.
GestureEffect
FIRST FINGER TAPActivates the screen. In this mode,
the controls and info on map become
available.
Tap a point on the map
SECOND FINGER TAP
1Places the cursor.
Tap a point on the map
2
Info on the point appears in the bottom
bar: name of the street and aerial
distance from current position.
FINGER DRAG Moves the map according the finger’s
movement direction.
Point the finger on the map and drag it
in any direction
PRESS THE BOTTOM BAR
Opens the info page on point.
PRESS ZOOM IN AND ZOOM OUT
BUTTONS Zooms the map
PRESS THE GPS STATUS ICON Opens the GPS Page
PRESS THE MENU BUTTON Goes back to Navigation menu
MAP - Active mode
1
2
Page 13 of 32
12 - NAVIGATION SYSTEM OWNER’S MANUAL
1.3 SETTING THE FIRST DESTINATION
1.3.1 THE DRIVE TO MENU
In the Navigation Menu, press the “Drive to” Button.
123
4 5 67
NFunction Page
1Address or postal code
13
Search the destination point entering an address or a ZIP code.
2POI
21
Search the destionation in the preloaded database of points of
interest.
3Favourites
22
Search the destination among the favourite marks.
4Point on Map
24
Search the destination exploring the map.
5Drive back 24
Start a route to drive back to the departure point.
6Recents 24
Search a destination between the last entries.
7Coordinates 24
Set the destination by entering the lat-lon coordinates.
Page 14 of 32
NAVIGATION SYSTEM OWNER’S MANUAL - 13
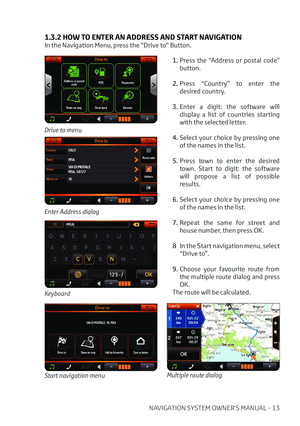
1.3.2 HOW TO ENTER AN ADDRESS AND START NAVIGATION
In the Navigation Menu, press the “Drive to” Button.1. Press the “Address or postal code”
button.
2. Press “Country” to enter the
desired country.
3. Enter a digit: the software will
display a list of countries starting
with the selected letter.
4. Select your choice by pressing one
of the names in the list.
5. Press town to enter the desired
town. Start to digit: the software
will propose a list of possible
results.
6. Select your choice by pressing one
of the names in the list.
7. Repeat the same for street and
house number, then press OK.
8 In the Start navigation menu, select
“Drive to”.
9. Choose your favourite route from
the multiple route dialog and press
OK.
The route will be calculated.
Drive to menu
Keyboard
Enter Address dialog
Start navigation menuMultiple route dialog
Page 15 of 32
14 - NAVIGATION SYSTEM OWNER’S MANUAL
1.4 MAP LAYOUT DURING NAVIGATION
23
4
MAP - Navigation mode
1
N
Item Additional info
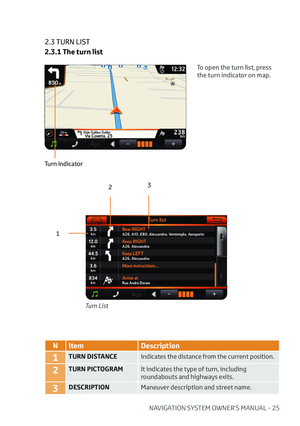
1TURN INDICATOR
Press the turn indicator to open
the turn list.
Next maneuver arrow indicator.
1aUPCOMING MANEUVER
1bUPCOMING MANEUVER in active
mode
2TURN DISTANCE
Distance to the next maneuver
3ETA data box
Press this data box to swap the
information: estimated time of
arrival / time to go.
Estimated time of arrival
4DTG data box
Press this data box to swap the
information: distance to go /
distance from departure.
Distance to go
1a1b
MAP detail in navigation mode:
Upcoming maneuver MAP detail in active mode:
Upcoming maneuver
Page 16 of 32
NAVIGATION SYSTEM OWNER’S MANUAL - 15
NItem Additional info
5TRIP OVERVIEW BUTTON
Open the “Trip overview” button to
have a synoptic view about your trip.
Opens the Trip overview page
6MENU The Navigation menu is the main menu
of the software.
Opens the Navigation menu
7CLEAR ROUTE A warning pop-up will ask
confirmation.
Clears the current route
8GPS STATUS ICON
Press GPS data box to open GPS Page.
GPS signal quality
9Lane Assistant It appears only when necessary. The
lane to be followed is highlighted.
10aSpeed Limit indicatorThe icons displays the speed limit
along the current street.
10bSpeed limit alarmThe icon changes to red when the
current speed is above the limit.
11Speed camera alarmThe bottom bar displays the speed
camera alarms, instead of the current
street name, in case of speed camera
approaching. It reports the type of
speed camera and distance to it.
10a
9
5
6
7
8
11
10b
MAP - Active mode


 8 - NAVIGATION SYSTEM OWNER’S MANUAL
1.1 NAVIGATION MENU SCREEN
1.1.1 OPENING THE NAVIGATION MENU
Press the “Connection” button on the menu, then choose “NAVI” among the options
in the list")
 NAVIGATION SYSTEM OWNER’S MANUAL - 9
1.1.2 NAVIGATION MENU FUNCTIONS
2
3
1
5
6 4
NFunction
1MAP
Direct access to the map page
2DRIVE ME HOME
Create a route to a user point saved as HOME
3USER SETTIN")
 10 - NAVIGATION SYSTEM OWNER’S MANUAL
1.2 MAP LAYOUT OVERVIEW
1.2.1 ACCESSING THE MAP PAGE
Access the map pressing the “Map” button in the Navigation Menu and tap a point
on the map to activate")
 NAVIGATION SYSTEM OWNER’S MANUAL - 11
1.2.2 HOW TO EXPLORE THE MAP
The touch screen technology allows you exploring the map by acting on the display.
GestureEffect
FIRST FINGER TAPActivates the scre")
 12 - NAVIGATION SYSTEM OWNER’S MANUAL
1.3 SETTING THE FIRST DESTINATION
1.3.1 THE DRIVE TO MENU
In the Navigation Menu, press the “Drive to” Button.
123
4 5 67
NFunction Page
1Address or postal")
 NAVIGATION SYSTEM OWNER’S MANUAL - 13
1.3.2 HOW TO ENTER AN ADDRESS AND START NAVIGATION
In the Navigation Menu, press the “Drive to” Button.1. Press the “Address or postal code”
button.
2.")
 14 - NAVIGATION SYSTEM OWNER’S MANUAL
1.4 MAP LAYOUT DURING NAVIGATION
23
4
MAP - Navigation mode
1
N
Item Additional info
1TURN INDICATOR
Press the turn indicator to open
the turn list.
Next maneu")
 NAVIGATION SYSTEM OWNER’S MANUAL - 15
NItem Additional info
5TRIP OVERVIEW BUTTON
Open the “Trip overview” button to
have a synoptic view about your trip.
Opens the Trip overview page
6MENU The")