2020 TESLA MODEL Y trailer
[x] Cancel search: trailerPage 59 of 232

Low beam headlights are on.
High beam headlights are on and Auto
High Beam is disabled or currently
unavailable.Auto High Beam is enabled and high
beams are on.
Model Y is ready to turn
off the high beams if light is detected.
See
High Beam Headlights on page 54.
Auto High Beam is enabled but high beams are not on because light is
detected in front of
Model Y. When light
is no longer detected, high beams
automatically turn back on. See
High
Beam Headlights on page 54.
This indicator flashes amber when the
electronic stability control systems are actively minimizing wheel spin by
controlling brake pressure and motor
power. See
Traction Control on page
63. If this indicator stays illuminated, a
fault is detected (contact Tesla
immediately).
Electronic stability control systems are no longer minimizing wheel spin. See
Traction Control on page 63.
Trailer mode (if equipped) is active (see
Towing and Accessories on page 73).Vehicle Hold is actively applying the brakes. See
Vehicle Hold on page 66.
A door or trunk is open. See Doors on
page 13, Rear Trunk on page 16, or Front
Trunk on page 18.
Appears when some of the stored energy in the Battery may not be available due to cold weather conditions. If
Model Y is
plugged in, you can heat your Battery by
turning on climate control with the
mobile app. The snowflake icon
disappears when the Battery is
su
Page 66 of 232

How Park Assist Works
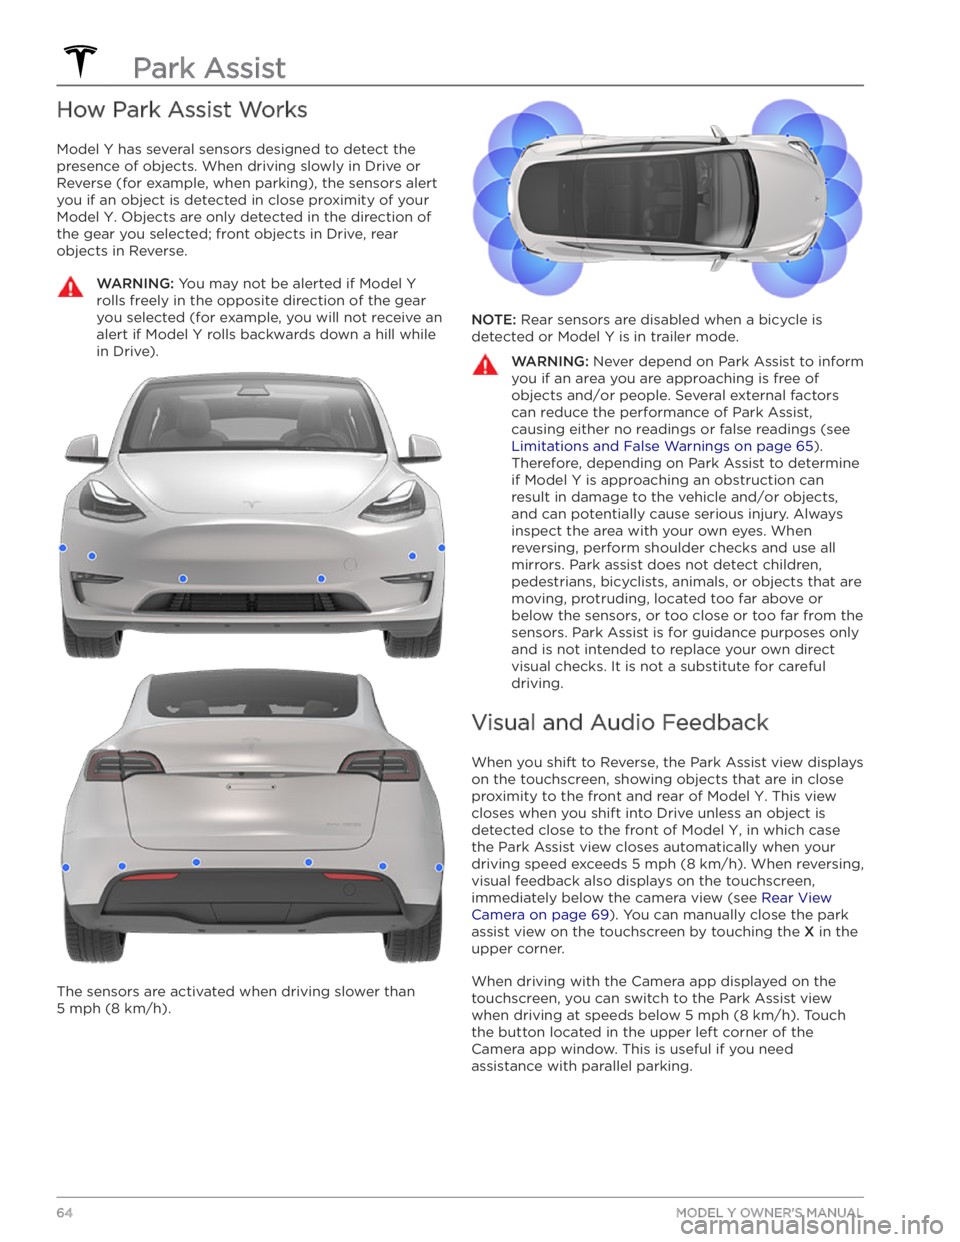
Model Y has several sensors designed to detect the
presence of objects. When driving slowly in Drive or
Reverse (for example, when parking), the sensors alert
you if an object is detected in close proximity of your
Model Y. Objects are only detected in the direction of
the gear you selected; front objects in Drive, rear objects in Reverse.
WARNING: You may not be alerted if Model Y
rolls freely in the opposite direction of the gear
you selected (for example, you will not receive an
alert if Model Y rolls backwards down a hill while
in Drive).
The sensors are activated when driving slower than
5 mph (8 km/h).
NOTE: Rear sensors are disabled when a bicycle is
detected or
Model Y is in trailer mode.
WARNING: Never depend on Park Assist to inform
you if an area you are approaching is free of
objects and/or people. Several external factors
can reduce the performance of Park Assist,
causing either no readings or false readings (see
Limitations and False Warnings on page 65).
Therefore, depending on Park Assist to determine
if Model Y is approaching an obstruction can
result in damage to the vehicle and/or objects,
and can potentially cause serious injury. Always
inspect the area with your own eyes. When
reversing, perform shoulder checks and use all
mirrors. Park assist does not detect children,
pedestrians, bicyclists, animals, or objects that are
moving, protruding, located too far above or
below the sensors, or too close or too far from the
sensors. Park Assist is for guidance purposes only
and is not intended to replace your own direct
visual checks. It is not a substitute for careful
driving.
Visual and Audio Feedback
When you shift to Reverse, the Park Assist view displays on the
touchscreen, showing objects that are in close
proximity to the front and rear of
Model Y. This view
closes when you shift into Drive unless an object is detected close to the front of
Model Y, in which case
the Park Assist view closes automatically when your driving speed exceeds
5 mph (8 km/h). When reversing,
visual feedback also displays on the touchscreen, immediately below the camera view (see
Rear View
Camera on page 69). You can manually close the park
assist view on the touchscreen by touching the
X in the
upper corner.
When driving with the Camera app displayed on the touchscreen, you can switch to the Park Assist view
when driving at speeds below
5 mph (8 km/h). Touch
the button located in the upper left corner of the Camera app window. This is useful if you need
assistance with parallel parking.
Park Assist
64MODEL Y OWNER
Page 75 of 232

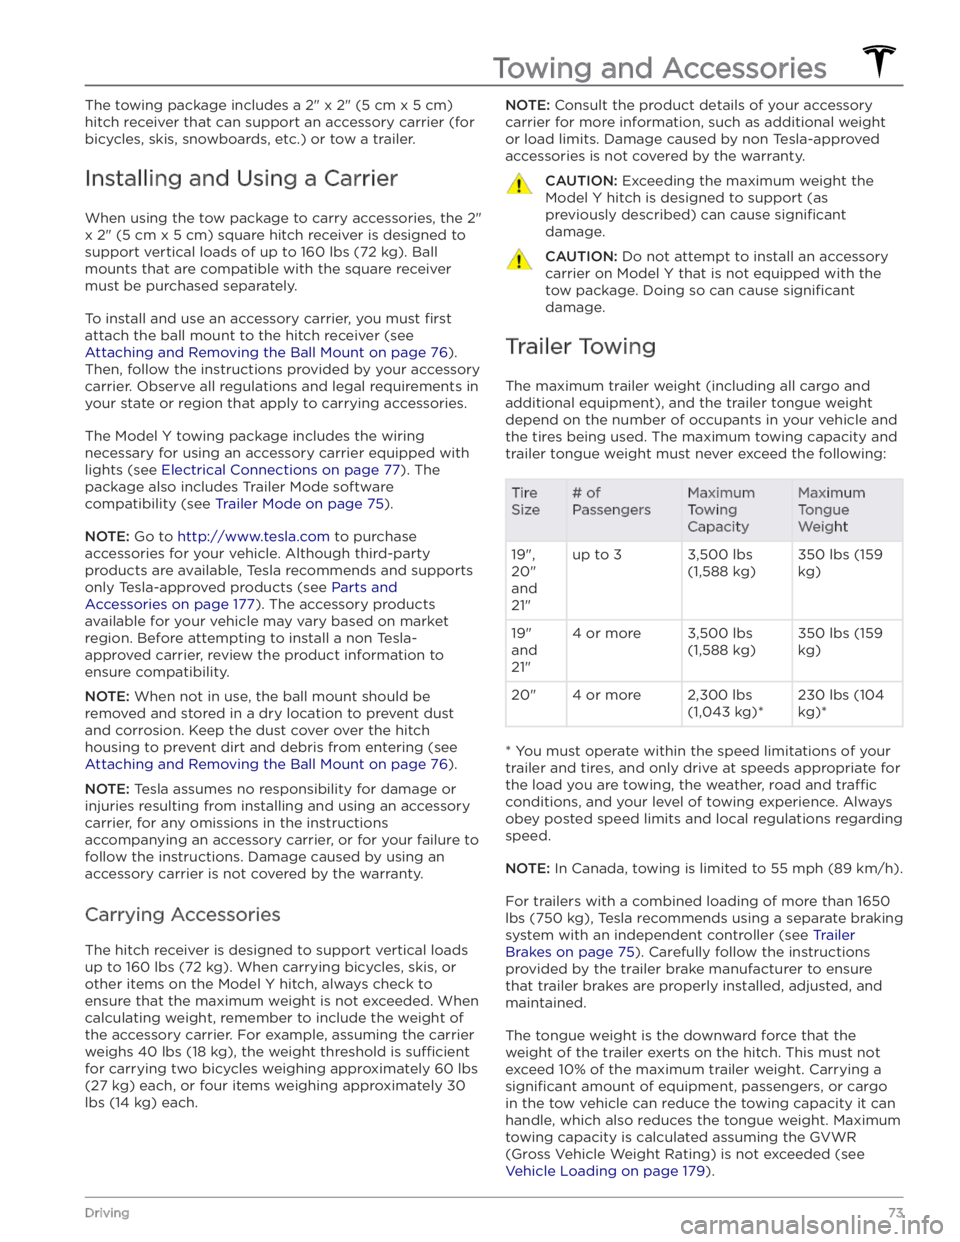
The towing package includes a 2" x 2" (5 cm x 5 cm)
hitch receiver that can support an accessory carrier (for bicycles, skis, snowboards, etc.) or tow a trailer.
Installing and Using a Carrier
When using the tow package to carry accessories, the 2"
x 2" (5 cm x 5 cm) square hitch receiver is designed to
support vertical loads of up to
160 lbs (72 kg). Ball
mounts that are compatible with the square receiver
must be purchased separately.
To install and use an accessory carrier, you must first
attach the ball mount to the hitch receiver (see
Attaching and Removing the Ball Mount on page 76).
Then, follow the instructions provided by your accessory
carrier. Observe all regulations and legal requirements in your state or region that apply to carrying accessories.
The Model Y towing package includes the wiring
necessary for using an accessory carrier equipped with lights (see
Electrical Connections on page 77). The
package also includes Trailer Mode software compatibility (see
Trailer Mode on page 75).
NOTE: Go to http://www.tesla.com to purchase
accessories for your vehicle. Although third-party products are available, Tesla recommends and supports
only Tesla-approved products (see
Parts and
Accessories on page 177). The accessory products
available for your vehicle may vary based on market
region. Before attempting to install a non Tesla-
approved carrier, review the product information to ensure compatibility.
NOTE: When not in use, the ball mount should be
removed and stored in a dry location to prevent dust and corrosion. Keep the dust cover over the hitch housing to prevent dirt and debris from entering (see
Attaching and Removing the Ball Mount on page 76).
NOTE: Tesla assumes no responsibility for damage or
injuries resulting from installing and using an accessory carrier, for any omissions in the instructions accompanying an accessory carrier, or for your failure to follow the instructions. Damage caused by using an accessory carrier is not covered by the warranty.
Carrying Accessories
The hitch receiver is designed to support vertical loads
up to
160 lbs (72 kg). When carrying bicycles, skis, or
other items on the
Model Y hitch, always check to
ensure that the maximum weight is not exceeded. When calculating weight, remember to include the weight of
the accessory carrier.
For example, assuming the carrier
weighs 40 lbs (18 kg), the weight threshold is su
Page 79 of 232

To attach a ball mount:
1.
Remove the dust cover from the hitch housing by using a small object, such as a
flat screwdriver, to pry
between the dust cover and hitch housing. Store the dust cover in a secure location.
2.
If necessary, remove the cotter pin from the locking
bolt and slide the locking bolt out of the hitch assembly.
3.
Slide the ball holder into the hitch assembly.
4.
Align the hole in the ball holder with the one in the hitch assembly.
5.
Slide the locking bolt through the hitch assembly/ball holder.
6.
Insert the cotter pin in the hole at the end of the
locking bolt.
To remove a ball mount:
1.
Remove the cotter pin from the locking bolt and slide
the locking bolt out of the ball holder/hitch assembly.
2. Pull the ball holder out of the hitch assembly.3.
Re-install the dust cover for the hitch housing and
store the ball mount in a secure location.
Electrical Connections
Regulations require all trailers to be equipped with tail lights, brake lights, side marker lights, and turn signals.
To provide power for trailer lighting, a built-in 7-pin
wiring connector is provided near the hitch support
Page 80 of 232

NOTE: Loss of trailer lights when towing may be the
result of a fault in the trailer wiring or excessive power
consumption by the lights connected to the trailer output(s). When this occurs, a Trailer Mode icon
appears on the touchscreen. Fix any issues with the wiring and/or reduce the number of lights connected to the trailer output(s), then toggle Trailer Mode
off and
on again.
CAUTION: Always ensure that the trailer electrical
cable does not contact or drag on the ground and
there is enough slack in the cable to allow for
turns.
WARNING: Use only the electrical connections
designed by Tesla. Do not attempt to directly
splice or attempt to connect a trailer’s electrical
wiring using any other method. Doing so can
damage the vehicle
Page 123 of 232

Driving
Acceleration: Adjust the amount of acceleration. Chill
limits acceleration for a slightly smoother and gentler
ride, whereas
Standard or Sport (depending on vehicle
configuration) provides the normal level of acceleration.
NOTE: When Chill is selected, Chill displays on the
touchscreen above the driving speed.
Steering Mode: Adjust the amount of effort required to
turn the steering wheel.
Sport feels more responsive
whereas
Comfort feels easier to drive and park (see
Adjusting Steering Effort on page 46).
Stopping Mode: Choose how you want Model Y to
behave once regenerative braking has reduced the driving speed to a very low speed, a driving gear is still
engaged, and both the accelerator and brake pedals are
released. See
Stopping Mode on page 61. You can adjust
this setting only when
Model Y is in Park.
Slip Start: Turn Slip Start ON to disable traction control
and allow wheels to spin to make it easier to dislodge the vehicle when stuck in mud, snow, ice, etc. (see
Traction Control on page 63).
Off-Road Assist: Turn Off-Road Assist ON to disable
traction control and allow wheels to spin when driving
off-road (see Traction Control on page 63).
Trailer Mode: (Available only if equipped with the tow
package) Must always be active when towing a trailer.
Some Autopilot features and rear sensor functionality may not be available. See
Trailer Mode on page 75).
Autopilot
Autopilot features that provide a safer and more
convenient driving experience. Some Autopilot features
are not controlled through
Controls. See About
Autopilot on page 81 for more information.
Page 166 of 232

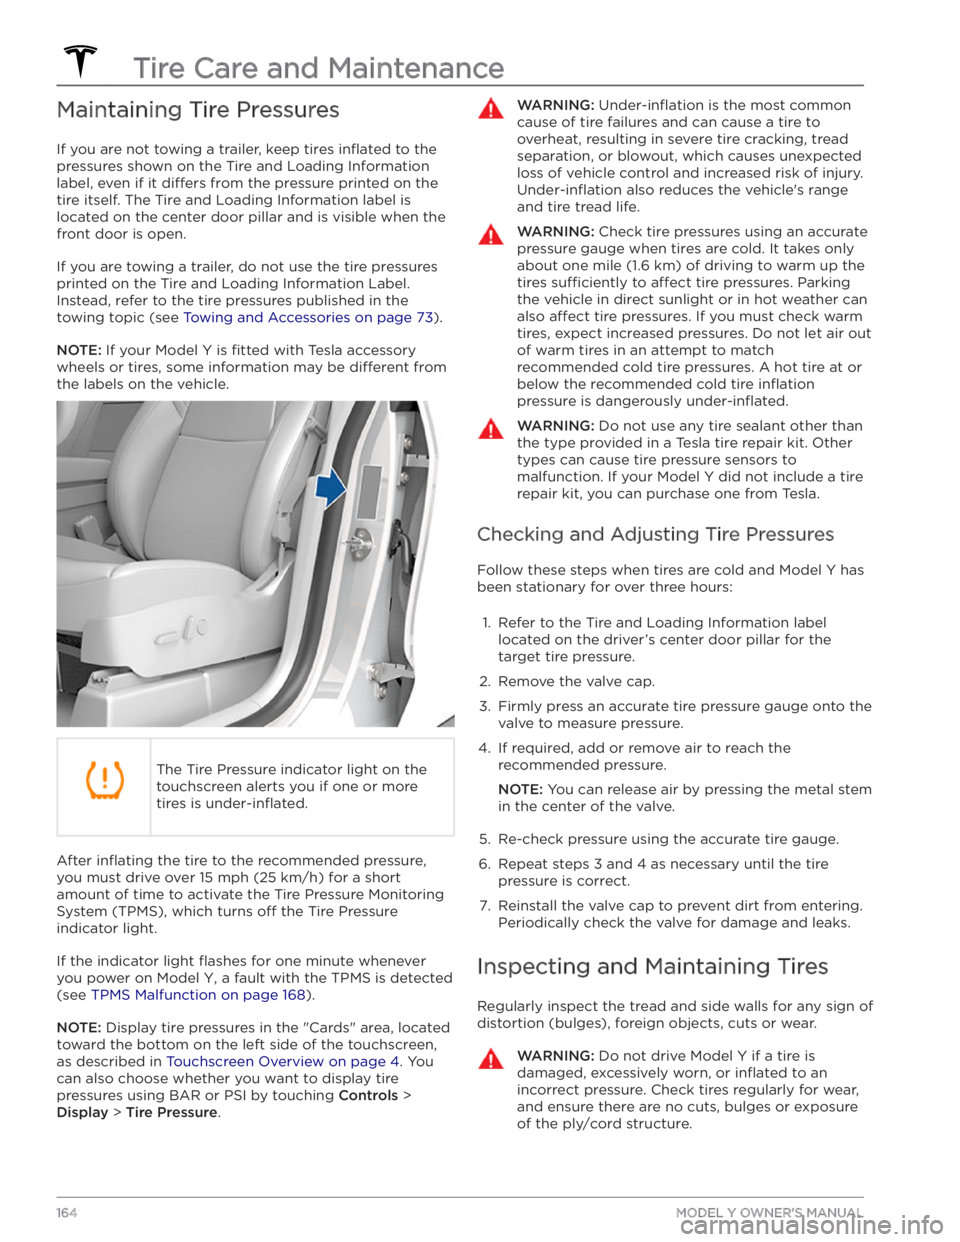
Maintaining Tire Pressures
If you are not towing a trailer, keep tires inflated to the
pressures shown on the Tire and Loading Information label, even if it
differs from the pressure printed on the
tire itself. The Tire and Loading Information label is located on the center door pillar and is visible when the
front door is open.
If you are towing a trailer, do not use the tire pressures printed on the Tire and Loading Information Label.
Instead, refer to the tire pressures published in the
towing topic
(see Towing and Accessories on page 73).
NOTE: If your Model Y is fitted with Tesla accessory
wheels or tires, some information may be
different from
the labels on the vehicle.
The Tire Pressure indicator light on the
touchscreen alerts you if one or more
tires is
under-inflated.
After inflating the tire to the recommended pressure,
you must drive over
15 mph (25 km/h) for a short
amount of time to activate the Tire Pressure Monitoring
System (TPMS), which turns
off the Tire Pressure
indicator light.
If the indicator light flashes for one minute whenever
you power on
Model Y, a fault with the TPMS is detected
(see
TPMS Malfunction on page 168).
NOTE: Display tire pressures in the "Cards" area, located
toward the bottom on the left side of the touchscreen
,
as described in Touchscreen Overview on page 4. You
can also choose whether you want to display tire pressures using BAR or PSI by touching
Controls >
Display > Tire Pressure.
WARNING: Under-inflation is the most common
cause of tire failures and can cause a tire to
overheat, resulting in severe tire cracking, tread
separation, or blowout, which causes unexpected
loss of vehicle control and increased risk of injury.
Under-inflation also reduces the vehicle
Page 230 of 232

T
telematics: 199
temperature: 56, 125, 156, 188
Battery (high voltage), limits: 156
cabin, controls for: 125
outside: 56
tires: 188
Teslacam: 70
tie-down straps: 195
tilt/intrusion detection: 142
Tire and Loading Information label: 179
tire noise: 168
Tire Pressure Monitoring System: 167
overview of: 167
tire pressures, checking: 164
tires: 164, 165, 168, 185, 186, 188
all-season: 168
balancing: 165
chains: 168
inspecting and maintaining: 164
pressures, how to check: 164
quality grading: 188
replacing: 165
replacing a tire sensor: 168
rotation: 165
specification: 185
summer: 168
temperature grades: 188
tire markings: 186
traction grade: 188
treadwear grade: 188
wheel configuration: 164
winter: 168
toll system transponders, attaching: 177
torque specifications: 183
touch up body: 171
touchscreen: 4, 46, 149, 171
cleaning: 171
overview: 4
restarting: 46
software updates: 149
towing a trailer: 73
towing instructions: 193
TPMS: 167
overview of: 167
Tracking Disabled: 130
traction control: 63
trademarks: 198
Tra