2020 TESLA MODEL Y towing
[x] Cancel search: towingPage 3 of 232

Overview................................................................2
Interior Overview.............................................................................2
Exterior Overview............................................................................3
Touchscreen Overview..................................................................4
Opening and Closing.........................................8
Keys.......................................................................................................8
Doors...................................................................................................13
Windows............................................................................................15
Rear Trunk.........................................................................................16
Front Trunk.......................................................................................18
Interior Storage and Electronics...............................................21
Seating and Safety Restraints.....................25
Front and Rear Seats...................................................................25
Seat Belts.........................................................................................29
Child Safety Seats.........................................................................32
Airbags..............................................................................................37
Driving..................................................................44
Driver Profiles.................................................................................44
Steering Wheel..............................................................................46
Mirrors...............................................................................................48
Starting and Powering Off........................................................49
Gears...................................................................................................51
Lights.................................................................................................53
Car Status.........................................................................................56
Wipers and Washers....................................................................59
Braking and Stopping.................................................................60
Traction Control.............................................................................63
Park Assist.......................................................................................64
Vehicle Hold....................................................................................66
Getting Maximum Range...........................................................67
Rear View Camera........................................................................69
Dashcam...........................................................................................70
Pedestrian Warning System......................................................72
Towing and Accessories.............................................................73
Cold Weather Best Practices....................................................79
Autopilot...............................................................81
About Autopilot..............................................................................81
Tra
Page 59 of 232

Low beam headlights are on.
High beam headlights are on and Auto
High Beam is disabled or currently
unavailable.Auto High Beam is enabled and high
beams are on.
Model Y is ready to turn
off the high beams if light is detected.
See
High Beam Headlights on page 54.
Auto High Beam is enabled but high beams are not on because light is
detected in front of
Model Y. When light
is no longer detected, high beams
automatically turn back on. See
High
Beam Headlights on page 54.
This indicator flashes amber when the
electronic stability control systems are actively minimizing wheel spin by
controlling brake pressure and motor
power. See
Traction Control on page
63. If this indicator stays illuminated, a
fault is detected (contact Tesla
immediately).
Electronic stability control systems are no longer minimizing wheel spin. See
Traction Control on page 63.
Trailer mode (if equipped) is active (see
Towing and Accessories on page 73).Vehicle Hold is actively applying the brakes. See
Vehicle Hold on page 66.
A door or trunk is open. See Doors on
page 13, Rear Trunk on page 16, or Front
Trunk on page 18.
Appears when some of the stored energy in the Battery may not be available due to cold weather conditions. If
Model Y is
plugged in, you can heat your Battery by
turning on climate control with the
mobile app. The snowflake icon
disappears when the Battery is
su
Page 75 of 232

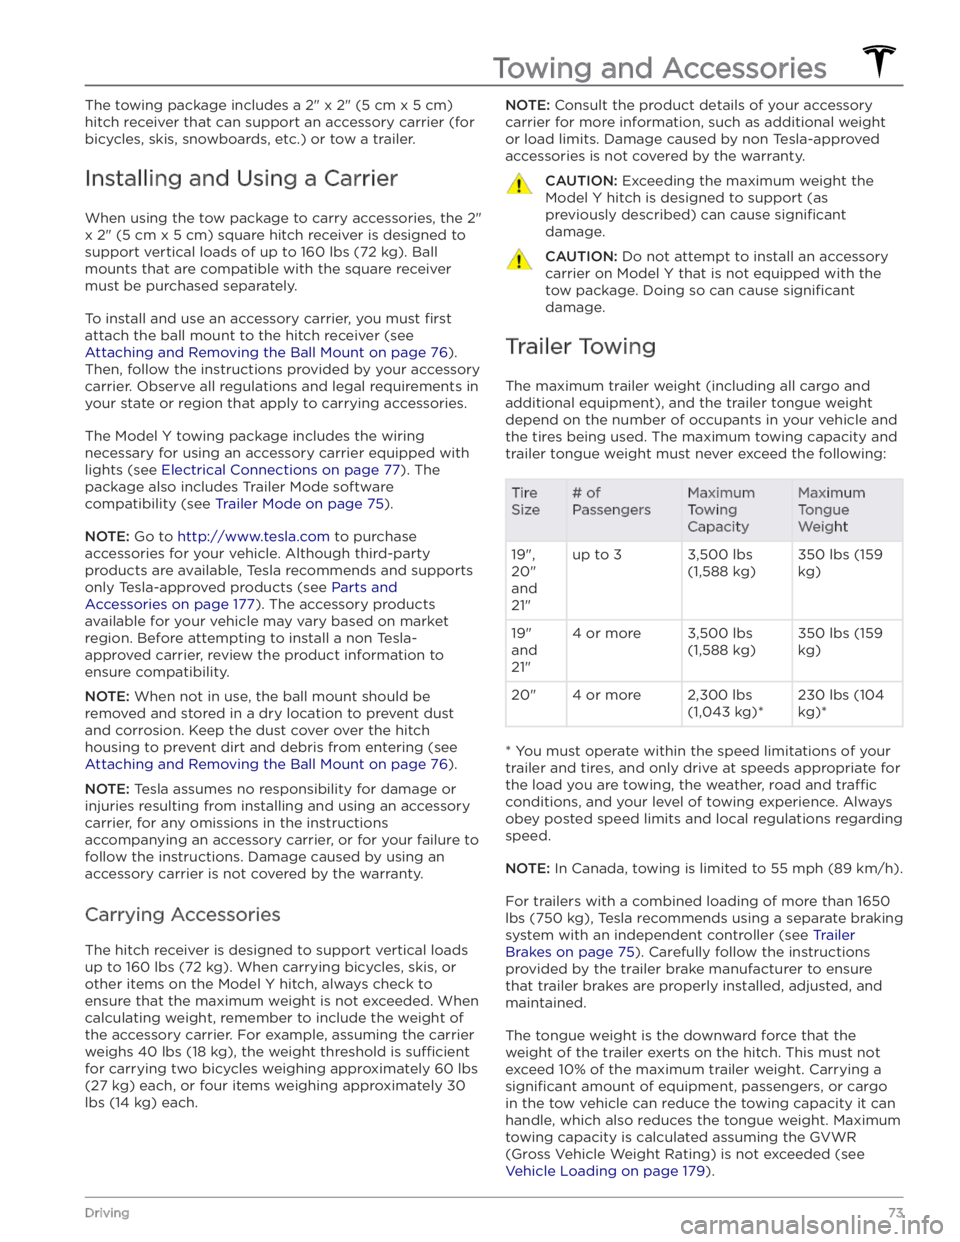
The towing package includes a 2" x 2" (5 cm x 5 cm)
hitch receiver that can support an accessory carrier (for bicycles, skis, snowboards, etc.) or tow a trailer.
Installing and Using a Carrier
When using the tow package to carry accessories, the 2"
x 2" (5 cm x 5 cm) square hitch receiver is designed to
support vertical loads of up to
160 lbs (72 kg). Ball
mounts that are compatible with the square receiver
must be purchased separately.
To install and use an accessory carrier, you must first
attach the ball mount to the hitch receiver (see
Attaching and Removing the Ball Mount on page 76).
Then, follow the instructions provided by your accessory
carrier. Observe all regulations and legal requirements in your state or region that apply to carrying accessories.
The Model Y towing package includes the wiring
necessary for using an accessory carrier equipped with lights (see
Electrical Connections on page 77). The
package also includes Trailer Mode software compatibility (see
Trailer Mode on page 75).
NOTE: Go to http://www.tesla.com to purchase
accessories for your vehicle. Although third-party products are available, Tesla recommends and supports
only Tesla-approved products (see
Parts and
Accessories on page 177). The accessory products
available for your vehicle may vary based on market
region. Before attempting to install a non Tesla-
approved carrier, review the product information to ensure compatibility.
NOTE: When not in use, the ball mount should be
removed and stored in a dry location to prevent dust and corrosion. Keep the dust cover over the hitch housing to prevent dirt and debris from entering (see
Attaching and Removing the Ball Mount on page 76).
NOTE: Tesla assumes no responsibility for damage or
injuries resulting from installing and using an accessory carrier, for any omissions in the instructions accompanying an accessory carrier, or for your failure to follow the instructions. Damage caused by using an accessory carrier is not covered by the warranty.
Carrying Accessories
The hitch receiver is designed to support vertical loads
up to
160 lbs (72 kg). When carrying bicycles, skis, or
other items on the
Model Y hitch, always check to
ensure that the maximum weight is not exceeded. When calculating weight, remember to include the weight of
the accessory carrier.
For example, assuming the carrier
weighs 40 lbs (18 kg), the weight threshold is su
Page 80 of 232

NOTE: Loss of trailer lights when towing may be the
result of a fault in the trailer wiring or excessive power
consumption by the lights connected to the trailer output(s). When this occurs, a Trailer Mode icon
appears on the touchscreen. Fix any issues with the wiring and/or reduce the number of lights connected to the trailer output(s), then toggle Trailer Mode
off and
on again.
CAUTION: Always ensure that the trailer electrical
cable does not contact or drag on the ground and
there is enough slack in the cable to allow for
turns.
WARNING: Use only the electrical connections
designed by Tesla. Do not attempt to directly
splice or attempt to connect a trailer’s electrical
wiring using any other method. Doing so can
damage the vehicle
Page 123 of 232

Driving
Acceleration: Adjust the amount of acceleration. Chill
limits acceleration for a slightly smoother and gentler
ride, whereas
Standard or Sport (depending on vehicle
configuration) provides the normal level of acceleration.
NOTE: When Chill is selected, Chill displays on the
touchscreen above the driving speed.
Steering Mode: Adjust the amount of effort required to
turn the steering wheel.
Sport feels more responsive
whereas
Comfort feels easier to drive and park (see
Adjusting Steering Effort on page 46).
Stopping Mode: Choose how you want Model Y to
behave once regenerative braking has reduced the driving speed to a very low speed, a driving gear is still
engaged, and both the accelerator and brake pedals are
released. See
Stopping Mode on page 61. You can adjust
this setting only when
Model Y is in Park.
Slip Start: Turn Slip Start ON to disable traction control
and allow wheels to spin to make it easier to dislodge the vehicle when stuck in mud, snow, ice, etc. (see
Traction Control on page 63).
Off-Road Assist: Turn Off-Road Assist ON to disable
traction control and allow wheels to spin when driving
off-road (see Traction Control on page 63).
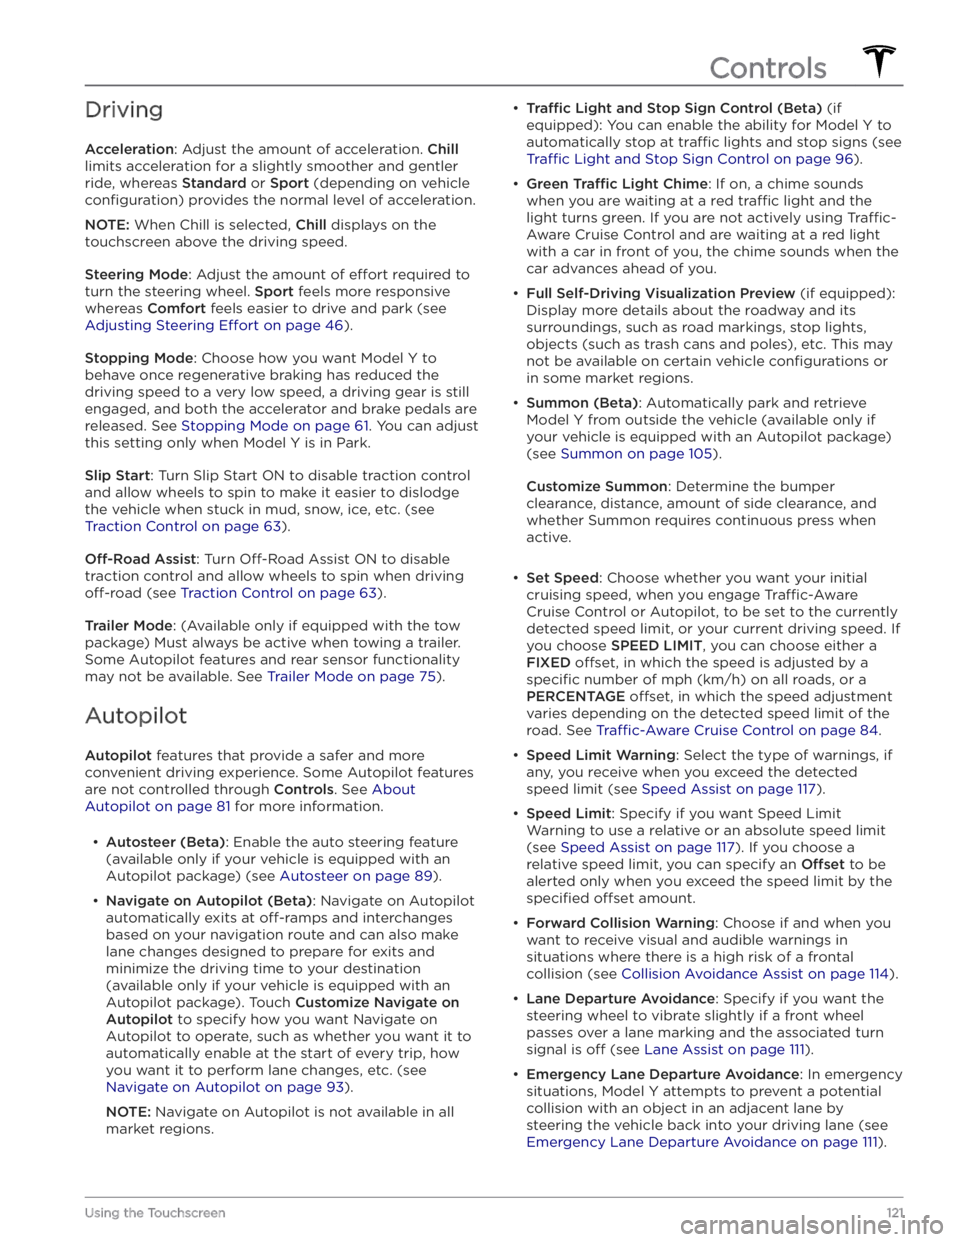
Trailer Mode: (Available only if equipped with the tow
package) Must always be active when towing a trailer.
Some Autopilot features and rear sensor functionality may not be available. See
Trailer Mode on page 75).
Autopilot
Autopilot features that provide a safer and more
convenient driving experience. Some Autopilot features
are not controlled through
Controls. See About
Autopilot on page 81 for more information.
Page 166 of 232

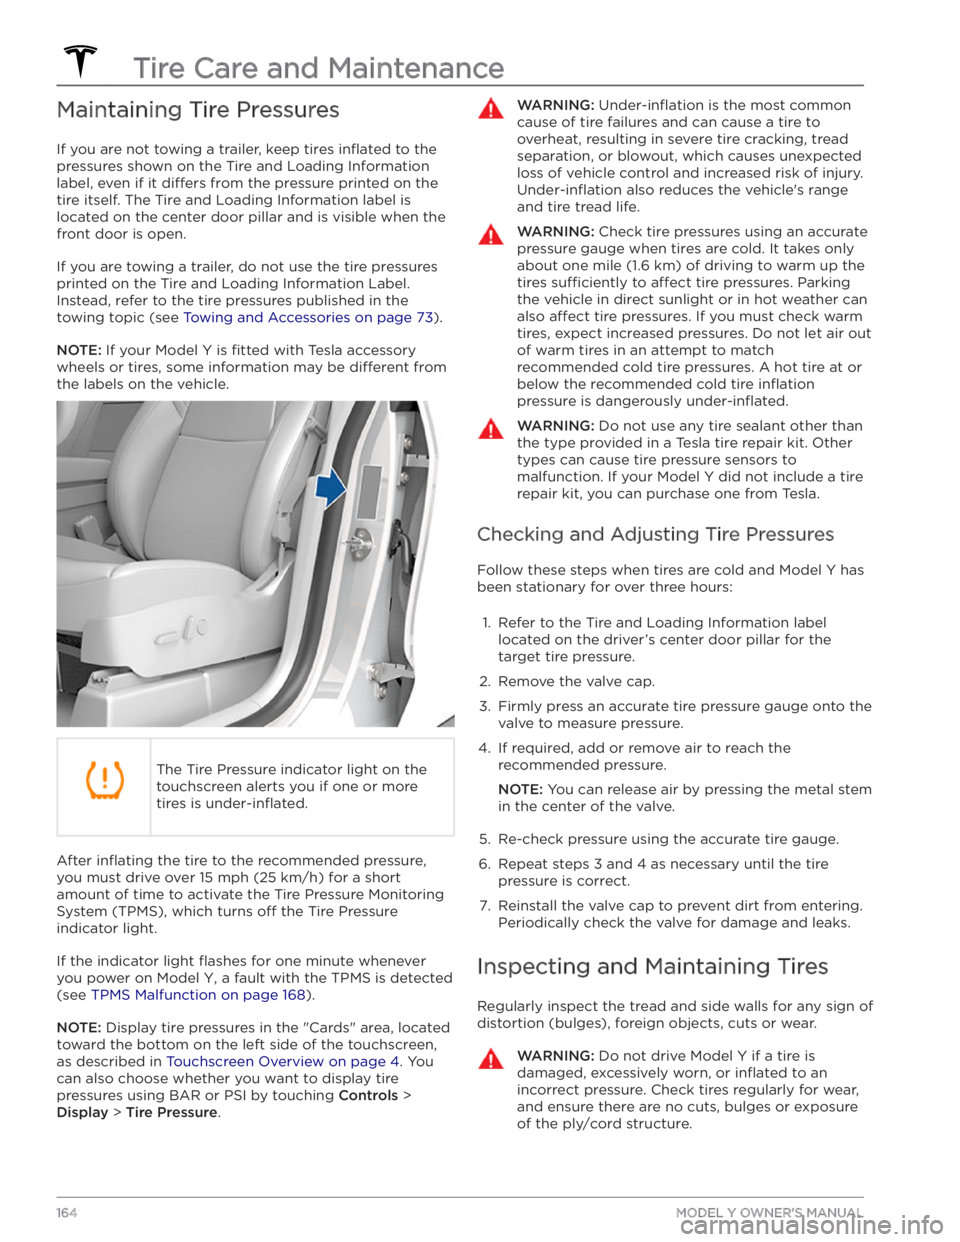
Maintaining Tire Pressures
If you are not towing a trailer, keep tires inflated to the
pressures shown on the Tire and Loading Information label, even if it
differs from the pressure printed on the
tire itself. The Tire and Loading Information label is located on the center door pillar and is visible when the
front door is open.
If you are towing a trailer, do not use the tire pressures printed on the Tire and Loading Information Label.
Instead, refer to the tire pressures published in the
towing topic
(see Towing and Accessories on page 73).
NOTE: If your Model Y is fitted with Tesla accessory
wheels or tires, some information may be
different from
the labels on the vehicle.
The Tire Pressure indicator light on the
touchscreen alerts you if one or more
tires is
under-inflated.
After inflating the tire to the recommended pressure,
you must drive over
15 mph (25 km/h) for a short
amount of time to activate the Tire Pressure Monitoring
System (TPMS), which turns
off the Tire Pressure
indicator light.
If the indicator light flashes for one minute whenever
you power on
Model Y, a fault with the TPMS is detected
(see
TPMS Malfunction on page 168).
NOTE: Display tire pressures in the "Cards" area, located
toward the bottom on the left side of the touchscreen
,
as described in Touchscreen Overview on page 4. You
can also choose whether you want to display tire pressures using BAR or PSI by touching
Controls >
Display > Tire Pressure.
WARNING: Under-inflation is the most common
cause of tire failures and can cause a tire to
overheat, resulting in severe tire cracking, tread
separation, or blowout, which causes unexpected
loss of vehicle control and increased risk of injury.
Under-inflation also reduces the vehicle
Page 184 of 232

Shoulder RoomFrontRear56.4 in 54 in1,432 mm1,373 mmHip RoomFront Rear53.8 in
50.6 in1,367 mm
1,286 mm
Cargo Volume
Total enclosed cargo volume68 cu ft
Weights
All Wheel DriveMaximum Curb Weight (incl. options)*4475 lbs (2030 kg)GVW** Total5302 lbs (2405 kg)GVW** Front2463 lbs (1117 kg)GVW** Rear2840 lbs (1288 kg)GAWR*** Front (all tires)3005 lbs (1363 kg)GAWR*** Rear (19" tires)3607 lbs (1636 kg)GAWR*** Rear (20" tires)3307 lbs (1500 kg)GAWR*** Rear (21" tires)3505 lbs (1590 kg)Towing Capacity (if equipped)See Towing and Accessories on page 73.
*Curb Weight = weight of the vehicle with correct fluid levels, no occupants and no cargo
**GVW = Gross Vehicle Weight ***GAWR = Gross Axle Weight Rating
NOTE: Values are approximate. Weights can vary depending on a vehicle
Page 189 of 232

8Load range. Shown as Standard Load (SL) or Extra Load (XL), the load range determines how much weight
your tires can support at a
specified tire pressure. When replacing tires, only use tires of the same load range.
If towing with snow tires, ensure they are the same load range of the tires your vehicle came equipped with.
9Tire composition and materials. The number of plies in both the tread area and the sidewall area indicates
how many layers of rubber coated material make up the structure of the tire. Information is also provided on the type of materials used.10Maximum tire load. The maximum load which can be carried by the tire.11Maximum permissible inflation pressure. This pressure should not be used for normal driving.12U.S. DOT Tire Identification Number (TIN). Begins with the letters DOT and indicates that the tire meets all
federal standards. The next 2 digits/letters represent the plant code where it was manufactured, and the last
4 digits represent the week and year of manufacture. For example, the number 1712 is used to represent the 17th week of 2012. The other numbers are marketing codes used at the manufacturer’s discretion. This
information can be used to contact consumers if a tire defect requires a recall.13Treadwear grade. This number indicates the tire’s wear rate. The higher the treadwear number is, the longer it
should take for the tread to wear down. A tire rated at 400, for example, lasts twice as long as a tire rated at
200.14Traction grade. Indicates a tire’s ability to stop on wet roads. A higher graded tire should allow you to stop
your vehicle in a shorter distance than a tire with a lower grade. Traction is graded from highest to lowest as
AA, A, B, and C.15Temperature grade. The tire’s resistance to heat is grade A, B, or C, with A indicating the greatest resistance.
This grading is provided for a correctly
inflated tire, which is being used within its speed and loading limits.
Wheels and Tires
187Specifications