2020 TESLA MODEL Y cooling
[x] Cancel search: coolingPage 128 of 232

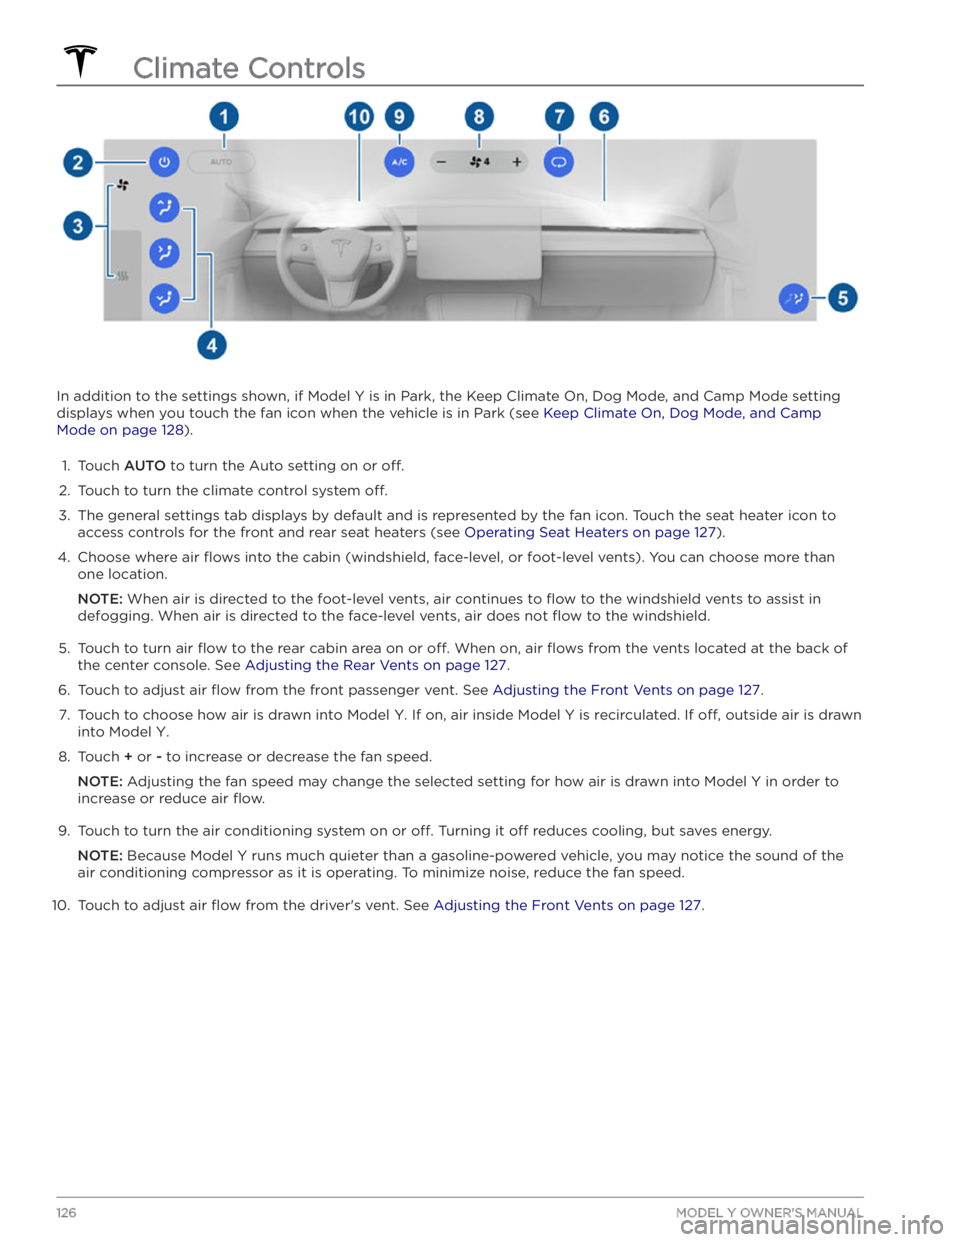
In addition to the settings shown, if Model Y is in Park, the Keep Climate On, Dog Mode, and Camp Mode setting
displays when you touch the fan icon when the vehicle is in Park (see
Keep Climate On, Dog Mode, and Camp
Mode on page 128).
1.
Touch AUTO to turn the Auto setting on or off.
2.
Touch to turn the climate control system off.
3.
The general settings tab displays by default and is represented by the fan icon. Touch the seat heater icon to
access controls for the front
and rear seat heaters (see Operating Seat Heaters on page 127).
4.
Choose where air flows into the cabin (windshield, face-level, or foot-level vents). You can choose more than
one location.
NOTE: When air is directed to the foot-level vents, air continues to flow to the windshield vents to assist in
defogging. When air is directed to the face-level vents, air does not
flow to the windshield.
5.
Touch to turn air flow to the rear cabin area on or off. When on, air flows from the vents located at the back of
the center console. See
Adjusting the Rear Vents on page 127.
6.
Touch to adjust air flow from the front passenger vent. See Adjusting the Front Vents on page 127.
7.
Touch to choose how air is drawn into Model Y. If on, air inside Model Y is recirculated. If off, outside air is drawn
into
Model Y.
8.
Touch + or - to increase or decrease the fan speed.
NOTE: Adjusting the fan speed may change the selected setting for how air is drawn into Model Y in order to
increase or reduce air
flow.
9.
Touch to turn the air conditioning system on or off. Turning it off reduces cooling, but saves energy.
NOTE: Because Model Y runs much quieter than a gasoline-powered vehicle, you may notice the sound of the
air conditioning compressor as it is operating. To minimize noise, reduce the fan speed.
10.
Touch to adjust air flow from the driver
Page 129 of 232

Operating Seat Heaters
To control the front seat heaters for the driver and
passenger, touch the corresponding control on the main climate control area at the bottom of the touchscreen.
To control the rear seat heaters (if equipped) or access
duplicate controls for the front seat heaters, touch the
fan icon, then touch the seat heater icon followed by
the seat for which you want to adjust heating. Seat
heaters operate at three setting levels from 3 (highest)
to 1 (lowest). When operating, the associated seat icon
displays twisting lines that turn red to indicate the setting level. You can touch
All Off to turn off all seat
heaters simultaneously.
Adjusting the Front Vents
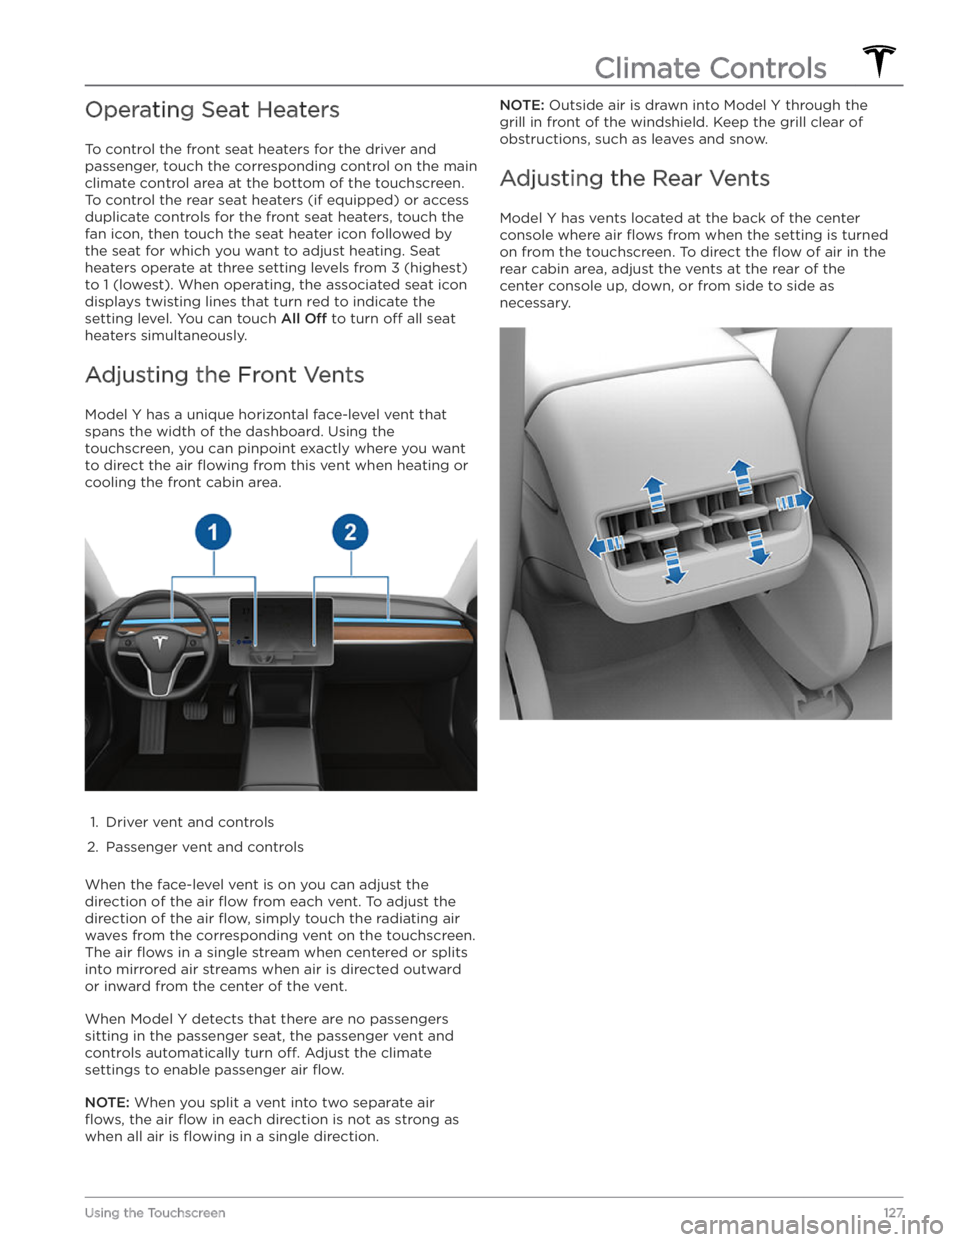
Model Y has a unique horizontal face-level vent that
spans the width of the dashboard. Using the
touchscreen, you can pinpoint exactly where you want to direct the air
flowing from this vent when heating or
cooling the front cabin area.
1.
Driver vent and controls
2.
Passenger vent and controls
When the face-level vent is on you can adjust the direction of the air
flow from each vent. To adjust the
direction of the air
flow, simply touch the radiating air
waves from the corresponding vent on the touchscreen.
The air
flows in a single stream when centered or splits
into mirrored air streams when air is directed outward or inward from the center of the vent.
When Model Y detects that there are no passengers
sitting in the passenger seat, the passenger vent and controls automatically turn
off. Adjust the climate
settings to enable passenger air
flow.
NOTE: When you split a vent into two separate air
flows, the air flow in each direction is not as strong as
when all air is
flowing in a single direction.
NOTE: Outside air is drawn into Model Y through the
grill in front of the windshield. Keep the grill clear of
obstructions, such as leaves and snow.
Adjusting the Rear Vents
Model Y has vents located at the back of the center
console where air
flows from when the setting is turned
on from the touchscreen. To direct the
flow of air in the
rear cabin area, adjust the vents at the rear of the center console up, down, or from side to side as necessary.
Climate Controls
127Using the Touchscreen
Page 176 of 232

Removing the Maintenance Panel
To check fluid levels, remove the maintenance panel:
1.
Open the hood.
2.
Pull the maintenance panel upward to release the clips that hold it in place.
3.
If checking the Battery coolant, remove the cabin intake trim panel by pulling it upwards to release the clips that hold it in place.
CAUTION: The maintenance panel protects the
front trunk from water. When re-attaching, make
sure it is fully seated.
Checking Battery Coolant
Your Battery coolant should not need to be replaced for the life of your vehicle under most circumstances. However, if the quantity of
fluid in the cooling system
drops below the recommended level, the
touchscreen
displays a warning message. Stop driving Model Y as
soon as safety permits and contact Tesla.
Fluid Level Check
DO NOT REMOVE THE FILLER CAP AND DO NOT ADD
FLUID. Doing so can result in damage not covered by
the warranty.
Do Not Top Up Battery Coolant
WARNING: Battery coolant can be hazardous and
can irritate eyes and skin. Under no circumstances
should you remove the filler cap and/or add
coolant. If the touchscreen warns you that the
fluid level is low, contact Tesla immediately.
To maximize the performance and life of the Battery, the cooling system uses a
specific mixture of G-48
ethylene-glycol coolant (HOAT). Contact Tesla for more
specific information about the coolant.
Checking Brake FluidWARNING: Contact Tesla immediately if you
notice increased movement of the brake pedal or
a significant loss of brake fluid. Driving under
these conditions can result in extended stopping
distances or complete brake failure.
A red brake indicator on the
touchscreen alerts you if the quantity of
fluid in the brake reservoir drops below
the recommended level. If it displays while driving, stop as soon as safety permits by gently applying the brakes.
Do not continue driving. Contact Tesla
immediately.
Topping Up the Brake Fluid
Do not top up your brake fluid. The following
instructions are provided for information purposes and future reference only:
1.
Clean the filler cap before removing it to prevent dirt
from entering the reservoir.
2.
Unscrew the cap and remove it.
3.
Top up the reservoir to the MAX mark using the
appropriate brake
fluid.
4.
Replace the filler cap, ensuring it is fully secured.
WARNING: Only use new fluid from a sealed air-
tight container. Never use previously used fluid or
fluid from a previously opened container